Convergent Series

learning, using & teaching metal clay, and other aspects of life

Posts Tagged ‘kiln’

Kilns and Kiln Maintenance

Posted by C Scheftic on 2023/02/07

Well that was a fun event last weekend! I went to an electric Kiln Maintenance workshop at The Union Project.

The kiln we used for the hands-on exercises was apparently a Skutt KM1231-PK. (My kilns are not by Skutt. I got that model-name from the diagram on the page that came with the new elements we installed and then went online to confirm that!)

It is a big, electric, ceramic-studio kiln (almost 10 cu ft inside: Skutt calls it “Our Tallest Kiln”!). Such big kilns (any brand) heat up and hold the temperature reasonably evenly throughout their entire interior: good enough for most ceramics but not always close enough for the tiny safe range between sintered and melted that we have with metal clays! We tend to use much smaller kilns (often on the order of 0.20 to 0.25 cubic feet, so smaller by a factor of 40 to 50!) to help resolve that issue. Skutt does have a few great little ones, but they still require 240V circuits. Paragon makes ones that run on regular household 120V, so I went with those.

I got my Caldera first, in the winter of 2008-09 (before starting this blog) and set it up at home. I moved my workspace into a studio in 2010; that’s also around the time I got the SC-2 that I now use there. Both are great for firing metal clays! Because the Caldera can go up to 2350°F, I can also use it for mid-fire ceramics; the 2000°F limit on the SC-2 pretty much restricts me to low-fire ceramics in that one. But the front-loading door on the SC-2 makes it much easier to load and unload hot things like metals with enamels or pottery to then be raku-fired.

The little SC-2 did have some issues right at the start, resulting in my learning how to install replacement digital controllers provided under warranty (which turned out, in the end, to not have been the source of the problem!). It has continued to work great ever since that got sorted out. And the Caldera has been great too, despite having been pushed a bit harder by some of the more complex (for metal clay) firings I’ve set it to do.

Which one is better? I’m happy with both! It depends on what you want to do. I feel so lucky that I am able to have two and that they are different! I can pick the right one for certain tasks, when that matters. And when it doesn’t, I can just fire whichever one is located in the most convenient place. If I’m done making pieces in my studio and want to go home, I can take them home and fire there. If I have a lot that have been sitting around for a while, I can fire them in my studio kiln while I start making my next batch.

But while they’ve worked well for ages already, I know that eventually some part(s) or other(s) are going to need to be tended to. So when I saw this being offered I figured it was worth a shot.

The class was interesting: it was aimed at potters, and it began with some discussion of basic firing processes before going on to how various ramp speeds and hold temperatures affect particular glazes. I do some pottery, mostly mid- and high-fire at places where they do all the firing for me. But I’ve always done a bit of low- and mid-fire on my own and (since covid) have been exploring and making more small pieces, so hearing all that was a delightful bonus.

Then we went to work on one of the studio kilns! We basically dismantled the whole thing! We replaced elements. And a thermocouple. And saw how to replace relays (though that didn’t actually need to be done, so it just involved loosening and retightening a few screws). We didn’t have time to replace a couple firebricks along the top, in part because of one small technical glitch (a mis-placed tool), so that topic ended up being another presentation. But by that time I at least was getting kind of tired, felt I’d already learned a lot, so I appreciated getting that information simply as discussion. And there were lots of good handouts too. While I don’t know when I may have to apply all the knowledge I gained, I’m glad to feel prepared when the time comes!

Here are a few fun thoughts resulting from the day:

Question: How many people (students in addition to the instructor) does it take to remove the lid of a big Skutt ceramics kiln tucked into a rather tight corner?! (At this point in my life, I was just glad that half of the class, all much younger, stepped up to help!)

Answer: A lot more than the one person it takes for a little Caldera! Its lid is not connected, so you just pick the little thing up by its handles. Easy! (Removing and replacing that Skutt lid would have been far and away the hardest task of that whole day, and I’m very happy I won’t have to deal with that on mine.)

I usually run this firebrick-construction Caldera kiln on my covered & enclosed back porch. I usually plug it straight into the GFCI outlet right there. I took this photo when I was documenting the need to use an electric-company-supplied surge protector power strip during several weeks when we were urged to use them anywhere we could while they were making repairs. (I should take a better photo, but when not in use that kiln lives just inside the house, by the door you don’t see to the left there and, mid-winter, I’m not hauling it back out just for this post.)

The uppermost three “layers” are the kiln. Counting from the top here, the first and third are the two interchangeable and reversible base and cover layers. The second one down, between those two, is the “functional” middle section with three complete rounds of elements inside and the blue control section you can see towards the back. In this configuration, it can reach 2350°F. (I believe that is the maximum that any firebrick kiln can reach on 120V current. (I’ve seen some quoted as 2400, but I think that’s just a rounding-error / marketing-promotion for what is really more like 2350…) If you are aware of real exceptions, please let me know!)

The lowermost (hollow inside) layer shown here is simply serving as a sort of stand to let air circulate under the kiln. In reality, it is a “bead shelf” that can be moved up one level (so the base is really at the bottom and the “middle” level with the elements is just above this one). Doing that adds another 0.15 cu ft to the firing chamber (for a total of 0.40 cu ft) but drops the maximum temperature to just under 2000°F.

The reason to move the bead shelf up, besides getting room for a third metal clay shelf or a tall (but now low-fire) ceramic piece, is because it has a little hinged opening (on the back as I have it set up here, so not visible in this photo) that you can open to insert and remove glasswork and some other media (certain kinds of enameling, miniature ceramics you want to treat as raku, etc.).

My mind did wander a few times in this weekend’s class as I thought: how many of my entire little metal clay kilns would fit (unusably, but just thinking for fun) inside the Skutt? Well more than I own! I could stack two SC-2s over to one side, and then tuck various arrangements of components from two Calderas in around them. (I confirmed that by looking up the specs…) I could continue to fit more, perhaps even all the pieces that make up a third Caldera, but only if I took it all apart, which is clearly going way too far with that silly but fun thought exercise.

So I’ll just end with a couple photos peeking into my (original blue color) SC-2. The SC part means it was designed specifically for use with Silver Clays. The 2 means it’s the kiln in Paragon’s SC line that is sized to hold up to two shelves with silver clay (though these photos both show it with just one).

The SC kilns are a “muffle” style, not firebrick. (I believe that 2000°F is the maximum temperature for any muffle kiln, regardless of voltage: if you can document that I’m wrong, please let me know!) The elements are stashed behind that inner white material (the muffle), and when those finally fail, you end up having to replace the entire muffle…

The first SC-2 photo shows it at the end of a silver firing cycle. Many pieces are on the shelf; a few others are supported by vermiculite in a small crucible.

(I often leave my annealing pan just sitting on that same cabinet top; it’s not serving any purpose here since I let everything cool before opening the kiln door.)

This last photo shows my SC-2 at the beginning of a “base metal” firing. Those metals (e.g., copper, bronze, steel) need to be fired in a reduction atmosphere. With metal clays, we can easily achieve that even in an electric kiln by completely burying the pieces to be fired in a box or bowl of activated carbon. (I love some reduction glazes, so I sure wish I could do that for them…)

Enough about kilns for today. I hope you found something useful in these ramblings!

Posted in Ceramics, General Techniques | Tagged: , , , , , , , , , | Leave a Comment »

Yep, I’m still a bit baffled….

Posted by C Scheftic on 2012/09/10

This will just be a relatively quick little follow up on my recent load of “crispy” bronze and copper pieces.

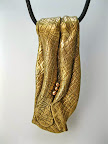
The two draped pieces actually polished up nicely. Somehow that even helped with the clunky sound they were making, that had made me even more dubious about their quality. The more-irregular one, of course, is still riddled with cracks and tiny holes: it will just look prettier in my “do as I say, not as I do” box of “teaching moments.” But none of the polishing added to the disintegration of that piece, nor did it reveal any holes in the rounder one. OK, so far.

I have not yet tried to polish the tulip with a copper flower on a bronze background because I know that one will take a good bit of work. The other two tulips turned out OK, but not as nice as I’d’ve liked. The bronze (flower) on the one to the left had actually bubbled a tiny bit and, although that did look OK after some grinding, sanding, and polishing, once I exposed it to the patina solution, small spots appeared where the edge of the blisters had been. I’m thinking that the tin in the bronze must have somehow “disappeared” at those points, leaving more copper to react with the patina chemicals. And, despite a lot of grinding on the other one, I did not seem to have eliminated all signs of the earlier cracking.

I have enough else to do right now anyway, I may just put those into the “seconds” bin that’s always seemed popular among my teenage visitors. Less than ideal, but perhaps not a total loss.

Posted in General Techniques, Technical Details | Tagged: , , , , , , , , , | Leave a Comment »

Well, gosh, was that ever exciting…!

Posted by C Scheftic on 2012/09/09

For a number of reasons not worth going into here, I’ve been a bit distracted lately. No crises, just too many things that need my attention all at once. (Yes, like most 21st Century American women, there are always a lot of demands on my time. But sometimes the number just sneaks up over the top of what is manageable.) And then, there are the days when you think you really are accomplishing something, at last, only to find out that was not the case. This post is a tale of both of those at once.

But, since this is a metal clay blog, let me begin by reviewing the process for firing items made from Hadar’s clay powders. The first photo with this post shows three pieces that had been fired earlier, had cracked a bit in that process, were then patched, and had just been refired in the session to be discussed here. That kind of cracking happens sometimes when mixing copper and bronze, as in these pieces, and the patching and refiring—often multiple times—is just part of the game if you want those mixed-metal (sometimes referred to as “married metal”) looks. (I’ll talk more about that more some other time….)

For full details on the firing process, of course, you should always check Hadar’s blog itself. But, in general, there’s a multi part process:

0. You mix the clay, form the piece, let it dry, and then…
1. You burn off the binder, taking as long as you need according to the size of the piece(s) as well as the method you are using (for jewelry-size pieces, this can often range from a quick 1/4 hour to 2 full hours; larger pieces can take even longer) and, finally
2. You “sinter” the remaining powdered metal into a more solid form during a two-hour firing process.

This discussion addresses only steps 1 and 2. (I started counting at 0 because the final two steps are often referred to as Phase 1 and Phase 2 firings.)

When Hadar first introduced her clays, the basic process went like this:

A1. Fire the pieces buried in carbon, uncovered, in the kiln. Let everything cool back to room temperature.
A2. Top up the carbon, if needed, and refire the still-buried pieces, uncovered, in the kiln.

Later, although she says that the above process still works, Hadar introduced this alternative approach:

B1. Fire the pieces on top of a layer of carbon, covered, on a gas stove-top.
B2. Immediately and carefully cover the pieces with carbon, then fire them (cooled or not, either way is OK), uncovered, in the kiln.

(There is more to all of it, but we can ignore that for now….) In each case, between step 1 and 2, the pieces are fragile: you have the formed-shape, but it’s then composed entirely of metal powder with no binder holding it together any more. It’s very fragile. I have been under the impression that a few of the main differences between the A and B approaches where that:

– The full B-process takes much less time and consumes less energy than A, but…
– Pieces in the B-method are at a very slightly higher risk of being cracked as you move and bury them.

I’ve been using both, off and on / back and forth, depending on whether I had time to actually watch Phase 1 (B) or didn’t want to watch but could wait longer (A). All the pieces photographed for this post were fired, in a single batch, using the B-process. Two of the three oval pieces (above) were polished up a bit after being fired in the same batch; the third one (left-most) and both of the two round pendants are shown just as they came from the kiln. The thing you can’t really tell from a photo of the two “draped” ones is that they feel, oh how to say this, sort of “crisp”!?

Yes, and the point of this whole post is to admit that I’m the one who crisped them up!

As I said at the start, I had a lot of things on my mind as well as a few people doing things in my studio as I began firing these. I was carefully watching the Phase 1 firing on top of a propane camp-stove on a rolling cart. Some unexpected visitors arrived, adding to the activity in the room. While enjoying the company, all I really wanted was to finish this firing, finish answering questions, go home, and have a nice dinner. I was trying to keep everyone moving along, introducing and talking and answering questions and what-not. When Phase 1 finished, I had to figure out where to put the hot lid safely out of range of the curious visitors, as I rolled carts around and proceeded to the two-hour Phase 2 in a kiln. I got everything situated, got the kiln going, spent the next hour getting questions answered and projects finished, got everyone out of the room, and was walking back to my little “office” area to finish up some paperwork when I looked at the table next to the kiln and thought, “Why is that cup-full of carbon just sitting there?”

OH, NO! I had forgotten to pour it over the pieces after Phase 1. They were in the kiln un-buried in carbon! The whole thing with these clays is they need to be fired in a “reduction atmosphere,” that is, with the carbon reacting with the oxygen in the air inside the firing chamber and thus reducing how much of that oxygen is available to react with the copper at kiln-temperatures. How much? Well, that’s not as clear. But that’s the basic principle, the way to avoid damaging the structure of the metal….

No, NO, NOOOO! If it had just been a few minutes, well, maybe. But we were an hour into a two-hour firing. Were they all ruined? Was there anything I could do?!!

I quickly increased the amount of heat-resistant material I had in front of the kiln, put on my high-heat gloves and IR-safety glasses, grabbed a few tools, took a deep breath, and opened the kiln. One obvious concern: what might the “thermal shock” do to the pieces or even to the kiln itself?!! I whipped the bowl out, set it down, closed the door as quickly as I could. Everything was glowing! In another context, it might have been considered a lovely color, but not here. I gently poured the cup of carbon over the pieces, took another deep breath, re-opened the kiln, replaced the bowl, closed it all back up, took off the safely gear, sat down, and started shaking. What had I just done? Would it work? Should I have just given up on that load? What about the kiln?

And the phone rang. I answered it. A long-time friend, someone I talk with only occasionally, was on the line (er, with cell phone, perhaps I should say in the air?). It had been no more than a minute since I’d closed the kiln back up. (As I reached over to answer the call I was, in fact, thinking how glad I was that the phone had not rung while I was in the midst of that attempted “recovery” process! Even if I had not stopped to answer it, that would have been another distraction at a crucial moment: whew!) My caller asked how I was. I was still shaking a bit, and surprised by the call. I said, “I don’t know. I may or may not have just ruined a whole bowl-full of jewelry pieces.” He’s a sweetheart, someone who has been all “You go, girl!” about my journey down this jewelry-making path, and he launched right into some nice little comments about how “things” sometimes happen and I shouldn’t beat myself up or question my abilities, I was good at this and he knew I knew it, …. When he finally paused for a moment I said, “Thanks. I love your support here. But what really has me worried is that, between the time I spent making pieces, firing some of them once, patching them, making a few new ones, firing those …. if I’ve lost them all, then I may just have lost hours that I simply do not have to spare right now. And it’ll be almost an hour before I know how much time I have just wasted by letting myself be distracted.” Luckily, there was nothing more in danger right at that moment, so we quickly moved on to chat about other things for a while. I didn’t get the paperwork done but doubt I could have concentrated on that anyway. I did get to catch up a bit with someone who’s known me since my teens, and we talked for longer than I’d’ve given myself if I’d still been focused on … paperwork.

So, what’s the outcome?

There was one small crack in the kiln-wall beforehand, and it’s now a bit bigger. Not a serious problem, I think, just one burst of extra-quick aging. I’ll simply continue to keep my eyes on that, and hope there’s nothing more.

The three mixed-metal tulip-ovals had been previously sintered (and were just in that load having some cracks patched) all look like they survived. The patches sank down too much, which may or may not have happened anyway. I can try to polish out the cracks, or else patch the patches and refire them. They don’t seem to exhibit much in the way of the various copper-oxides that we’re trying to avoid via the carbon firings. At this point, though they may not end up being quite as strong as I’d like, I still think they may be OK.

The other two all-bronze draped pendants, well, as I said, they are crisp. The slightly-bigger, slightly-more-irregular one is criss-crossed with cracks and holes. Yes, not just cracks (which I would not have expected from in this single-metal piece) but also little holes that you can actually see light through (which I’ve never seen before, and which are too small to really see in the photo, even if you click to see a larger version). I figure that piece can go into one of my “teaching moment” displays. The other one, well, it doesn’t have all the same cracks and holes, but there’s something odd about it. Maybe it’s just the way the edges curled up, and I’ll get used to it over time, but it sounds a bit crisp too. I may hold onto it, but it’s not one I’d wear because I don’t want to “advertise” a piece I’m unsure about. I may give it to one good friend who I’m pretty sure will be OK with my saying, “I can’t sell this because I’m not sure it will hold up. But if you want it, you can have it on one condition: if/when it breaks or does something odd, give it back to me so I can what happened. I’ll replace it with something else.”

And, finally, there’s that thing about time, and being overloaded just now: which clearly means it’s time to end this post, get some other things done and write about those later on, once I’ve managed to catch my breath again. Oh, and I’m sorry this is so long. It takes me longer to write shorter pieces—to do the editing needed to end up with a shorter piece—and I’m still feeling waaaay behind. So I hope you’re OK with this rambling version of the tale….

Posted in General Techniques, Technical Details | Tagged: , , , , , , , | 2 Comments »

The lifespan of a no-flake-foil firing box….

Posted by C Scheftic on 2012/01/30

I folded this little firing box out of No-Flake Foil (from Cool Tools) some time last April, although I didn’t record the exact date because, at the time, I had no clue it was ever going to be worth noting.

I first wrote about this particular box in a post last July, after I’d noticed a little flurry of discussion about what people used to fire the copper, bronze, steel, or other metal clays that needed to be buried in carbon. At that time, I said it had held up just fine through several dozen firings.

I do tend to fire pieces in spurts (some weeks, nothing; other weeks, multiple loads) but, since then (especially, prior to the last “Holiday Season”!), it has survived dozens more.

The last time I emptied it out, however, during this past weekend and after it had provided almost ten months of regular service, I was sad to note that it has begun to sprout a few little holes. They are tiny and not easy to see (so of course I highlighted them with big red arrows for you in the photo!). But I know they signal the beginning of the end for this particular box.

So I thought I should note the date that it has been retired from duty as my primary firing box. My number-two box will step into that role. The experimenter in me isn’t quite ready to part with number-one yet, of course, so I’ve got it stashed away at the moment. I may try using it again a few more times, just so I can document its demise for my own information.

But, really, it’s just foil. There may be nothing more worth noting about it, except that I am amazed, and delighted, that it has already done so well for this long.

Posted in General Techniques, Technical Details | Tagged: , , , , , | Leave a Comment »

Foil-Firing Base-Metal Clays

Posted by C Scheftic on 2011/07/06

One question that seems to keep recurring (everywhere from individual conversations to the big, international Yahoo group on Metal Clay) involves what people use for firing their various copper, bronze, and / or steel clays, so I decided to write a bit about what I’ve been doing.

At first (~2008) I used the stainless steel “steam table” pans that were the original suggestion for this. The clays fired OK (i.e., the metals sintered), but the pans flake black crud. (I’ve seen hints that the technical term is that they “spall,” though I know that word with a slightly different connotation, so I’m not sure…) Anyway, it’s not a crisis, but cleaning it up is just one more little thing to tend to, and I’m seeking to simplify this process as much as possible.

Later on, a number of ideas for other, alternative firing vessels started to circulate. Some people fire in used metal cans (i.e., reusing the kind food comes in, which would mean having the inner plastic linings burn off as you fire them; and, while cheaper than the steam table pans, they still flake). Others suggested building vessels out of fiber blanket. Neither of those held much appeal for me: I never tried either one.

Last winter and spring, Hadar Jacobson blogged about several other options, such as building a frame out of kiln posts, drilling an opening into firebrick, and building a box from ceramic cloth and T-pins. I tried the first and third of those. The posts are easier to find, the cloth is easier to use, but neither quite fit my “simplify” goal. Hadar also talks about working with several options in the instruction manual she provides. (Aside: Her manual is useful even if you’re using other copper or bronze clays! You may have to adjust specifics of the firing schedules to fit other products, but Hadar does a great job of explaining in a simple way what’s going on, what you want to have happen, and what might be going wrong if you encounter problems.) In the past year, also, several manufacturers came out with a range of fiber or ceramic firing boxes, but at least the ones I investigated appeared somewhat high-priced to me. (Or, perhaps a better way to say it is that the ones I checked seemed high for my budget for this, so I just stopped hunting. If you have found any well-priced ones, do let me know!)

Right after Hadar was here late last winter (when I gained motivation to do more with these non-precious metal clays) I decided to try something Hadar had not discussed, and to invest in some No-Flake Firing Foil. (I got mine from CoolTools.) That’s what I’ve been using quite happily now for the last few months. It does take a little fiddling-with before the first time you use it–you do have to fold it into the box shape–and then you should fire some test pieces to verify the temperatures to use–which you should do with any new firing vessel you try (or new kiln, or new carbon, etc.). But after that, this kind of box is both very easy and much more affordable than most of the other options.

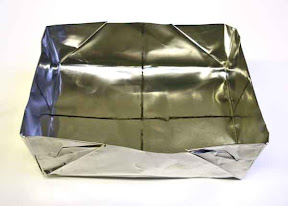
The first photo with this post shows a newly-contructed firing pan before its first use. The foil comes with instructions on how to fold this particular box, and there’s a video available on the product-page. From my (somewhat basic) knowledge of origami boxes, this does seem to be a pattern that yields a relatively large-volume basic box from a given amount of material, so I did not try to second-guess the instructions there. But I will note two things about the instructions….

(1) They provide finished dimensions for various sizes of foil one might start with, but there’s no reason to limit yourself to just those. Make a box of whatever size will fit the foil you have and the size of your kiln. (Be sure to leave room for air to circulate all around the box!) Try a few paper models first, if you don’t already have experience folding boxes, so you see how it works and get a sense for the size. But, here’s the trick: the instructions list only sizes for rectangular boxes because that’s what you want to build. Not a square!

Any rectangular box will have a sort of “flap” of material that gets folded over the short edges and part-way around the long ones. (You should be able to see it on the photos with this post.) A square one won’t have that flap. You want the flap for two reasons:

  • Those “flaps” seem to increase the stability of the box, and
  • You can fold up the corners of the flaps on one long side of the box to mark the “front”–something that’s useful when you’re putting a carbon-filled box into your kiln (and especially important with front-loaders, because you don’t want to position any pieces along the un(der)heated front edge).

(2) The instructions and video use the traditional origami trick of making two folds at the very start that you just open back up again. They simply mark the center of the sheet. If you can find and mark the center-lines yourself, you can start with that rather than those two folds. That’s why my “new” box (above) has black ink lines, rather than folds, down the center. Why does that matter?

Well, some people report that these boxes only hold up for a couple of firings. Mine have held up much longer. The one shown here has been through several dozen two-phase firings, has not been treated with any particular care, and seems to be holding up just fine.

When pressed for more information, those reporting early failures say that their boxes seem to fail along the folds. Not necessarily the center ones in particular, but along folds somewhere. Now my theory is that they are not failing after, say, two or three or four firings: I think they are beginning to fail with their very first use, but the problem only gets big enough to see after several more. If you put a hole in the foil while folding it, it will get bigger with each firing, through the heating (expansion) and cooling (contraction). So the trick is to not put holes in the foil to begin with!

Thus, I chose to not make those first two folds, which must then be reopened. You’ve got to mark the center line accurately or the box won’t come out with everything lined up right, and doing it via that fold is an easy way to mark it. So either be careful folding and unfolding those lines or, if you can find both centers another way, do that.

Then, proceed with the rest of the instructions. Crease smoothly, but not so harshly that you rip little holes in the edge. Unfold smoothly too, also with care.

And, then, enjoy the treasures that emerge after being fired in such a box…

Please leave a comment if you’ve found anything useful in this post! It’s great to hear from readers. (I can see from my “blog stats” that you are out there! But comments offer even more motivation to keep on writing these notes….)

UPDATE: This box lasted for seven more months of regular use! Since this topic keeps coming up, and I keep pointing folks to this post, I’ve decided to add a link to my follow-up post.

Posted in General Techniques, Technical Details | Tagged: , , , , , | 11 Comments »

To answer Coral’s question….

Posted by C Scheftic on 2011/04/28

Last night was the first part of a 2-session class at the delightful Zelda’s Bead Kit Company. The plan was to use metal clay on the first night to create our own custom-made toggle clasps and, if desired, focal beads. I’d take them back with me to fire and tumble-polish them the next day. Then, on the second evening, everyone would return to Zelda’s for a quick lesson on work-hardening and applying a patina, after which we’d select beads and make ourselves some wonderful bracelets.

One of the participants last night had a number of questions about kilns for use with metal clay. One of her questions was how many pieces you could fit on one kiln shelf. Well, the answer is, just about as many pieces as all of us made last night! Here’s one of my kiln shelves (the upper right corner has been missing since I first got this shelf…) ready to go into the kiln (though I moved Ellie’s toggle bar, up on the top row, down a little bit just before I put it in).

With firing more analytical than creative a process, if you were in the class and are looking for your piece, know that the pieces are spread around the shelf in roughly the same arrangement as participants were seated…. They’re firing as I write this. With luck (but with no promises), I will remember to take some photos of the finished pieces to share here too.

Posted in Teaching Metal Clay, Technical Details | Tagged: | 2 Comments »

Problem resolved, and mystery solved.

Posted by C Scheftic on 2010/08/08

It’s always something, isn’t it? Just when you think you’re making some progress, sixteen roadblocks suddenly appear. Not necessarily crises, mind you, just things that suck time and energy away from what you’d intended to do.

One of my time-sinks last spring involved problems with a new kiln. I wrote a little bit last June (with this same photo of three of the kiln controllers I’d tested) but the whole story is this:

With a digital kiln, in theory, you should be able to program it and walk away, letting it run while you do something else (whether that’s more jewelry, making dinner, getting a good night’s sleep, or whatever). It should “ramp” up to the set temperature, run through its entire program, and finish with no error code being reported. And mine would appear to do that. Except….

Mine was not holding the set temperature. It was yo-yo-ing, getting up ok, not getting too hot (whew! since that would have melted the contents) but it was dropping hundreds of degrees lower than it should have. Thus, all the binder was burning out fine, but some pieces were coming out inadequately sintered. Since it was not reporting any errors, however, I had to watch its display to identify the problem.

The kiln was still under warranty. It really had never worked right. To get coverage, nonetheless, I had to make it clear to the distributor that it wasn’t just some fluke or mistake at my end but, instead, some semi-replicable problem. Since it was not generating any error codes, I had to monitor repeated firings, to document and report what I observed.

Not wanting the expense of shipping kilns back and forth under warranty, these products are manufactured with a number of parts that can be replaced by the end-user. When you report a problem, they try to figure out the cause, and send you the piece to replace yourself. Even if they’re wrong, it’s more of your time than their tech’s that has been wasted, and the postage for shipping a few parts back and forth is less to them than that of shipping the kiln. I don’t mean that as any sort of attack on the kiln manufacturers or distributors, just as a statement about modern business practice in general… Much of the time, the problems are simple, fixed quickly, and everyone is happy.

But, in order to know if the replacement has worked, I needed to again watch it run. And since my kiln’s problem occurred somewhat erratically, I had to watch it a number of times to be sure … that the problem still wasn’t fixed.

After several rounds of this, with no improvement, the distributor agreed to take back the original kiln and let me have a new one. In the end, I was happy with how they handled that, and with the new kiln I’ve been using since mid-June. In other words, the problem has been resolved for a while.

I had said, since I’d spent so much time bonding with that kiln as I just sat there monitoring its operation, if they ever did figure out what the problem was, I’d like to know. I got a message on Friday saying they’d finally gotten to it. Now even the mystery of what was wrong with it has been solved!

After replicating the replacements I’d made, with things like controllers and thermocouple (which I understood they had to do to first check that it hadn’t been “just me”), one of the only other obvious possibilities was the relay. They’d not had me try replacing that. (After the relay, pretty much all that is left is some wire and the actual heating elements, isn’t it?) Well, it wasn’t the relay either. That piece was fine.

The problem was that the plug at the end of the wire that connects to the relay was loose. (I assume that connection is made with a plug — or, more accurately, a lug — rather than a direct soldered joint so that the relay is also user-replaceable.) But there it was, a simple manufacturing error: a crimp that wasn’t tightened down enough. Does that sound familiar, or what?! Ha!!!

Anyway, my website (which I’m trying to do myself) is probably half a year behind where I thought it’d be right now. And a good two of those months are directly attributable to time I spent watching that kiln fail. (Part of my plan for the site had been to work on that some of the times when the kiln just ran in the background.) I know, that leaves another four months to account for (no, dear reader, I won’t bore you with tales of other distractions) but I will publicly admit that I’m happy to know exactly why I lost all that “spare” time … to a kiln!

Posted in Technical Details | Tagged: | 6 Comments »

Oh, baby-kiln, please be mine!

Posted by C Scheftic on 2010/06/06

The kiln that I mentioned in my last post has been causing me problems came from Rio Grande. Though covered under warranty, they didn’t want to send me a completely brand new one, and I didn’t want to accept a too-heavily-used one. We needed to find an acceptable middle-ground to resolve the problem.

Well, they sent two to another Rio Rewards PMC Certification class, to be held in Pittsburgh, at the Society for Contemporary Craft. (The first one was last January, in the middle of winter.) Tim McCreight came back and taught two classes: one on mold-making and t’other was the actual certification class.

Rio normally sells one of the kilns to a student in the class. (The price isn’t any less than a qualified customer would get, but you save because there are no shipping costs involved). For the second kiln, the host institution has dibs on it first, if they want it, which SCC does not. If there are no other “priority list” people in an area, then the second one goes to a student as well.

Even though I had signed up for neither of those classes, I was designated as eligible for the second kiln. To replace the problem-kiln, one of these two will be heading off with me at the end of these classes.

Posted in Technical Details | Tagged: | Leave a Comment »

Kiln-controllers.

Posted by C Scheftic on 2010/06/05

Though you may have seen one of the small electric kilns used by metal clay artists, you may never have seen the guts of the “digital controller” that’s behind the black faceplate. Here’s one example:

Even if you’ve seen one, have you ever seen a whole collection of them? I now have!

Are you wondering why I happen to have some just sitting in a row like that?

Well, I’m wondering why and none of these led my kiln to work correctly!

The middle one won’t even turn on. The other two (from different batches) won’t hold the kiln at anything even near the set temperature for the required time.

Somehow, I thought that moving from computer visualization into art jewelry would mean I wouldn’t have to spend time writing bug reports any more. Silly me! At least, I know how to make a bug report, so the tech support folks working with me on this are likely to believe I do know how to set up and use the controllers. But I really had not allocated any time for this sort of thing, and what’s happening is that work on my website, and writing on this blog, are getting shoved aside on the schedule once again.

More on this shortly. But I figured I should explain why I’ve been so quiet lately…

Posted in Technical Details | Tagged: | 4 Comments »