

") Artsmiths of Pittsburgh
Artsmiths of Pittsburgh") Hoyt Center for the Arts, New Castle, PA
Hoyt Center for the Arts, New Castle, PA") Portage Hill Gallery, Westfield, NY
Portage Hill Gallery, Westfield, NY") _Open Houses in my Studio
_Open Houses in my Studio _Or…contact me about hosting a private party!
Some Thoughts on Finishing: Equipment!
Posted by C Scheftic on 2012/10/06
There’s been a lot of discussion lately on the big (i.e., international) Metal Clay group on Yahoo about tumbling and other methods of finishing pieces. I’ve just been waaay to busy the past week or two to comment on individual posts. With a few minutes right now (curiously enough, because I finished a couple other tasks early while I tumble pieces for students from a recent workshop!) I thought maybe I’d start on some posts with a few of my thoughts on two aspects of this issue: (a) deciding how I will polish (and otherwise finish) a piece and (b) what equipment I do and do not use.
Now, in practice, I believe that the design-part should come first, and the equipment-choice second. But to talk about design issues, I will need to mention different kinds of equipment. And if you don’t know what I’m talking about, that could be a problem. So I’m going to start by mentioning just a few of the possible tools one could use. And I’m going to present them in the order that I discovered them, because I’m sure that affected my understanding of them.
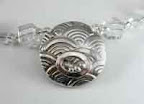 As I think I’ve mentioned here before, though I first discovered metal clay while I was living in California but visiting my family home in Florida, I didn’t actually start working with it until after I moved to Pennsylvania. I’d read a lot, had tons of questions, but figured that (rather than waste product experimenting on my own) I wanted to start by taking an introductory class. We made a lentil bead. The instructor (Donna Penoyer) fired it after class, and tumbled it with stainless steel shot in a rotary tumbler (more on these in a moment), before returning our pieces to the shop so we could return and pick them up. I was happy with the piece. I then added a very light patina with Liver of Sulphur, before stringing it to wear. Shown to the right (in the first jewelry photo I ever tried to take … and it shows!) the thing that jumps out at me about it, now, is how evenly-shiny it is all over.
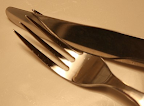 For the next few pieces, ones I made on my own or with a long-time friend (Bonnie) with whom I’d reconnected after my move (and who’d also taken one intro class!), we fired them with a creme brulee torch, brushed them with a brass brush, then burnished them by hand with stainless steel flatware. Yes, that’s right: I did buy a brass brush with my first order of clay, but we had no additional “equipment” for polishing. So I dedicated a knife, spoon, and fork to jewelry making! That approach, though admittedly slower than tumbling, kept me going for months as I spent the odd bit of spare time learning and exploring! Over time, eventually, I did buy an assortment of burnishers but I still pull flatware out during workshops to show that you don’t actually need anything fancier. You may want it, but you don’t necessarily need it!
Not too much later, Bonnie somehow ended up with a child’s plastic rock tumbler. They’re small and lightweight, meaning amazingly under-designed for actual lapidary work. But we cleaned up the barrel, and got a one-pound package of mixed-shape stainless steel shot so we could use a few scant ounces to try tumbling a couple pieces at a time. I would never recommend that someone go buy one of these for this purpose but having access to a rotary-shot tumbler to play with a few times did offer me the chance to explore the finishing process while I decided what I wanted to buy. (I’ll talk about that in the design-post.)
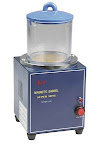 With that experience, I’d decided I didn’t want to start out with a rotary tumbler: I had fallen in love with magnetic pin polishers! The standard ones of these cost start at a price comparable to a full-scale metal clay kiln, and go up quickly from there! For a full-time bench jeweler, that cost can be justified because those machines work their magic so much more quickly than do rotary tumblers. For a part-time art jeweler, however, that seems like a lot of money. But then I found this little item (shown, right, with a blue base) for about $150. Still not cheap, but a price I found manageable. The cup is about the size of a measuring cup, a tad under 3 inches across, but all the action takes place in the very bottom. So I can’t do a lot of pieces at once, and I can’t do anything that’s more than about 2.5 inches across, and for really thick 3-d pieces, I may have to turn them over manually. But I rarely have any reason to exceed its capabilities. Sometimes it’ll take me several cup-loads to finish a kiln-load, but since this machine will complete the job in around 15 to 20 minutes, that means I could do six to eight loads in the two hours that is often quoted for a single load in a rotary tumbler. I must note, however, that while the time savings is a big benefit, the real reason I love this little item will be discussed more in my post on design considerations!
Before moving on, I will say that I’ve seen that some people in the MetalClay group are using a different “under $200” magnetic pin finisher (see photo here), and there seem to be larger (pricier) versions of that model. Overall, the cup on that one is reported to be 3.5 inches across, so a little bigger than mine, but there appears to be some kind of a post sticking up the middle. That would seem to severely limit the size of any individual piece one could put in it to not much bigger than one inch across, if that. (If you have one and want to say any more about that, please feel free to leave a comment!) That one also has a timer, which can be a nice convenience but is also yet one more thing that can break. So I’m neutral on that.
The next piece of equipment I added was a rotary tool. (If you somehow landed here without being familiar with them, I’ll just say that they are like small electric screwdrivers, except you can add all sorts of other attachments to them besides screw-drilling bits.) These are sometimes referred to by brand (e.g., Foredom, Prodigy, Dremel, etc.), and sometimes by handpiece style (e.g., flexshaft). A few of my favorite attachments for polishing (in no particular order) are silicone wheels, rubber wheels, fiber wheels, radial bristle disks and (least often) sanding drums or split mandrels with sandpaper. Other essential but merely human-powered tools that I use include steel bench blocks and an assortment of hammers and such. (I don’t plan on discussing any of that in detail right now. I will likely do so eventually. If you want to talk about them before then, just let me know!)
And then, yes, I did go and get myself a rotary tumbler with mixed stainless steel shot. I tried the inexpensive route first, the kind with an imported rubber barrel. It didn’t stay long: the smell of the rubber was just worse than I could bear. I kept having the feeling that I was at the gas station, filling my car, and that the pump was overflowing and would not shut off: that’s what it smelled like to me. I left the barrel out in my garage for six months, to see if it might “air out” over time. No such luck. I sold it to a student who did not seem bothered by the smell. Then I went and bought one made in this country, the kind that has a hexagonal plastic barrel. I still use the mini-mag one more often but, when I want a rotary tumbler, this one does the trick.
![]() This particular model has gotten some negative reviews online, but I don’t consider any of the issues reported to be a big deal at all. Some people complain that the steel shot in the plastic barrel is noisy and, yes, it does make more noise rattling around in plastic than it does in a rubber barrel. But all tumblers sound noisy to me, so I put them in the next room anyway; in that case, the sound of this one does not bother me. It doesn’t have an on/off switch, but I plug it into a power strip that has one, and just use that. (And a power strip is easier to replace than is a tumbler whose switch has died. And, further, I find it convenient to operate the power strip switch with my foot, rather than having to touch a button on the machine with sometimes-wet hands.) It is possible to have little bits of the shot land in the odd small spaces at the top of the barrel (from where the hexagonal sides are spread out to meet the round lid); but a magnet captures those easily and I can just plop them down into the barrel so I never gave that a thought until I read about it later on. (Did the writers perhaps not think to try a magnet?) The lid is the one part that took me a few tries to figure out but, to be honest, so did (in a different way) the one on the rubber barrel. There is a sort of “art” to getting it on just tight enough: not so loose that it leaks, and not so tight that it’s hard to get off. But with a bit of determination, I figured that out too. The only problem reported with which I do agree is that it is possible to have very thin bits stick between the barrel and the lid. But I rarely make metal clay pieces thin and flat enough to get caught; some earwires can get that thin but those are not something I’d tumble anyway. (I’m not doing mass production. I can hammer the odd earwire to work-harden it (more on this in a few days…) or, since I often use Argentium for them, it is even easier to heat-harden that!) Still, though I’m glad I have this one, I don’t use it all that often: mostly, I use it for pieces from beginner classes, where students have not yet learned much about finishing. Just like my very first piece, an evenly-smooth shine everywhere works just fine in that situation. And if folks say they want a more nuanced finish (yep, that’s the big design-related issue!) that’s a perfect lead-in to the fact that I offer workshops on finishing too.
This particular model has gotten some negative reviews online, but I don’t consider any of the issues reported to be a big deal at all. Some people complain that the steel shot in the plastic barrel is noisy and, yes, it does make more noise rattling around in plastic than it does in a rubber barrel. But all tumblers sound noisy to me, so I put them in the next room anyway; in that case, the sound of this one does not bother me. It doesn’t have an on/off switch, but I plug it into a power strip that has one, and just use that. (And a power strip is easier to replace than is a tumbler whose switch has died. And, further, I find it convenient to operate the power strip switch with my foot, rather than having to touch a button on the machine with sometimes-wet hands.) It is possible to have little bits of the shot land in the odd small spaces at the top of the barrel (from where the hexagonal sides are spread out to meet the round lid); but a magnet captures those easily and I can just plop them down into the barrel so I never gave that a thought until I read about it later on. (Did the writers perhaps not think to try a magnet?) The lid is the one part that took me a few tries to figure out but, to be honest, so did (in a different way) the one on the rubber barrel. There is a sort of “art” to getting it on just tight enough: not so loose that it leaks, and not so tight that it’s hard to get off. But with a bit of determination, I figured that out too. The only problem reported with which I do agree is that it is possible to have very thin bits stick between the barrel and the lid. But I rarely make metal clay pieces thin and flat enough to get caught; some earwires can get that thin but those are not something I’d tumble anyway. (I’m not doing mass production. I can hammer the odd earwire to work-harden it (more on this in a few days…) or, since I often use Argentium for them, it is even easier to heat-harden that!) Still, though I’m glad I have this one, I don’t use it all that often: mostly, I use it for pieces from beginner classes, where students have not yet learned much about finishing. Just like my very first piece, an evenly-smooth shine everywhere works just fine in that situation. And if folks say they want a more nuanced finish (yep, that’s the big design-related issue!) that’s a perfect lead-in to the fact that I offer workshops on finishing too.
The other major finishing tool that some artists seem to have is a vibratory tumbler. I will admit that I’ve never used one of those. (I’d be game to try it, if you happen to have one that you’d like to offer up for my examination!) At this point, the (many!) finishing tools I have acquired over the years seem to be meeting my needs. If (when) one of the tumblers should go out, then I may make a serious attempt to look into these. At this point, at least, I’ve got nothing at all against them; I mention them simply to acknowledge that they could be on the discussion list too. But, for now, I want to spend more time making new pieces, rather than simply acquiring even more tools I may or may not ever use.
Tomorrow, I’ll try to write some things about how the tools I do have interact with the designs I try to create. I find the interactions between them, and how that has influenced my understanding of design, to be the most interesting aspect of all this!

Alice Walkowski said
I used a vibratory tumbler in Tennessee. It was very noisy compared to the Rotary. We had to put it in the bathroom and close the door. It did work more quickly though. I’m not sure it was enough of a difference to warrant the extra cost though.
LikeLike
Lora said
Excellent post Carol! I think I’ll bookmark it to share with my students. ;D I like the Gy-Roc vibe tumbler I got at PMC 123 many years ago. Great for a class because it can tumble many more jewelry pieces at a time than either the mini mag (which I own) or a rotary tumbler. I put the entire class’s work in it and let it go for 15-20 minutes and they come out beautifully shiny. It is very loud, and when I don’t have an extra room to hide it in, I put it on a furniture blanket, and flip the blanket over the top to muffle the sound. You don’t want to completely wrap up the tumbler because it needs some air flow so it won’t over heat.
To work harden ear wires in a tumbler try putting some in a little plastic baggie and throwing that in the barrel. They still get tossed around and hardened, but don’t get lost in the shot. I think that may be a Holly Gage trick.
LikeLike
Alice Walkowski said
My first burnisher was knitting needles. They worked as well as items made for that purpose.
LikeLike
C Scheftic said
Thanks for the comments, Alice and Lora!
I’m guessing that the results from a vibe-machine are more like those from the rotary one (what I think of as either not-done-yet or all-shiny-everywhere) than from the magnetic pin device (where I love stopping at an intermediate brushed / satin stage that, so far at least, I have seen only with that style). Yes?
Both because that’s only a guess and the fact that another person’s “aesthetic” may differ from mine when they look at the results, that’s why I’d like to be able to just try a vibratory tumbler for myself some time….
LikeLike