

") Artsmiths of Pittsburgh
Artsmiths of Pittsburgh") Hoyt Center for the Arts, New Castle, PA
Hoyt Center for the Arts, New Castle, PA") Portage Hill Gallery, Westfield, NY
Portage Hill Gallery, Westfield, NY") _Open Houses in my Studio
_Open Houses in my Studio _Or…contact me about hosting a private party!
Hollow Bead Armatures
Posted by C Scheftic on 2013/08/21
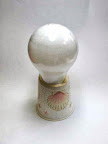
 I like making hollow beads. I sometimes wonder how much of my fascination with them is because the first piece I ever made using metal clay was a hollow bead, shown to the right, and how much is simply because they can be both fun and interesting to make. I’ll never know the answer to that, but I expect to continue enjoying making them.
In the class where I made that bead, I dried the pieces for each side over a light bulb. The nice thing about light bulbs is that, if you prop them up with the screw-end down, their tops really are nice and round. Why does that matter? Because it means you don’t have to worry about centering, or otherwise specifically positioning, your clay on it to dry. You just move it onto the bulb, carefully press it down to match that curvature, wait for it to dry, and admire the nicely symmetric results.
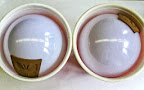
 There are a few minor complications with using a light bulb. Nothing serious, but things to consider. How will you prop the bulb? In that first class, the teacher had two kinds of holders: one was a small paper cup turned upside down with a slot cut into the base and the other were small blobs of polymer clay into which she’d pressed the end of a bulb to form it before curing that clay. (Of those two, I have a small preference for the paper cup approach (as shown here, to the left) simply because, when I’m storing enough of those to use for a class, I can stack the cups so they take up very little space.) Another consideration is that you are then working with (i.e., moving around) a piece of oiled (i.e., slippery) glass, where slippery means easy to drop and break. Can’t you just hear the “voice of experience” there?!
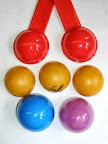 So, what else to use for an armature? A few of the things that I’ve tried (some of which are shown, to the right) include the following:
- plastic eggs (bottom), but you have to take care to use the “round” end because, with the “more-pointy” end, then you do need to take a lot more care with how you position your clay on it to dry;
- measuring spoons (top) but, again, you need to take care to get round ones;
- ping-pong balls (middle row), which I like to cut open so they don’t roll around, and
- plastic paint palettes (not shown) which, like the other items shown in this colorful collection, are also “open” on the other side, so you can turn them over and position your clay on the inside too, should you want to do so.
 Which armature is best? I don’t have any one favorite. So, how to choose which one to use? Me, I think about the size of the piece I want to make, and the amount of curvature I want it to have, and pick whatever happens to match that the best. And sometimes, yes, I do return to the old light-bulb trick, as I did with a piece I made recently out of Hadar’s Quick Fire Bronze clay. This piece was not going to be round (like my first-ever piece); I wanted this one to have more of a “trapezoidal” shape (i.e., a rectangle with only two parallel sides). This piece would be fairly large but, because of its non-round shape (meaning it would end up having four “side” or “edge” areas that I would then have to fill), I did not want it to have a lot of curvature. Instead of a “standard” incandescent bulb (as used with that first-ever piece), this time I used a larger round “vanity” bulb. With those, instead of turning a cup upside-down to hold the bulb, I’ve found that they fit nicely inside a large cup. So that’s how I positioned my two “trapezoid” pieces for drying. Since this was the last piece I started one day, I just positioned them over the bulb, made sure all the edges were tucked down smoothly, and left them to dry over night. As I was packing up my camera, for no obvious reason I decided to snap a quick photo of them before I left.
 The next morning, I was surprised (which, in fact, surprised me even more: I was surprised at my surprise….) to find that, once dry, they had released themselves from the bulb, and slid down to the side, where they were caught by the cup holding the bulb! Whew! I would have been very disappointed if the dry pieces had fallen from a noticeable height onto the tabletop and, perhaps, even then bounced down to the floor (as could have happened if I’d stuck them into an overturned cup) and, quite possibly in their “dry clay” state, cracked or even broken apart from the fall. (Yes, I know how to patch them should that happen, but it takes time and effort that I’d rather just avoid. And pointing that out to you, dear readers, is the whole reason I decided to write this particular post!)
 Since I mentioned the “edges” this piece would have, this next photo (left) shows the opening along the “top” of the piece after I’d attached the two main elements. (I hesitate to call them the front and the back because, like most of my work, this piece is fully reversible: it has two different fronts!) I’ve got it standing on quadrille paper (with 1/4 inch squares) to help give you a sense of its size. Once I had covered each of the four edges (the openings that I’d wanted to keep to a relatively small size by using an armature with a relatively shallow curvature), I inserted a bronze “embeddable” bail in the top and fired the piece.
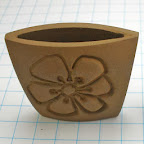
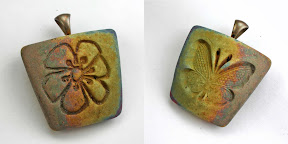 And I was delighted with the result. My original plan had been to finish this piece to a high shine but, given the colors the kiln decided to give it that day, for now at least I’m leaving it like this. Yes, I know, the colors are somewhat ephemeral. I’m experimenting with a new acrylic coating to see if / how it may help to preserve such colors. So this piece won’t officially be going up for sale right away, until I can see how it holds up. You may, instead, see me wearing it as part of the testing process. (Which I find to be another part of the “fun” of making pieces like this.) But, what do you think: if the colors do hold up, should I leave it like this, or remove the coating and polish it until it shines?

Alice Walkowski said
Yep, making hollow beads is one of my favorite things to do too (along with making rings.) I have also used wiggly eyes, the tabs from orange juice cartons and rubber balls to form my beads (along with all the things you mentioned.) The light bulb in an inverted cup was what I used first, but for smaller things I use the other items. There is just something about a nicely curved shape that I can’t resist.
I like your new bead. I would definitely keep it as is. Somehow the beautiful colors that come out of your kiln are worth saving.
LikeLike
C Scheftic said
Thanks, Alice!
FYI, I fired a number of pieces in this load. Two came out with this kind of coloring. The rest were clearly asking for more polish. The thing I wish I understood is what contributes to the “magic” behind a piece’s falling into one category or the other….
LikeLike