Another unplanned gap in posting here, sigh. I just did a couple of things that, I’m told, are not what others think of as typical for a grandmother. What can I say? So what if I went to visit the week before Thanksgiving? And spent part of the time helping the younger one with his statistics class? Between my schedule and theirs, my interests and theirs, it sure made sense to me.
For reasons not worth going into, however, on top of that there was also a bit of a problem with ‘net connections. I could get on, but it involved either various contortions (due to short cables instead of my usual wireless set-up) or tiny keyboard (on phone instead) rather than comfortable seating. So I just figured I’d take time to enjoy the people I was with, give thanks for that opportunity, and think about posting again after I got back to my own home. Even though, now, I’m into the crush of holiday-events, I’ll keep trying to find spare moments….
 So, given those surprises, let me re-start with something else that surprised me.
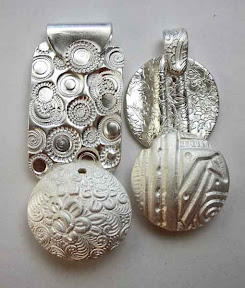
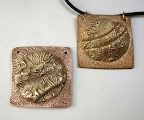
Regular readers of this blog will have already seen the piece in the upper right of the first photo with this post (the one, in that photo, with the black cord). It contains a draped-disk of bronze positioned on a square of rose bronze. The other piece in that photo, in the lower left position and not yet hung from anything, includes a draped-disk of bronze positioned on a square of copper that I finished about a month later (just a few days before I headed out of town).
To summarize: both the draped disks are made from (regular) yellow bronze; the backing disks are made of either copper or (special) rose bronze. At first glance, all the colors seemed fairly close to each other: both yellow-bronzes looked the same, and the copper was pretty close in color to the rose bronze. There was just a tiny bit of “aging” visible on the older, all-bronze piece. I liked how both of them had turned out, so they were among the ones I packed up with chains, beads, stringing material, crimps, jump rings, clasps, plus of course a collection of tools, and headed south on my trip to spend time with “the kids.”
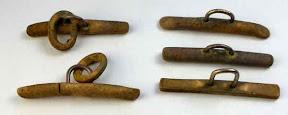
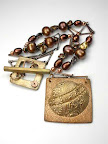 A day or so later, I took out the first one, and chose an assortment of items to hang it from. On multi-strand beading wire, I made little segments of some copper- and bronze-colored freshwater pearls, connected them with chain segments, added one of my hand-made bronze toggle clasps (embellished with a little coil of copper), and connected all the bits together. So far, so good.
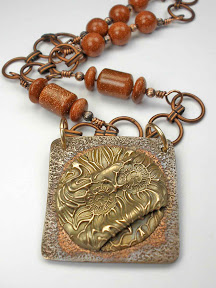 The next day, I took out another assortment to work on. This time, I used bronze wire to build up little segments of goldstone beads, and connected them with bits of chain (different than I’d used the previous day). There were more events going on that day so, once I had what I thought was a good length of that, I went off to play.
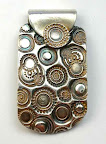
On the third day, I took out the bronze on copper focal bead. I wasn’t particularly surprised that the copper had begun to “age” already, darkening more (much more quickly) than had the rose bronze piece. But I did find three surprises: (1) the yellow bronze on this piece had started to darken with a distinctly green-ish hue; (2) there were bits of copper near the draped dome that (I am guessing) must have alloyed with the bronze in that (to a sort of rose-bronze that had not been immediately apparent) and those areas were not aging as quickly, leaving them a bit lighter; and 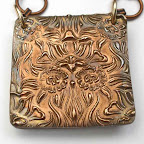 (3) that this difference (alloying?) was also visible on the flat side of the piece, where a huge “central’ area of the texture was slightly lighter too. Once I recovered from my surprise, I decided I was delighted with these changes. I finished assembling everything: two more pieces done and ready to be given the opportunity to go to new homes themselves.
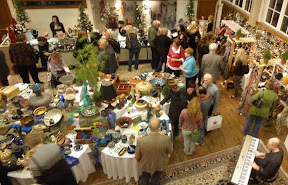
As soon as I got back, these were among the pieces I delivered to the Sweetwater Art Center for their annual (and delightful) “h*oliday mART” show. If you’re in the area (they are in Sewickley, PA, just down the Ohio River a few miles from its beginning in Pittsburgh), do check it out; it’s one of my favorite local art shows each year. It will run from November 27 through December 4. (Well, actually, it opens with a preview party / fundraiser tonight, and I’ll be there!)


") Artsmiths of Pittsburgh
Artsmiths of Pittsburgh") Hoyt Center for the Arts, New Castle, PA
Hoyt Center for the Arts, New Castle, PA") Portage Hill Gallery, Westfield, NY
Portage Hill Gallery, Westfield, NY") _Open Houses in my Studio
_Open Houses in my Studio _Or…contact me about hosting a private party!
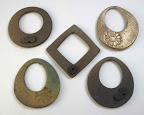
 The first photo, at the right, shows a piece with alternating strips of copper and bronze. (In two places, there’s a mixed-metal layer sandwiched in there too, where I used clay containing small, leftover scraps of copper and bronze kneaded together: can you spot them? Click the photo if you want a larger image.) The piece was polished pretty well although, given the tools I have available, the only way I know to get it super-shiny would have also obliterated the slight waves between the layers, so I made a choice when to stop. I wanted to leave a bit of the natural variations between the alternating strips, and I’m happy with the slight satin finish overall.
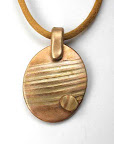
 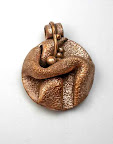 The second photo, left, shows an all-copper piece I made several weeks later, another one of my “draped metal” designs. Can you tell I’m having fun with these?! It’s especially delightful when I work with Hadar’s copper clay, since that one has a texture that feels almost like silk: soft and luxurious to work with!