Way More Photos of My Work
(on Picasa, which Google took over, and broke the links; I’m still trying to figure out how to link to the album collection there…)
I’m delighted that my reversible, silver “lentil bead” necklace, Acanthus, was selected to be included in the Pittsburgh Society of Artists Guild‘s 56th Annual Exhibit!
What was most stunning to me was that, of the 71 artists who submitted pieces, I was one of only 22 whose work was selected, and this was the only 3D piece chosen! What an honor!
Oh, and if you know me, you probably expect that piece to be reversible … and it is! The other side is a similar sort of leaf design, with a somewhat subtle difference: more of an “outie” than this “innie” pattern in the center. I had originally made them separately, intending to do two different things with their respective “other” sides. But once these components were ready, they just sort of told me that they belonged together instead!
In addition to the two receptions for this show that are noted in the “postcard” photo, above, there are two additional events related to this show that seem worth mentioning:
Saturday evening, October 28, an Ekphrastic Reading. Free and open to the public. (I’ve been holding off making this post, awaiting time and other details (poet, artistic inspiration) for this event, but so far only the evening date has been made available. Do let me know if you want to attend that evening but don’t see details anywhere else and I forget to update this.)
Friday, November 4, from 4 to 8 pm. This is the shift during which I will be staffing the gallery! (It’d sure be great to have some folks I know stop by to see the show and visit with me a bit during that.)
And, since I’m writing, I just realized that while I mentioned this earlier event on Convergent Series’ Facebook page, I didn’t note here that I’d had two pieces accepted in July for the Cranberry Artists Network‘s annual Martinis with Monet show, that one of them (shown on the left in this picture) had won an award, and that both of them were purchased by one of my collectors!
What with all that from Martinis with Monet, my solo “glass-case” show for the month of September, and now getting into the PSA annual show, it really feels great to have hit the ground running (and not falling!) again, at last. (Though I still have to remember about posting such things!)
Here’s hoping that we all have a great autumn. And, as noted in my last post, I have two classes scheduled and filling (as I write this, a few seats do still remain) at Artsmiths soon too: might I see you there?
So here we are at the first Wednesday in April of 2021 and this evening I’m not going to be able to meet with other members of the Penn State Master Gardener of Allegheny County at the first regular Wednesday work-night at the lovely Edible Teaching Garden, and not because I’ll be at the opening of always-interesting Quantum Theatre‘s latest story-walk, 10 for 21 (10: based on the Decameron; 21: another year, still in pandemic…)
At the same time, instead, I’ll be at the (virtual) opening of the Cranberry Artists Network‘s spring show, Reawaken, Rejoin, Rejoice, where two of my pieces have been accepted for display!
Yes, while the reception will be virtual, this will be my first, actual, in-person show in a year!
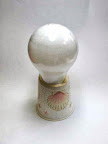
Exit from the Vault is a fine silver (.999) pendant (hung on a sterling silver chain, not shown here) from my Doorways series. What can I say: I just hope it’s an appropriate metaphor for much of the world right now…
Leaves and Tendrils–As Spring Returns! is a fine silver (.999) reversible hollow bead (the other side has a similar but less-deep texture) suspended from Argentium silver (.930) round and square wire “tendrils,” with all of that hung on a sterling silver (.925) chain. This one just seemed highly appropriate for the season.
The reception tonight is from 6-8 pm. You can view the show at the Cranberry Township Municipal Center, 2525 Rochester Road, Cranberry Township, PA 16066. It runs during regular Municipal Center hours through May 6, 2021.
~~~~~~~~ If you would like to purchase any of my pieces but are unable to get to the show itself, please just let me know and I’ll be happy to review your (all very easy!) options.
Like so many of us over the last year, I have missed getting together in person with a lot of my usual people although, except for the worst of winter, I have been able to share outside activities with many of the local ones. In another way though, I have missed even more all the different, random people I would interact with at the Wilkins School Community Center (WSCC) where I have my studio.
Still, I am very happy to have two pieces in WSCC’s current exhibit, Artists Choice IV, even though is yet another virtual show. It looks as though I have the only 3D entries in this one! There are two pendants and, once again, I was able to make both of them reversible!
I Will Always Hold a Piece of Your Heart in Mine has two golden-bronze (“brilliant bronze”) hearts, one nestled inside the other, and hangs on a gold-plated chain. It is fully reversible: you can wear it with the pairing facing forward, or you can turn the chain around to keep the little one snuggled in, closer to your own heart. To me, the difference in the size of the hearts indicates a visual illusion, a sort of perspective, where the smaller one represents the heart of someone at a distance, for the moment at least, but the two are still firmly anchored together.
What do you see in it?
Spring is Peeking Out at Last! is another reversible bead, this time a hollow one made from fine silver (.999). One side is textured with an array of cute little spring blossoms. The other side shows a different flower eagerly peeking out through an opening in the ground. Like so many of us, all of the flowers are ready to get out into the sunshine and to get on with their lives!
What are your plans for this spring, and beyond?!
~~~~~~~~ Both pieces are available for purchase, so do let us know if you’re interested! There’s info on the show page, or you can simply get in touch with me directly and I can process it for you.
If you haven’t been over to The Arsmiths of Pittsburgh to see their great Instructors Show yet, you still have two more chances, this Saturday or Sunday (July 7 or 8). Not only does the show include a range of different styles from the various artists who teach there, but Artsmith’s proceeds from this show will be targeted specifically to support their great education programs!
If you’d like to talk with me in person, I’ll be over later in the afternoon on Sunday. (I should get there at or very soon after 2 pm, and I’ll stay until the closing, at 4.)
Whether or not we manage to connect in person this weekend, we’ll have another chance next weekend! You’ll be able to shop some of my creations and / or talk with me about any of my upcoming classes (at four separate venues), when I’ll hold another Second Saturday Open House session in my studio. That’ll be Saturday, July 14, and I should be there from about 1 to 5 pm. Stop by any time!
Next weekend’s bonus for one or two of my students: If you’d like to come over and use the tools & equipment in my studio during the Open House, I can have part of one table set up for that on the 14th too. Because I’ll have a few of my own projects going too, for students it’s really best if you reach out in advance to be sure I’ll have a spot for you.
(Since I’m still getting questions about these sessions, let me repeat that they are not the same as my private lessons or small group classes: I’m not saying I won’t speak to you at all, because I’ll help as I can. But they’re meant as an opportunity for students, working pretty much on their own, to continue or follow up on projects they’ve already learned how to do … but without having to invest in the great range of tools and supplies I bring to my workshops!)
This Saturday, June 9, is a “Second Saturday”! So I am, once again, planning a little Studio Open House. For more reasons than it’s worth listing here, this month I’m shifting the time a bit later than usual: 2 to 6 pm. I’ll have pieces for sale, along with information about the various workshops I have scheduled for this summer or might still add to the calendar.
The main reason for the slightly-later time is that the Regent Square Civic Association’s Second Saturday event will be at my building, and that’s scheduled for 4 to 7 pm. So I tried to plan my Open House to overlap: you can visit me from 2 to 6, if you’re able to come later in that range you can check RSCA out too, and I can still join them from about 6 until 7.
Follow either link above for a little more information on what each event offers. Stop by for the full effect!
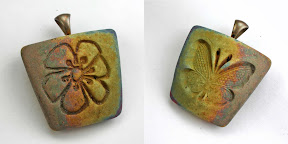
Some people call these “lentil” beads, because their underlying shape is similar to a very oversized lentil. Others call them “saucer” beads, though I never imagined flying saucers that looked quite like these. Long-time readers of this blog will know, however, that I love making lentil beads, and I think they make a great class projet too. The photos with this post are meant to show that even a complete beginner can master the making of a relatively simple one that is still impressive! Those with some prior metal clay experience can work a few more advanced techniques into their designs, but you’ll have to come to class to see some samples of those!
At Artsmiths, we will cover ways to make yours so it can be worn all by itself as a pendant. Or, if you’re into beading, we’ll cover ways that are ideal for stringing it with a bead selection of your choice. Hint: the pieces in the photos here are designed for beading, but can be worn alone as pendants, as shown. Follow the class link, above, to see some more basic samples and to find out how to register for this session.
~~~~~~~~~~
And one miscellaneous musing…
Again, I’m really sorry I haven’t been posting much here lately. (I’m apologizing both to myself and to you!) Facebook is such a thought-sink! I’m not talking about how it can be a general time-sink; I miss all sorts of posts because I don’t spend much time browsing there. But I do spend some participating in a few relevant groups (on specific techniques and on art and jewelry in general; not all the possible ones, but a few!) where I oten find myself anwering questions or making comments there that, pre-Fb, I would have written up as posts here or on public blogs by others.
This bothers me: the class-link above goes to a public page I’ve written, while the two event-links above go to publicly-available Facebook-page events (perhaps with an annoying banner asking you to sign in / up to Facebook, but at least visible). But there’s no way for me to link here to something I’ve written in a “closed” art / jewelry group. I do understand the use of “closed” groups to help reduce the risk of spam, trolls, etc., but I’m still struggling with the idea of spending my time writing up useful information that is then limited in how far it can be shared.
If I’m going to write it up, I want it to be available to anyone who’s interested! Well, of course, I could copy my comments and post them here, but they’re often part of a thread, and I wouldn’t feel comfortable copying all that from a private to a public space; so that would mean re-writing everything to build up my own context. And that’s just more effort than seems worth it when I’d rather be making than writing in the first place!
Have you solved this dilemma? Do you know anyone else who has? Your thoughts (comments, links, pointers, whatever) would be much appreciated!
Happy Winter! Happy New Year! Happy Second Saturday!
This is now the fourth of what has become a pattern: spending the Second Saturday of each month in my Studio. I’ve been considering whether to continue the pattern, at least for a while, and make it a more-or-less recurring event.
So, if you’d like to join me for a Studio Session on a Second Saturday in the future, please let me know! At this point, I do not plan to offer actual classes then but will open my studio to others for a small fee: If you already have some clue what you’re doing with metal clay, you’re welcome to just come over and use the facilities in my studio! I will plan to get some of my own making-work done those days too, and we can chat about it as we go. I will have a bit of clay available for purchase too: I don’t promise to maintain a complete stock of every variety, however, so if you want to purchase a particular one, do check with me in advance. (I can get most of them with a week’s notice; if you ask later, however, we may have to add your express shipping fee to what I’d normally charge.)
Since there is a certain amount of clean-up involved in switching between precious and base metal clays, on many Saturdays I am likely to restrict things to precious (silver) metals only. If there is enough interest in base metals, however, I’m happy to occasionally set a session specifically for those instead.
Note that I am qualifying this: I’m not really calling it SSSS, for Studio Sessions every Second Saturday. I’m thinking more along the lines of SSmSmS: Studio Sessions, mostly on a Saturday, and mostly on the Second one of the month.
I may have to shift a few of them to the Friday. (If Friday would, in general, be better for you, let me know. Most months I should be able to accommodate that!) Or maybe the subsequent Sunday. In the occasional months where the second Friday is ajacent to the Third Saturday, I may switch my in-studio time for one or the other so they are consecutive days.
Why didn’t I post earlier about today? Well, I had already agreed to let a few folks come over and use my studio! Space is limited, so please PM me if you want to come in future months.
FYI, here’s one of the things I worked on today: adding bezel cups to a lentil bead. I’d taught a workshop on using fine silver metal clay to make lentil beads last month, at the Appalachian Rock Shop & Jewelry Emporium in Harmony, PA, and made this bead as part of my demonstration. I hadn’t added any embellishments to this particular bead, but fired it along with all the class pieces anyway, despite knowing it needed something! How about a gemstone? Which stone: either this sunstone or the sapphire would look nice with the texture I’d used. Which side: each one has an area where a little stone would fit. Hey, why not put one on each side?!! So I used PMC3 paste supplemented with a few drops of lavender oil to add a bezel cup to each side. And fired it today while working on other projects. This photo shows how I propped it up as the paste on both sides dried, along with the sunstone and sapphire I’ll add after I’m done with patina and polish:
As a teacher of metal clay techniques and processes, there is one thing I particularly like about that photo! Notice how the bead, having been fully sintered in a previous firing, has a sort of matte-white look, while the bezel cups, made from fine silver sheet metal, look more shiny like we typically imagine silver to be. Well, it is all fine silver. The “white” look is just a result of the way the silver crystals form as the powdered-metal pieces in the clay sinter into the solid-metal final form. (It is NOT, as some novices assume, some sort of outer crust that needs to be removed. It IS silver that we want to keep!) With polishing, the invisible-to-naked-eye peaks in the silver crystals will all get pushed over in one direction, and only then will we be able to see the shine that we normally associate with silver. I’ll try to remember to post a picture of this piece once I’ve finished it. (Though I have several others I must finish first….so this one may have to wait until my next Second Saturday Studio Session, in February…!)
Great news! My four-week introductory series on working with silver metal clay still has a few seats available in “Session 2” — from 6 to 9 pm — starting next Thursday (Feb 23) at the North Hills Art Center, and we’ve agreed not to close the registration this afternoon, but leave it open until next Tuesday!
So if you forgot to sign up, there is still time. Or, if you didn’t notice the listing among my classes down the right side of this blog, didn’t check the Classes section of my website, and you’re not on my mailing list nor the one for the North Hills Art Center … well, now you know about the series and that it’s still possible to sign up.
We’ll cover the basics of designing, texturing, shaping, cutting, and refining pieces. You’ll make a woven piece. And a hollow one (open or closed design: you choice!). With every piece you make, pendant or earrings, you’ll have the option of making it reversible! By the end, we will also have covered various ways to polish and add patinas to your pieces, to help bring out the textured designs. And we’ll have lots of fun doing it all!
For my one- or two-day workshops, registration is usually cut off a week ahead: I need time to order the silver we’ll be using (and I sure don’t want to charge students for overnight shipping)! I have ordered silver clay for those who already signed up for this but, since I’m getting enough to cover all four weeks, I can sneak enough out of that for late-comers to use the first week, and replenish it in time for later evenings.
If you’re in the area, I hope you’ll be able to join us!
Also please notice (e.g., down the right side of my blog) that this session will be followed at NHAC by a simple, two-night introduction to making a beautiful piece out of bronze metal clay. Registration for that one will close on March 16. (Bronze is a little trickier to work with than silver, so you may end up making only one piece … but the materials cost less, so bronze worth risking for big “statement” pieces!)
Registration has closed for my class on making silver buttons this week, but if you missed it, don’t worry. I’ll be offering that one again, in my studio, in November AND I’ve got one on making bronze buttons on the studio schedule for February. Those dates are set to coincide with Indie Knit & Spin, which is a great event that happens in the building where I have my studio. More on all that next month … because I’ve got several other great classes lined up before those.
The next one will be at The Artsmiths of Pittsburgh, this Monday, September 26, from Noon to 5 pm. We’ll make hollow, domed, reversible, silver “lentil-style” beads—one of my most favorite basic shapes to work with! If you want to add some extra bling to yours, you’ll learn a great way to set a lovely, sparkly cubic zirconia too, using an easy technique that lines up the top of your CZ with the top of your bead in a very elegant design.
Should you arrive early, consider having lunch at the Koolkat Cafe. You’ll want to start out well-nourished, from there or otherwise, so you’ll be ready to have lots of fun for the rest of the afternoon! During our session, there will be no specific time designated for everyone to take a break at once, but each person will reach stopping-points now and then where it’ll make sense to relax briefly.
The beads shown here are all just under an inch in diameter. That’s a good size to start out with: somewhere between 3/4 and 1.25 inches across.
We’ll be using a silver-rich version of sterling silver!
In class, I’ll help you understand the major differences (both advantages and disadvantages) of fine silver (99.9% silver), standard sterling silver (must have at least 92.5% silver, with the remaining 7.5% usually copper), and our class-clay (which is 96% silver and a mere 4% copper).
This class makes a great introduction to metal clay: the very first piece I ever made with the stuff was a lentil bead! Then again, if you already follow any metal clay discussions online, you’ll know that this “960” sterling silver is still relatively new in clay form but working with it is being explored by many metal clay artisans. This will be a chance for you to work with it yourself! Until recently, I taught classes using “999” fine silver; I still use that for a lot of my pieces and classes, and choose among brands and formulations according to which seems to be the best one for the various designs I have in mind. But I’m thrilled to have a number of “960” versions available now too, as yet another choice, and I’m selecting projects to offer as classes that allow me to highlight the advantages (or avoid the disadvantages) among the many wonderful metal clay varieties that are now available.
I’ve been doing some additional behind-the-scenes testing of the various forms of 960: don’t hold your breath waiting, but know that those results will appear here eventually too. In the meantime, besides that testing, I’m keeping busy in this part-time activity of mine through teaching some private lessons, planning for a guest lecturer session next week on metal Art Jewelry for the Costume Design (undergrad) and Costume Production (graduate) programs in the Drama Department at Carnegie Mellon University, and trying to build up inventory for the holiday-sales season. And the ‘net connection at my studio still varies from wonky to non-existent. I do have some great 960 information in the writing-queue, and I am trying to get it in condition to be posted!
As I said in my last post in April, I sure had a great time teaching at The Artsmiths of Pittsburgh last month, and I’m thrilled to have been invited back to offer more courses there this May! Here are the three that are on the calendar for this month. Clicking on each course title should take you to a page where you can read a bit more about the projects and, if you want, actually register for the various sessions.
This will be the simplest, most fun, yet easy-going introduction to metal clay that’s possible! In three hours, each participant will create lovely, unique, art jewelry: fine silver (.999) earrings!
There will be lots of options for texture, shape, and small embellishments, so everyone will come out with their own unique pieces. And, we’ll texture both sides, so each pair will be reversible!
There will definitely be enough time and materials for each participant to make (at least!) two pairs of earrings … but, remember, since they’ll be reversible, it’ll almost be like getting four pairs from just this one class!
The very first piece I ever made using metal clay was one of these “lentil shape” beads, and it can be the first one you make too, if you want.
Then again, even if you’ve been working with the stuff for a while, this project involves a few special techniques that are also applicable for a range of more “advanced” projects … which makes this a special (and easy) project on which to learn and begin practicing them.
I find that lentil-beads always seem to be such fun to make: join us, if you can, and see for yourself!
There’s a long story here, not worth going into but, although I’d hoped to offer this class last month, several situations conspired to prevent that. So we simply rescheduled this one for May! I hope that those who had signed up for April will be able to come to this one; plus, there were a few seats still open in that session so there should still be room for some new-comers!
There are lots of things I love about this woven-silver project. The one I’ll mention here is that this is a great session for people who like to make and / or wear silver pieces that are big! At times, the sheer cost of the materials can seem somewhat intimidating but, because these designs have so much open space, they require far less material. Relative to many other designs or approaches, you can stay small, and keep your material costs down, or go big, and not have those costs skyrocket. Your choice!
As I said last month, there’s no significance to the specifics of dates and times. That is, if you want to take a workshop and those date/time combos don’t work for you right now, please let me (or Artsmiths) know! All of us are trying out different combinations to figure out what will work for folks who are interested in the classes. As long as we know there’s interest, we can work out other day/time combos for future months, either repeating these topics or adding new projects to the offerings. And I’m willing to offer any of them as small (private or semi-private lessons) or group sessions (if enough people express interest) in my Regent Square studio as well as at The Artsmiths of Pittsburgh.
Personally, I think that all of these are lots of fun to make!
I’m late in announcing this one, but I’ve got two pieces (a “pillow” pendant and a multi-part “spools and lentils” necklace) in another show up at the Confluence Cafe in New Castle, PA. The show opened back during the Arts on the Riverwalk weekend, July 10, but it will stay up for a while, through September 10, so interested folks around here still have plenty of time to check it out.
New Castle is sort of at the limit of what I think of as my “local” area (and, I’m just at the edge of the region the Hoyt Center for the Arts there considers a “local” artist, so at least we match there!). I wish I lived a bit closer, because The Confluence Cafe is just a nice little space! How can you not love a place that uses their chalkboard, not for menu specials, but instead for thoughts like those in the first photo shown here!?
I’ve got a ton of other things going on right now, so the rest of this post will just contain a few of the better photos I managed to capture of the pieces on display. That is, these are the shots that I thought turned out OK; I was talking with friends as I snapped away, and didn’t realize until I got back and started to post that I’d changed an option on my camera and messed up some of the photos, including the ones of my entries! Clearly, I’m not quite as familiar with that new toy as I’d thought. Oh well, these 16 pieces are less than a third of the 51 total entries, but they’ll give you an idea of how strong the show was. (As usual, clicking should open a new page with a larger version of each image.)
Life tends to get crazy-busy this time of year, for multiple reasons, some of which I’m sure you can imagine and others would take too long to explain. So I’m just going to list a few events you may want to know about should you be interested in seeing some of my work in person:
November 30 – December 7: H*liday mART at Sweetwater Center for the Arts, Sewickley, PA
December 5-6-7: Holiday Gift Shop at the Wilkins School Community Center, Swissvale, PA
December 5-6-7: Open House in my Studio, to coincide with WSCC’s Holiday Gift Shop
December 13: Open House at the Hoyt Center for the Arts, New Castle, PA
December 13-14: Open House in my Studio, to coincide with an Art Studio tour in Regent Square (Swissvale, Pittsburgh, Edgewood, Wilkinsburg), PA
For other venues, please see the list of Ongoing locations down the right side of this blog.
If you find yourself missing any of those, no problem. Just get in touch with me: leave a comment on this post, or message me via Convergent Series page on Facebook (and, while you’re at it, a Like there would be very much appreciated…). We’ll find a way for you to explore my creations!
I’m not sure how much else I’ll manage to post this month. But I have new designs in the works, new workshop pieces I’m testing out plus, of course, new variations of ongoing favorites in both those categories … and lots more for 2015! I look forward to posting about all of those in the New Year, and I hope you’ll enjoy reading about them too.
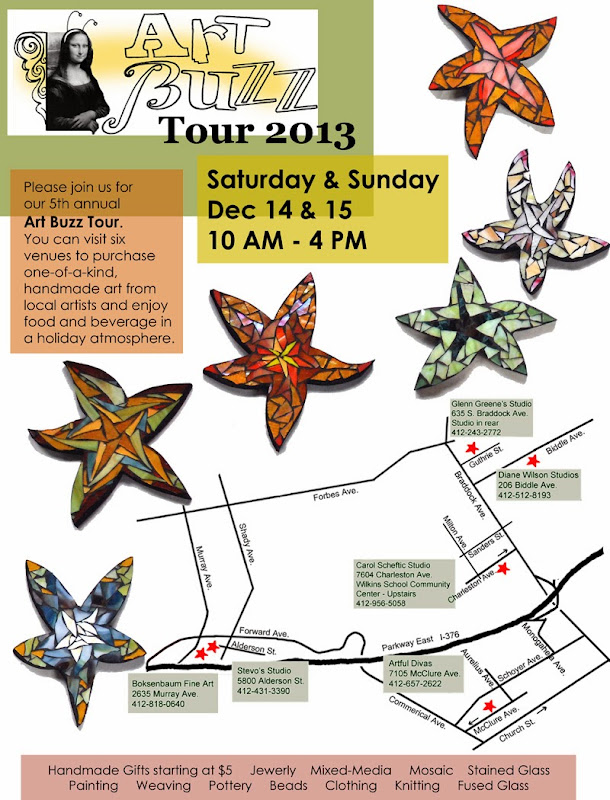
Have you heard the buzz? Six sites! All in the Pittsburgh area’s “East End” this weekend: Regent Square, Swissvale, and Squirrel Hill. And my studio is one of the locations on it again this year.
I’ve got lots of jewelry on offer, plus a handful of other small adornments.
I also have aloe vera plants that need a new home, babies that i repotted from some of the big ones I keep around. (I do work with hot metals here!) BONUS: small ones are free with a purchase of $35 or more (or a discount can be applied to the price of any of the larger ones if that’s what you prefer).
Plus you’re welcome to share some of my cookies and hot mulled cider. (I also got the makings for cranberry-orange frosties but, with all the snow that’s falling, I’ll save that until there’s a request or I run out of cider, whichever comes first.)
I like making hollow beads. I sometimes wonder how much of my fascination with them is because the first piece I ever made using metal clay was a hollow bead, shown to the right, and how much is simply because they can be both fun and interesting to make. I’ll never know the answer to that, but I expect to continue enjoying making them.
In the class where I made that bead, I dried the pieces for each side over a light bulb. The nice thing about light bulbs is that, if you prop them up with the screw-end down, their tops really are nice and round. Why does that matter? Because it means you don’t have to worry about centering, or otherwise specifically positioning, your clay on it to dry. You just move it onto the bulb, carefully press it down to match that curvature, wait for it to dry, and admire the nicely symmetric results.
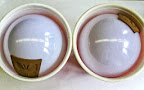
There are a few minor complications with using a light bulb. Nothing serious, but things to consider. How will you prop the bulb? In that first class, the teacher had two kinds of holders: one was a small paper cup turned upside down with a slot cut into the base and the other were small blobs of polymer clay into which she’d pressed the end of a bulb to form it before curing that clay. (Of those two, I have a small preference for the paper cup approach (as shown here, to the left) simply because, when I’m storing enough of those to use for a class, I can stack the cups so they take up very little space.) Another consideration is that you are then working with (i.e., moving around) a piece of oiled (i.e., slippery) glass, where slippery means easy to drop and break. Can’t you just hear the “voice of experience” there?!
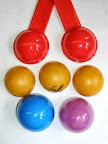
So, what else to use for an armature? A few of the things that I’ve tried (some of which are shown, to the right) include the following:
plastic eggs (bottom), but you have to take care to use the “round” end because, with the “more-pointy” end, then you do need to take a lot more care with how you position your clay on it to dry;
measuring spoons (top) but, again, you need to take care to get round ones;
ping-pong balls (middle row), which I like to cut open so they don’t roll around, and
plastic paint palettes (not shown) which, like the other items shown in this colorful collection, are also “open” on the other side, so you can turn them over and position your clay on the inside too, should you want to do so.
Which armature is best? I don’t have any one favorite. So, how to choose which one to use? Me, I think about the size of the piece I want to make, and the amount of curvature I want it to have, and pick whatever happens to match that the best. And sometimes, yes, I do return to the old light-bulb trick, as I did with a piece I made recently out of Hadar’s Quick Fire Bronze clay. This piece was not going to be round (like my first-ever piece); I wanted this one to have more of a “trapezoidal” shape (i.e., a rectangle with only two parallel sides). This piece would be fairly large but, because of its non-round shape (meaning it would end up having four “side” or “edge” areas that I would then have to fill), I did not want it to have a lot of curvature. Instead of a “standard” incandescent bulb (as used with that first-ever piece), this time I used a larger round “vanity” bulb. With those, instead of turning a cup upside-down to hold the bulb, I’ve found that they fit nicely inside a large cup. So that’s how I positioned my two “trapezoid” pieces for drying. Since this was the last piece I started one day, I just positioned them over the bulb, made sure all the edges were tucked down smoothly, and left them to dry over night. As I was packing up my camera, for no obvious reason I decided to snap a quick photo of them before I left.
The next morning, I was surprised (which, in fact, surprised me even more: I was surprised at my surprise….) to find that, once dry, they had released themselves from the bulb, and slid down to the side, where they were caught by the cup holding the bulb! Whew! I would have been very disappointed if the dry pieces had fallen from a noticeable height onto the tabletop and, perhaps, even then bounced down to the floor (as could have happened if I’d stuck them into an overturned cup) and, quite possibly in their “dry clay” state, cracked or even broken apart from the fall. (Yes, I know how to patch them should that happen, but it takes time and effort that I’d rather just avoid. And pointing that out to you, dear readers, is the whole reason I decided to write this particular post!)
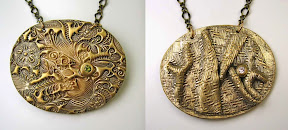
Since I mentioned the “edges” this piece would have, this next photo (left) shows the opening along the “top” of the piece after I’d attached the two main elements. (I hesitate to call them the front and the back because, like most of my work, this piece is fully reversible: it has two different fronts!) I’ve got it standing on quadrille paper (with 1/4 inch squares) to help give you a sense of its size. Once I had covered each of the four edges (the openings that I’d wanted to keep to a relatively small size by using an armature with a relatively shallow curvature), I inserted a bronze “embeddable” bail in the top and fired the piece.
And I was delighted with the result. My original plan had been to finish this piece to a high shine but, given the colors the kiln decided to give it that day, for now at least I’m leaving it like this. Yes, I know, the colors are somewhat ephemeral. I’m experimenting with a new acrylic coating to see if / how it may help to preserve such colors. So this piece won’t officially be going up for sale right away, until I can see how it holds up. You may, instead, see me wearing it as part of the testing process. (Which I find to be another part of the “fun” of making pieces like this.) But, what do you think: if the colors do hold up, should I leave it like this, or remove the coating and polish it until it shines?
One of the early assignments in the accreditation program for Hadar’s Clay teachers involved having to make a sealed, hollow bead, and to fire it. (There’s more than that, but this post is only about that part.)
Of course, who can make just one? I did restrain myself: I made only two. Both are “lentil” beads. One was made from Quick Fire Bronze (which I’ve happily used for ages now), and one using Brilliant Bronze (which is newer to me, and not always successful but one I’ve been determined to master). I made all four “pieces” (both sides, both beads) the same size (diameter and thickness). I did drape the Quick-Fire one over a “steeper” curve than I used for the Brilliant Bronze. After completing the rest of the construction process, I fired them (along with several other pieces I was making for the Western PA Garden Marketplace on April 20). Shown, above, are the results.
The Quick Fire one is shown to the left. It sintered and looks great. It held its curvier-shape well, the seams held, and the kiln gave lovely colors (that, for this exercise, will eventually disappear…).
The Brilliant Bronze one is shown to the right. All the seams held together, no cracks appeared, and it appears to have sintered. Well, to be honest, it appears to be over-fired! It has a rough, sort of pitted, almost bubbled surface. Its edges shrank an extra amount, resulting in a sort of “rim” the whole way around it. Worst of all, perhaps, it slumped a bit: its shape no longer has a nice, even, slight curve to it. Instead, it sort of bulges off to one side (which is hard to see in the photo here).
How did this happen? Well, I knew that Brilliant Bronze should be fired about ten degrees lower than the “other” bronze. But there are several “other” bronzes! And I had a copy of Hadar’s shrinkage-rate chart that led me to believe that it could be fired at either the mid- or high-fire range — and there is a “bronze” that fits the bill for “other” at each of those!
So, here’s the secret: If you EVER have ANY sort of problem using one of Hadar’s clays, first be sure you have the latest information! Always go and check her blog (look at the list on the right side of the screen there). Apparently I had missed that there’d been a typo in an early version of the shrinkage chart, so I had not gone to grab the update. The chart that’s out there now makes it clear that Brilliant Bronze is a mid-fire formula only. Meaning I have to fire it a bit lower than the Quick Fire Bronze.
So the next time I fire Brilliant Bronze, I’ll just lower the firing temperature a few degrees more, and look forward to an even more successful outcome.
In the meantime, though, I have a collection of pieces with butterflies, with roses, and with hibiscus flowers that I made out of Quick-Fire Bronze XT (the high-fire bronze formula) that are calling out to be fired next. Here’s hoping!
I’ve been meaning to write for a while about several questions that often come up in workshops, especially with beginners when each person is allocated a package of clay and then finds they don’t use all of it: why did you give me more than I need and how do I save it for later use?
I see the answers to these questions as being connected, but let’s start with the first one: for many “projects” it is just worth having a bit extra as you roll it out, so you’re sure to get a big enough area to cut out the shape you want. While this remains true no matter how experienced you become, it is especially important for beginners who are just learning the various ways to manipulate clay.
The answer to the second question is a bit more complicated. Silver clays come in a well-sealed package, and can remain in great condition for a rather long time inside that. The trick is that, once the package has been opened, all sorts of things can happen. At a minimum, the clay dries out. If that happens, it can be rehydrated: ways to add water to get it back to working consistency is something I’ll try to remember to write about at some point in the future (even though it’s not something I encounter myself on a regular basis any more…). If you’re going to use the remaining clay again fairly soon, you can just try to keep it moist. There are all sorts of products you can buy, or build yourself, to create a little humidified storage environment. The problem with doing that for any length of time (and something that the product vendors rarely address) is that your clay can easily become contaminated with mold. Now, you can add something to the environment (not to the clay itself, but simply inside your storage box) that can help retard mold growth. White vinegar or lavender oil are examples of some mold retardants. And, even if your clay does acquire a bit of visible mold, it’s not a crisis. At that point, your options are to scrape off the mold or to just work with it. (You do have to take care with the latter because the extra “space” taken up by the growing mold may create spaces in your fired piece that may influence its look and/or interfere with its strength.) But, in my experience, there’s a much better solution: don’t even try to store it!
That is, my general answer to both of the original questions is this: why not see if you can just use up any remaining clay in some creative and productive way?! Add to your current piece, or make something else.
One of the earliest “lentil” shape beads I ever made is shown in an old photo here, to the left, strung with some Russian jasper and green glass beads. (It’s also one of the pieces that led me down the path of making reversible pendants!) Its other / first side had a more elaborate design; what at the time I thought of as the “back” had the simple, low-relief, fleur-de-lis pattern shown here. After decorating the first side, I had a bit of clay left. I rolled it all out, just two cards thick, which got it big enough that I could cut out a small square. I put that on the same drying form I’d used for the lentil (so it would have the same curvature) and cut a circle out of the center of that. With the clay left over from trimming the square and cutting the circle, I made a number of little balls and let those dry too. Then, I moistened the center of the fleur-de-lis side and the underside of the open square, and stuck those two pieces together. Once those seemed secure, I added more water inside the open circle, and pressed the little balls into place. Having the circle around the outside of the balls gave me a way to make sure I could attach all of them securely, to that ring and to each other, rather than trying to count on a small point of connection on the bottom of each ball. And, suddenly, after investing only a few more minutes and a tiny bit of “left-over” clay, the piece became reversible, which sure seems like a good deal to me!
Of course, if you have more clay left over, you can always make something else with it. All of the elements in the silver and bronze earrings shown in the smaller image to the right were made when I had some larger leftover bits. After completing other pieces I’ve often used any remaining clay to make little patterned disks, or cut out little textured designs, and just set them aside to dry. When I’m firing up a load in my kiln, if I have a bit of extra room, I pop them in. When I have a few spare minutes–with metal clay, one always seems to have moments of waiting for something else to happen … to dry, to rehydrate, to finish firing or cool off, for example–I will go through these bits and pieces, and assemble them into something interesting. Their small size, of course, means they often (but not always) become elements in earrings.
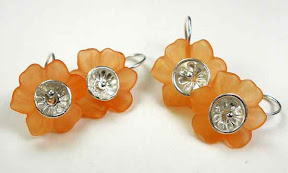
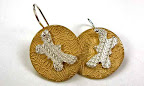
Sometimes I’ll add other elements to such “bits and pieces” too. The orange-and-silver earrings shown at the very top of this post were done that way. When I fell in love with the little colored lucite flowers, I bought a small collection of them to use both for my own creations and during workshops. For several months, whenever I’d have a little bit of clay left over, I’d make a little flower disk or leaf of some sort. I kept track, so that I’d end up with matching pairs, but I didn’t worry about completing any particular number at once. I just used up what I could for some larger shapes, made smaller ones when I had less clay left, and made other small elements or even just tiny balls with the very end of the clay I had on hand.
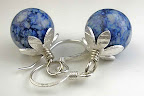
In fact, for silver pieces that I intend to fire first and figure out how to use later, those I make flat. Then, when I do decide where I want to use them, if they need some shaping for that particular purpose, I can use the “traditional metalsmithing” technique of dapping the fired pieces to shape them as needed. That’s what happened to the little flowers I set on top of the blue-and-white glass beads shown with the earrings in the final photo here. In fact, though I made those flowers specifically to use with these beads, I could not have domed them to match their shape in the “dry” state because I punched them out of a little bit of extra / scrap clay that I had mixed up so it would remain flexible as greenware. I had finished the project I wanted to make with that clay and had some left then too. Since I knew that “flex greenware” clay that has been rolled out is great for using with paper punches, I used some of my leftover clay to make a small sheet for punching. I then made these flowers but they had to be fired flat … since they were too flexible to hold any other shape. (I also rolled the final bits of that flex-clay into long “snake” shapes that would remain flexible and could be used to embellish other pieces later on.)
I will note that, while fired silver and copper clays can be dapped after they’ve been fired to metal itself, the various bronze clays that I enjoy working with cannot be formed much (if at all) after firing. That’s just the nature of bronze, not simply the fact that it came from metal clay.
I do sometimes wonder how much this is something I do, myself, verus what other metal clay artists do with their leftover bits of clay. I know that a number of you do read this blog (without commenting) but I sure hope you will speak up now: Do you do this too? Or what?? And, why?
Have you heard the buzz? It’s even louder this year! Over forty artists! Seven sites! All in the Pittsburgh area’s “East End” this weekend. And my studio is one of the locations on it again this year.
At WSCC (where I’ll be), the Holiday Gift Shop will still be running downstairs, and I am pretty sure that Daviea Davis will have her glass mosaic studio open too, upstairs across the hall from mine.
If you’re in the area, I sure hope you can stop by. To say, “Hello” and “Happy Holidays” at least. If, for some reason, you can’t get yourself there in person, how about leaving a holiday greeting as a “comment” on this blog post. Even having you say just “Hello” or “Happy Holidays” would be much appreciated!
I look forward to seeing / hearing from you, dear readers, so I can extend my best wishes for this holiday season to you too, in return, in a more personal way.
Have you heard the buzz? Eighteen artists! Seven sites! All in the Pittsburgh area’s “East End” this weekend. And my studio is one of the new locations added this year….
If you’re in the area, I sure hope you can stop by. To say, “Hello” and “Happy Holidays” at least. If, for some reason, you can’t get yourself there in person, how about saying “Hello” or “Happy Holidays” or something else even more interesting as a “comment” on this blog post.
I look forward to seeing / hearing from you, dear readers, so I can extend my best wishes for this holiday season to you too, in return, in a more personal way.
I taught a “reversible hollow domed” (aka “lentil”) bead workshop earlier this week at my studio in the Wilkins School Community Center.
Of course, I didn’t think to stop and get good photos of finished student work (lovely as it was, I was overly eager to get it into student hands!) so I illustrate this post with the element I made to demonstrate a number of relevant techniques.
(Except, bezel-setting a stone was not a part of that particular workshop: after class, I added the 6 mm bezel cup, refired the whole thing to secure that, and set the jade cabochon.)
I love the end result, and hope you do too! I’m reasonably satisfied with the photo that shows the jade cab. In my ongoing attempt to learn how to take better photographs of small, shiny, silver objects, however, I will admit that I’m really not happy with the amount of reflection in the other image. (It is, however, the best of about 30 attempts.) Yes, I know ways to solve the problem, just not affordable ones! The month is almost over (Feb is a short one!) and I haven’t make quite enough to cover rent on my studio (and I really do love that space!) let alone the other expenses involved in doing all of this, so the cost of photos (whether by hiring a photographer or investing in additional equipment myself) is one big issue behind this problem.
Still, I love making reversible hollow beads. After my students left this week, I stayed behind and made a number of samples for the three box workshops I have set for early-March. Aside from the fact that I just enjoy making and teaching those (and the way their “reversible” aspect means you get two distinct adornments for the price of one!), I’m also hoping I’ll earn enough from those to cover that month’s rent and, maybe, even this month’s shortfall. (The latter isn’t huge, but it does need to be covered somehow!)
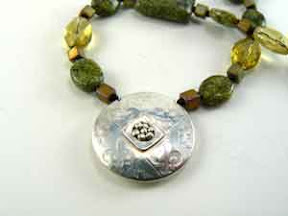
I considered entering this necklace in the Show Me the Love Challenge at Metal Clay Today but, in the end, decided not to. “Lentil beads” are fairly common fare in the metal clay community: beautiful (I think) and great fun to teach (lots of “bang for the buck” in general, but especially for a beginner project) but even adorable ones are not very likely to win a competition any more.
Still, I am very fond of the fine silver focal bead in this piece. I’m not much of a “pink” person myself (fuchsia, maybe, or some deep rose and burgundies, but not so much the delicate pinks (that my mother loved to wear)). But I had a couple of adorable, little, pink cubic zirconia and I thought they’d look lovely set in this combo of textures and shapes, so I used them here. I debated putting both on one side, but then chose to set one into each separate texture, and not in the “obvious” locations either. What do you think of those choices? (A click on either of the detail shots, below, should take you to larger versions.)
If you’ve known me and my jewelry for a while and this bead somehow looks familiar, this may be the fourth, or is it fifth?, iteration of how I’ve strung it. I’m getting happier with each new attempt and, with this one, I like the little reversible heart-shaped toggle clasp I (finally!) made to go with it. I think it’s at last time to put it up for sale.
Really, that’s one thing the challenge got me to do: make a little heart toggle for it. And then I decided to enter some other pieces instead. Go figure…
On Saturday I taught for the first time at the newly-relocated Mars Beads. It’s a great space, lots of room, and owner-Carolyn has a wide selection of reasonably-priced beads. (If you want the more unique — and pricier — stuff, your choices are somewhat limited here. If you want a good deal on a good intermediate-level selection (that, say, you can use to enhance a major focal piece without pricing it out of range) then Mars Beads should definitely be on your shopping list.)
The class was on how to make a reversible hollow “lentil” bead. I think that’s a good class for a number of reasons: it covers a lot of the basics of working with metal clay that are applicable to a number of other projects; and you come out of it with a unique piece that is reversible, so it’s almost like you are getting two different pieces for the (not inexpensive, I know) price of one.
Since there are lots and lots of little details to keep straight as you’re starting out, I’m happy if it’s a relatively small class. That way, I have a better chance of being able to give everyone the individual attention they need. In describing the class to potential students, there was the photo of four sample pieces shown above, plus I left a selection of about seven or eight pieces at Mars Beads for a month prior to the class.
Below is one piece I constructed while doing in-class demos. It is not quite as “polished” (in either design or finish) as some of my other pieces, but it illustrates what I think a typical student should be able to do in an introductory session. (Some will do even better, more like some of my other pieces, but everyone should be able to achieve this.)
It covers rolling, texturing, and cutting the clay. Cleaning up edges in the moist-clay state. Cutting holes versus drilling them. Making, shaping, and attaching appliques. Working with little coils and balls of clay for decoration. A little bit of each basic activity.
Although I try to teach using methods that reduce or eliminate the need for sanding dry clay, hollow beads like these are among my few exceptions: we do sand to get the edges down to a “knife edge” before attaching the two separate sides to each other. While doing that sanding, I talk casually but deliberately about safety issues, especially those related to eating, absorbing, or breathing any of the materials students will be working with. I am not a “purist” who insists that “all sanding is bad” but do tell cautionary tales, urging people to realize that every act of sanding should be a deliberate choice, best taken only when no other option exists, and should then be done with care and adequate precautions.
As I’m both sanding and talking about that, I carefully pass each half of the bead around the room several times, asking people to identify when it has been sanded “enough.” I also pass around samples with sharp versus rounded edges where the pieces were attached. I find it interesting how different people react quite differently to that whole part of the session.
Well, on Saturday I had one student who did an absolutely perfect job of identifying when my sample pieces were and were not adequately sanded, and of picking out the samples that corresponded to stopping at various stages along the way. But when she went to do her own bead, of course, she happily moistened her clay and stuck the pieces securely together and then asked, “Now what do I do about all these gaps and ridges?” Aack! Her edges were nowhere near ready to have been stuck together yet, and way too lumpy to resolve by more sanding at that point. All of that should have been handled before attaching the pieces. And, yes, she had done a wonderfully good job of getting them stuck together.
Soooo, the workaround we came up with was to roll out a “string” of clay and use that to surround the piece. We pushed the bottom of it down into the gaps while trying to keep the outside nicely rounded. (Aside from the poor quality of the lighting in the photos I snapped quickly before giving the final result back to this student) how do you think that idea worked out? What else might we have done?
[The photos with this post were taken before I did any finishing at all of the first piece, and after just a quick, preliminary tumble of the second. I did do some more polishing, and the pieces now look a lot better than shown here. But read to the end of this entry, and you’ll see the main reason why I’m including the photos of these pieces at this stage of finishing….]
Ann (mentioned in my last post) bought some 4mm fine silver bezel cups. I’m not sure why she got them that size but, once they arrived, she realized how small they were. What would she do with them? Well, I had some small blue spinels (both faceted and cabochon), so I traded her a few of those cabs for a few of her bezel cups.
Several days later, at the end of a pack of clay, I figured I had just enough clay left to make this piece (i.e., if I didn’t use any extra clay pushing it into a texture stamp). So I made this piece, fired it, cooled it, added the bezel cup, and refired the whole thing. Though the stone should have survived the firing, I figured it’d be easy enough to set it afterwards.
Then, I decided to open another pack silver clay and make several more lentil beads. Here’s an example:
But, here’s the dilemma. Once I polish any of these further, they’re more difficult to photograph without having my reflection take away even more from the polished area. So I’m displaying the un- or semi-polished images for now.
(That is, in the lower pair, the camera is actually visible in the photo to the right; it is, luckily, sort of hidden in the texture of the one to the left. I did try shooting through a shield that would hide my outline somewhat: but I could not find an angle at which to shoot the first piece, above, that would both show it off well and "hide" the lens in the stone… One photographer I talked with suggested trying to put it in a bowl of water and shoot through that, but I haven’t yet had time for such experiments.)
One great outcome of the Month of Earrings challenge was coming up with a selection of projects for a May class. Specifically, on Sunday 23 May, I’ll be back at KoolKat with an earrings class. Here’s a photo of some of the options that will be available to participants:
That should be a great intro for beginners, people who’ve been wondering about metal clay but haven’t yet taken the plunge. But I’m hoping that we’ll have a mix of beginners and those with some experience too: the projects are simple enough to leave time, not always available in other classes, to include a few basic “finishing” techniques too. In other words, something for everyone!
I’m also looking forward to several other great workshops coming up well before that:
Sunday, 18 April, Lentil Beads, at Beads2Wear in McMurray, PA
All of those are suitable both for beginners and for those with some experience who are looking to add more techniques to their repertoire and delights to their jewelry or gift stashes.
Of all the pieces I made in the second class with Tim, once again a lentil bead is my favorite individual piece.
But, between the two classes over five days, the reception our metal clay guild put on Friday night for Tim and metalsmiths from the area, putting up a friend for the duration, and more, I’m just too wiped out to say much more now. I’m fine, just tired…
Thinking back on what I wrote in my first post, the thing that has stopped me from doing this earlier has been the photography part.
Now, I do know a lot of the basics of photography (for that matter, I have even taught it), but small little jewelry pieces are a bit of a challenge, and jewelry that is made of shiny metal and often set with sparkly stones can be even trickier to shoot well. And I have just been very hesitant to illustrate my blog with photos that didn’t reasonably represent the pieces I was discussing.
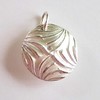
I haven’t yet gotten the photography part to the level I want. But I do still like making “lentil” shape beads like that first one. The snapshots with this post are of a more recent lentil bead.
That side has an opening, with a view to some embellishments nested inside.
This other side features a cubic zirconia (CZ) and more of a patina (a coloring of the surface, in the valleys of the texture; patinas added to high points simply wear off, while those in the valleys will darken over time).
I plan to redo the bail (the wire at the top, from which it will hang).


") Artsmiths of Pittsburgh
Artsmiths of Pittsburgh") Hoyt Center for the Arts, New Castle, PA
Hoyt Center for the Arts, New Castle, PA") Portage Hill Gallery, Westfield, NY
Portage Hill Gallery, Westfield, NY") _Open Houses in my Studio
_Open Houses in my Studio _Or…contact me about hosting a private party!


 This Saturday, June 9, is a “Second Saturday”! So I am, once again, planning a little
  Some people call these “lentil” beads, because their underlying shape is similar to a very oversized lentil. Others call them “saucer” beads, though I never imagined flying saucers that looked quite like these. Long-time readers of this blog will know, however, that I love making lentil beads, and I think they make a great class projet too. The photos with this post are meant to show that even a complete beginner can master the making of a relatively simple one that is still impressive! Those with some prior metal clay experience can work a few more advanced techniques into their designs, but you’ll have to come to class to see some samples of those!
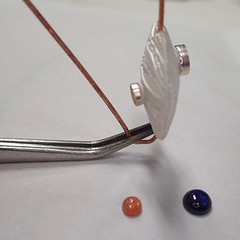

 Also please notice (e.g., down the right side of my blog) that this session will be followed at NHAC by a simple, two-night introduction to making