Convergent Series

learning, using & teaching metal clay, and other aspects of life

Posts Tagged ‘intro’

Starting Out by Layering.

Posted by C Scheftic on 2012/05/29

OK, now, let me get back to silver again…. While I’m perfectly happy to have beginners in sessions like the box-pendant workshop I mentioned in my last couple of posts, I also enjoy offering start-up workshops with much simpler projects. Especially with silver: many people are happy to dive right in and try it but, especially given the price of silver these days, some may be more hesitant, concerned about doing something wrong, perhaps not yet fully grasping how easy it is–with metal clay–to just squish it up and start over! (Well, there are a few limits, but it sure is easier to “just start over” without any waste using the metal clay approach than it is with traditional metalsmithing.)

In the past, I’ve offered a collage / mosaic class that’s pretty straightforward; this summer I’ll be offering one (or more) with the option of doing a somewhat simpler layering approach.

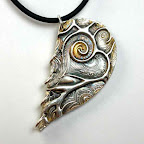
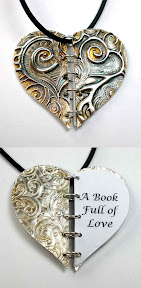
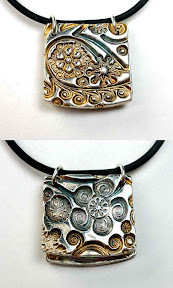
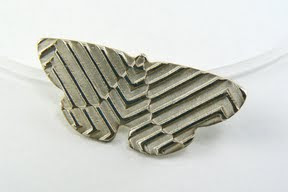
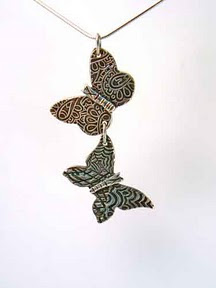
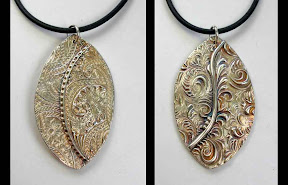
With this post are photos showing both sides of three of the sample pieces I made for this. I try to make ones that I can use to present a number of design and construction issues.

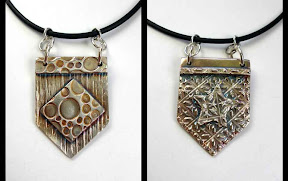
Just few of the points I can make with these are issues involving: using a texture stamp, creating your own design, and combinations of those; deep versus shallow textures and various ways they interact; rolling “coils” and “balls” of clay and different things you can do with those; pre-fire finishing of textured versus plain areas; and more.

Of course, we’ll also cover the different methods of joining pieces–wet to wet, wet to dry, and dry to dry–and how to “reactivate the binder” in dry elements for secure joins.

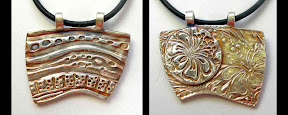
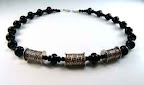
Also, using these (and a number of other examples I’ll bring to class), we can discuss a range of ways to hang a pendant. Of the three sets of images I chose to show here, my own opinion is that:

  1. one works just fine in general;
  2. one is OK as long as you pay attention to what you hang it from; and
  3. one needs “something else” (which I’ll take to show) to make it work reasonably.

Can you tell which is which?

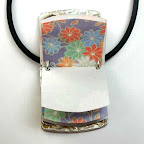
Also, later this summer I’ll be offering one or more Add-a-Cab workshops. Folks who’ve taken a class from me, or from someone else, or who’ve made a piece on their own, will be able to come and add a (most likely 6 mm) cabochon to it. This will be an introduction to stone-setting, so you can see what’s involved, before you get into doing something more complicated (which I’ll address in other workshops later on). I may use one of my layered pieces in the demo for that. I think I’ve picked one out for that purpose, but I’m still debating if that’s the right one. If you have a suggestions there, feel free to chime in with a comment on that too.

Posted in General Techniques, Teaching Metal Clay | Tagged: , , | Leave a Comment »

Posted by C Scheftic on 2012/02/14


Happy
Valentine’s
Day!

Posted in Misc. Musings | Tagged: , , , , , | Leave a Comment »

Workshop ideas can come from workshop participants too!

Posted by C Scheftic on 2011/08/27

Jane and Rose, delightful students both, have taken several of my workshops. The last time we were together, Jane asked if I could please offer a workshop on making little fine silver books that could be worn as pendants. Yes, of course, great idea!

I asked Jane to show me sort of what she had in mind, just to be sure we were thinking in compatible ways. Shown with this post, are two of my simplest interpretations of her ideas. I’m working on a few others too, in between everything else that’s a part of life, but I wanted to let folks know this is in the works via a couple of the simplest interpretations, ones that anyone can do. Yes, anyone: that does include even those of you who keep reading and thinking about metal clay without ever trying it to actually see and feel what it’s like!

Before I offer a workshop, I always make a collection of sample pieces. Partly, that’s so participants will be able to see some variations (to get their imaginations going); but, even more, it’s so I can try to do some things right, and some things wrong—I can be sure of what works how and where I can and cannot safely push the limits of what folks might want to try. So far, I’ve focused on the metal covers, not so much the contents. But I believe it’s the inside that makes this project particularly special: you can put anything inside your special little book that you want. You can put in blank pages, and write little notes on them. You can print something out. Or cut pictures or bits of text out of magazines. Or include photographs. Even little bits of pretty fabric, or would work. So could relatively thin “found objects” such as pieces of plastic or metal trimmed to fit. That part is entirely up to you!

In the piece shown above, I used little bits of origami paper, white on one side with a design on the other; you could add drawings or text to the white side, or used papers with patterns on both sides, or…. Note how it hangs from its “binding” loops: that turns out to be a great yet easy way to handle both the “binding” of the book and how to “hang” it as a pendant.

I made another piece, “A Book Full of Love” (shown both closed and fully open) in order to illustrate how you’d actually have to factor in gravity if you wanted the “binding” to run down the side: because the top loop is in a corner, it’s going to want to hang with that at the top, and the rest will just naturally angle down from that. If you want that look (which, conveniently, also helps to keep the book closed), great: gravity just gives it to you! If you don’t, however, then you’ll have to think of other ways to counteract the way it will want to balance. You could, for example, embellish the whole thing with some additional elements (e.g., beadwork), and then dangle some more beads from the bottom hinge piece to pull it down and into place. There are lots of other options too, of course, which is yet another way in which this is a very versatile project. (I’ll get some more photos up, eventually, though it might not be until after the actual workshop….)

Here are a just few other points, to keep you thinking about this: while the jump rings I used to hold everything together in these particular samples are an easy way to do this, what else could you use to bind the pages and covers together? How many places do you want to loop through (these samples used two sets of holes, and then five, respectively) and how much might that vary depending on whether you chose a different mechanism for your binding (or content for your insides)? Where and how do you anticipate this piece being worn: that is, do you need to make sure the pages are waterproof (or, at least, water resistant)? Jane specifically requested a pendant, so that’s what I’m showing in this particular post, but what else might you do with a little silver-covered book? Or what other designs might you come up with, that used a book-binding sort of approach, but didn’t end up being a book at all?

I’ll be working with Rose and Jane in the next few weeks to come up with a time and place to offer this workshop. We’d love to have a few other folks join us, so please let me know if you’re interested.

Posted in Teaching Metal Clay | Tagged: , , , , , , | Leave a Comment »

Fine Silver Butterflies!

Posted by C Scheftic on 2011/08/21

Since I’ve been writing about workshop inspirations, here’s another one: My annual “Fine Silver Butterflies!” workshop is coming up! So many folks signed up for it (this year, I’m offering it down at Zelda’s Bead Kit Company in Bridgeville, PA) that we had to add a second session! With two of them now (both afternoon and evening on Wednesday) I think there may still be a seat or two open, so check it out if you’re interested.

But where did that idea come from? Regular readers of this blog may have picked up the fact that, in addition to my passion for metal clay and related topics, another interest of mine is gardening. And not just my own garden either: I also volunteer with the Penn State Master Gardeners of Allegheny County, which means both helping out in their various Demonstration Gardens, and also helping to prepare materials, give talks, and teach workshops on a range of gardening topics throughout our area.

Before my latest move to PA and joining the PSMG program (as well as visits to Pittsburgh’s Phipps Conservatory with its lovely Butterfly Forest), I lived near a couple of different Monarch Butterfly sanctuaries. The first of those is in Pacific Grove, CA. Later, after a stint in MN, I lived near another such grove in Pismo Beach, CA. (Did you know that those monarchs and their descendants, since they wintered along the Pacific coast, then all summered west of the Rockies? Monarchs that summer all over east of the divide then winter in one specific place in Mexico!) And, although south Florida’s Butterfly World came into being only after I’d headed off in search of cooler climates, when I’d head back south to visit the folks down where I’d grown up, I felt a little bit of relief when I found that sort of development amidst all the seemingly relentless “expansion” there.

All of which made it sort of obvious, to me at least, that when I took up metal clay, I’d then try making some butterflies out of it and even add a Butterflies class to my offerings.

For the workshops, it took me a little while to collect a reasonable number of butterfly stamps and cutters and such so participants would have a nice set of choices, but I’ve been offering this workshop each summer for several years now. (I schedule them then, but am happy to offer this at other times of the year if people request it.) In addition to my usual metal clay handouts, I get some brochures from the Penn State extension office on butterflies and other pollinators, and I provide a few links to information that’s online. (I mention our pollinator-friendly program with respect to bees too, since they seem to be having such a hard time with their colony collapse disorder these past few years, and it seems increasingly important to mention those as well.) Workshop participants are welcome to take brochures home with them if they want, and to look at some of the butterfly (and insect) books I bring along. During the moments in the hands-on time when everyone is working but some chatter still goes on, I provide an introduction to the value, care, and feeding of pollinators.

I usually take with me a good number of lovely but fairly simple examples (such as the ones that accompany this post) plus a couple more advanced samples. I find it interesting to watch the choices participants make: do they stick with simpler designs and go for quantity; do they focus on one piece but add more intrigue and complexity to it (e.g., using shaped drying forms, adding movement mechanisms, constructing detailed little 3-part butterfly-bodies and antennae, etc.); do they make only butterflies or add one or more flowers to hold or accompany that piece?

Even if these fine silver butterflies do not themselves contribute to the important task of plant pollination, it’s my ongoing hope that the wearing of them—along with the relevant gardening information provided in the class—will help to both draw attention to, and spread the word about, the value of these wonderful little creatures in real life.

Posted in Teaching Metal Clay | Tagged: , , , , , , , | Leave a Comment »

Where do other workshop ideas come from?

Posted by C Scheftic on 2011/08/13

I sure do think that it’s loads of fun to wrap strips of clay into cylindrical shapes … and, then, fire them so they turn into sturdy but lovely metal tubes! Do you? Have you tried it? Would you like to come to a workshop and make a few?

One fairly easy thing—something even an absolute beginner can do—is to overlap the material as you twist it around. This gets you a shape I think of as a “lapped cylinder,” one that’s open at both ends. Depending on the texture / design you have chosen, the pattern can remain the same along the full length of the cylinder (upper tube in photo to the right), or it can vary noticeably as you turn it around (lower tube in upper photo at right).

You can hang one or more of these cylinders from some fancy ribbon and you’ll have your very own one-of-a-kind piece of art-jewelry! You can use ribbon just as it comes from its package, or you can use any of a range of braiding and/or beading techniques to make it fancier. It can be as quick and easy, or as elaborate, as you want it to be.

(Not shown in that photo is the way you can even use a matching tube as part of a toggle clasp! I’ll write about bracelets again in a little while, and show that then.)

Cylinders that Can Spin. Little CylindersAn interesting variation on the cylinder involves capping one end and putting a small hole in that, just large enough for a piece of wire to pass through. Then, you can use a headpin (I often make my own!) to either: make a wrapped loop so you can hang the whole thing from an earwire (first photo to the left) or even use a headpin that’s long enough so you can bend it directly into a hand-made earwire (second photo, to the left). Though I illustrate only the second approach with additional beads here (I used crystal and glass), it’s possible to include them (or not) with either style, as you desire.

All of the cylinders described so far are possible outcomes for the workshop I offer periodically called Simply Stupendous Cylinders. Where did that idea come from? I wanted to find a way to offer a shorter, simpler version of a couple of my other favorite projects.

(1) Silver Spools involves another great project. It’s also appropriate for beginners, while those with prior metal clay experience will often have the chance to learn some new techniques. But the strategy used to construct spools just takes a bit longer to complete than does that for simple cylinders. Spools also use up some more material. So I like to offer the simpler version sometimes too, for those who want to try making some tubes but at a slightly lower cost.

Spinner Twists(2) I also love making and teaching others to make “twistie” earrings (or pendants) like the ones shown to the left here. I like their twisted shape, and I especially like the way they can be made to spin on their handmade ear-wires. Surprisingly, however, they are much harder than they may look to make! The Do the Twist workshop where we make these is one of the few I teach involving silver metal clay that I do not recommend for absolute beginners….

Here’s why: The “open twist” shape of this construction is just incredibly fragile in the greenware shape. The end result is sturdy enough, but even the slightest “wrong” move as you do any finishing or cleaning prior to firing can cause a “twistie” to snap into pieces. Then you have to decide: stick them back together (and risk snapping it somewhere else in the process), smooth off the ends of the pieces and just end up with shorter twists (though that smoothing can also lead to more breakage), or rehydrate the clay and try again another day (since, though no clay is lost, it still takes time to get it workable again)? That’s just not a set of choices I want to foist on metal clay beginners! You need not be an expert to make these, but I do recommend waiting until you feel comfortable working with metal clay in both its moist (lump clay) and dried (greenware) states before you tackle this approach. And the cylinders-class is one great way to gain the relevant experience.


If you’re reading this note within about a month of when it was first posted, you can look over to the right sidebar to see when I’ll next be offering the relatively quick and easy Simply Stupendous Cylinders workshop in my studio (in “Regent Square” in western Pennsylvania, where Pittsburgh, Swissvale, Edgewood, and Wilkinsburg intersect…). If you’re interested, just let me know that you want to sign up for it.

If you’re reading this more than a month after it was first posted, you may not see it listed on my evolving workshop schedule. But, at any time, you are welcome to request any of my workshops (regular ones or something special), including the ones discussed here. I’m always happy to offer any of them (at my studio or even at your site) as long as I know there are folks interested in taking them!

Posted in Misc. Musings | Tagged: , , , , , , , | Leave a Comment »

Where do workshop ideas come from?

Posted by C Scheftic on 2011/08/07

I was over at Zelda’s Bead Kit Company a week or so ago, and noticed a box with these cute and colorful little Lucite beads. I think they’re so adorable—with several different leaves and flowers and butterflies—and I just couldn’t decide which color or design to buy.

How could I justify getting a whole collection of them? Even a single strand of one color and design contained more than I’d be likely to use myself. Why? Well, while I may make “similar” pieces in a “series,” I don’t go around making lots of multiples of the same design. So I rarely use lots of the same kind of bead.

But … I got to thinking, in workshops, my participants are encouraged to take my ideas, demonstrations, and samples as inspiration and then make something that adds their own special twist to it.

So … could I justify buying a collection of these in different designs and colors, and offer a workshop where I’d make these available as materials? Clearly, given the presence of these photos, the answer was, “Of course!”

Garden Delight Earrings is now on the schedule as one of the workshops I’ll offer in my studio at the Wilkins School Community Center soon after the fall series opens. This one will be on the evening of September 21. Though returning students are certainly welcome, this is one of the classes I’ve designed as a super-easy one for beginners. And because the silver elements themselves are likely to be relatively small, the materials fee for this one should also be very affordable!

Posted in Misc. Musings | Tagged: , , , , , , | Leave a Comment »

2 half-days, 6 people, 52 pieces …

Posted by C Scheftic on 2011/06/26

… and I forgot to take photos!

On Thursday, it was great to have several folks came over just to use my studio as a workspace. Then, on Friday, I taught a small semi-private introductory workshop.

And everyone was very productive, as you may be able to guess from the subject-line of this post.

The thing is, I had my camera with me, but everyone (including me, myself) kept me so busy that I only thought to take one quick snapshot, after everyone was pretty much done on Thursday, then not even that on Friday, neither the people nor their any of their many, lovely, silver pieces (lentil beads, domed pendants, foldover pendants, earring components, charms, and more!). But, since I had my camera with me, I stuck it in a little black case I have for it, and put that into my pocket as I headed off to the Summer Music Festival sponsored by community radio station WYEP in a local park that is tucked into a curious little space (called Schenley Plaza) between Carnegie Mellon University, the Carnegie Museums of Art and Natural History, the Carnegie Library, and the University of Pittsburgh. (The city actually tore out a parking lot a few years ago to install a public park area!)

With a series of bands playing, an array of vendors, and lots of general socializing, etc., I just didn’t think to take photos there either. But I did manage to lose the camera! Somehow it fell out of my pocket. I didn’t even realize that until well after the first big rainstorm of the evening. (The band playing a few minutes before that started had commented on everyone just sitting around in lawn chairs or on blankets as storm clouds gathered; but they seemed stunned as the downpour began and most people just stayed right where they were, popping open the umbrellas they had brought!) Anyway, on top of that, I only noticed that the camera had gone missing after sunset, after most of the park had gotten pretty dark.

We spanned out in different directions and, amazingly, my friend Lyn (thank you!!!) still managed to find that little black case with the camera inside, spotting it (in the near-dark) somehow underneath a folding chair (and thus relatively dry) about 20 people away from where we had camped out. (It must have fallen out of my pocket when I got up to wander over for some browsing in the crafts market along the east side of the venue: that’s the only time I headed off in that direction, and I was not sure of the exact path I had taken to get there.) Miraculous as that was, the camera did not acquire any additional photos while lying there in the dark. So I still have only words (and a few numbers) to use to illustrate all those events. But they were lots of fun!

Posted in Events, Photographing Jewelry, Studio, Teaching Metal Clay | Tagged: , , , | Leave a Comment »

LIttle Silver Boxes (sample #1)

Posted by C Scheftic on 2011/01/21

I’ve been playing around with box-shapes lately.

I keep thinking up very complex designs: what can I say, I simply love “puzzle boxes” of all sorts!

But, for silver boxes, at the moment, I’m trying to keep the designs fairly simple because what I’m really making right now are samples for a class I have coming up in my studio early in March (the afternoon of the 3rd or the 6th, as you prefer). [Update: And we’ve added another “section” for those of you south of the ‘burgh: I’ll repeat it again on Saturday, March 12 at Zelda’s down in Bridgeville!] And I really want these particular samples to be ones that even people trying metal clay for the very first time can easily make!

I hope to post several more next month, but I’ve got two ready to share now. The first one, shown here, has been sealed into a “closed” box shape so that it can be worn as a pendant. It’s about an inch across, a little under a quarter-inch deep, and weighs 11.1 grams. Both sides are finished, so it’s fully reversible. (You’ll see another one like that in my next post, which will show something extra-special about that one…) The ones that should appear here a bit later have lids that open.

And, once Spring is on its way, my plan is to have some samples of hinged boxes to show off too. Those are my ultimate goal, but I’m hoping that some of these will help pave (i.e., pay!) the way for those!

Posted in Teaching Metal Clay | Tagged: , , | Leave a Comment »

Thanks, Jan! Hi, Beth!

Posted by C Scheftic on 2010/10/26

My friend Jan came over today. (I’ve known Jan since we were in college together. After graduation, we both moved around a lot, and didn’t keep in close touch over those years. Then we both moved back to this area and reconnected through another classmate, Nancy, who’d stayed in the area.)

Jan has taken one class using “metal clay” techniques, but she’s done far more using “lost wax casting” techniques. She’s also done some wire-wrapping and brought some of her latest (lovely!) projects in that area for me to see.

We spent the day: climbing up and down ladders–hanging posters and prints and drapery rods and whatnot; crawling around on the floor cutting fabric to fit into the bookcase door panels; and moving furniture back and forth around all of that. We didn’t finish all the fabric-related tasks, but Susan is coming over on Thursday and I think we should be able to make good headway on the rest of those.

We had one visitor, Beth, who’d read about my upcoming classes in the WSCC newsletter. She’s taking a watercolor class now, and came up after that finished today: to see what metal clay feels like and what it looks like after it’s been fired to fine silver. She signed up for the pendant class (November 17). After that, Jan and I walked over to the Regent Square business district for a delightful lunch at the Square Cafe.

Posted in Studio, Teaching Metal Clay | Tagged: | Leave a Comment »

Some Spring Classes

Posted by C Scheftic on 2010/04/07

One great outcome of the Month of Earrings challenge was coming up with a selection of projects for a May class. Specifically, on Sunday 23 May, I’ll be back at KoolKat with an earrings class. Here’s a photo of some of the options that will be available to participants:

That should be a great intro for beginners, people who’ve been wondering about metal clay but haven’t yet taken the plunge. But I’m hoping that we’ll have a mix of beginners and those with some experience too: the projects are simple enough to leave time, not always available in other classes, to include a few basic “finishing” techniques too. In other words, something for everyone!

I’m also looking forward to several other great workshops coming up well before that:

Sunday, 18 April, Lentil Beads, at Beads2Wear in McMurray, PA
Samples for How Charming Two Saturdays, 1 May & 8 May, Basic Pendants and Charms, at Eastern Gateway Community College, in Steubenville, OH.
Two evenings, 11 & 12 May, Mosaics & Collages, at Zelda’s Bead Kit Company in Bridgeville, PA

All of those are suitable both for beginners and for those with some experience who are looking to add more techniques to their repertoire and delights to their jewelry or gift stashes.

Posted in Teaching Metal Clay | Tagged: , , , , | Leave a Comment »