Way More Photos of My Work
(on Picasa, which Google took over, and broke the links; I’m still trying to figure out how to link to the album collection there…)
Life tends to get crazy-busy this time of year, for multiple reasons, some of which I’m sure you can imagine and others would take too long to explain. So I’m just going to list a few events you may want to know about should you be interested in seeing some of my work in person:
November 30 – December 7: H*liday mART at Sweetwater Center for the Arts, Sewickley, PA
December 5-6-7: Holiday Gift Shop at the Wilkins School Community Center, Swissvale, PA
December 5-6-7: Open House in my Studio, to coincide with WSCC’s Holiday Gift Shop
December 13: Open House at the Hoyt Center for the Arts, New Castle, PA
December 13-14: Open House in my Studio, to coincide with an Art Studio tour in Regent Square (Swissvale, Pittsburgh, Edgewood, Wilkinsburg), PA
For other venues, please see the list of Ongoing locations down the right side of this blog.
If you find yourself missing any of those, no problem. Just get in touch with me: leave a comment on this post, or message me via Convergent Series page on Facebook (and, while you’re at it, a Like there would be very much appreciated…). We’ll find a way for you to explore my creations!
I’m not sure how much else I’ll manage to post this month. But I have new designs in the works, new workshop pieces I’m testing out plus, of course, new variations of ongoing favorites in both those categories … and lots more for 2015! I look forward to posting about all of those in the New Year, and I hope you’ll enjoy reading about them too.
In other words, this is merely a follow-up to my earlier “second report” on PMC Flex (which I thought I’d posted earlier but just noticed I had not…) I’ll use subsequent “numbers” on later projects.
I really am working on some other designs using PMC Flex, but must-do-now tasks keep interrupting my explorations, and then I get inspired to try something else, and I end up having lots in-the-works but not yet finished and ready for reporting. As usual! But my earlier post had stopped before I’d gotten through the entire process with even my first little pair of earring elements. They are now finished, so I’ll at least take the time to finish their documentation too.
Since I last wrote, somewhere I viewed a series of pages (annotated images, but I forget where, and even whether it was a slide show or a .pdf file or…) that contained another “introduction” to the PMC Flex product. But I’d started playing with the stuff even before that was available, so I’d been just sort of guessing as I went along … based on my prior experiences with diy-flex (where you add glycerin to various regular metal clays). That “intro” also talked about heating the clay at 300°F for some amount of time, not so you could sand it (as I’d mentioned in my last post) but in order to help it hold its shape during firing. OK, now, the do-it-for-sanding idea makes a little bit of sense to me (even though I long ago learned how to work with clay in a way that will greatly minimize (though not always eliminate) sanding) but that one baffles me even more. If it’s going to distort, I’d think it would do so at the binder-burnout and/or early-sintering stages; either way, if it’s going to need support to get through that part of the firing process, I just don’t see how having “hardened” it for room-temperature handling is going to make much if any difference. (Hmmm, maybe that file was taken down and that’s why I can’t find it again now when I want to reference it? Or, if you truly understand what I’m missing about all this “baking” please contact me to discuss it! Yes, there are a few instances where I can imagine it would help, and I’m trying to explore that a bit too. But I simply don’t see why it should, in general, be required….)
Anyway, long before I saw that, I’d already fired my first two little pieces by just placing the still-flexible greenware flat and unsupported on my kiln shelf.
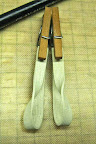
Now, to be honest, I had thought I might place them on some vermiculite in a little silica crucible I have. Except, I’d just taught a morning-only workshop where students made at total of 19 pieces (using PMC3 and PMC Plus that had been ordered well before the Flex was released). I had to get those pieces fired and returned to the participants. With this particular group I was not going to have a follow-up finishing session, where I could show them how to re-shape any that had “shifted” during firing. Though many were ones I could place flat on my kiln shelf, there were enough that had gentle curves I wanted to support, so I squeezed all of those into the vermiculite. Since I didn’t want to wait to fire my two little earring pieces, flat on the shelf they went too (as shown in the second photo with this post).
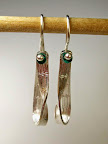
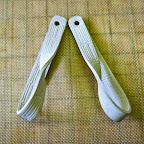
And I think they came out fine! I added a small glass bead to each for a touch of color, and hung them on ball-end sterling earwires. I’m calling the “Almost Möbius #1” (the number because, though I’m sure I’ll never make another pair exactly like this, I can imagine myself playing around some more with the Möbius-band idea).
I’ve got several other high-priority things going on right now, but I just can’t resist sneaking a few moments here and there to play with this new toy!
(Sorry that the photo-colors are all over the place because I’m just shooting on my work-table as I go, not stopping to move everything over to my photo-table. And the light at my work-table varies by time of day and by which of the overhead lights are or are not on at the moment. I work in a building that’s over 100 years old, and much of the wiring is very old too.)
Fresh from the pack, when I try to break off a piece of it, it gives way in the same (what to call it? stringy? gummy?) way that diy-flex (regular silver clay with some glycerin mixed in) does:
There’s nothing wrong with clay that does that! I just note it here, in case you’re wondering why this happened to your clay. It’s normal!
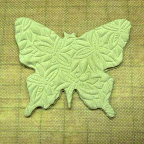
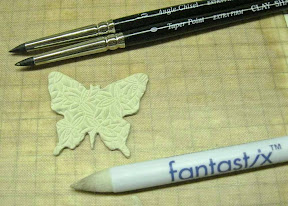
Right away, I decided to use a little “cherry blossom” texture (that I got ages ago at Cool Tools, but seems to have been discontinued…) and a butterfly-shaped pastry-cutter:
You can see (especially if you click on the image to enlarge it) that the edge of the cut is rather rough. Normally, I would smooth that out as much as possible while my clay was still wet; but I know that a lot of metal-clayers just leave it and sand the rough bits off later. I am just not into sanding clay if it can be avoided, so even when I find I’ve missed and left a rough edge behind, I still use a bit of water and various other tools to smooth out my clay. For this little test, then, I just left the edges as they were, to see how much I could smooth it once it had “dried” using my usual tools:
Pretty good!
My plan had been to cut a matching shape out of the interior of this butterfly, using a paper-punch I have. Except, it seems I had not marked that punch (for my own short-memory benefit) before I made this piece, and only at this stage did I realize it was one of my “thinner” ones … meaning this piece was one-card too thick to fit into the punch. Oh well, I’ll deal with cutting it, a different way, later on. For now, let’s just look at another little play-thing.
I had rolled out another little sheet, trimmed it down to a rectangle, and cut that in half. I left the pieces to air-dry overnight, and returned to find they were curving apart. I’ve seen a couple other early-testers mention curving, and having to press their clay down, but I’ve not seem that. The only curving I’ve seen has been like this, left to right:
Still, this is “flex” clay, so I never worry if it curves much in any direction. It’s simple enough to ease it back into shape:
The problem I ran into was with my next step which, of course, I did not stop to photograph. I had wanted to try something with this clay ever since seeing the little video that Mitsubishi had put out on YouTube about the product:
In it, they talk about how easy it is to let the clay “dry” and, since it remains flexible, you can still form it into a ring. Now, the one thing I’d always had trouble with, using the diy-flex clay, was when I wanted to join ends of “dried” flex-clay together. I found that to be far more difficult than with “wet’ clay. But I really didn’t want to invest the time in a ring first-time out. So I thought I’d just try making a couple little “Möbius bands” … where you take a strip, flip one end, and join them together. (With paper there’s tape to show the join. With clay, you get a true “Möbius” shape, where you can take a pencil, draw a line down the middle of the band, turning and drawing as you go, the whole way around, and end up where you start: there is no front or back, top or bottom of the strip. It’s all on the “same” side! If you’ve been following this blog for a while, you already know that I love to make reversible pieces. Continuous ones are even better!!!)
If you watch the video, you’ll see them make it look so easy! And I’m here to tell you their secrets: First of all, you can see the “cut” in the video stream where they left out a bit of the fussing needed to make it work (it IS possible, even with diy-flex clay) but, even more important, their band is perfectly smooth. That makes it much easier to get the join to work, because you can fuss and fill and sand it all smooth again. But I like textures, and I don’t like sanding. It’s not like it wasn’t going to work at all, but I soon realized (soon … after a twist, some water, some squidging together, some tape to hold it for a while, etc.) that it was not going to be quick and simple. I’ll work on that idea a bit more but, in the meantime, I moved on to test-plan-b for these strips.
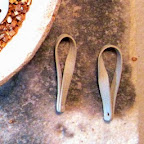
I let the newly-damp parts dry again. I trimmed off a tiny bit at the ends that had gotten smushed; I also trimmed the second piece to match. I then gave each piece a twist, folded the ends up so the tips aligned, added a drop of water, and clipped them together:
Now, I could have gotten that shape with non-flex clay. But I would have had to do everything while the clay was wet. Or, more accurately, while it was starting to dry out, which can sometimes be a problem for me (especially when trying to make two matching pieces) and is far more often an issue with students when it all starts to crack. So, in that sense, the PMC Flex does make this project now far easier to do in a beginner class.
And, doing it this way, I could still try using a paper punch!
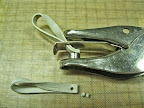
Not one of the fancy crafting punches, as I’d planned with the butterfly, but with a plain, small hole punch. Yeah, I could have drilled a little hole with a drill bit, but this turned out to be way more fun, once I’d gotten over the surprise!
With non-flex clay, I’d never have tried that. (I’d’ve just used a drill bit.) But, with flex, even though the piece slipped down into the punch-opening (gasp!), it was really easy to pry out–carefully–with no harm done! (I took the little “holes” I’d punched out and wrapped then with a bit of moist clay. I wrapped that in a piece of plastic, and put it back into the foil pouch. And by the next day, it had all rehydrated to the point that I could not find the little bits any more.)
The thing is, if you look at the piece lying along the bottom of the photo above, you’ll see that both it and its mate (though harder to see in the punch) have a very straight, sharp edge along what will be the top end when hung. I didn’t want that sharp edge with the rest of these curves. Had I planned to do this from the start, I would have smoothed all those corners while it was still wet. But now I had dried, attached, and punched clay, and I needed to soften its edge.
With non-flex clay, I’d either wet and smooth it (as I discussed earlier in this post) or I’d take out a bit of sandpaper and smooth it down (I may try to avoid sanding when I can; but I have no qualms about doing it in situations where it really is most appropriate…). With diy-flex clay, however, I always found that sanding was pretty difficult. Actually, the fact that I really enjoyed working with diy-flex is what first led me to figure out all sorts of sanding-alternatives! Once I started using them, I just let them spread over into my non-flexible greenware too, thus replacing much of the sanding I’d earlier been taught.
But the video and the package insert talk about how you can “dry the object by heating it to 300°F for 20 minutes.” Hmmm, I’d never even though to try that with diy-flex clay with glycerin in it. And, as of my writing this, I still haven’t … with neither diy-flex nor PMC Flex! I think those two references may have caused a little confusion via some “social media” posts, where people talk about “baking” their clay. Personally, I never saw any reason to “bake” it until you want to make it hard enough to sand. (Or, if you want to harden it in the process of building some complex 3-D structure, but I’ll get to that in some other post … much later on.)
For now, I just want to go on record as saying that you can sand PMC Flex gently in its flex state, without any “baking.” which is what I did here:
I didn’t change it a lot, but I did round out the corners as I’d wanted, while it is all still flexible.
That’s all I have time for tonight. I’ve also started on a woven-silver piece that I hope to report on next.
I’m teaching a fine-silver workshop this week (non-flex: had to have that clay on hand before the PMC Flex was actually shipping, but I’ll show of the Flex a bit since I have that first trial batch), and I will report on firing this clay once all the student pieces have been fired.
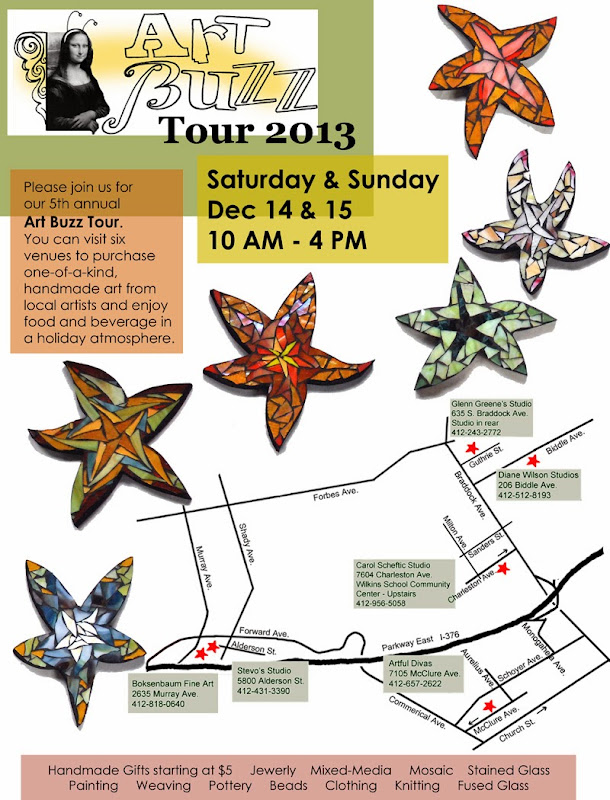
Have you heard the buzz? Six sites! All in the Pittsburgh area’s “East End” this weekend: Regent Square, Swissvale, and Squirrel Hill. And my studio is one of the locations on it again this year.
I’ve got lots of jewelry on offer, plus a handful of other small adornments.
I also have aloe vera plants that need a new home, babies that i repotted from some of the big ones I keep around. (I do work with hot metals here!) BONUS: small ones are free with a purchase of $35 or more (or a discount can be applied to the price of any of the larger ones if that’s what you prefer).
Plus you’re welcome to share some of my cookies and hot mulled cider. (I also got the makings for cranberry-orange frosties but, with all the snow that’s falling, I’ll save that until there’s a request or I run out of cider, whichever comes first.)
Have you heard the buzz? It’s even louder this year! Over forty artists! Seven sites! All in the Pittsburgh area’s “East End” this weekend. And my studio is one of the locations on it again this year.
At WSCC (where I’ll be), the Holiday Gift Shop will still be running downstairs, and I am pretty sure that Daviea Davis will have her glass mosaic studio open too, upstairs across the hall from mine.
If you’re in the area, I sure hope you can stop by. To say, “Hello” and “Happy Holidays” at least. If, for some reason, you can’t get yourself there in person, how about leaving a holiday greeting as a “comment” on this blog post. Even having you say just “Hello” or “Happy Holidays” would be much appreciated!
I look forward to seeing / hearing from you, dear readers, so I can extend my best wishes for this holiday season to you too, in return, in a more personal way.
It seems like I’ve been working forever on several mixed-metal pieces, but at last I have one for which I can write a little report.
This one contains my current-favorite three-metal mix: bronze (in the traditional yellow-bronze color, used here as the base), rose bronze (in the slightly more pink color, used here for the bail), and copper (a reddish-brown used, along with those two bronze formulas, in another of my reversible pieces, in the decorative designs on both sides).
Well, technically, all of the metals contain copper: bronze is made from copper and tin. Yellow bronze gets its color (and strength) from a very particular mix of the two; rose bronze shows by its color that it has a higher proportion of copper in its mix, while white bronze (not shown here) contains a higher proportion of tin (which gives it more of a “white metal” color that is lovely, but also makes it trickier to work with (both finicky to fire and potentially as fragile as glass in its final form) so I use (and write about) it much less often…).
The three “flower disks” overlays are, from top to bottom, made from rose bronze, then yellow bronze, and copper. The copper has begun to darken a bit, as copper will; I put the rose bronze disk as far away from it as I could–the rose one will likely darken more than the yellow bronze (which often ages to a greenish hue), but less than the copper. In the middle, the smooth surface of the yellow bronze flower seems to give a very slight hint of the copper in it, more so than does the sandpaper-texture backing of the same metal. The contrasts possible with these metals make exploring them a delightful experience.
Most of the time, anyway (which accounts for part of the delay between posts recently). The other side (photo below / left) has a brushed-satin finish. Here, the bronze base also keeps its yellow color (the reddish tint towards the bottom is just a reflection of the red shirt I was wearing as I took this photograph!), but I applied a bit of patina-solution that would accentuate the differences in copper-content among the metals in the design. The twist inlaid down the middle shows, from the top, rose bronze, copper, yellow bronze; then another twist of rose bronze, copper, yellow bronze; and ends with a tiny hint of rose bronze again. The challenge in hand-finishing this side was to get a smooth, even surface so the patina-solution would not “pool” on the bronze and appear as a smudge (or worse, the start of some rough corrosion) which took several (rather frustrating…) tries. But I kept at it, because the fun part was seeing how the copper stripes darkened just the same as an aged penny would do, while the rose bronze has a sort of dotted appearance featuring a range of hues in a slightly more yellow range.
Now, all I have left to do is to hang it! I plan to use a soft, supple, satin cord, and slip a simple larks-head loop through the bail. One question is whether to crimp metal findings on the cord’s end, and then add a jump ring and clasp, or to skip the findings and instead use a pair of sliding Chinese button knots (thus, making its length adjustable). I’ll answer that once I’ve decided which color of cord to use. (From different sources, some are harder to knot than others: O the tension between artistry and practicality!)
I bet you can understand why I call this piece Three Flowers with a Twist.
Have you heard the buzz? Eighteen artists! Seven sites! All in the Pittsburgh area’s “East End” this weekend. And my studio is one of the new locations added this year….
If you’re in the area, I sure hope you can stop by. To say, “Hello” and “Happy Holidays” at least. If, for some reason, you can’t get yourself there in person, how about saying “Hello” or “Happy Holidays” or something else even more interesting as a “comment” on this blog post.
I look forward to seeing / hearing from you, dear readers, so I can extend my best wishes for this holiday season to you too, in return, in a more personal way.
I sure do think that it’s loads of fun to wrap strips of clay into cylindrical shapes … and, then, fire them so they turn into sturdy but lovely metal tubes! Do you? Have you tried it? Would you like to come to a workshop and make a few?
One fairly easy thing—something even an absolute beginner can do—is to overlap the material as you twist it around. This gets you a shape I think of as a “lapped cylinder,” one that’s open at both ends. Depending on the texture / design you have chosen, the pattern can remain the same along the full length of the cylinder (upper tube in photo to the right), or it can vary noticeably as you turn it around (lower tube in upper photo at right).
You can hang one or more of these cylinders from some fancy ribbon and you’ll have your very own one-of-a-kind piece of art-jewelry! You can use ribbon just as it comes from its package, or you can use any of a range of braiding and/or beading techniques to make it fancier. It can be as quick and easy, or as elaborate, as you want it to be.
(Not shown in that photo is the way you can even use a matching tube as part of a toggle clasp! I’ll write about bracelets again in a little while, and show that then.)
An interesting variation on the cylinder involves capping one end and putting a small hole in that, just large enough for a piece of wire to pass through. Then, you can use a headpin (I often make my own!) to either: make a wrapped loop so you can hang the whole thing from an earwire (first photo to the left) or even use a headpin that’s long enough so you can bend it directly into a hand-made earwire (second photo, to the left). Though I illustrate only the second approach with additional beads here (I used crystal and glass), it’s possible to include them (or not) with either style, as you desire.
All of the cylinders described so far are possible outcomes for the workshop I offer periodically called Simply Stupendous Cylinders. Where did that idea come from? I wanted to find a way to offer a shorter, simpler version of a couple of my other favorite projects.
(1) Silver Spools involves another great project. It’s also appropriate for beginners, while those with prior metal clay experience will often have the chance to learn some new techniques. But the strategy used to construct spools just takes a bit longer to complete than does that for simple cylinders. Spools also use up some more material. So I like to offer the simpler version sometimes too, for those who want to try making some tubes but at a slightly lower cost.
(2) I also love making and teaching others to make “twistie” earrings (or pendants) like the ones shown to the left here. I like their twisted shape, and I especially like the way they can be made to spin on their handmade ear-wires. Surprisingly, however, they are much harder than they may look to make! The Do the Twist workshop where we make these is one of the few I teach involving silver metal clay that I do not recommend for absolute beginners….
Here’s why: The “open twist” shape of this construction is just incredibly fragile in the greenware shape. The end result is sturdy enough, but even the slightest “wrong” move as you do any finishing or cleaning prior to firing can cause a “twistie” to snap into pieces. Then you have to decide: stick them back together (and risk snapping it somewhere else in the process), smooth off the ends of the pieces and just end up with shorter twists (though that smoothing can also lead to more breakage), or rehydrate the clay and try again another day (since, though no clay is lost, it still takes time to get it workable again)? That’s just not a set of choices I want to foist on metal clay beginners! You need not be an expert to make these, but I do recommend waiting until you feel comfortable working with metal clay in both its moist (lump clay) and dried (greenware) states before you tackle this approach. And the cylinders-class is one great way to gain the relevant experience.
If you’re reading this note within about a month of when it was first posted, you can look over to the right sidebar to see when I’ll next be offering the relatively quick and easy Simply Stupendous Cylinders workshop in my studio (in “Regent Square” in western Pennsylvania, where Pittsburgh, Swissvale, Edgewood, and Wilkinsburg intersect…). If you’re interested, just let me know that you want to sign up for it.
If you’re reading this more than a month after it was first posted, you may not see it listed on my evolving workshop schedule. But, at any time, you are welcome to request any of my workshops (regular ones or something special), including the ones discussed here. I’m always happy to offer any of them (at my studio or even at your site) as long as I know there are folks interested in taking them!
Having done a simple cylinder (posted as #28), twisted cylinder (#29), and a simple twist (#27), it seemed fitting to finish up with a flourish based on a “twisted tube” theme.
Last summer, I’d made a series of “Twistie” earriengs, with a shape rather like that. They are fragile during construction: when I’d break a bit off of one, I’d then trim the other to match. And repeat that as necessary, sigh, until a few twisties ended up far shorter than I’d intended. I was also fiddling around with various ways to drill nice, even little holes to use in attaching them to earwires, without falling prey to distortion (working with wet clay) or even more breakage (once they’d dried). Though I liked the look, and they did sell rather well, I had been thinking I needed to take a different approach if I wanted to enjoy making them.
Looking at the final remaining pair, last fall, I realized: don’t drill a hole at all— build a special little tube, attach it vertically, and run the wire through that! The idea’s been sitting there for several months. This, its first full implementation, seemed a good way to end this month’s challenge.
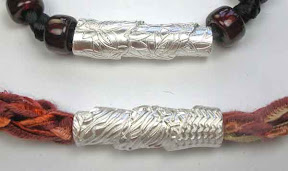
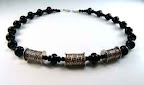
Here’s a triplet of fun spool-shaped beads that I made last November:
They are delightfully easy to make. They are a bit fragile when you have the dried looped parts, before you apply the ends, so you have to work carefully. And they take a bit of “elapsed” time while you wait for each end to dry, before you can fire them and end up with such fine silver pieces. But I hope you agree with me that they’re well-worth the effort!
Here’s what I’ve done with them:
Personally, I do love the patterns in the black beads, as well as the silver beads.
The necklace uses a simple commercial clasp. I guess if I’m going to make more of these spool-beads (and I do think I will!), then I’ll have to come up with a home-made clasp to accompany them.
Back to the design-board… Your suggestions are welcome!


") Artsmiths of Pittsburgh
Artsmiths of Pittsburgh") Hoyt Center for the Arts, New Castle, PA
Hoyt Center for the Arts, New Castle, PA") Portage Hill Gallery, Westfield, NY
Portage Hill Gallery, Westfield, NY") _Open Houses in my Studio
_Open Houses in my Studio _Or…contact me about hosting a private party!
 Life tends to get crazy-busy this time of year, for multiple reasons, some of which I’m sure you can imagine and others would take too long to explain. So I’m just going to list a few events you may want to know about should you be interested in seeing some of my work in person:
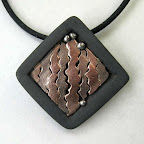 If you find yourself missing any of those, no problem. Just get in touch with me: leave a comment on this post, or message me via Convergent Series page on Facebook (and, while you’re at it, a Like there would be very much appreciated…). We’ll find a way for you to explore my creations!