

") Artsmiths of Pittsburgh
Artsmiths of Pittsburgh") Hoyt Center for the Arts, New Castle, PA
Hoyt Center for the Arts, New Castle, PA") Portage Hill Gallery, Westfield, NY
Portage Hill Gallery, Westfield, NY") _Open Houses in my Studio
_Open Houses in my Studio _Or…contact me about hosting a private party!
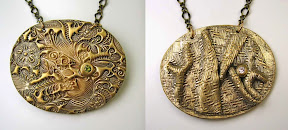
For reasons I’ll explain at the end, here are a few examples of pottery I’ve made over the past few years to use in some of my early experiments in adding silver metal clay decorations to them. Since I’m showing here my first experiments with various techniques, for those I chose to not risk my best pottery pieces and the decorations were deliberately kept very simple. But each of them does seem to have a little story to tell!
- I threw, bisqued, glazed, and fired these pieces. The same electric kiln was used for both firings. The relatively rough glaze was a deliberate choice … I then smushed some clay onto the surface and fired that with a creme brulee torch to sinter the silver. For my first-ever attempts at these, I was happy with these results.

- I threw several pieces, cutting ridges into their outside surfaces. After bisque-firing those (in a different electric kiln), I glazed the inside and smushed silver clay onto the outer ridges, then fired those (in a gas kiln). Most turned out wonderfully, and I’ve already sold all of those but the one shown here. Part of the back of this one did break off. (I used the same glaze inside this one as on the piece in item #3, below.) The fault could have come from either a flaw in the pottery (perhaps I’d cut a ridge a little too deeply?) or because I’d applied the metal clay a bit thicker there (and the shrinkage as the binder burned off and it sintered was too much for the pottery clay), or even from both of those combined… I haven’t yet gotten around to trying to distinguish among those possibilities.

- I threw, bisqued, glazed, and fired this piece. (Those firings were done in the same electric / gas pattern as #2, above.) Then I rolled out some “snakes” of a low-shrinkage silver metal clay and spread a tiny bit of overlay paste onto them (in the setting where I made this–not my own studio and I’d forgotten to take a tiny paintbrush for this step–that was far easier than applying paste to the pot). I pressed those onto the vase, and fired this piece yet a third time (and in yet a different electric kiln, a small one that another artist had for firing metal clay molds). The clay shrank: the upper snake held at the ends but cracked open at roughly 1/4 of the way from one end; the lower one held along its length but pulled up into itself leaving a little smudge of silver paste at the end and at a few places along its side. The little “splats” of silver must have been a bit of clay/paste from my fingers as I was sticking it all together. I didn’t notice those until after the firing, but I really like that accidental result. Now I want to figure out a way to reliably recreate those, especially like the one above and to the right of the top snake!

- I threw this piece and bisque-fired it (in an electric kiln). I applied glaze to the outside. I rolled several “snakes” of a low-shrinkage metal clay, wet them on the bottom, and applied them in a “spray” pattern to the unglazed inside bottom and edge. The piece was fired in a gas kiln. When removed, the silver looked sintered and the patterns were all still intact. The piece was immediately (i.e., still hot!) dropped into a newspaper-filled can, and covered. (Those who know the process will recognize that as a “raku” firing!)

This outcome was my biggest surprise! The gas kiln did not over-fire the silver, but the fire from the raku-process did then get the inside of the can hot enough to completely melt the silver! You may just be able to see some faint hints of where part of the pattern had been: tan spots where some of them were even show little trails of tiny silver balls. But most of it pulled up into two balls in the center! (Another small bit from the edge must have just fallen off in the raku-can and disappeared as it was emptied out. That’s experimentation!) I was able to get a number of pieces with ball-decorations to survive the raku process (similar look to both #1 and #2 above) and turn out beautifully, but I have yet to figure out how to approach, in raku, designs like those that later developed from the technique I first tried with #3. - While I’m sure that many readers with metal clay experience will have taken their clue from the size of the silver balls and snakes above, I will end with another little pot from that session. The pencil is there to give you a sense of scale for all these pieces! And if you look carefully, you should be able to see the small (3 mm) clear cubic zirconia I’d set into the wet clay. All the ones I made with those did survive all three firing steps (bisque and two-part raku).

While the previous items all show my very first attempt at each technique, this was my second try. The very first piece did have one very tiny crack just off to the side of the CZ, visible but with no obvious damage to the structure. That was probably due to my having used too-wet clay until I figured out that I could set CZs in stiffer clay. That bowl did have a great shape, and another artist really wanted to swap me some art-glass for it!
I’ve been playing around with miniature pottery, off and on, with and without such embellishments, for several years now. Though I have been offering my miniature pottery for sale at various shows, I haven’t taken the experimentation seriously enough to feel inclined to write much about it. (And I’m not teaching this, at least not yet, so I don’t have that inspiration for writing about it either…)
But I decided to post these examples after seeing some experimentation that Terry Kovalchik has been doing, and writing about, with painting silver clay paste onto pottery shards, and reading some of the reactions he’s gotten to that in the Metal Clay Now group on Facebook. (Metal Clay Now is a “closed” group, but readers of my blog who use Facebook are certainly welcome to ask to join it!)
While many of his results are superb (as usual!), Terry has reported some further breakage of the clay shards during the sintering process. But, like my #2 above, that could be from any or all of: a weak spot in the pottery (at initial construction or from whatever created the “shards”), the shrinkage of the silver clay (how thickly or how evenly it’s applied, exactly how it aligns with any weakness in the clay body), or any number of other little peculiarities. So I thought it was time for me to bring out a few of my explorations too, and maybe others will start to chime in with what they’ve tried and how it’s worked out for them.
If you are working with similar combinations, please leave a comment: I’d love to hear from you, see some of your results, and compare more notes!

 Also please notice (e.g., down the right side of my blog) that this session will be followed at NHAC by a simple, two-night introduction to making


