Convergent Series

learning, using & teaching metal clay, and other aspects of life

Archive for July, 2011

Thanks, Hadar!

Posted by C Scheftic on 2011/07/31

I am truly honored that Hadar Jacobson chose to include not just one but two of my pieces as examples of what can be done with the techniques she describes in her latest (fourth) book, Patterns of Color in Metal Clay.

She begins the volume with an Introduction, “How to Read This Book,” that opens with:

“The projects in this book have been written and re-written while I was teaching them over an entire year, at my studio and other places in the world.”

Our wonderful workshop in Pittsburgh in March 2011 (which I documented throughout much of April) was one of the last few “trial runs” of this material, and I am still soooo glad that I took it!

I had already devoured Hadar’s first three books pretty much on my own (though, for a few bits, I’d discussed those with a handful of guild-mates) and regularly followed her blog. I appreciated all those sources for both specific techniques and general inspiration. I think this book, on its own, is just as useful as are the earlier ones but, still, there is nothing like participating in a workshop for gaining additional insight from a talented artist-teacher and, when you’re really lucky, from your classmates too!

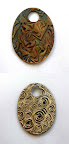
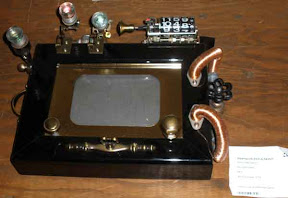
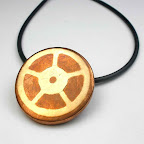
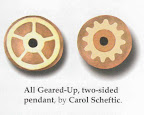
I did talk a bit about All Geared Up right after our workshop. Afterwards, I put up for sale everything from the workshop but this piece: this one I had determined I wanted to keep for myself as a memento. I’m especially thrilled that Hadar managed to show both sides of it, since one of the challenges I regularly set myself is to design pieces that are reversible.

That one appears early in this book, on page 7, along with the very first project. It’s an example of the “inlay” technique, which Hadar introduced in an earlier book (Mixed Metal Jewelry from Metal Clay). But she provided another description of that here, briefly, because it’s a component of many of the other techniques introduced in this book.

(Please note, however, that there is very little redundancy across Hadar’s books. In most cases, when she mentions some technique she’s already addressed, she just refers you to the earlier book. On one hand, that means for some specific projects you also need the earlier books to really follow everything but, on the other, it means that when you do buy later books you are not paying for information you already have…which I very much appreciate. I might guess that she made an exception with Inlay here, simply because she wanted to emphasize how crucial a skill it is to the success of so many subsequent techniques, more than to remind us that we can make lovely pieces using that alone as the earlier book had emphasized.)

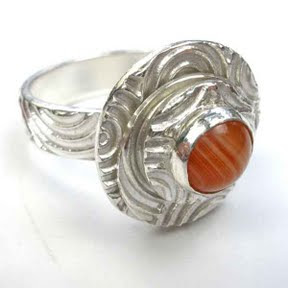
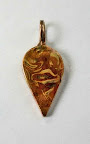
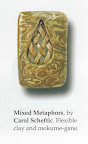
The second piece of mine that Hadar chose to include is the one I call Mixed Metaphors, which can be found on page 124. I have not mentioned it, specifically, before this, although I did slip in a different photo of it a few weeks ago when I said a bit about firing boxes. Though the other side is illustrated neither on my blog nor in Hadar’s book, this piece also is reversible. The other side has a simple matte-finish, softly-striped, textured-copper design with the same “droplet” opening to expose the weaving. And it now hangs from a hand-made copper wire-wrapped bail. (I sure hope you continue to be delighted with your purchase, Debby!)

It’s a later piece from the series I started (right after the workshop) that combined weaving (using what I call “flexible greenware,” from Hadar’s first book) with mokume-gane (from her then-upcoming / now-published fourth volume). That entire series posed a number of technical challenges (which I figure is one reason why I’m not yet seeing lots of other examples of that combination–and could be one reason this piece was included…). In many cases, but not all, you can easily combine various different clays in a single piece. What I was trying to do with these felt like it might have been approaching the limit a bit on what was likely to work well (at least in the ways I was then imagining). I’m still testing and tweaking some ideas about mixed-metals and weaving (in between trying to build inventory for fall and winter sales of tried-and-true approaches—hey, this girl has to make enough money somehow to pay for the experimenting that leads to new styles—and keeping up with Hadar’s other new announcements, such as a new version of her Pearl Gray Steel to add to the mix). When I have enough reliably-successful pieces, I’ll write some more about what works well, and what went not-so-well.

But please don’t hold your breath waiting for that. It’s on the to-do list, but I’ve a number of other ideas I hope you’ll find interesting that are competing with it for positions near enough the top of the list to actually have a chance of getting done! Conversely, if you are experimenting with similar approaches, please leave a comment … and a link if you have any photos and/or other commentary to share!

Posted in General Techniques | Tagged: | 1 Comment »

A tiny bit of progress…

Posted by C Scheftic on 2011/07/25

Spinner Ring with Red Lace Agate Cabochon.

OK, to be honest, I made this ring months ago. But the recent progress–finding a bit of time to do something, anything, with metal clay again–involved adding the red lace agate cabochon to it.

The original ring was one of my “experimental construction” trials. The silver part of the ring actually includes four stacked disks. The one on the very bottom (not visible in this photo) is there solely to hold onto the ring shank. The next one up (the largest one, visible in this shot) forms the base of the design. The third one (hanging sort of low in this photo) has a hole in the center (not visible here) that lets it spin around a hidden central post: some people might therefore call this a fidget-ring because there is something to fidget, or play, with. The fourth disk is solid, and serves to hold that third (spinner) disk in place.

The part of the construction that was experimental involved using the spinner disk at all: Figuring out how to stack everything so it would both hold together and allow just-enough movement. Now that I’m more sure about how that works, I have plans for additional pieces, ones where the spin-able disk is much larger and more elaborate.

In the meantime, I thought this first trial piece needed something … somewhere. Looking at a few 8 mm red lace agate cabs t’ohter day, it struck me that this one——with its ever so slightly curved banding——would go well with the texture on the silver here. [So I added a little dollop of very thick metal clay paste (laced with a bit of lavender oil) to the top, positioned a fine silver bezel cup on top of that, and fired it into place. (original sentence expanded to this on 7/28)] Then, of course, I had to re-polish everything. Finally, I was able to add the stone. I’m happy with the result and, even if it’s just a simple little change, it is something at last!

Posted in General Techniques | Tagged: , , | Leave a Comment »

Edible Flowers, once again!

Posted by C Scheftic on 2011/07/22

OK, I spoke too soon with my previous post: There was one other major event to consider!

Last night, once again, was the ever-wonderful, 11th annual, Edible Flowers Food Fest, sponsored by the Allegheny County (Pennsylvania) Parks Department and the Penn State Master Gardeners of Allegheny County.

The speaker’s topic this year was how to establish an Edible Flower Container Garden. While the plants discussed and demonstrated could be use in either large or small spaces, the use of a container garden is one way to encourage others to get started with growing flowers to use in meals themselves, not only as decorations on the table.

My own major edible-flower contribution was having spent several days last May collecting violet blossoms from my (somewhat disastrous but healthily organic) yard and freezing them into several flower-dense ice rings (for the serving bowls) plus hundreds upon hundreds of individual ice cubes (for the drink glasses). Luckily, my friend Susan agreed to take several bags of my ice cubes to store in her freezer until the day of the event, thus lessening the amount of space I had to devote to them in the interim.

I was also one of several dozen Master Gardeners who, in addition to contributing flowers and other edibles, helped to prepare the food on one or more of the four days in advance of the event, served the goodies, and helped to clean everything up afterwards. A long but rewarding week!

A special highlight of this year’s event was the release of Denise Scheiber’s lovely new book, Eat Your Roses … Pansies, Lavender, and 49 other Delicious Edible Flowers. (It’s published by St. Lynns Press in Pittsburgh, PA.)

Of course, we call it “Eat Your Roses” for short. Denise is a horticulturist and greenhouse manager with the Allegheny County Parks, and is the person who initiated and continues to organize “our” great Edible Flowers event into a delightful fund-raiser. If you know anything about the history of the Edible Flowers Food Fest (or, if you don’t but buy the book), you’ll know why Denise chose roses to lead her parade of edible flowers! In short, her Rose Petal Ice Cream (which led to the whole EFFF event) is superb!

Along with some basic information on which flowers are and are not edible, on gathering flowers and saving or preparing them for use, plus some basic sources and resources (including the central number for the Poison Control Center just in case someone doesn’t heed all the appropriate advice), the book has one basic page for each of the 52 edible flower types Denise has selected. She doesn’t provide detailed information on growing them (that information is available plenty of other places for any plants that interest you), but she does include a photo, some important aspects of each plant’s nature and general appeal, information on their sensory impact, and a number of suggested uses. All of those give great clues as to which ones are likely be of most interest to you. She also provides about 30 pages of detailed recipes, some with extra variations, to get you started with ways to incorporate edible flowers into your cooking. Once you’ve tried those, you can go on to experiment with adding them to your own favorite recipes. Bon appetit!

Posted in House & Home | Tagged: , | Leave a Comment »

Time to get back on track!

Posted by C Scheftic on 2011/07/14

Please pardon my slipping out of metal-clay / artistry mode for a moment to publicly offer here a lifetime of best wishes to the oldest grandson and his bride, who “got hitched” (their wording) late last week. It was raining as everyone arrived: but if you’re getting married in the Baltimore harbor, maybe you should just accept water as somehow a part of the event?! With lots of umbrella-toting escorts, everyone got into place safe and mostly dry. Thankfully, the skies began to clear as the ceremony began, and the sun emerged in full force as the couple exchanged the vows each of them had written. The sun’s return, of course, was taken as a good omen! (Oh, and, since I’m writing about you, my dear: Happy Birthday too!)

And now it’s time to get back to “work”! I had gone on a making-binge in the spring so I could get a number of pieces out for sale at various new or special venues. But then, in the last six weeks or so (as I’ve at least tried to catch up a bit with various reports I’d intended to write for this blog), all I’ve made are some pre-class samples and in-class demo pieces, plus a small handful of commissioned items. Sort of a feast-or-famine routine. What I’m hoping I can do over the next few months is to find a better balance: continue to teach workshops and make the items associated with that; try out some new pieces I’ve been thinking about, make more variations on my favorite designs, and get some of those out for sale right away; but also gradually build up inventory for the winter holiday sales season.

In preparation for more making, one of the things I did as soon as I got back from Maryland was to review in detail the sales statement that had arrived from Koolkat regarding the pieces of mine that had been their Gallery Booth at the Three Rivers Arts Festival last month. And I learned two major things.

[1] This I had suspected but (because I didn’t have to be there the whole time) had not been able to confirm until my statement arrived: the vast majority of my sales came during the first five days of the ten-day event. Now, partly, that is to be expected in any year: even if people stroll through the market a number of times for various events (e.g., the different concerts), when they see an item they like in a collection of one-of-a-kind pieces, many know it’s a get-it-while-you-can situation. So I’d bet that accounts for part of the early-days boom.

But this year I suspect there might have been another aspect to the huge drop-off in the second half: jewelry-saturation. I had been feeling particularly honored that Koolkat had asked if I wanted to be represented in their booth this year because I’d heard that the organizers of the festival had put a strict limit on the amount (%) and types of jewelry that that Koolkat could exhibit. What I had not realized until I got to the festival was how many individual booths in the Artists Market would feature jewelry as well. Mind you, jewelry has always been a part of Three Rivers: I love jewelry, and “art jewelry” in particular, so over the years (from long before I ever started making the stuff myself!) I have enjoyed a lot of “window shopping” as well as a good amount of actual buying of it at this festival (and others). This year, there did seem to be a good bit of it in the first half, but a nice mix, certainly not quite what I’d call an overwhelming amount. But, in the second half, the amount of jewelry was even higher: something like one in three booths featured it! As a visitor myself, I know that after I have looked at some number of booths with any particular kind of work, I just reach a point of overload and can’t process any more through my brain, no matter how interesting or unique the work of the remaining artists may be. (I love museums too but, for example, often reach my “limit” on a single visit there as well!) And I know I’m not alone in that. Oh well, at least I did fine in the first half!

[2] Luckily, the second thing I learned was really good news. In addition to having a few of my silver items go to new homes, I also sold a lot of pieces made from bronze and/or copper and/or steel: basic pendants, more complex necklaces, earrings, etc. As I’d been working on those this past spring, with the idea that I would “introduce” them at Three Rivers, I had been wondering if they’d turn out to be worth the effort I was putting into them. Apparently, the answer is “Yes!”

So, as I said above, now it’s time to get back into studio and try out some more ideas, and to do that across the whole range of metal clays. Well, at least I’ll do that once the plumbers have finished fixing a few problems I’ve had at home, and in between sessions with the rototiller as I attempt to move and expand my garden beds, plus whatever other surprises crop up as life goes on….

Posted in Events | Tagged: , , , , | Leave a Comment »

Foil-Firing Base-Metal Clays

Posted by C Scheftic on 2011/07/06

One question that seems to keep recurring (everywhere from individual conversations to the big, international Yahoo group on Metal Clay) involves what people use for firing their various copper, bronze, and / or steel clays, so I decided to write a bit about what I’ve been doing.

At first (~2008) I used the stainless steel “steam table” pans that were the original suggestion for this. The clays fired OK (i.e., the metals sintered), but the pans flake black crud. (I’ve seen hints that the technical term is that they “spall,” though I know that word with a slightly different connotation, so I’m not sure…) Anyway, it’s not a crisis, but cleaning it up is just one more little thing to tend to, and I’m seeking to simplify this process as much as possible.

Later on, a number of ideas for other, alternative firing vessels started to circulate. Some people fire in used metal cans (i.e., reusing the kind food comes in, which would mean having the inner plastic linings burn off as you fire them; and, while cheaper than the steam table pans, they still flake). Others suggested building vessels out of fiber blanket. Neither of those held much appeal for me: I never tried either one.

Last winter and spring, Hadar Jacobson blogged about several other options, such as building a frame out of kiln posts, drilling an opening into firebrick, and building a box from ceramic cloth and T-pins. I tried the first and third of those. The posts are easier to find, the cloth is easier to use, but neither quite fit my “simplify” goal. Hadar also talks about working with several options in the instruction manual she provides. (Aside: Her manual is useful even if you’re using other copper or bronze clays! You may have to adjust specifics of the firing schedules to fit other products, but Hadar does a great job of explaining in a simple way what’s going on, what you want to have happen, and what might be going wrong if you encounter problems.) In the past year, also, several manufacturers came out with a range of fiber or ceramic firing boxes, but at least the ones I investigated appeared somewhat high-priced to me. (Or, perhaps a better way to say it is that the ones I checked seemed high for my budget for this, so I just stopped hunting. If you have found any well-priced ones, do let me know!)

Right after Hadar was here late last winter (when I gained motivation to do more with these non-precious metal clays) I decided to try something Hadar had not discussed, and to invest in some No-Flake Firing Foil. (I got mine from CoolTools.) That’s what I’ve been using quite happily now for the last few months. It does take a little fiddling-with before the first time you use it–you do have to fold it into the box shape–and then you should fire some test pieces to verify the temperatures to use–which you should do with any new firing vessel you try (or new kiln, or new carbon, etc.). But after that, this kind of box is both very easy and much more affordable than most of the other options.

The first photo with this post shows a newly-contructed firing pan before its first use. The foil comes with instructions on how to fold this particular box, and there’s a video available on the product-page. From my (somewhat basic) knowledge of origami boxes, this does seem to be a pattern that yields a relatively large-volume basic box from a given amount of material, so I did not try to second-guess the instructions there. But I will note two things about the instructions….

(1) They provide finished dimensions for various sizes of foil one might start with, but there’s no reason to limit yourself to just those. Make a box of whatever size will fit the foil you have and the size of your kiln. (Be sure to leave room for air to circulate all around the box!) Try a few paper models first, if you don’t already have experience folding boxes, so you see how it works and get a sense for the size. But, here’s the trick: the instructions list only sizes for rectangular boxes because that’s what you want to build. Not a square!

Any rectangular box will have a sort of “flap” of material that gets folded over the short edges and part-way around the long ones. (You should be able to see it on the photos with this post.) A square one won’t have that flap. You want the flap for two reasons:

  • Those “flaps” seem to increase the stability of the box, and
  • You can fold up the corners of the flaps on one long side of the box to mark the “front”–something that’s useful when you’re putting a carbon-filled box into your kiln (and especially important with front-loaders, because you don’t want to position any pieces along the un(der)heated front edge).

(2) The instructions and video use the traditional origami trick of making two folds at the very start that you just open back up again. They simply mark the center of the sheet. If you can find and mark the center-lines yourself, you can start with that rather than those two folds. That’s why my “new” box (above) has black ink lines, rather than folds, down the center. Why does that matter?

Well, some people report that these boxes only hold up for a couple of firings. Mine have held up much longer. The one shown here has been through several dozen two-phase firings, has not been treated with any particular care, and seems to be holding up just fine.

When pressed for more information, those reporting early failures say that their boxes seem to fail along the folds. Not necessarily the center ones in particular, but along folds somewhere. Now my theory is that they are not failing after, say, two or three or four firings: I think they are beginning to fail with their very first use, but the problem only gets big enough to see after several more. If you put a hole in the foil while folding it, it will get bigger with each firing, through the heating (expansion) and cooling (contraction). So the trick is to not put holes in the foil to begin with!

Thus, I chose to not make those first two folds, which must then be reopened. You’ve got to mark the center line accurately or the box won’t come out with everything lined up right, and doing it via that fold is an easy way to mark it. So either be careful folding and unfolding those lines or, if you can find both centers another way, do that.

Then, proceed with the rest of the instructions. Crease smoothly, but not so harshly that you rip little holes in the edge. Unfold smoothly too, also with care.

And, then, enjoy the treasures that emerge after being fired in such a box…

Please leave a comment if you’ve found anything useful in this post! It’s great to hear from readers. (I can see from my “blog stats” that you are out there! But comments offer even more motivation to keep on writing these notes….)

UPDATE: This box lasted for seven more months of regular use! Since this topic keeps coming up, and I keep pointing folks to this post, I’ve decided to add a link to my follow-up post.

Posted in General Techniques, Technical Details | Tagged: , , , , , | 11 Comments »

Yes, but is it Art?

Posted by C Scheftic on 2011/07/03

I wrote a good bit about Art All Night between April 20 and 30 last year, so I’m not going to repeat all that background again.

The whole event was back in the same building as last year, the former Iron City Brewery. Whenever that site gets redeveloped (or, sad to contemplate, if it doesn’t and crumbles beyond safe usefulness) the organizers are going to be in a real bind. Art All Night has grown so so much over the years and become so popular, that it’s going to be a real challenge to find another site that is big enough to accommodate its increasing size, both in the number of entries and of visitors. (As I mentioned one or two posts back, the numbers for 2011 were 1,240 entries and over 12,000 visitors!)

In the meantime, though, it’s still an absolutely superb event! I’d been meaning to post at least a few comments and a handful of photos, but what pushed me to finally assemble a few at last (and to use the title I gave to this post) was the photo on a recent post by Alice over at her Ally’s Art blog. So … once you’ve checked that out … in no particular order (at least, not after the first one), here we go:

This photo I took specifically for John & Sally, ‘burghers-turned-Eugenians; they’ll know why (especially if they click on it to reach a slightly larger version):

I didn’t get a very clear photo (sigh!) of the annual “Etch-A-Sketch” portraits entry (my own entry last year had been hung next to them) but I think it’s clear enough to be obvious that the local “Icons” presented are the rather disparate Andy Warhol and Fred Rogers (who were not just from the same city–Pittsburgh–but actually from the same neighborhood … I lived between Andy’s mother (he’d already left for NY) and Fred (’twas a few blocks either way) while working on my MA degree, but I still thought that put a rather interesting spin on the whole “Won’t you be my neighbor” bit….):

I feel I must note that there was another Etch-A-Sketch entry this year, one that I found nicely amusing, the Steampunk Etch-A-Sketch:

For some reason, there was what might almost be called a plethora of entries this year that somehow included guitars. Why guitars? I have no clue! I was a fair bit of the way through the show before it hit me that I’d already seen quite a few, and then there were suddenly three grouped together. It’s like they simply ran out of places to hang them separately. I didn’t go back to photograph all of them; didn’t decide to start snapping from then on either. But when I got home, I realized that I had captured part of one early in the evening. I caught it as part of my quest to get (for myself, not to post here) a shot of each of the close to a dozen “jewelry” entries, but I’d guesstimate that there were at least twice that many, maybe three times, that included or involved a guitar!

A number of other entries featured “creative reuse” of various sorts, such as this “Skateboard Chair”…

… and the Googly Eyes keyboard (where I admit I’m not-so-sure about the clothespins) …

… as well as the window assembled out of bits of bottles:

I have to say that my snapshot of the photograph “Stink Bug on China” does not do justice to the original photo (nor can I imagine wanting to look at a brown marmorated stink bug magnified to anywhere near that extent more than once, and for just a moment at that). Still I did find the original photo to be stunning:

Ditto on all counts for this caterpillar….

And I note that the slightly more “abstract” quality of carved oak did help a bit to overcome the nature of the skunk cabbage portrayed in this piece:

Lest you think that all the entries were–what term might I use?–quirky, I guess I should say that there were lots of lovely entries too. I may not have taken as many photos of those, but the place was full of them. Here’s one really sweet example:

And the mix of geometer-and-gardener in me loved the design of this one:

While a number of the “Kid’s Art” entries were, perhaps, lovingly-displayed refrigerator-door pieces, it is worth noting that there were some superb entries from budding artists, such as this one by an 11.5-year old:

I was kind of glad that the Iron Butterfly bench was marked Not For Sale, because then there was no need for me to even wonder about the price (could I afford it, was it worth that much, etc.). This way, I can simply covet it via the photo, without any guilt at all over having passed it up:

But I’ve rambled on long enough for this post. To see more entries yourself, photographed by their artists, check out Art All Night All Year. It’s just another great feature offered by the volunteers who put on this wonderful event, and includes photos donated for the shows from 2008 through the present.

For now, then, I’ll close with a shot of the Thank You board. I’d like to extend my thanks also to all the volunteers, as well as all the groups listed here, who help make each Art All Night such a wonderful event.

Posted in Events | Leave a Comment »

Ahhh, memory is a funny thing….

Posted by C Scheftic on 2011/07/02

This note fills a spot from July 2 that had had some information about the Metal Clay Demos that Donna Penoyer and I offered at Art All Night this year.

I’d been feeling frustrated as I tried to write the follow-up, because I was sure I had started writing something about that part of the evening, and just could not find any notes nor the draft. Only after I’d posted a relatively brief summary did I notice that the reason I couldn’t find the draft is because that’s the one complete item I had already posted in early May about that event. So go back and read that one, if you missed it. The rest of my report from this year is here, in early July…

Sigh. It’s really been one of “those” weeks….

Posted in Uncategorized | 1 Comment »

Art All Night by the Numbers

Posted by C Scheftic on 2011/07/01

OK, here we go at last, with the first of a couple of posts discussing and displaying this year’s Art All Night event (two months ago! yikes!! time sure does fly when you’re having fun!!!).

First of all, my entry (shown) was Steering a New Course. At the Three Rivers Arts Festival (June 3 – 12) I officially “introduced” my new copper and bronze pieces (some of which included little hints of steel as well), and I also have a few of those available at Portage Hill Gallery up near Lake Chautauqua. But Steering a New Course is the first such combo-piece I ever made and the first one I put up for sale anywhere, as my entry in Art All Night for 2011. Thanks so much to Alice B for entering the “winning bid” on this pendant: I hope you remain happy with your purchase!

Now, for a few statistics (sorry, the old math-teacher in me just can’t resist…). All of these came from the “about” page on the Art All Night website (and some of the “missing” info just isn’t there: sorry!):

  • 1998 debut: 101 entries, approximately 200 visitors.
  • 1999 repeat: over 200 entries, over 1100 visitors.
  • 2000 had more record numbers including over 300 entries.
  • By 2005, there were 868 entries and over 7,000 visitors.
  • In 2007, only 850 entries but still over 7,500 visitors.

The first one that I attended was, I think, in 2002 (though I might be off by 1 year either way?). I know I was still living in California at the time, was just in “the ‘burgh” on a visit for some reason or other, saw a little blurb about it somewhere, decided to go check it out, and was immediately hooked! I attended every one I could after that (i.e., every one for which I was in town, something for which I then did try to plan!).

The first one in which I actively participated was 2008, after I had moved to Pittsburgh. I’m sure of that year, because it was the spring that Donna Penoyer, Jan Durkin, and I “launched” the Western PA Chapter of the PMC Guild. Our first meeting wasn’t until May of that year, but I offered demos on the Saturday night of Art All Night so more people could see what metal clay was. That was actually the first time I’d done demos of metal clay in a truly “public” venue … and I did it at an event that drew over 10,000 people: Talk about jumping off at the deep end! Every year since then, I’ve both entered a piece (as an individual artist) and offered live demos (which I’ve since been able to organize in collaboration with other members of our local Guild chapter), and encouraged more friends and acquaintances to attend. And continued to have a great time every year!

  • In 2011, there were 1,240 entries, 40 on-site artists (where I’m pretty sure that either an individual or a group counted as “1”), and over 12,000 visitors!

Tentatively, the dates for 2012 are April 28-29. Mark your calendar: I sure hope to see you there!

Posted in Events | Tagged: , , | Leave a Comment »