I’ll get over it. There’s no major crisis. But I haven’t been able to work in my studio for several weeks now. I don’t do “this” full-time, far from it in fact, but I’m kind of frustrated, now feeling like I’m starting the year far behind schedule!
I knew the building where I rent my studio was going to be “closed” over the holidays, with a lot of painting going on. In theory, that was a good thing. A number of the rooms (not mine) had had some damage from a roof leak. The leak had been fixed last year and the damaged parts patched, but things still looked a bit worn. So they were taking advantage of the holiday-lull to paint ceilings and walls.
And, as a tenant, I have keys and can get in the building even if it’s closed to public events. So, in theory, I could have gone in then. I did stop in briefly a few times, in fact, only to have confirmed my fears that a mid-winter paint job with all the windows sealed shut would mean an atmosphere full of unpleasant fumes. Maybe not as bad as they might have been a few decades ago, but still not ones I wanted to breathe for extended work-sessions. Besides, it was “the holidays,” so I just planned to spend a week celebrating with a range of friends.
Except … the notice about when the painting would be completed was incorrect. Though the painting of “public” rooms finished on December 31, as I’d planned for, there were four more days of painting to be done in the “rented” rooms that had also suffered the leak-damage. With a closed building, that meant probably five more days of fumes. Five more days of avoiding the studio.
Now, the rooms do look lovely! No longer are those spaces all a bland, institutional cream; now their walls sport a range of khaki, yellow, green, and blue colors. Aside from my bit of personal frustration, I must say the place is looking much better. (While I remain glad that I did not suffer ceiling bits falling into my metal clay projects back when the leaks were happening, the down-side there is that it did make my room ineligible for new paint in this round….) Still, though I’d “lost” a few more days, at that point I remained OK.
But … that wasn’t the end of it! I don’t know just what happened, but there was some plumbing issue downstairs that meant no water and limited electricity for a few days. That got resolved. But, then there was a water main break just as the “polar vortex” was approaching: water rushing down the lovely old cobblestone road created a thick, wide stream of icy, deep, freezing slush that basically blocked access to the building. That did get fixed before the depths of the arctic blast reached us, but I knew my room’s lovely-but-leaky windows (the only “original” ones remaining in the building) would leave the room unpleasantly cold. So I decided to wait another day before going back.
 Today. Only to find that the furnace that heats my room had gone out. There are, I think, ten separate heating units in the building. All but one are working. But the one that’s out is my main heat source. And, yes, I did think about firing up a kiln. But a unit intended to heat less than 1 cubic foot is not going to have much impact on my 7000 cu ft room (350 sq ft footprint with 20′ ceiling!).
I have an electric space heater that I turned on, which brought the temps up from low-40s to mid-50s. But that’s as far as that little unit can take it. (I do have another space heater at home I could bring over, but I also know that the room’s old circuitry won’t handle it. The heater that is working is plugged into the new line that was installed so I could run any one of kiln or space heater or air conditioning unit.)
Furnace-guy has been called, and is scheduled to check it out tomorrow (Thursday) afternoon. If we’re into a situation where obtaining parts is an issue, the back-up plan is that I’ll move what I need into a room across the hall. It’s a nice space in many ways but the lighting in that room is entirely different from what I have in my studio. And moving and settling in will take up time too. So I’m hoping the furnace-fix is an easy one.
And I know it will all get resolved. I’ll get back to work. It’s just that I’d just been soooo looking forward to finishing some catch-up tasks before deadlines started heating up again. And, poof!, day-after-day, that fantasy has now evaporated. I’m just not feeling as resilient as I wish I could manage right now…. So using my computer (which, of course, is in the cold studio) I post this, quickly for the moment, with very cold fingers, and apologize that I’ve not yet managed to update the information down the right side here, nor the Classes page on my website. It’s coming…
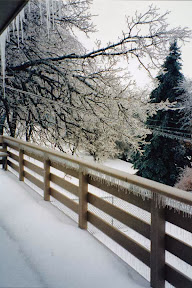
(The photo with this post shows the back deck of my house one year when I lived in Minnesota. It was taken five days after a frozen-rainstorm in January, 1996, that was followed, on February 2 of that year, by record-setting cold temperatures (-60° F in northern parts of the state, merely in the -50s where I lived). I really am trying to regain a sense of perspective here!)


") Artsmiths of Pittsburgh
Artsmiths of Pittsburgh") Hoyt Center for the Arts, New Castle, PA
Hoyt Center for the Arts, New Castle, PA") Portage Hill Gallery, Westfield, NY
Portage Hill Gallery, Westfield, NY") _Open Houses in my Studio
_Open Houses in my Studio _Or…contact me about hosting a private party!
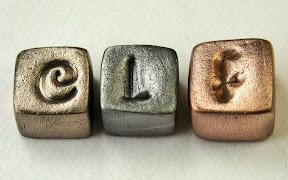 Here’s a photo showing a few more little bits from my first trial firing of Hadar’s One-Fire Trio. Though I didn’t start out by making them as perfectly-similar as would be required for a scientific comparison, I did roll and cut them to the same size. So, in order, from the most shrinkage to the least are: Champagne Bronze (C), Low Shrinkage Steel XT (L), and Friendly Copper (F).