Convergent Series

learning, using & teaching metal clay, and other aspects of life

Archive for September, 2011

It’s been a while, hasn’t it?

Posted by C Scheftic on 2011/09/29

I just realized it’s been almost two weeks since I posted anything. Sigh… I realized that around the same time it hit me that it’s been just under a month since I last fired up my kiln. Yikes! Where has the time gone?!

It’s not that I’ve been completely slacking off, mind you. It’s more that I do not see this whole art-jewelry adventure as a “full time job” (and do not ever want to see it that way … by which I mean that, no matter how many or how few hours I work at it, I don’t want to ever let it even approach a feeling of drudgery!). So sometimes I decide to take things a little bit easier, to take time to just enjoy what I’m doing. In addition to the things I have posted about in recent weeks, I’ve attended market-shows, visited museums and galleries, and so on.

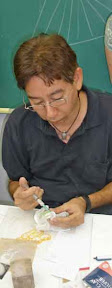
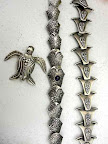
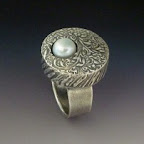
Mid-month, I held an Open House in my studio, where I did make a number of pieces just to demonstrate the process for visitors. Because those were done to illustrate one or more points about working with metal clay (rather than from some specific design I had in mind), I then just smushed most of them back up afterwards so I could use the clay in a more deliberate manner later on. I did finish and keep a few but, feeling no pressure to complete them immediately, I just set them on my to-be-fired tray for when I had more of a kiln load. I guess I could have taken photos and written about any or all of those activities, but I decided to simply enjoy doing all those things, without thinking about using them here. Same thing with most of the other activities I’ve been involved with recently, like events with the Master Gardeners (as well as with my own garden), spending time with friends visiting from out of town, etc.

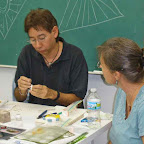
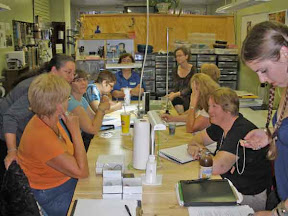
We did have a meeting of the Western PA Chapter of the PMC Guild. That was on Tuesday, out at the Four Directions Jewelry Studio that chapter-member Barbara Kaczor recently opened out in Springdale, PA. The photo shows some of the folks in attendance that evening. (That’s Barbara on the left, standing up and leaning over between Alice and Michelle.) The group had not had a formal meeting in a while, so it was great to get together with everyone again, see what all they’ve been up to, and share inspiration and discoveries. As always, we started out with a Show & Tell session (which included metal clay pieces and traditional metalsmithing, but also reports of surgeries, weddings, and travels… we’re pretty flexible about what gets included!). We dealt with some “business issues” and had some refreshments (for which, thanks to new-participant Susie, I was not the only one who brought a dish containing edible flowers!). We finished up with a lively discussion of making your own textures using the “tear-away technique.”

Since that ran late, and Alice lives a lengthy drive away, she stayed over at my place. We went back to my studio the next morning, right after breakfast. Alice sat down at one table and began designing a bracelet she wants to make, and I spent a bit of time getting studio back in order for working. (It had been in Open House configuration.) I just sat down to start working when Alice got a text from her husband, asking if she’d be back in time to go out for dinner with “the Holders.” Problem is, she couldn’t think of anyone named Holder! After several more text messages, the situation was clearer: the “Holders” is what his phone thought he meant when he tried to type in “the golfers” — meaning the people that he was out with for the day! Once she finished her design, in its preliminary state at least, she decided that it was too complex to finish in one afternoon, so she’d be better off heading home. She said her farewells, and I got back to serious work.

I spent the afternoon and evening making several “trial” pieces out of Hadar Jacobson’s relatively new “Rose Bronze” clay! Though I’ve enjoyed working with many of her other products, that was my first-ever use of the rose bronze. Those pieces are in the kiln now: noting their firing in my log book is what showed me how long it had been since the last time I’d fired it up.

I don’t like to sit right in the room as binders are burning away, but neither do I feel comfortable just leaving the building as the kiln fires. So I took my laptop over to another room in the building that houses my studio, and started this post.

These pieces are only going to get their first-phase firing tonight; when they’re done, I’ll take them out of the kiln. They can cool down on their own, but too much carbon will burn up if I just leave them in the kiln. (That extra fiddling, and multi-phase firings, are among the reasons that creating with the base metal clays seems more labor-intensive than do the precious metals!) It may be a couple days before I find time to fire the second phase. I’ll post results, good or bad, once I see what I’ve gotten and done some post-fire finishing on them. Please wish us good luck!

Posted in Guild, Misc. Musings | Tagged: , , , | Leave a Comment »

Yet Another Ring.

Posted by C Scheftic on 2011/09/17

To understand what I mean when I say (as I did in my last post) that, relatively speaking, I don’t make a lot of rings, you probably need to know how many other pieces I make. I don’t have that number handy, but it’s a lot.

What I do have, however, is another example of a ring I recently made for myself. A few weeks ago, I wrote about one that I said was a practice piece, and that I had plans for additional pieces. Here is one of its successors:

I built it from components, using a design that required multiple firings. The flower was built atop a slightly squared-off band: because the top is heavy, that shape helps to hold it upright on my finger when worn.

The stone was set in a fine-silver bezel. I fired that combo in place as part of the last step (unusual for me: I tend to set stones post-firing), so I had to use one that could handle the heat of the kiln. I chose a lab-created ruby cabochon.

But the main treat, for me, is that all three of the flower-petal layers spin! Do you like, as I do, jewelry that you can play with? (I do try to be discreet about when I do that, but there are moments when it’s just so much fun…!)

Posted in General Techniques | Tagged: , , | Leave a Comment »

Making My Ring Come Out the Size I Wanted.

Posted by C Scheftic on 2011/09/16

Given how many pieces of various sorts I have made out of the different metal clays over the years, relatively speaking I have not made many rings. What’s the difference? I do make rings for myself; I will teach others how to make them; I may give the occasional one as a gift; but, at this point at least, I rarely make rings to sell.

Sizing is an issue for any ring-maker. Since metal clays shrink as they sinter into a more-solid metal form, however, size is a detail that really matters when making rings. (This is one reason why I would never use a mix of clays for a basic band ring. If I can’t be sure of the shrinkage, I may have to spend more time post-fire in resizing it. Using “fresh” clay is a simple way to reduce the chance of that! That’s also why I held off posting this item until I could write the two entries that preceded it this month….)

When I do make rings, I often start by making a flat piece that will become my ring’s band, firing that, then shaping, sizing, and adjusting the resulting piece of metal as needed, all before adding the top and re-firing. While that method does require two firings, there are several very simple ways to test and adjust the ring band before proceeding. The already-fired band won’t shrink any more, so I can be pretty sure what size the ring will come out to be before I start on its decorative top.

The recent class I took at the Valley Art Center with Gordon Uyehara, however, used a different technique. We formed the clay around a ring mandrel, let that dry, then added the top, and fired everything at once. It’s a hold-your-breath situation waiting for the rings to come out of the kiln, to see what size you end up with. Yes, there are methods for adjusting size, if necessary, to make rings larger (relatively easy with a simple band) or smaller (can be trickier, depending on the ring, and does require yet another firing, whether in kiln or via soldering). Personally, I find it more thrilling to have the ring go into the kiln and come back out the right size in the first place, but I was happy to venture down the other route for that one day.

Also, while I’ve used both PMC and Art Clay for rings with the double-fire method, I’ve only used PMC-brand clays for band-rings made the way we did at that workshop. (Why? Because I’ve only done them that way in workshops, specifically, in ones where the clay was included in the class price.) For Gordon’s Pearl Box Ring class, however, we could bring whatever clay we wanted. Since he works mostly with Art Clay, that’s what I took. If I had questions about working with it on the ring, I could get help from someone with lots of experience using it. Here’s what happened with sizing (sorry, but rings require simple math):


  • My goal was a size 8 ring. Anything from 7.75 to 8.25 would be OK. A little smaller would be tolerable. But 8.5 would be bigger than I wanted, and I did not want to have to do anything to reduce the size afterwards.

  • Gordon reported that Art Clay says to make a ring 2 sizes larger, to account for shrinkage.

    • Thus I should make it a 10, so it’d shrink to an 8.


  • But, he added, since you’re covering your ring mandrel with a teflon strip or another easy-release surface, you should figure that adds about a half-size. Position it 1.5 sizes beyond your goal.

    • If I made it on the mandrel mark of 9.5 then, with wrap, that would give me the 10 that would shrink to an 8.


  • With rings, I always try to “work-harden” them a bit after they’ve been fired. The “99.9% pure” fine silver of regular metal clay comes out of the kiln annealed (i.e., soft). Fine silver will always be softer than sterling or Argentium silver (and even those are not necessarily the strongest choices for rings). But any form of silver will harden up, at least to some extent, if you “work” it for a while: hit it (gently…) between two hard surfaces (e.g., a between a hammer or mallet and ring mandrel or a steel bench block), to “re-align” the silver crystal structure. But, in my experience, that hitting tends to increase the ring size at least a little. (If a ring comes out to small, that’s one of the easiest ways to size it up as needed!) In the end, I chose to position mine only 1 size larger, and use the work-hardening, along with a little reshaping, to get it back up where I wanted.

    • I built it on the mandrel at 9. I had some moderately heavy teflon wrapped around it so, per Gordon’s logic, I guess that took it up just a tad above 9.5.


  • It came out just a tad above 7.5.


    • Once I finished hardening and reshaping the band, it ended up right at 8, maybe a hair over that. Perfect!


Why did I reshape the band to no longer be the perfect round I had out of the kiln? (The round band is shown in the first photo with this post, above. The slight change should be just visible in the second photo above.) Because I find that round rings with heavy tops tend to topple over on my finger. The thing that really controls the ring size you wear is rarely the space where you’re wearing it! In most cases, it’s the knuckle the ring must pass over to reach that spot. (And the extra size of the knuckle often helps to keep the ring from just falling off the finger.)

With an oval band shape, you can make it a bit smaller than you think you need, turn the ring sideways to put it on, then straighten it back up to wear. Or, with a squarer band, the sides of the band and the sides of your finger are fairly well matched up, so the ring sits in place as intended.

(If I’d made this in my studio, rather than in a class, I’d’ve taken the extra time to add a few embellishments to the top. In the workshop, we didn’t have that much extra time, and I wanted to wear mine home. But, at least, I got the “fronds” to sort of sprout from the space where I set the pearl, so I’m OK with it as it is.)

What’s your favorite “tip” for making metal clay rings, using whatever method you prefer?

Posted in General Techniques, Learning Metal Clay | Tagged: , , , , | Leave a Comment »

Silver Metal Clay “leftovers” — Mixing & Matching

Posted by C Scheftic on 2011/09/12

In my last post, I described some little elements I’ll make at the end of a session when I have only a little bit of clay left over. But there are times (I’m sure you have these too!) when I’ll be at the end of a session and just not have much time left to fiddle with the leftover bits. In that case, if what’s left is just a small amount, I may mix it in with some other opened clay. The important thing is to remember to mark what I’ve done: that is, if I’ve mixed, say, PMC3 with PMC+, or PMC+ with Art Clay Low Fire, then I make a note of that.

Why is the note important? Well, in those examples, it’s because PMC3 and PMC+ have different minimum firing requirements, while PMC+ and Art Clay Low Fire have both that and different shrinkage rates. Each clay has its own specific characteristics but, at one point or another, I think I’ve mixed up leftover bits of just about every possible combination of silver clays!

Yes, there are a few exceptions: Leftover sheet or paper clays don’t mix in well, but they are essentially “dry” elements that I just stash for later use as-is. Art Clay’s Oil Paste is a special formulation with a specific purpose–as a bond between pure metal pieces (not clays)–so it shouldn’t be mixed in with other products. PMC Pro contains copper, and should not be mixed with the fine silver varieties. But I have no qualms about mixing together with abandon the various fine lump clays, regular paste, and unusable dribbles from syringe-clay.

Also, though I try to minimize the amount of sanding that I do on dried clay, there are still times when doing that really is necessary. I save up any “silver dust” as I go and then, at the end of my session, I spritz the whole thing with a little bit of water, knead everything together well (whether it’s just all “dust” or a mix of dust and lump clay), and let it sit to finish rehydrating until the next time I sit down to work. Easy! And economical!

And, yes, I’ve mixed clay-dust of one sort with moist-clay of another. Same thing if I work on a piece, let it dry, decide it has some major issue that I just don’t want to deal with. I do try to mix it back in with some other clay of the same kind but, if I don’t have any of that handy and open when I want to recycle it, I’ll mix it with what I do have. Makes life simpler!

[Aside: I hear about other artists who suddenly go on a binge and “reclaim” huge amounts of dried clay at once. I can’t imagine letting clay just sit around in the quantities I’ve heard reported (many, many ounces). Any clay I have on hand gets used up as quickly as I can find the time to get to it!!!]

The main tricks that I see are:

  • I really want to knead any mix well, to be sure both the silver particles and the binders from the different clays are thoroughly distributed (I find that my experience with making both pie crusts and bread has paid off here);
  • I have to fire according to the “strictest” clay in the mix (though, with fine silver, I usually just fire everything at 1650°F for two hours anyway); and
  • I have to remember the effect of mixing on shrinkage: if the two clays have different shrinkage rates, then the mix will shrink a sort of in-between amount (and, how close to one end or the other of the range between the two will depend on how much of each kind is in the mix).

Because of the last factor, I do take a bit of care with how I use mixed-clays. They are just fine for simple, stand-alone pieces. The round one in the photo shown with this post (which is domed, textured on both sides, with added embellishments on the concave (hidden here) side) could well have been made with a clay mix. For the oval one (which was made from two ovals, each textured on only one side, dried, re-moistened on their plain sides and “squidged” together, then embellished a little bit more), I deliberately chose a “pure” clay, fresh from the pack. I could have used a “mixed” clay for the individual pieces but, in that case I’d want to be sure I had enough so I could use the exact same clay for all the elements. Otherwise, I’d risk having one layer shrink more than the other, thus distorting the shape. With clay straight from the pack, I can be sure I can have enough that’s all the same. An alternative, which I have done but can’t find a photo of just now, is to build a little bit of distortion into your design, and use elements made from clays with different shrinkage to achieve that effect. That’s your choice!

If you are wondering how all this applies to “base metal” clays (such as copper, bronze, steel), for now I’ll just say that there are possibilities but it’s not quite as simple. I’ll probably write about that eventually, but I’ve got a lot of other things higher on my to-do list, so that may not happen for a while…. I my next post, however, I will mention the one and only time I never use a batch of silver mixed-clay, myself, even if I’m sure I have enough to complete the project. (Your choice, of course, may differ.)

Posted in General Techniques | Tagged: , , , | Leave a Comment »

Silver Metal Clay “leftovers” — Components

Posted by C Scheftic on 2011/09/12

The first metal clay I ever heard about was Art Clay Silver (from Aida Chemical Industries) but the first one I ever got my hands on to try was PMC (from Mitsubishi Industries). Over the years, I’ve made pieces from both brands and, in fact, just about every product available in both lines.

There are things I like more and less about each one, though I’m not planning to go into details of the (mostly relatively minor) differences right now. For the moment at least, I will say simply that, when I’m starting a new project, I pick whichever clay seems most appropriate to me at the moment.

But when you work with metal clay, and you’re rolling and trimming, taking a little bit off here and adding some more there, you generally want to have some extra clay on hand. And what is one to do with that when the project at hand is complete?! You can just mist and knead it to be sure it’s still in a workable state, seal it away appropriately, and use it in your next project. But, there are other possibilities to consider! The ones I’ll discuss in this post are useful in many situations, but they are my absolute favorites when I think it may be a while before I will find time to work with my clay again.

If I have just a little bit of that clay left over, often I will take a moment to form what’s left into some little element that I can use in another piece later on (e.g., bail elements, toggle bars, washer- or loop-shapes, some little decoration which could be anything from a few tiny flower petals or a butterfly body to even just a few small balls, etc.). Or I may use it to add a new embellishment to a piece that’s sitting there in the dried (“greenware”) state, waiting for some final element in its design before I consider it complete.

Magic Carpet (striped frame side)Other times I may mix in some glycerin, which prevents it from ever really drying out. That means it will remain flexible in its near-dry “greenware” state, which allows me to weave, twist, and knot it in that state. (Information on how to do this is contained in Hadar Jacobson’s first book, The Handbook of Metal Clay: Textures and Forms. This does seem to work better with PMC+ or PMC3 than any of the others from PMC or from Art Clay.) I’ll then shape it into a long rope or roll it into a little textured sheet—sort of like making my own metal clay “paper” except that mine is now textured! Once the rope or sheet has “dried” I can work with those pieces without smushing their texture or leaving fingerprints everywhere!

Will all of the above approaches, you can see that I let these new elements dry, and then set them aside for later use. I like that approach for several reasons: it is very convenient later on to have this little stash of pieces from which I can just pick one up and use it to complete a piece, and silver metal clay keeps just fine in this “greenware” state (unlike lump clay, which needs to be kept both moist and protected from mold, neither of which are problems with “dry” clay). I do try to keep track of which elements were made from which clay, of course, so that I know what are their firing temperature limitations or shrinkage rates. I’ll talk a bit more about those in my next post.

Posted in General Techniques | Tagged: , , , | Leave a Comment »

How I Spent Last Weekend.

Posted by C Scheftic on 2011/09/04

With a bit of island-themed whimsy, in honor of the workshops led by Gordon Uyehara at the Valley Art Center in Chagrin Falls, OH, last weekend, I open this post with a photo of the “Cosmic Honu” turtle pendant made last Saturday by one of my local guild-friends, Michelle Glaeser (who is also the developer of rose gold clay), checking out the “Pearl Box” ring that I made on the Sunday. As I’d mentioned in my last post, not everyone who went had been able to stay for all the events, but Michelle and I met at my studio for an hour or so a few days later to talk about the different workshops each of us had taken.

There are several ways to approach the making of a ring using metal clay, and this class from Gordon uses the method I practice the least myself. So, why did I take this class? First of all, I wanted to push myself to practice this method. Even though I don’t find it particularly easy, if you look at book and magazine articles plus a range of on-line posts, it appears to be the one most commonly used by metal clay artists. (I don’t know how many are just starting from the same point they first learned and extending that for their project, or if they have tried others and simply prefer this one. It is the first method I learned too, but I later figured out, read about, and otherwise explored others that I find easier (not necessarily quicker, just easier) and have, myself, mostly expanded on those. I guess I’d better think about making, and writing about, some of those this winter….) In the meantime, rather than struggle on my own to master this technique, I figured I’d take it (again) from someone reported to have many happy customers (both product buyers and workshop students), and maybe I’d be able to pick up a few tips I’d missed. Besides, there can actually be two ring-bands in this particular design: one that goes around the finger and another that goes around the decorative top. So, this offered double the practice all in one day!

[Several asides: I wasn’t the only one with questions either. At left, you can see Gordon doing a little demonstration for Carole B from Columbus. It was fun to meet her in person at last! We’d emailed each other for months, first over organizing workshops in separate cities when our three groups brought in Hadar Jacobson, which I wrote about early last April, and then there was more mail setting up this combined effort with Gordon last week.]

The finished samples Gordon brought, one of which was shown in my last post, all had the pearl set into a flat-topped, circular box, with the pearl off from the center of the box but positioned centrally in line along the finger when worn. He also discussed, had unfired versions of, and constructed during demos, some other styles: different box shapes, different top-shapes, various wall heights, with the pearl positioned in different ways (e.g., centered or offset relative to the top or to the textured design). At the right, in a snapshot that shows eight of the sixteen pieces that participants made (one kiln-load), you can get a clue about their choices: I can see oval, oblong, and triangular as well as circular, and having flat, curved, or fully-domed tops.

Those who know my work, especially those who take my classes, know that I love various curved shapes: domes, waves, loops, and more. And that, although I often use some fairly “subtle” textures, I do tend to put textures just about everywhere: fronts and backs (making pieces reversible), inside little openings (whether visible in public or a little secret about the space known only to the wearer), and so on. Also, having gotten some of my design sense through working within the math world as a geometer, I know how to find centers and figure angles and such. So one funny thing about this ring, for me, is that I made it with:

  • a flat top;
  • a simple satin-finish on both the wall-sides and finger-ring;
  • the pearl at some almost-random off-center, not-aligned position; and
  • the whole box deliberately set ever-so-slightly off-center on the band (both left-to-right and front-to-back) because it just seemed while I was assembling it as though it would sit nicely that way (too far off might want to topple, but a tiny bit off just felt better to me).

But another, even-funnier thing is that, without us ever discussing any of this during the session (because we were so busy working away on our own projects), both Alice (another local guild-friend, and my traveling companion for the weekend) and I made almost identical choices all along the way! (And this is not her typical style either, which usually has lots of curls and swirls.) We had brought different textures to use, and hers (left) was one that comes out a tiny bit deeper than mine (right). Other than that, however, I don’t think we could have made more-matching rings if we’d tried! We had a good laugh when we each saw what the other had done….

Posted in Guild, Learning Metal Clay | Tagged: , , , , | Leave a Comment »

Where I Spent Last Weekend.

Posted by C Scheftic on 2011/09/03

Three Metal Clay guild groups–in Pittsburgh / Western Pennsylvania, Cleveland / NorthEast Ohio, and Columbus Ohio–got together (with the help of a small grant from the PMC Guild) to sponsor four days of workshops, held at the Valley Art Center in Chagrin Falls, OH, over the last full weekend in August this year. (Sorry, but I don’t have links for websites of those Ohio groups. If anyone reading this can provide them, I’ll be happy to add the links here! In the meantime, if you’re trying to find either one, you might try checking the guilds listing at Metal Clay Today.)

One of the features involved a series of workshops by Hawaii-based metal clay artist, Gordon K. Uyehara:

  • “Fabulous Bail Link Bracelet” (two days: Thursday and Friday);
  • “Cosmic Honu” (stencilled turtle) pendant (Saturday); and
  • “Pearl Box Ring” (Sunday).

All the photos with this post show Gordon’s delightful pieces, samples for the various workshops. Two bracelets, above. One turtle is with the bracelets, and a second one is visible on Gordon himself during one of his demos in the ring class. (Click to see a larger version of either of those snapshots, which I took.) And, shown further down this post is one of Gordon’s own photos of an example of his ring project. (Beyond those, if you’re not already familiar with his work, do check his website to get a better clue of his style and range. I remain in awe of the work I know goes into making most of his pieces.)

There were a number of other sessions too, for which I have no photos (sigh…). The other major hands-on workshop, led by Ohio-based artist Catherine Davies Paetz, covered making a series of carved, seamless rings (stackable, if you wanted to wear them that way) using PMC Pro. Other scheduled sessions involved topics like design, photography, and flexshaft maintenance. And there was a big pot-luck dinner on Saturday night.

Now, it just so happens that all this got scheduled over days when I had tons of stuff already going on. And, in fact, I wasn’t the only one! So, while a few people stayed for the entire four days, there were lots of others who did their best to find an opening somewhere in their schedule when they could participate in at least some part of the weekend. Though that posed a bit of a challenge (would all the costs be covered by the registration fees that had been set?!) in another way it was OK: because there were a few openings, it was possible to accommodate requests from others to join the fun, which ended up including folks from Colorado, Maryland, Florida (and those are just the ones I caught; there may have been others).

So, on Saturday I drove up to Franklin, PA, to meet with Alice Walkowski, and we headed over to Chagrin Falls together. On my way to Alice’s, however, I hit a major traffic jam. I knew there was construction and, based on previous trips through that area, I’d factored in a 40 minute delay; online sites I checked en route then told me it would set me back 45 minutes; there is an alternate route, but it normally takes 45-50 minutes longer than the other route and due to lots of traffic lights, so I figured I’d risk the interstate construction for an easy drive the rest of the way. Wrong decision! In reality, that single three-mile stretch added well over two hours to my trip!!!

But we still managed to arrive in Chagrin Falls just in time to make a quick stop at the delightful Village Herb Shop. I wanted to get there because it’s a great source for edible flowers (which you should know by now that I love to cook with). But I mention it here specifically because they also carry the lavender oil that many metal clay artists use in joining pieces of metal! In fact, they carry both the essential oil (alone) and a tincture (with alcohol), in several sizes. I already have a bottle of that, but this time I picked up some organic edible flowers, both in the Village Herb Shop’s special mix (where I may have gotten the last jar of this season!), and some separate, individual varieties (including some delightful little button roses whose petals can go into my next few batches of rose petal ice cream!) Alice is not quite the edible flower fan that I am but, while I shopped, she explored the yarn shop upstairs and the garden outside. So we were both happy with that stop.

After we were done there, we headed over to meet up with all the various guild members for that delicious pot-luck dinner. We spent the night in a near-by hotel, and were thus able to arrive promptly for a 9 am start for Gordon’s “Box Ring with Pearl” workshop. More about that in my next post.

Posted in Guild, Learning Metal Clay | Tagged: , , , , , , , , | Leave a Comment »