Convergent Series

learning, using & teaching metal clay, and other aspects of life

Posts Tagged ‘rings’

Trying Hadar’s White Satin

Posted by C Scheftic on 2014/02/19

Another new clay means another trial making rings!

Though I love rings–both wearing them myself and admiring those on others, in shops, at galleries–and I love making small adornments using metal clays, in general rings are not my favorite things to make. I’ll leave the reasons for that for another post specifically about rings. Why? Because today I want to talk about rings made from another “new” clay! Now that I’m familiar with a number of different types of metal clay, one of the things I often do to try to get myself comfortable with a new one is to make myself some rings out of it–to test what it’s like to work with–and then wear them everywhere–to test how they hold up. And my first question about an iron-bronze formula in particular was whether it would hold up as well as I might expect under all the stresses I put on rings.

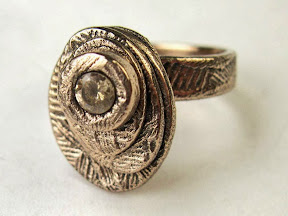
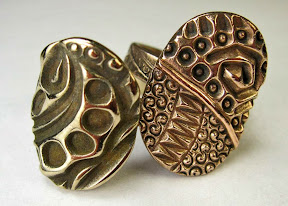
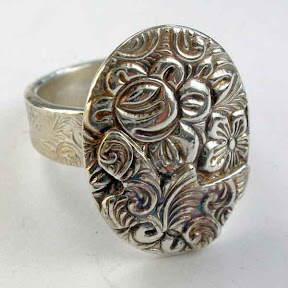
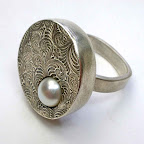
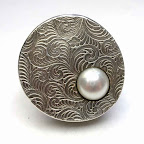
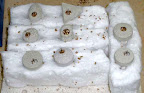
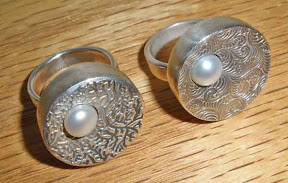
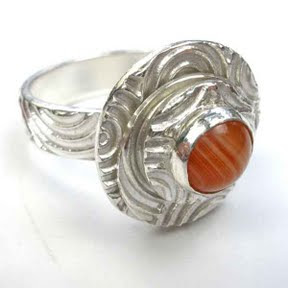
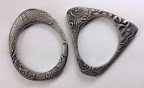
So one of the first things I made when I got my hands on a (pre-release!) tube of Hadar’s new White Satin was to try making a couple of rings. I wasn’t going to be able to make them my favorite way (with iron in it, I was not going to count on being able to fire the shank first and then form it around a mandrel–a method that pretty much guarantees it will come out a perfect fit–and I was too eager to try it to first make a little test strip to see if/how I could manipulate it, though if will try that eventually…). And I didn’t want to make a ring using the “common” metal clay way, shaping a band in the clay-state (with lots of potential shrinkage-issues during firing). So my first White Satin rings were a pair of seamless stackers with each one textured on one side (using the “eastern paisley” design from Cool Tools) and plain on the other side.

My plan was to make them two different shapes, and wear them with the “plain” sides together. And, no, they didn’t warp during firing: I made the openings oval on purpose!

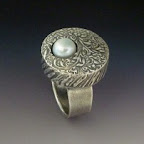
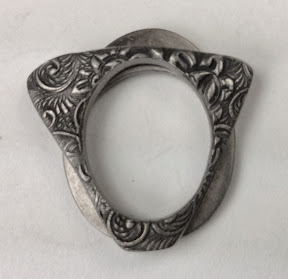
I usually make my rings either oval (as shown here) or square-ish (a rounded-corners trapezoid). The latter is easy with metal I can whack around something like the finger-shape mandrel from Rio Grande. Since I wasn’t yet ready to try that with White Satin, I just cut the clay itself with an oval opening. Hadar said rings would shrink about 3 sizes, so I used that for my beginning estimate.

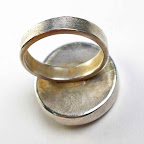
Though, since I was making my rings oval, I did cut the opening a tad smaller than that. What I really did was to fit a narrow strip of metal inside a ring sizer at the +3 size, but then trim it a tad smaller. I then shaped that into an oval, and used that to cut my clay. The reason for down-sizing a tad is that, to put on an oval ring, I turn it sideways until it’s passed over my knuckles, but then turn it back up to wear. The “twist” allows the larger-direction opening (still at the +3 size) to fit over the larger-dimension part of my finger. But when it gets twisted back again, the straighter side (now smaller and narrower) holds each ring upright better, so I don’t have to keep straightening them.

The rings shown here were fired and then polished. And they did come out fitting the finger for which I was trying to make them! Since they contain iron, which will rust, they were sprayed with an acrylic protectant. Since they are rings, I have no clue how long that protection may or may not last. That’s what I’m now trying to test! I’ve been wearing them off and on for almost two weeks (more on than off, but nowhere near constantly) before taking these snapshots. They seem to be holding up fine in the short term. It’ll just take more time to see how they do over a longer stretch.

In the meantime, I am very happy with the results so far, and I hope you appreciate this early-report.

~~~~~

Update: This post originally referred to White Satin as a form of steel. I have since decided that it is more appropriately described as a form of iron-bronze, and have edited the post to reflect that. (Bronze is an alloy of copper and tin. Different proportions yield metals of a different color. Rose bronze, for example, has more copper than does the typical yellow-bronze. White bronze has more tin. which produces a nice color when used as an accent, but results in a metal that is too “fragile” to be used as a major structural component. Hadar’s White Satin is a bronze formula that contains some iron too, which produces a black-metal that can be polished to a white-metal color but has the strength more like that of a typical bronze….)

Posted in General Techniques, Learning Metal Clay, Technical Details | Tagged: , , , , | 6 Comments »

I Made It Onto “Hadar’s List”!!!

Posted by C Scheftic on 2014/02/14

It has been one long, fun, hard, exciting, challenging year, with lots I’ve learned and still more I’ve been inspired to explore further, but I’m now a “graduate” of the Hadar’s Clay™ Teachers’ Accreditation Program.

As I write this, there are about two dozen of us around the world. Maybe a dozen or so more should be added in the next month. There’s a second group that should finish before the end of the year. I feel truly honored to have had the opportunity to spend the past year working with such an amazing and wonderful group of artists and explorers.

I look forward to the adventures we’ll continue to have together, and to continuing to share them with my students and with all my other readers here. Check for links to my workshops down the right side of this blog. My first four-part series based on this program will run in my studio during April and May of this year. (I’m still teaching silver too, and have four individual classes set up for that in March.) Do let me know if you’re interested in either the silver classes or the base metals series … or both!

Posted in Hadar's Teachers, Learning Metal Clay, Teaching Metal Clay | Tagged: , , , , , , , | 2 Comments »

Another Quick Peek—Another New Ring

Posted by C Scheftic on 2014/02/08

Here’s another Champagne Bronze ring, this one topped by (hey, I just couldn’t resist it) a Champagne CZ. This one took a little while to tell me what it wanted to be….

It incorporates several of the other bits I said I’d try to write about another time in an earlier mention of shrinkage. The strip that I bent into this band didn’t shrink anywhere near as much as I’d expected, which caused me to re-think how I’d assemble it. The oval pieces on the top shrank about as much as I was expecting in length by width but, as far as I can tell, they shrank not at all in height. And that height matters in the re-design of this ring too: I’d thought I might make it so that they could spin (like the petals in my fine silver flower ring with ruby), but their thickness made that difficult. Yeah, I know ways around that, but this was just a supposedly-quick little trial piece, so I tried something else, to confirm how well they’d fuse in place. That did work out well and, again, I like the color (even though it still looks a bit more like sparking rose´ than champagne to me, though not quite as much as the first one I tried).

I can of course make a bronze spinner later, when I can find time to do more accurate calculations on the shrinkage and actually plan it out. For now, I’ll just wear this one as-is, and quite happily, as a test of how rings made this way with this new product will hold up. Which is probably all for the good anyway, as I’d’ve treated a spinner as a special-occasion ring, when having another nice Champagne Bronze ring for everyday wear is far more practical.

Posted in General Techniques, Learning Metal Clay | Tagged: , , , , | 2 Comments »

Quick Comparison of Two Bronzes

Posted by C Scheftic on 2014/02/05

Have you been wondering why, so far, all my posts about Hadar’s new One Fire Trio have mentioned shrinkage? Every single metal clay piece of any sort will shrink during processing: as you let it dry (i.e., as the water evaporates), burn off the binder and, finally, sinter it. During each of those steps, things contract a bit. Exactly how much varies by product and technique, but it still happens. For many items, this either isn’t an issue (so what if a lentil bead comes out a tad smaller) or it can even be an advantage (for sculptural pieces, being able to work a bit bigger and have details end up magically smaller can be a real treat).

But, for rings, where the band-size really does matter, then shrinkage matters. A lot. Which is why several of my recent posts have noted shrinkage among the various One Fire Trio products in particular.

Even though I’m still puzzling over that, I have to tell you that there is one feature of Hadar’s new Champagne Bronze powdered metal clay product that I just love: with Champagne Bronze, I can bend ring shanks around a mandrel!

Years ago, working with fine silver, I figured out a way to make rings that I love (and that I later found out that some, but apparently not a high proportion of, others use and love too), a way that removes most of the shrinkage concerns. I make the strip that will become the band first. And fire it as a strip, so it shrinks. Then, I bend the fired-strip into the ring shape that I want, fiddle and adjust and tweak it so that it’s exactly what I want. I add any top-decoration to that, and refire the whole thing. The bit on top will shrink a bit, but if my estimate of that is off a fraction of a millimeter, it’s rarely noticeable. But the already-fired band should (if it was fired properly the first time) come out the same size it went in. To be sure, that approach does not work for every possible ring design but, for the ones where it does— Voila!—there are simply NO sizing issues.

That was a real advantage when I made the spinning-flower ring with ruby, shown first above. When I ventured into Hadar’s Smart Bronze (another one-fire clay), I was advised against trying to bend that, so I had to use the “traditional metal clay” methods with it. Though I like the two rings (second photo) that I made with it, neither ended up sized quite the way I’d wanted. They’re for me, so I just wear them on different fingers than I’d planned; the only problem with that shift is that I can’t wear them in combination with some other rings the way I’d wanted. (I don’t wear rings when I work, but I love wearing lots of them when I’m out and about.)

What I’m reporting today, however, is that my first Champagne Bronze ring fits beautifully. I include a photo of it, below, paired with one from my first attempts with Smart Bronze. The difference in the size and shape of the decorative top was intentional (i.e., I’m not trying to illustrate shrinkage this time); the image does, however, give you a good hint as to the difference in the color of the two products. (Next to Smart Bronze, this does look a bit pink. Next to Copper, or even Rose Bronze, this looks to be much more of a yellow-bronze tint. I’ll try to post a few more comparisons, using some other pieces, but it may take me a while. There’s lots to do right now, too much to justify all the time I’ve spent with Champagne Bronze and Friendly Copper. But, me, I just felt I had to try to complete at least one such ring! So … more when I get caught up elsewhere.)

Posted in General Techniques, Learning Metal Clay | Tagged: , , , , | 2 Comments »

How long did it take you to learn how to do this?

Posted by C Scheftic on 2013/05/30

So far, I have not made many pieces out of steel. I have used bit of steel as small accents, but only a few times as the main element in my work.

But, over the last few weeks, a number of us who work with and teach about Hadar’s Clays have been doing some explorations with the “Low Shrinkage Steel XT” product. Shown is a photo of a dozen pieces, which are about half of the ones I made during this exercise. While most of them turned out pretty much as I would have expected, there were a few surprises that I’m still trying to understand. I will likely have to make a few more pieces like the surprise-ones (when I find some more time to just explore), to see if the pattern repeats or if the surprises were nothing more than the occasional surprise.

Specifically, we’ve been looking at shrinkage. All metal clays shrink from when you first shape a piece in that medium to when it ends up as fully-sintered metal. Different products shrink different amounts. Some shrink more as they dry (go from wet clay to what we call greenware); others shrink more as they are fired (as the binder burns out and the atoms sinter (arrange themselves into a regular metal structure)).

Even working with just one product, different pieces will shrink different amounts in different directions. This leads to some interesting results, such as the fact that rings (usually) shrink smaller (though how much depends on the size and shape of the ring), the clay around cracks (usually) shrinks away from the opening (thus making it look larger after it’s been fired), and holes (usually) remain about the same size (depending on how big and what shape they are in relation to the clay around them).

With my background in mathematics and statistics, I tend to think of shrinkage as a “degrees of freedom” issue: if a clay wants to shrink a certain percentage and, for some reason, it can’t shrink that much in one direction, it compensates by shrinking more in the direction where it has more freedom to shrink. Except, it’s nowhere near as exact as that might make it sound…. It may vary from one time to the next. It may also vary from one artist to the next.

Why? Is it the amount of water in the clay? The humidity in the air? The altitude at which you work? The attitude with which you work? Phase of the moon? I could go on, but I think you get the idea: some variations are fairly clear while, for others, your guess is as good as mine! (Feel free to suggest additional ideas in the comments: I could use both solid suggestions and a few good laughs!)

But I write all this simply because I wanted to take a moment to say how much I enjoy exploring this entire “powder metallurgy” process: trying slight variations that go increasingly farther away from an original starting point just to see what happens. That is, in relation to the question in the title of this post (which I’ve been asked more times than I care to count) my answer is this: I hope to continue to learn as long as possible. I want to keep adding more information to my store of knowledge but, at the same time, I hope I’m never done learning!

Posted in General Techniques, Learning Metal Clay | Tagged: , , , , , | Leave a Comment »

Some Thoughts on Finishing: Strength!

Posted by C Scheftic on 2012/10/08

One more comment, now that I’ve started down this route. And then I really have to get back to other things….

I have heard people say that they tumble their pieces to work-harden them. Personally, I don’t believe it works quite like that. And it’s not just a theory; it is based on at least one example (well, one series of examples) from my own personal experience.

When I got my first rotary tumbler (the one with the smelly barrel that I hated, which I mentioned two posts back), part of the reason I did so was because I’d heard people talking about work-hardening via tumbling. And I’d seen how mixed stainless steel shot did appear to bang on pieces as they tumbled, so it seemed to make sense. Since I’d started playing around with making rings, I wanted them to be as strong as possible.

Especially because I wanted to make a few adjustable / by-pass / wrap-around rings: the kind that do not have what I think of as the “extra strength of internal connectedness.” (If there is some official technical term for that, I’d appreciate learning what it is! What I’m referring to is how much harder it is to bend the band of a continuous ring, compared to that of an adjustable one.)

And, yes, I do understand that fine silver will never “work harden” to the extent that sterling silver will. (But it does get harder with working than it is after being annealed, and heat anneals it, and firing uses heat, and hammering will un-anneal it even if it does not get it quite as “hard” as work-hardened sterling.)

So there I was, working with fine silver metal clay, and I was willing to make thicker bands to help compensate for its softness; I simply wanted my rings to be as strong as I could make them. And I’m here to tell you that, in teaching myself to make them, I found out that tumbling does NOT yield full strength. If you think it does, you are wrong! I’m not saying it has no effect in that regard: tumbling is better than doing nothing. Yes, in the past few posts I’ve said that the shot does bang on pieces as they’re tumbled, but perhaps I should have used the word peck instead. Thousands, even millions, of little pecks does not equal a handful of good hammered whacks! Those pecks do appear to add a little bit of strength [later clarification: but just to the surface, not the whole way through the piece] which may be enough for earring elements that are not going to take much of a beating while worn. I have not found it to yield the strength needed for things that will get knocked around, such as rings, bracelets, cuff links, etc.

I know that some people will tell you that tumbling is adequate. But you can verify my statements by doing something very much like what I did: Just make yourself a pair of wrap-around rings. (They are the easiest project to use for this test. If you don’t know how to make them, there are sample projects online. Here is a very simple one that is actually pretty good, except for the line that then suggests tumbling to work harden the final results, sigh.) Your two rings need not be identical in design. (I’d suggest making them at least slightly different so you can clearly tell them apart!) But, for this test to be meaningful, they should be very close in size and thickness. Fire them to the maximum (2 hours at 1650 degrees Fahrenheit). You can curve them in the moist clay state and dry them in that shape, but it’s probably better if you fire them flat and carefully curve them after firing: bending a fired-flat piece into shape can be another very useful step in the work-hardening process! (I’d guess that’s the reason Nettie’s project, linked above, has you do that.) But if you are more comfortable shaping them in the moist-clay state, that’s OK; just make both of them the same way so that doesn’t add an extra “effect” to your test.

After your rings have been fired, you should shape or adjust them, as needed, to get a good fit. Tumble one for as long as you think is necessary. Then, take a hammer and a bench block and really work-harden the other one. Or, if you prefer, you can tumble both and then just hammer-harden one of them. (If you don’t know how to do that, either find a local metalsmith who can teach you, or let me know and I can make some suggestions. You really have to know what work hardening means for this test to be valid; but as you keep working on the piece, you should figure it out!)

Finally, with your bare hands, try to open or twist each of them. If you work hardened one correctly, you will feel the difference immediately!

(Full disclosure here: it did take me several tries to really grasp how to do this. At first, I was way too gentle with my attempts to hammer-harden my by-pass rings. But I kept thinking that they were just too soft: no way I’d sell them like that, I didn’t even want to risk wearing them myself. But I also wanted to keep the lovely metal-clay-style texture on my rings. So it took some experimenting with different hammers and mallets, steel blocks with and without some protection (e.g., a bit of leather), and more, even including some consulting with a local metalsmith (and author, Jan Loney) before I really grasped all this. A well-hardened ring will still be “adjustable” but it will become noticeably, ummm, harder to do so.)

For that matter, if you want to take this experiment to the next level, make one pair out of fine silver metal clay and a second pair out of the sterling form, fire each pair as recommended for its type, and do the same test with each pair. The kind of knowledge you can get from such an experiment will go a long way to building your understanding of the metals involved.

And you’ll get a nice collection of rings in the process: to wear yourself, to give as special gifts, or even to sell to help recover the cost of the clay used in this learning episode! (Be sure that any test-rings you pass on to others have really been work-hardened as much as possible…)

Happy claying to all!
-cs

p.s. I learned that lesson early on in my explorations with metal clay, when only the fine silver clays were available, though I did play around with annealing and hardening bits of both copper and sterling silver to get a feel for what was going on. All those results had such a physical feel to them, ones I had no idea how to capture in a photo so I did not even try. But I will close with a photo of a more recent ring; it’s about a year and a half old now. This one does have a connected, continuous band but, because all the flower-petal layers spin around the post holding the ruby, it still posed some particularly interesting challenges in my quest to find effective ways to work harden each and every the element of all my creations….

Posted in General Techniques | Tagged: , , , , , , | 2 Comments »

Maybe I should try a white lab coat?

Posted by C Scheftic on 2012/07/01

I was just wondering if being dressed in white might help me in my ongoing struggle to get decent photos of small shiny objects without unwanted colored reflections in them….

In person, I think it’s somewhat more obvious that the design on this intentionally-simple ring involves a butterfly on some flowers, with ferns around the ring-band. The LOS patina came out nicely, with a sort of blue-tint to the butterfly and a sort of rosy-color deep into the roses. I know that the butterfly would stand out more from the flowers if I’d used textures with more contrast, but I’m happy with subtle difference–the camouflage–that I achieved this way. Yet at some point I just stopped counting the number of shots I have taken trying to get one that looks even remotely like what I see. (O the joys of digital cameras with their instantaneous results!) I hope you can see my intended design because mostly what I see here are various reflections on the silver….

Oh well, the important thing is that students in my next ring class, who will be there in person (at Zelda’s Bead Kit Company later this month), can see the points I’ll be making with this and the other dozen-ish rings I’ll be taking to illustrate various aspects of ring-making.

I’ll have two rings (this and one other) that I’ll use specifically to illustrate post-fire sizing. I don’t use the “ring pellets” that seem popular among many metal clay artisans. I understand what they do, but I cannot fathom why they seem so popular. I’m happy to have a ring come out a tiny bit small–in fact, I construct mine so that they come out of the kiln a very controlled amount too small! And I don’t care at all if they do not emerge from the kiln in a perfectly round shape–though mine rarely change shape during firing. Even if I wanted a ring to end up round and it came out of the kiln a slightly different shape, it’s easy enough to get a properly fired-to-metal ring into round, and to strengthen it in the process of getting it to the desired shape.

Once my ring has been fully-fired and, unlike the one shown here, usually before I apply any patina (but my snapshots of the other new, and as-yet-untreated ring, have even more distracting reflections), that’s when I do all the sizing, shaping, and work-hardening of the finished metal to achieve just the fit I want and to give my creation as much strength as possible. In most cases, my ring will end up a bit bigger than it started (meaning it will then fit just right) and a bit oblong or oval (so it will stay put when worn, much better than a round one does), both of which are results that I want. Even if I were to use the pellets, I’d still do all that … so I just don’t bother with them.

Yes, it did take me a slight leap of faith, back in the beginning, to believe that metal clay really turned into a true metal that you could metal-smith. And, yes, I’ve seen people with under-fired pieces that were still too brittle to treat that way. But a pellet isn’t going to solve any of that…. If you’re making rings, especially silver ones, I encourage you to make one a few sizes too small, and fire it for a full two hours, so you can try some gentle yet firm hammering on the edges of the band and around the band itself to see what happens in terms of both size and strength. Bypass rings, in fact, are particularly good for this exploration (better than ones like the construction shown here) because the bypass rings really let you feel how much stiffer / stronger they get as you work them. They are also a bit more forgiving as you aim for a certain size!

If you try this, please do let me know what you find, knowing that another reason I was thinking about the white lab coat is because I look at learning about the metal clay process, and the best ways to work with both the clay products and the final all-metal results, as a series of ongoing experiments.

Posted in Photographing Jewelry, Teaching Metal Clay | Tagged: , , | Leave a Comment »

Yet Another Ring.

Posted by C Scheftic on 2011/09/17

To understand what I mean when I say (as I did in my last post) that, relatively speaking, I don’t make a lot of rings, you probably need to know how many other pieces I make. I don’t have that number handy, but it’s a lot.

What I do have, however, is another example of a ring I recently made for myself. A few weeks ago, I wrote about one that I said was a practice piece, and that I had plans for additional pieces. Here is one of its successors:

I built it from components, using a design that required multiple firings. The flower was built atop a slightly squared-off band: because the top is heavy, that shape helps to hold it upright on my finger when worn.

The stone was set in a fine-silver bezel. I fired that combo in place as part of the last step (unusual for me: I tend to set stones post-firing), so I had to use one that could handle the heat of the kiln. I chose a lab-created ruby cabochon.

But the main treat, for me, is that all three of the flower-petal layers spin! Do you like, as I do, jewelry that you can play with? (I do try to be discreet about when I do that, but there are moments when it’s just so much fun…!)

Posted in General Techniques | Tagged: , , | Leave a Comment »

Making My Ring Come Out the Size I Wanted.

Posted by C Scheftic on 2011/09/16

Given how many pieces of various sorts I have made out of the different metal clays over the years, relatively speaking I have not made many rings. What’s the difference? I do make rings for myself; I will teach others how to make them; I may give the occasional one as a gift; but, at this point at least, I rarely make rings to sell.

Sizing is an issue for any ring-maker. Since metal clays shrink as they sinter into a more-solid metal form, however, size is a detail that really matters when making rings. (This is one reason why I would never use a mix of clays for a basic band ring. If I can’t be sure of the shrinkage, I may have to spend more time post-fire in resizing it. Using “fresh” clay is a simple way to reduce the chance of that! That’s also why I held off posting this item until I could write the two entries that preceded it this month….)

When I do make rings, I often start by making a flat piece that will become my ring’s band, firing that, then shaping, sizing, and adjusting the resulting piece of metal as needed, all before adding the top and re-firing. While that method does require two firings, there are several very simple ways to test and adjust the ring band before proceeding. The already-fired band won’t shrink any more, so I can be pretty sure what size the ring will come out to be before I start on its decorative top.

The recent class I took at the Valley Art Center with Gordon Uyehara, however, used a different technique. We formed the clay around a ring mandrel, let that dry, then added the top, and fired everything at once. It’s a hold-your-breath situation waiting for the rings to come out of the kiln, to see what size you end up with. Yes, there are methods for adjusting size, if necessary, to make rings larger (relatively easy with a simple band) or smaller (can be trickier, depending on the ring, and does require yet another firing, whether in kiln or via soldering). Personally, I find it more thrilling to have the ring go into the kiln and come back out the right size in the first place, but I was happy to venture down the other route for that one day.

Also, while I’ve used both PMC and Art Clay for rings with the double-fire method, I’ve only used PMC-brand clays for band-rings made the way we did at that workshop. (Why? Because I’ve only done them that way in workshops, specifically, in ones where the clay was included in the class price.) For Gordon’s Pearl Box Ring class, however, we could bring whatever clay we wanted. Since he works mostly with Art Clay, that’s what I took. If I had questions about working with it on the ring, I could get help from someone with lots of experience using it. Here’s what happened with sizing (sorry, but rings require simple math):


  • My goal was a size 8 ring. Anything from 7.75 to 8.25 would be OK. A little smaller would be tolerable. But 8.5 would be bigger than I wanted, and I did not want to have to do anything to reduce the size afterwards.

  • Gordon reported that Art Clay says to make a ring 2 sizes larger, to account for shrinkage.

    • Thus I should make it a 10, so it’d shrink to an 8.


  • But, he added, since you’re covering your ring mandrel with a teflon strip or another easy-release surface, you should figure that adds about a half-size. Position it 1.5 sizes beyond your goal.

    • If I made it on the mandrel mark of 9.5 then, with wrap, that would give me the 10 that would shrink to an 8.


  • With rings, I always try to “work-harden” them a bit after they’ve been fired. The “99.9% pure” fine silver of regular metal clay comes out of the kiln annealed (i.e., soft). Fine silver will always be softer than sterling or Argentium silver (and even those are not necessarily the strongest choices for rings). But any form of silver will harden up, at least to some extent, if you “work” it for a while: hit it (gently…) between two hard surfaces (e.g., a between a hammer or mallet and ring mandrel or a steel bench block), to “re-align” the silver crystal structure. But, in my experience, that hitting tends to increase the ring size at least a little. (If a ring comes out to small, that’s one of the easiest ways to size it up as needed!) In the end, I chose to position mine only 1 size larger, and use the work-hardening, along with a little reshaping, to get it back up where I wanted.

    • I built it on the mandrel at 9. I had some moderately heavy teflon wrapped around it so, per Gordon’s logic, I guess that took it up just a tad above 9.5.


  • It came out just a tad above 7.5.


    • Once I finished hardening and reshaping the band, it ended up right at 8, maybe a hair over that. Perfect!


Why did I reshape the band to no longer be the perfect round I had out of the kiln? (The round band is shown in the first photo with this post, above. The slight change should be just visible in the second photo above.) Because I find that round rings with heavy tops tend to topple over on my finger. The thing that really controls the ring size you wear is rarely the space where you’re wearing it! In most cases, it’s the knuckle the ring must pass over to reach that spot. (And the extra size of the knuckle often helps to keep the ring from just falling off the finger.)

With an oval band shape, you can make it a bit smaller than you think you need, turn the ring sideways to put it on, then straighten it back up to wear. Or, with a squarer band, the sides of the band and the sides of your finger are fairly well matched up, so the ring sits in place as intended.

(If I’d made this in my studio, rather than in a class, I’d’ve taken the extra time to add a few embellishments to the top. In the workshop, we didn’t have that much extra time, and I wanted to wear mine home. But, at least, I got the “fronds” to sort of sprout from the space where I set the pearl, so I’m OK with it as it is.)

What’s your favorite “tip” for making metal clay rings, using whatever method you prefer?

Posted in General Techniques, Learning Metal Clay | Tagged: , , , , | Leave a Comment »

How I Spent Last Weekend.

Posted by C Scheftic on 2011/09/04

With a bit of island-themed whimsy, in honor of the workshops led by Gordon Uyehara at the Valley Art Center in Chagrin Falls, OH, last weekend, I open this post with a photo of the “Cosmic Honu” turtle pendant made last Saturday by one of my local guild-friends, Michelle Glaeser (who is also the developer of rose gold clay), checking out the “Pearl Box” ring that I made on the Sunday. As I’d mentioned in my last post, not everyone who went had been able to stay for all the events, but Michelle and I met at my studio for an hour or so a few days later to talk about the different workshops each of us had taken.

There are several ways to approach the making of a ring using metal clay, and this class from Gordon uses the method I practice the least myself. So, why did I take this class? First of all, I wanted to push myself to practice this method. Even though I don’t find it particularly easy, if you look at book and magazine articles plus a range of on-line posts, it appears to be the one most commonly used by metal clay artists. (I don’t know how many are just starting from the same point they first learned and extending that for their project, or if they have tried others and simply prefer this one. It is the first method I learned too, but I later figured out, read about, and otherwise explored others that I find easier (not necessarily quicker, just easier) and have, myself, mostly expanded on those. I guess I’d better think about making, and writing about, some of those this winter….) In the meantime, rather than struggle on my own to master this technique, I figured I’d take it (again) from someone reported to have many happy customers (both product buyers and workshop students), and maybe I’d be able to pick up a few tips I’d missed. Besides, there can actually be two ring-bands in this particular design: one that goes around the finger and another that goes around the decorative top. So, this offered double the practice all in one day!

[Several asides: I wasn’t the only one with questions either. At left, you can see Gordon doing a little demonstration for Carole B from Columbus. It was fun to meet her in person at last! We’d emailed each other for months, first over organizing workshops in separate cities when our three groups brought in Hadar Jacobson, which I wrote about early last April, and then there was more mail setting up this combined effort with Gordon last week.]

The finished samples Gordon brought, one of which was shown in my last post, all had the pearl set into a flat-topped, circular box, with the pearl off from the center of the box but positioned centrally in line along the finger when worn. He also discussed, had unfired versions of, and constructed during demos, some other styles: different box shapes, different top-shapes, various wall heights, with the pearl positioned in different ways (e.g., centered or offset relative to the top or to the textured design). At the right, in a snapshot that shows eight of the sixteen pieces that participants made (one kiln-load), you can get a clue about their choices: I can see oval, oblong, and triangular as well as circular, and having flat, curved, or fully-domed tops.

Those who know my work, especially those who take my classes, know that I love various curved shapes: domes, waves, loops, and more. And that, although I often use some fairly “subtle” textures, I do tend to put textures just about everywhere: fronts and backs (making pieces reversible), inside little openings (whether visible in public or a little secret about the space known only to the wearer), and so on. Also, having gotten some of my design sense through working within the math world as a geometer, I know how to find centers and figure angles and such. So one funny thing about this ring, for me, is that I made it with:

  • a flat top;
  • a simple satin-finish on both the wall-sides and finger-ring;
  • the pearl at some almost-random off-center, not-aligned position; and
  • the whole box deliberately set ever-so-slightly off-center on the band (both left-to-right and front-to-back) because it just seemed while I was assembling it as though it would sit nicely that way (too far off might want to topple, but a tiny bit off just felt better to me).

But another, even-funnier thing is that, without us ever discussing any of this during the session (because we were so busy working away on our own projects), both Alice (another local guild-friend, and my traveling companion for the weekend) and I made almost identical choices all along the way! (And this is not her typical style either, which usually has lots of curls and swirls.) We had brought different textures to use, and hers (left) was one that comes out a tiny bit deeper than mine (right). Other than that, however, I don’t think we could have made more-matching rings if we’d tried! We had a good laugh when we each saw what the other had done….

Posted in Guild, Learning Metal Clay | Tagged: , , , , | Leave a Comment »

Where I Spent Last Weekend.

Posted by C Scheftic on 2011/09/03

Three Metal Clay guild groups–in Pittsburgh / Western Pennsylvania, Cleveland / NorthEast Ohio, and Columbus Ohio–got together (with the help of a small grant from the PMC Guild) to sponsor four days of workshops, held at the Valley Art Center in Chagrin Falls, OH, over the last full weekend in August this year. (Sorry, but I don’t have links for websites of those Ohio groups. If anyone reading this can provide them, I’ll be happy to add the links here! In the meantime, if you’re trying to find either one, you might try checking the guilds listing at Metal Clay Today.)

One of the features involved a series of workshops by Hawaii-based metal clay artist, Gordon K. Uyehara:

  • “Fabulous Bail Link Bracelet” (two days: Thursday and Friday);
  • “Cosmic Honu” (stencilled turtle) pendant (Saturday); and
  • “Pearl Box Ring” (Sunday).

All the photos with this post show Gordon’s delightful pieces, samples for the various workshops. Two bracelets, above. One turtle is with the bracelets, and a second one is visible on Gordon himself during one of his demos in the ring class. (Click to see a larger version of either of those snapshots, which I took.) And, shown further down this post is one of Gordon’s own photos of an example of his ring project. (Beyond those, if you’re not already familiar with his work, do check his website to get a better clue of his style and range. I remain in awe of the work I know goes into making most of his pieces.)

There were a number of other sessions too, for which I have no photos (sigh…). The other major hands-on workshop, led by Ohio-based artist Catherine Davies Paetz, covered making a series of carved, seamless rings (stackable, if you wanted to wear them that way) using PMC Pro. Other scheduled sessions involved topics like design, photography, and flexshaft maintenance. And there was a big pot-luck dinner on Saturday night.

Now, it just so happens that all this got scheduled over days when I had tons of stuff already going on. And, in fact, I wasn’t the only one! So, while a few people stayed for the entire four days, there were lots of others who did their best to find an opening somewhere in their schedule when they could participate in at least some part of the weekend. Though that posed a bit of a challenge (would all the costs be covered by the registration fees that had been set?!) in another way it was OK: because there were a few openings, it was possible to accommodate requests from others to join the fun, which ended up including folks from Colorado, Maryland, Florida (and those are just the ones I caught; there may have been others).

So, on Saturday I drove up to Franklin, PA, to meet with Alice Walkowski, and we headed over to Chagrin Falls together. On my way to Alice’s, however, I hit a major traffic jam. I knew there was construction and, based on previous trips through that area, I’d factored in a 40 minute delay; online sites I checked en route then told me it would set me back 45 minutes; there is an alternate route, but it normally takes 45-50 minutes longer than the other route and due to lots of traffic lights, so I figured I’d risk the interstate construction for an easy drive the rest of the way. Wrong decision! In reality, that single three-mile stretch added well over two hours to my trip!!!

But we still managed to arrive in Chagrin Falls just in time to make a quick stop at the delightful Village Herb Shop. I wanted to get there because it’s a great source for edible flowers (which you should know by now that I love to cook with). But I mention it here specifically because they also carry the lavender oil that many metal clay artists use in joining pieces of metal! In fact, they carry both the essential oil (alone) and a tincture (with alcohol), in several sizes. I already have a bottle of that, but this time I picked up some organic edible flowers, both in the Village Herb Shop’s special mix (where I may have gotten the last jar of this season!), and some separate, individual varieties (including some delightful little button roses whose petals can go into my next few batches of rose petal ice cream!) Alice is not quite the edible flower fan that I am but, while I shopped, she explored the yarn shop upstairs and the garden outside. So we were both happy with that stop.

After we were done there, we headed over to meet up with all the various guild members for that delicious pot-luck dinner. We spent the night in a near-by hotel, and were thus able to arrive promptly for a 9 am start for Gordon’s “Box Ring with Pearl” workshop. More about that in my next post.

Posted in Guild, Learning Metal Clay | Tagged: , , , , , , , , | Leave a Comment »

A tiny bit of progress…

Posted by C Scheftic on 2011/07/25

Spinner Ring with Red Lace Agate Cabochon.

OK, to be honest, I made this ring months ago. But the recent progress–finding a bit of time to do something, anything, with metal clay again–involved adding the red lace agate cabochon to it.

The original ring was one of my “experimental construction” trials. The silver part of the ring actually includes four stacked disks. The one on the very bottom (not visible in this photo) is there solely to hold onto the ring shank. The next one up (the largest one, visible in this shot) forms the base of the design. The third one (hanging sort of low in this photo) has a hole in the center (not visible here) that lets it spin around a hidden central post: some people might therefore call this a fidget-ring because there is something to fidget, or play, with. The fourth disk is solid, and serves to hold that third (spinner) disk in place.

The part of the construction that was experimental involved using the spinner disk at all: Figuring out how to stack everything so it would both hold together and allow just-enough movement. Now that I’m more sure about how that works, I have plans for additional pieces, ones where the spin-able disk is much larger and more elaborate.

In the meantime, I thought this first trial piece needed something … somewhere. Looking at a few 8 mm red lace agate cabs t’ohter day, it struck me that this one——with its ever so slightly curved banding——would go well with the texture on the silver here. [So I added a little dollop of very thick metal clay paste (laced with a bit of lavender oil) to the top, positioned a fine silver bezel cup on top of that, and fired it into place. (original sentence expanded to this on 7/28)] Then, of course, I had to re-polish everything. Finally, I was able to add the stone. I’m happy with the result and, even if it’s just a simple little change, it is something at last!

Posted in General Techniques | Tagged: , , | Leave a Comment »

A Tale of Two Rings.

Posted by C Scheftic on 2010/01/26

I made another attempt at a double-fire ring. I’m still in experimental mode, but the second one exhibited some definite improvements.

Two Double-Fire Rings.

On the left is the first one I tried using this particular double-fire approach, mentioned in my last post. Note where the shank meets the top section of the ring. On the right side (of the left ring), there’s a bit of a lump, where the shank that had already been fired did not shrink any more, leading the new clay to leave that lump there as it tried to shrink. On the left side of that ring, the problem is even worse: the clay didn’t simply form a lump, it actually cracked! On the bottom edge, by the way, both sides had the “lump” seen on the right side above. I know that a bit of patching and filing could make both of those problems disappear, but this is an experiment, so I’m not going to take the time to do that. I’ll wear it like that and see how it holds up.

But now, on the right, is my second attempt. Instead of topping it with a narrow, rectangular band, I tried a round one. This one did not exhibit either the lumping or the cracking.

Hmmm. I wonder how much of the difference was because there was just a tad more clay on either side of where the shank was attached, and how much was because it was a circle rather than a rectangle much wider than it was high? Suggests areas for further experimentation, doesn’t it?

(If you’re curious about this method, you may want to check out the work of Kate McKinnon. She is one of the leading designers to make rings this way, but as I recall the ones of hers that I have seen, I think they’ve tended to be round or square or some other shape with more “consistent” dimensions in various directions. Her (very interesting) book, Structural Metal Clay, does talk about making such rings, but does not include details like that.)

Posted in Learning Metal Clay | Tagged: | Leave a Comment »

Ringing my hands.

Posted by C Scheftic on 2010/01/22

I love rings. Have done so for years. I’ve bought some lovely ones, have received others as gifts: for years I’ve rarely left the house without wearing at least a couple rings.

Now, while I love metal clay too, I’m still trying to work up a passion for metal clay rings. In several of my earliest classes, we made rings. It’s a big deal, because you have to factor in the shrinkage as the metal clay fires.

I got a great feeling of _accomplishment_ from the first ring I made even though, from the design angle, the ring itself was not one of my all-time favorites. Here it is, in one of my early attempts at photographing jewelry (thus, the gray line down the inside is some quirk of the lighting; it’s not actually there on the ring):

Now, one way around some of the shrinkage concerns with rings is to make a flat strip that’s approximately the right size, fire it while still flat, and then bend it into the ring-shape. At that point, you can adjust its size and shape. Then you can add some other decorative piece, with various ways to connect that to the ends of your already-fired shank. One “traditional” option is to solder the components so they all hold together. Another “metal clay” approach is to use some form of the clay as your connector and refire the whole thing so the sintering will cause it all to hold together.

So, when Tim was here, one of the class projects was yet another ring. We used that “double-fire” method to build the ring. I was having some problems with it. Now, part of the problem was just me: some blocked ducts in my eyelids (leftovers from a “poison ivy incident” last fall, sigh) were making it a challenge for me to see really fine detail. Another part of the problem was that I was not confident how _what I was visualizing in my head that Tim was telling us to do_ would provide enough contact area to ensure a secure connection. I kept adding more silver clay (in the form of a paste supplemented by lavender oil), not trusting I’d gotten it right, and showing it to Tim to ask when I needed some more. He’d point out some issue, I’d add a bt more, and we continued like this for several rounds until he said it looked fine to him.

Me, I could visualize different constructions that should hold better. And those would involve the use of clay (“grout”) rather than paste (“simple glue”) to make the connections. Did my hesitations jinx the project? I don’t know about that but (a) in the end it came out too small (first ring I’ve ever had that happen with) and (b) after several times of putting it on and off a smaller finger than the one where I’d thought I’d wear a ring of that design, it did still pull apart.

Silly me: in my disappointment, I didn’t think to take a photo of it before I started fiddling with the components. I just took the shank, and used it to try a different construction technique.

Band from signet ring is reused here.

I’m much happier with that ring! Yes, there is a very slight crack–that happened during the second firing–and I see it’s already picked up a scratch in the couple of days I’ve been wearing it. I could fix all that, but I consider this a trial-ring, so I’m going to just continue to wear it as-is for a while and see how it holds up. The little almost-square piece with a cubic zirconia (CZ) set into it is what broke out of the ring as I’d originally made it in Tim’s class. I’ll put that aside, and find some other piece in which to use it.

And that is part of what I do enjoy about all of this: even a failure doesn’t end up as a total loss. I can reuse the components in different ways, and learn new things in the process.

Posted in Learning Metal Clay | Tagged: | Leave a Comment »