Convergent Series

learning, using & teaching metal clay, and other aspects of life

Archive for February, 2013

Translation, please…

Posted by C Scheftic on 2013/02/28

Here’s something else I make at times, something that ties in with the theme of my last post about using bits & pieces of clay that may be left at the end of a session. (Well, sometimes I deliberately save little bits of clay during a workshop, so I’ll have some left in case a student has a question that’s best answered with a quick demo. That’s actually how I ended up with so many of the oak leaf bits shown here….)

Can you help: I’m trying to figure out what to call the resulting pieces!

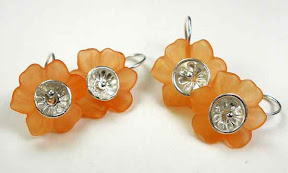
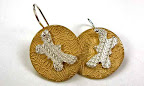
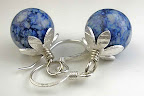
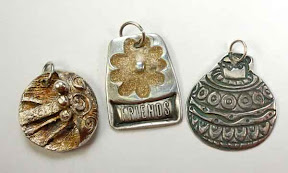
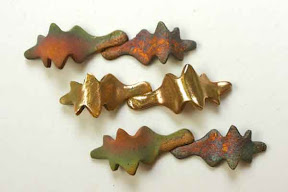
My inspiration for little pieces like these are “chopstick rests.” In transliterated Japanese, I am familiar with the term hashi oki for that use. According to Wikipedia, the transliterated Chinese term is kuaizi zuo. Shown are examples of such little items that I sometimes make with the remaining bits of clay at the end of a session. All of these are bronze. If the kiln happens to produce lovely colors, I leave them as-is; otherwise, I polish them up well; I tend to combine them in non-matching mixes. (Having three such pairs itself is unusual! And, yes, the photo deliberately shows an odd number of them!)

Sometimes I make slightly larger, more complex ones too, and do that more-deliberately (that is, not just with leftover bits of clay!). I’m completely sold out of those right now, however, and don’t seem to have any good photos of ones that have moved on to new homes. But in his excellent book, Metal Clay Fusion, Hawaii-based artist Gordon Uyehara includes a sample project for making several different styles of seashore-themed hashi oki, so metal clay artists may want to check that out.

The thing is, now that I’m located in Southwestern PA, I don’t come across many chopstick-users. When I host a dinner where I set the table with those, I often have to teach diners how to use them! Even when people are already comfortable with them, often they are still not familiar with the use of little stands to keep the chopsticks both in place and off the table / tablecloth itself.

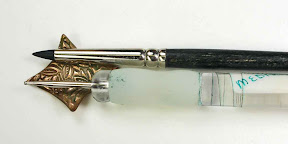
I do, however, know lots of artists and craftspeople who use specific hand tools that might benefit from a creative little resting-place. Shown farther down this post are two of the tools I often use, a colour shaper and a ball burnisher resting on another such piece on my own worktable.

What should I call these items when used that way? Now, I do believe that oki is fine to use for the “stand” or “rest” part of the name. But hashi for “chopstick” is not. What is?

I asked the person who teaches Aikido Kokikai down the hall from my studio (and has spent time studying that in Japan). She was, of course, a bit concerned by my “westernization” of this “traditional” idea: why not just call it a tool rest? When I explained how much I valued the “art” aspect of hashi oki, rather than the strict utilitarianism of a “tool rest,” she was a bit more willing to consider this. Not a native speaker of Japanese, however, she said that the best phrase she could come up with was dohgu oki. Except, she said, dohgu expresses the idea of equipment, more than a simple hand tool, but she could not think of a Japanese word or phrase for the generic idea of a small hand tool like this.

If you can help me out with this, please leave a comment on this post. (Make sure to leave your email address–this is something I can see but it is not automatically posted in public with your comment.) If I end up using your suggestion for this, I’ll be happy to send you a little set of these pieces if you’d like. (If several people suggest the same name, and I pick that, then I’ll draw one at random.) The offer remains open until I pick one and post my choice in the comments.

Please help, if you can! Thanks….

Posted in Misc. Musings | Tagged: , , , | 3 Comments »

Bits & Pieces

Posted by C Scheftic on 2013/02/23

I’ve been meaning to write for a while about several questions that often come up in workshops, especially with beginners when each person is allocated a package of clay and then finds they don’t use all of it: why did you give me more than I need and how do I save it for later use?

I see the answers to these questions as being connected, but let’s start with the first one: for many “projects” it is just worth having a bit extra as you roll it out, so you’re sure to get a big enough area to cut out the shape you want. While this remains true no matter how experienced you become, it is especially important for beginners who are just learning the various ways to manipulate clay.

The answer to the second question is a bit more complicated. Silver clays come in a well-sealed package, and can remain in great condition for a rather long time inside that. The trick is that, once the package has been opened, all sorts of things can happen. At a minimum, the clay dries out. If that happens, it can be rehydrated: ways to add water to get it back to working consistency is something I’ll try to remember to write about at some point in the future (even though it’s not something I encounter myself on a regular basis any more…). If you’re going to use the remaining clay again fairly soon, you can just try to keep it moist. There are all sorts of products you can buy, or build yourself, to create a little humidified storage environment. The problem with doing that for any length of time (and something that the product vendors rarely address) is that your clay can easily become contaminated with mold. Now, you can add something to the environment (not to the clay itself, but simply inside your storage box) that can help retard mold growth. White vinegar or lavender oil are examples of some mold retardants. And, even if your clay does acquire a bit of visible mold, it’s not a crisis. At that point, your options are to scrape off the mold or to just work with it. (You do have to take care with the latter because the extra “space” taken up by the growing mold may create spaces in your fired piece that may influence its look and/or interfere with its strength.) But, in my experience, there’s a much better solution: don’t even try to store it!

That is, my general answer to both of the original questions is this: why not see if you can just use up any remaining clay in some creative and productive way?! Add to your current piece, or make something else.

One of the earliest “lentil” shape beads I ever made is shown in an old photo here, to the left, strung with some Russian jasper and green glass beads. (It’s also one of the pieces that led me down the path of making reversible pendants!) Its other / first side had a more elaborate design; what at the time I thought of as the “back” had the simple, low-relief, fleur-de-lis pattern shown here. After decorating the first side, I had a bit of clay left. I rolled it all out, just two cards thick, which got it big enough that I could cut out a small square. I put that on the same drying form I’d used for the lentil (so it would have the same curvature) and cut a circle out of the center of that. With the clay left over from trimming the square and cutting the circle, I made a number of little balls and let those dry too. Then, I moistened the center of the fleur-de-lis side and the underside of the open square, and stuck those two pieces together. Once those seemed secure, I added more water inside the open circle, and pressed the little balls into place. Having the circle around the outside of the balls gave me a way to make sure I could attach all of them securely, to that ring and to each other, rather than trying to count on a small point of connection on the bottom of each ball. And, suddenly, after investing only a few more minutes and a tiny bit of “left-over” clay, the piece became reversible, which sure seems like a good deal to me!

Of course, if you have more clay left over, you can always make something else with it. All of the elements in the silver and bronze earrings shown in the smaller image to the right were made when I had some larger leftover bits. After completing other pieces I’ve often used any remaining clay to make little patterned disks, or cut out little textured designs, and just set them aside to dry. When I’m firing up a load in my kiln, if I have a bit of extra room, I pop them in. When I have a few spare minutes–with metal clay, one always seems to have moments of waiting for something else to happen … to dry, to rehydrate, to finish firing or cool off, for example–I will go through these bits and pieces, and assemble them into something interesting. Their small size, of course, means they often (but not always) become elements in earrings.

Sometimes I’ll add other elements to such “bits and pieces” too. The orange-and-silver earrings shown at the very top of this post were done that way. When I fell in love with the little colored lucite flowers, I bought a small collection of them to use both for my own creations and during workshops. For several months, whenever I’d have a little bit of clay left over, I’d make a little flower disk or leaf of some sort. I kept track, so that I’d end up with matching pairs, but I didn’t worry about completing any particular number at once. I just used up what I could for some larger shapes, made smaller ones when I had less clay left, and made other small elements or even just tiny balls with the very end of the clay I had on hand.

In fact, for silver pieces that I intend to fire first and figure out how to use later, those I make flat. Then, when I do decide where I want to use them, if they need some shaping for that particular purpose, I can use the “traditional metalsmithing” technique of dapping the fired pieces to shape them as needed. That’s what happened to the little flowers I set on top of the blue-and-white glass beads shown with the earrings in the final photo here. In fact, though I made those flowers specifically to use with these beads, I could not have domed them to match their shape in the “dry” state because I punched them out of a little bit of extra / scrap clay that I had mixed up so it would remain flexible as greenware. I had finished the project I wanted to make with that clay and had some left then too. Since I knew that “flex greenware” clay that has been rolled out is great for using with paper punches, I used some of my leftover clay to make a small sheet for punching. I then made these flowers but they had to be fired flat … since they were too flexible to hold any other shape. (I also rolled the final bits of that flex-clay into long “snake” shapes that would remain flexible and could be used to embellish other pieces later on.)

I will note that, while fired silver and copper clays can be dapped after they’ve been fired to metal itself, the various bronze clays that I enjoy working with cannot be formed much (if at all) after firing. That’s just the nature of bronze, not simply the fact that it came from metal clay.

I do sometimes wonder how much this is something I do, myself, verus what other metal clay artists do with their leftover bits of clay. I know that a number of you do read this blog (without commenting) but I sure hope you will speak up now: Do you do this too? Or what?? And, why?

Posted in General Techniques, Teaching Metal Clay | Tagged: , , , , , , , , , , , , , | Leave a Comment »

The January Sale at Bead Paradise

Posted by C Scheftic on 2013/02/11

Here’s another report from back during my little blog-hiatus.

First, a bit of background: My jewelry-friend Alice and I have been talking about going to “Bead Paradise II” in Oberlin, OH, for several years now. We live several hours apart (she is NE of here) and the shop is several more hours off in yet another direction (NW of me, and over double the distance of that to her place). Somehow, we just never managed to find a slot in our schedules when both of us had both the time and some extra funds available … and the weather cooperated … and neither of our cars were acting up …. and I think you get the idea. We do find ways to get together for guild meetings and play days and such, but organizing that trip was just one step too complicated. But we both wanted to go….

So, last November, Alice and a friend near her made the trip. And, in January, I found another friend to make the trip with. It’s not that I needed anything in particular: I really do have enough of a bead-stash. So I will admit it: I was determined to get there during the “January sale” so I would not feel quite so guilty that I simply wanted the “experience”…. And, yes, it was wonderful!

I did buy a number of strands of various shapes, styles, and sizes of wooden beads, because I’d all but run out of those. And several yards of brass chain. And half a dozen different little connectors, plus several different kinds of earwires, just a sampling of each to play with and see which ones I might like the most in practice. (Sometimes I can predict that very well, and sometimes I surprise myself when I actually sit down to assemble things.) Plus, since they were on sale, I also got some extra bits and pieces (needles, glue, etc.) that I know I’ll use soon enough.

But what I’m wondering is this: have any of the regular readers of this blog noticed the thing that is “most different” about the photo–with a sample of that collection–that I include with this post? Here’s a hint: most of the time, I photograph jewelry with a plain, white background.

That is, the hint is in the background here: my biggest “treat” from the trip was the sweater I also bought. You can get a little peek at it in the background of this photo, although it’s the design that caught my eye as much as the colors. (If I ever get a photo of myself wearing it, I’ll post that. But that’s a big if….) Because the place is more than just a bead store. They also carry clothing, bags, beauty products, rugs, fabrics, and more.

As it says on the FAQs page at their website, “To see our selection is to believe it! If you can possibly come to see our store in person, that is truly the best way to shop.” I do agree with that!

Happy shopping to you, at whatever location fires your imagination!

Posted in Shopping | Tagged: | 2 Comments »

Snow ==> White ==> Christmas

Posted by C Scheftic on 2013/02/09

Thinking about the winter white-out storm that has been and continues to bear down on a number of northeastern states today, here is a very belated Christmas-time report from back during my blog-hiatus.

How did my brain make this connection? I was born in the midwest. I have no actual memory of my original home, however, because my family moved east to Ohio in my first year of life. I do have a few memories from that, but only a few: within two years we moved farther east, to Pennsylvania.

Then, when I was in second grade, my father won a trip to visit the Pittsburgh Pirates baseball team at their Spring Training Camp in Florida, which was then in the Gulf-side area of Fort Myers. My parents fell in love with Florida and, a few years later we moved down that way, although we ended up settling on the eastern (Atlantic) side.

Thus, I typically say that I come from / grew up in South Florida, because that’s where most of my youthful memories come from. Although I do have a few early memories of the White Christmas phenomenon, my biggest association with white-winter snowstorms involves how much I would hope that there’d be enough snow to cancel school! I remember sitting with my mother on the porch of our house, both of us bundled-up in winter-wear, and having her tell me that I would have to go as long as the snow had not come up higher than the step. And being terribly disappointed a few weeks later, when several snowstorms had accumulated that much, that I did still have to go to school …. because it hadn’t come up a whole step in one storm! Having snow at Christmas was never a big deal to me: for the few years we lived there, getting enough snow to cancel school was what mattered to me!

In Florida, each year we hosted various visitors from those northern climates. They would note some differences (e.g., the summer heat and ocean breezes; those from the mountain-areas would remark on the flatness of the land; etc.) but the one thing all those folks would make a big deal about was, “I just don’t see how it can feel like Christmas without snow, without even a chance of having a White Christmas.” Now, readers of this blog who live in warmer areas probably know the standard response to that: “Well, what do you think the weather was like on the First Christmas, the day Baby Jesus was born: Was it closer to snow in the mountains, or to sand and palm trees?!”

Still Snow ==> White ==> Christmas is a common set of associations in the culture in which I live, so it’s easy for me to make the connection in that context. Thus, the photos with this snow-day post are from the Charm Exchange that the Western PA Chapter of the PMC Guild held again, just before Christmas, last December.

The three fine silver charms shown here, below/left, are the ones I received in our “grab-bag” style exchange. They come from guild-mates Georgie Nix, Susie Varoli, and Barbara Kaczor. Clearly, Barbara’s ornament commemorates the holiday season. Susie’s reflects her own sparkly personality and the camaraderie of the group. And Georgie’s illustrates the complex thinking that goes into of all her lovely artistry. I’m thrilled with all of them but I will note that I’ve even worn Georgie’s as a pendant several times, rather than risking its getting hidden in the jumble of one of my charm bracelets….

But there was something else very interesting going on this year: with jewelers exchanging gifts, their packaging often reflects their artistry as well! Shown at the very top of this post (to the right) is a shot I managed to capture of several of the charm packages as they went into the grab-bag. The one in the middle held the “friends” charm, and is a lovely, hand-made, 3-dimensional construction with, from Susie Varoli, a little more sparkle. The other two, that were ultimately selected by others in the group, are from Alice Walkowski and Michelle Glaeser. Both of them recently bought themselves one of the Silhouette Cameo cutters that began sweeping the metal clay community last year. Originally used a lot in scrapbook-making, they can be used for adorable little packages like this, whether you use their features for cutting (Alice’s, to the left, with cut-out green exposing red under-layer) or drawing (Michelle’s, to the right, with white ink drawn on green).

Our group had a great time, as we typically do at our monthly gatherings. I hope that all my readers had a great holiday season and that the illnesses and snowstorms and everything that seems to be circulating since the new year began are not limiting your opportunities for creative expression!

Posted in Guild | Tagged: , , | Leave a Comment »

Forty-Five Days!

Posted by C Scheftic on 2013/02/02

This post is a small diversion from my art jewelry theme, but I figured I should say a little something about my recent absence here…..

When I was thinking about moving back to PA from CA, I went house-hunting as part of my investigation into whether I could make the move work out. I found this place, located very near a large city park: a two-story, brick home from the late-1940s, to which the then-owners had attached a one-story addition in the mid-1990s. (This first photo was just a quick shot taken during the pre-purchase home inspection.) The inside of the addition was great, but I never liked the look of it from the outside, just stuck down next to the original house with no architectural-design tie-ins. Besides thinking the flat-roof was one of several rather unattractive elements, after moving in I discovered that it also leaked on both sides of the corner shown here. Yuck! Plus, though I loved the idea of circulation (both air and human) facilitated by the two sets of french doors added during that construction, I wasn’t thrilled with all the wildlife (both large and small) those large openings seemed to invite. Something had to give.

And this is what I have recently given up a lot of time and money to achieve:

Over 45 days (including much of this past holiday season…) this has involved: repairs to the old flat roof to improve its structural integrity; a pitched roof built on top of that; changes to some windows (around the corner, not shown here) to accommodate the pitched roof; gutters re-hung to drain into a rain barrel (also around the corner, where it can serve a garden bed at the front); a whole range of repairs inside where the flat roof had leaked; removal of the (extremely-solid!) basketball hoop; and enclosing the entire large concrete patio into a screen-porch with ceiling fans inside, intended both to provide a great protected “outside” area and to try to visually tie everything together (at least a bit, given what I had to start with…).

Clearly, mid-winter, this project is nowhere near complete. In addition to all the inside-tasks that remain (two examples: I’ve done some clean up, but have not yet finished all of that yet because I’ve been so wiped out; and there’s lots of furniture to be moved back where it belongs), outside I had also deferred all sorts of landscaping because I knew this project would tear up yard area, which it certainly did. But, at last, in a few months I can move on to that. (And, dare I say it, at some point to remodeling the kitchen next …. which was my other big pre-purchase dream!)

Assuming I can get myself healthy, and somewhat caught up in the jewelry-realm, by then. I’m still trying simply to achieve those…..

I sure hope I can get to feeling better soon!!! I was thinking of health and long-life today, in particular, reminiscing about my paternal grandparents because this day, February 2, was the date on which they celebrated their wedding anniversary. It was always easy to remember that one: perhaps I should note that they were married near Punxsutawney, PA … and all sorts of people (in the colder parts of this country at least, plus some fans of certain US films) celebrate another Punxsutawney-related event on February 2, don’t they?! I do hope groundhog-Phil’s prediction of an early end to winter this year is accurate!

Posted in Health & Medicine, House & Home | 2 Comments »