Let me be clear from the start: I think that “weaving” metal clay is loads of fun, and it produces interesting results. Great combo, eh?
Some Background
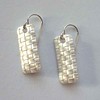
I don’t have any decent pictures from when I first started trying to weave metal clay. I don’t even have any of the earrings I made by weaving strings of PMC+ (on my own) or strips of PMC+ sheet (when I took a RioRewards certification class with CeCe Wire, down in Baltimore). Both ways, I had fun doming the results by backing that with the now-discontinued, sigh, high-shrinkage PMC Standard clay. But here’s a pair of the latter that I made in 2010 (yeah, well, I redid the Rio Rewards when Tim McCreight taught it a few miles from my house); this photo is from when I used them as one of my entries in Vickie Hallmark’s Month of Earrings Challenge that year.
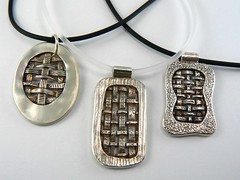
While I enjoyed doing this, and I did play around with other weave-spacings, I found that the sheet product had two drawbacks. First of all, you have to be very careful attaching sheet to a backing or frame: not enough water and it doesn’t stick, but too much and you’ve ruined it. Second, another thing I love about metal clay includes the design possibilities with textures, and sheet does not take textures the same way. Early in 2008, not long after Hadar Jacobson’s first book (The Handbook of Metal Clay: Textures & Forms) had come out, I was thrilled to read about how to doctor-up my own clay so that I could texture it but it would still remain flexible, like the sheet product, in the greenware state. Here are several of the first pieces I made with that clay, photographed together to use in promoting the first workshop I taught using this approach.
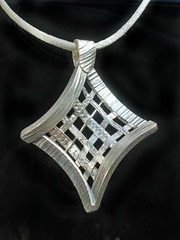
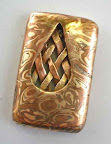
Though my workshops for beginners emphasized making woven pieces that were still essentially flat, on my own I went on to explore a number of other designs. Magic Carpet (or, to those with some knowledge of non-Euclidean geometry, Weaving through Hyperbolic Space), shown below, is one of my favorites from that period.
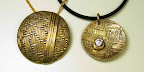
After Hadar came out with her own base metal clays, and introduced us to various ways of combining those, I again launched right in to combining those with multi-metal weaves. Here is a piece I called Mixed Metaphors. Hadar was kind enough to include a photo of this in her fourth book, Patterns of Color in Metal Clay, which came out in 2011. (This piece later went to live with my cousin Debby; by then it was also sporting a lovely coiled-copper wire bail.)
PMC Flex
So when I first got my hands on PMC Flex, one of the things I thought to try with it was another woven piece. Yes, I knew I could also explore other styles entirely, and that’s coming. But, first time with a new clay, my inclination is to do something that is already deeply seated in my “finger memory”! Something that I know I can make successfully some other way, such that the question is how this particular clay performs in that approach. So, at last, here’s something of a step-by-step on weaving PMC Flex.
I began by rolling out a few strings (aka rods, snakes, etc.) of PMC Flex. I also textured a few small sheets of clay; after neatly trimming two edges, I returned the extra clay to the package.
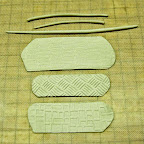
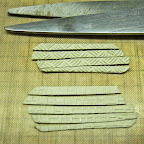
Once the sheets were dry, I cut them with a pair of plain scissors. For what it’s worth, I’ve been known to cut moist regular clay the same way, with plain scissors and with fancy-edge crafting scissors. By waiting until your clay has dried to cut it, you remove the risk that you’ll smush the piece, leave unwanted finger- or tool-marks, or stretch the pattern. And, yes, I’ve been known to cut dry regular clay, but there is some risk of breakage doing that. Dried flex clay just cuts beautifully, with ease.
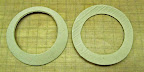
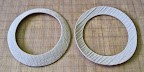
While my flex sheets were drying, I also made two narrow washer shapes. To keep this test simple, they are the same size in both inner and outer dimensions, plain on one side and textured on the other. They were dried over matching light bulbs. One had the texture facing up; the other, facing down. The one on the left (textured on the convex side) was made out of PMC Flex; the one on the right (textured on the concave side) was made from PMC 3. There is no technical reason to use two different clays. I just didn’t want to use the relatively small amount of PMC Flex that I had on components that didn’t require the flex feature, so I used PMC 3 for one of them. Still, I was curious how the PMC Flex would work in this design, so I did use it for the other. (I’ll discuss this more in a moment…)
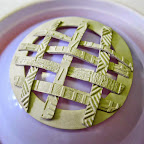
Next, I started loosely weaving together my strips of dried PMC Flex. My intention all along had been to make a somewhat open weave. I did not plan to push the pieces tightly together (as shown in the PMC+ earrings, above); neither did I intend to leave extremely large openings. What I found was that the PMC Flex could be pushed together as much as is shown in the following photo, but only that much. Had I used PMC+ to make my own diy-flex, I would have been able to snug the strips up even closer. These strips made from PMC Flex felt rather similar to the diy-flex I’ve made from PMC3. (No surprise there, just confirmation: the product is, in fact, marketed as being most-comparable to PMC3!)
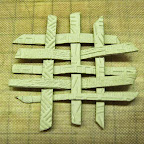
My last question for the evening was how well this little woven sample would fit my cut-out washers. There’s no reason one has to get it to fit as well as shown below, though that is a pretty good fit if I do say so myself! The point is that the strips need to be long enough; later on, you can always trim off any pieces that are too long.
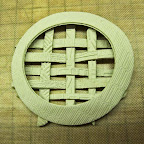
The one and only problem I noticed (as you can see, above) was that the inside edges of each the washers were a bit rough. I’m one of those people who tries to minimize the amount of sanding that I do: when I cut moist clay, I just take care to smooth the edges immediately. With narrow-edge washers, however, it can be a bit of a challenge to smooth the inner edges without risk of distorting the shape of the piece. So that is one area that I will “refine” by sanding once the piece has dried. Here’s what I was able to do the next morning. (Note the color change in the photos in the daylight!)
And here’s the thing about that sanding. With diy-flex, I would almost always make the washer / frame shape out of regular (non-flex) clay. Why? Because the diy-flex clay (especially the extra-bendy stuff I could make from PMC+) was challenging to sand. It was so flexible, it just bent away from my sandpaper. I’ve read about heating this new PMC Flex clay to harden it up so that you could sand it. Had that really been necessary, in this instance, it would have made sense to just make the frames out of non-flex clay. But, given the success I’d had with smoothing the sharp-ish edges on the Möbius-strip earrings I’d tried first, I decided to make one frame out of flex clay to see whether or not I could sand smooth its inner edge. As you can see from the images above (especially if you click to enlarge them), I was able to smooth both pieces out nicely. I did hold them both carefully as I did so: the PMC 3 so I would not risk cracking it, and the PMC Flex so it would remain straight-up under my sandpaper. But I did not have to heat the Flex to accomplish this, which really did please me.
Next, I put the rigid PMC3 frame back onto the light bulb on which I’d dried it. (That’s why I’d made that one out of the non-flex clay: there is no reason at this point to have it move at all.) I carefully placed my woven swatch over that, shifting it around a bit until I was happy with its position.
Then I took a dab of water, and attached each strip-end to the frame.
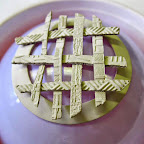
And then, well, I really thought I’d taken photos of the next few steps too, but now I can’t find them. I put a few little end-trimmings in the bigger gaps around the frame to serve as supports. Then I moistened the strip-ends and the other frame element, and squidged all that together. Finally, I took a little bit of moist PMC3 and filled in all the gaps around the outer edges. (I could have used the Flex for that but, again, I was conserving my first batch of it.) Once that was all neat and smooth, I waited until I was sure it was dry. Then I fired it, sitting on top of a little pile of vermiculite to offer a bit of support. After firing, I polished it a bit, and added a liver of sulphur patina, before adding a jump ring from which to hang it.
My last comment here is that using the frame-ring made out of PMC Flex for the second side was a bit of an experiment. I wasn’t sure if the flex-aspect would help, or cause problems, in that step. In the end, I think it’s a bit of six-of-one, half-dozen-of-the-other. Its flexibility let me wiggle it around a bit to line everything up nicely; its flexibility also let one little segment end up a tad out of alignment. My current thinking about future pieces is that, with simple frames like this, I’ll probably go back to making both sides out of non-flex clay. For less-precise shapes, making it possible for the second side to be “flexed” to match the first (but out of a clay that can still be sanded as needed for clean edges) could be a real advantage.
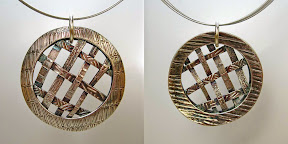
Here’s the final result: one photo that shows both sides:
Your comments on this are welcome!


") Artsmiths of Pittsburgh
Artsmiths of Pittsburgh") Hoyt Center for the Arts, New Castle, PA
Hoyt Center for the Arts, New Castle, PA") Portage Hill Gallery, Westfield, NY
Portage Hill Gallery, Westfield, NY") _Open Houses in my Studio
_Open Houses in my Studio _Or…contact me about hosting a private party!
 I am thrilled to report that my work is now being carried in the Gift Shop at the Hoyt Center for the Arts in New Castle, PA.