Posts Tagged ‘Hadar’s Clay’
Posted by C Scheftic on 2018/03/14
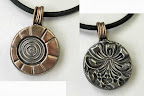
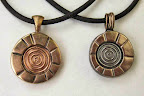 I was trying to think about what photo to post today in honor of “Pi Day” 2018 and this one came to mind. It shows something vaguely along the lines of circles and radii, so that does fit.
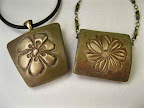
The real reason I chose it is because it shows similar circles with two different areas, and Pi is all about the ratio between a circle’s radius and its area. I created these two pieces a little over four years ago, shortly after Hadar came out with her “friendly,” “one fire” clays. And I wrote about how, even though they’d started out the same size, they ended up being so different. You can check my post from early February of 2014 if you missed it then (or forgot!) and are curious now.
Or you can just use this as an inspiration for making something yourself, whether that is jewelry, or pies, or something else. If you do, please leave a comment about your creation!
Posted in General Techniques, Technical Details | Tagged: bails, bronze, copper, embeddable, firing, Hadar's Clay, Pi, shrinkage, steel, wire | Leave a Comment »
Posted by C Scheftic on 2015/02/23
Now, the delay in posting this is not entirely my fault. OK, some of the delay is, just not all of it.
Most (but not all) years, members of the Western PA Metal Clay guild hold a holiday-season charm exchange. For some reason, it rarely gets agreed to very far in advance (which, of course, is why some years it just doesn’t happen…). In 2014, well into the fall, it was decided to not do it in December but, instead, skip that gathering (fair enough, it is a very busy time of year for everyone) and do the exchange in November. Aack!
 One of the things with the last minute planning is that we do let people exchange IOUs. That is, if you want to participate, but can’t get charms made in time, you can exchange an IOU that you’ll deliver your charms by our next meeting. Me, I find November easily as frantic a time as December and, though I made several attempts to block out a chunk of time for charm-making, each block kept getting eaten up by something else for which there was no escape. But I do enjoy the exchanges, so I jumped at the chance to use the IOU option. We typically exchange three (3) charms according to some rule or other. In the past, for example, we’ve put all the charms in a stocking and drawn pieces at random. This time, we changed the plan and did direct back-and-forth exchanges.
The first photo shows the charms I received in the exchange. The bee in a circle, highlighted with gold colored guilder’s paste, was from Holly Dobkin. The puzzle piece, highlighted with Vintaj patina color, was from Debbie Rusonis. And the abstract circle, highlighted with a liver of sulphur (LOS) patina, was from Georgie Nix. I love the artistry of all three, in general, and was very happy to receive their 2014 ideas.
 Now, I could have posted that much right away. But I decided I wanted to wait until I could post the pieces I offered in exchange. I started them in mid-December (after my last show of the season), but we didn’t have a meeting set for that month, so I let the final step slip into early January. Except, we cancelled the January meeting due to weather issues … and I didn’t want to post my pics until the recipients had their pieces in hand. Finally, we met (despite winter weather this time) in February. Yesterday afternoon. So, at last, here’s what I offered in return. They were made from Hadar’s Quick-fire bronze. (The photos were taken before I added oval bronze jump rings.)
Even though we typically exchange three charms, while I’m making mine I always add at least one and sometimes several more. This time, I tried to make five: three for the exchange, one for me to keep, and one extra for some time when having a little treat to offer would be useful. Except, somehow, I managed to crack one of the pieces while I was joining its two dried segments (I was so annoyed with myself: I even managed to crack both parts at once!) and it just did not seem worth the trouble to try to repair it. Instead, I reconstituted that clay and used it for something else later on.
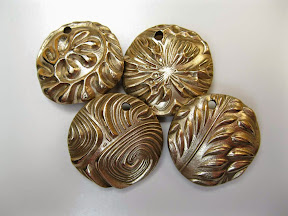
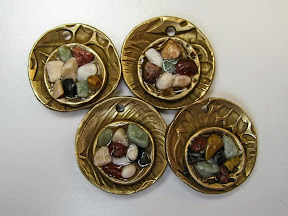 Regular readers of this blog will know that I love to make reversible pieces, and I do that even for little charms. For these, one side simply displays a deeply-textured pattern. I ended up being very happy I’d waited until December to even start these, because that permitted me to use the charms as my very first attempt at a variation on the Chip Inlay Project for the Holidays posted by Hadar Jacobson on December 3rd! The final photos shows what I did on the “other” side of each charm: I made little cups that I could fill with something called “Painted Desert Sand” that I’d gotten a while back for a completely different reason. As my first attempt at this process, I’m definitely keeping the fourth charm, both as a reminder to myself and as a sample to use in discussions with other artists or students.
I hope my guild-mates will let me know how these seem to hold up. I believe they’ll be fine, and I’ll be happy to replace any that appear to have any problems, but I’d sure rather learn about that from a sympathetic fellow artist than a possibly irritated customer. I’ve since used the technique on a few other pieces I’m testing out myself. Basic images of those, if not more detailed reports, will appear here eventually. (For now, I will say only that there are both similarities and differences among various fillers and holding agents…) I’ll say more once I’m confident in what I’m talking about with these, not just displaying untested guesses.
For now, though, I just want to be sure folks know that making these sure is fun!
Posted in Guild | Tagged: bronze, charms, exchange, filled, Hadar's Clay | Leave a Comment »
Posted by C Scheftic on 2014/12/01
 Life tends to get crazy-busy this time of year, for multiple reasons, some of which I’m sure you can imagine and others would take too long to explain. So I’m just going to list a few events you may want to know about should you be interested in seeing some of my work in person:
- November 30 – December 7: H*liday mART at Sweetwater Center for the Arts, Sewickley, PA
- December 5-6-7: Holiday Gift Shop at the Wilkins School Community Center, Swissvale, PA
- December 5-6-7: Open House in my Studio, to coincide with WSCC’s Holiday Gift Shop
- December 13: Open House at the Hoyt Center for the Arts, New Castle, PA
- December 13-14: Open House in my Studio, to coincide with an Art Studio tour in Regent Square (Swissvale, Pittsburgh, Edgewood, Wilkinsburg), PA
- For other venues, please see the list of Ongoing locations down the right side of this blog.
 If you find yourself missing any of those, no problem. Just get in touch with me: leave a comment on this post, or message me via Convergent Series page on Facebook (and, while you’re at it, a Like there would be very much appreciated…). We’ll find a way for you to explore my creations!
I’m not sure how much else I’ll manage to post this month. But I have new designs in the works, new workshop pieces I’m testing out plus, of course, new variations of ongoing favorites in both those categories … and lots more for 2015! I look forward to posting about all of those in the New Year, and I hope you’ll enjoy reading about them too.
Posted in Events, Studio | Tagged: Art Buzz, Art Clay, bails, boxes, bronze, collage, copper, domes, earrings, fine silver, gemstones, Hadar's Clay, handmade, hollow beads, lentil beads, mosaic, pearl, pendants, PMC, Regent Square, reversible, shows, steel, stones, texture, twists, weaving, WSCC | Leave a Comment »
Posted by C Scheftic on 2014/09/05
 Here’s a peek at another of my Three Rivers pieces.
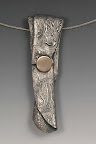
I say “peek” because the main image shows what it looked like straight from the kiln, cooled off a bit but not cleaned up at all (which should be pretty obvious, from the carbon-crumbs still clinging to it…). Just peeking out from behind is a hint of what it now looks like, what you’ll see if you find me wearing it tonight at the “Public Reception” up at The Confluence in New Castle, PA.
This is a Pittsburgh piece for sure. I embedded a trillion-shaped CZ into a little steel frame and positioned that at “the Point.” The “neighborhoods” are made from copper, with various garden-theme textures. I used those to reflect how much I appreciate all the green space in Pittsburgh.. I even continued that idea on the other side, which is all-copper with a rose-themed texture. The three rivers are made from bronze, with “expansion joints” positioned to reflect the locations of the major bridges. It is technically-convenient to add a few of those gaps, so I figure I might as well make them design-appropriate while I’m at it….
That sort of problem-solving is part of why I have so much fun working in this medium of powdered metals! What captures your interests that way (whatever is your favorite medium…!)?
Posted in Events | Tagged: At a Confluence, bronze, copper, CZs, Friendly Bronze, Friendly Copper, Hadar's Clay, Hoyt Center for the Arts, pendants, shows, steel, The Confluence Coffehouse | 1 Comment »
Posted by C Scheftic on 2014/08/25
 This post will follow up on my earlier post about the show, At a Confluence, that’s running from August 15 through November 13, 2014. First, since I just included a link before, without details, this time I’ll include some specifics right here on the post:
The Confluence
address: 14 E Washington St, New Castle, PA 16101
phone: (724) 698-7604
hours: Mon – Sat: 8:00 am – 8:00 pm
Next, I’m thrilled to report that one of my pieces, Sparkle (Together) on a Stormy Night (shown, right), earned a “Merit Award“!
And … there’s going to be a Public Artist Reception on Friday, September 5, from 5 to 7 pm. If you can get yourself over to The Confluence for that, it’d be great to see you there!
Finally, if you’re not already familiar with The Confluence itself, here are a few things you might find interesting: It’s a social enterprise venture developed by Cray Youth & Family Services of Lawrence County, PA, to (in their words): generate revenue [via both sales & donations] to help support their critical and life-changing programs; offer free events that build community; provide a safe gathering place for all children and families; and provide employment opportunities to young people.
While I am certainly delighted to be a part of this art show, and proud to be recognized with an award, the thing that really makes me happy is that it’s all a part of such a great enterprise. This is a case where, by asking you to join me, I’m hoping you will help support this whole project.
Posted in Events | Tagged: At a Confluence, bronze, copper, CZs, Friendly Bronze, Friendly Copper, Hadar's Clay, Hoyt Center for the Arts, pendants, shows, The Confluence Coffehouse | Leave a Comment »
Posted by C Scheftic on 2014/08/15
confluence |ˈkänˌfloōəns; kənˈfloōəns|
noun
ORIGIN late Middle English : from late Latin confluentia, from Latin confluere ‘flow together’
- the junction of two rivers, esp. rivers of approximately equal width
here at the confluence of the Laramie and North Platte Rivers;
- an act or process of merging
a major confluence of the world’s financial markets.
Many thanks to my fellow Koolkat artist Judi Erno for giving me a heads-up about the exhibit, At a Confluence, juried by the Hoyt Center for the Arts, and to be displayed in the Art Gallery at The Confluence coffee house in New Castle, PA, from August 15 to November 13, 2014. Judi saw the Call for Artists and recognized how perfectly my new series of pendants might fit with that theme. I’m delighted to report that two of my pieces have been accepted for this show:
 |
|
Zipping Along Together
Bronze on Copper
|
Sparkle (Together) on a Stormy Night
Copper on Bronze with CZ
|
The At a Confluence exhibit runs from August 15 to November 13, 2014. Should you find yourself in that part of Western Pennsylvania during that time, do check out the show, as well as the reading room & lending library (with delightful artist-created shelves!). At the coffeehouse, you can also enjoy breakfast, lunch or dinner Monday through Saturday from 8:00 a.m. to 8:00 p.m.
Posted in Events | Tagged: At a Confluence, bronze, copper, CZs, Friendly Bronze, Friendly Copper, Hadar's Clay, Hoyt Center for the Arts, pendants, shows, The Confluence Coffehouse | Leave a Comment »
Posted by C Scheftic on 2014/05/25
 I have to admit something: I love “draping” metal clay! The clay is so soft and pliable, and the end results are so satisfying!
I am impressed with many of the effects that can be obtained via various “metalsmithing” techniques, but this draping is just sooo different from working with “solid” metal (sheet, wire, etc.). Yes, there are a lot of little “tricks” involved in successfully draping a mix of powdered metal, binders, and water, but it still is a relatively easy process for achieving a look that is much more difficult to achieve via any methods used with, say, sheet metal.
All the photos in this particular post were made with Hadar’s new-ish Friendly Bronze metal clay powder. At one point or another, I’ve draped every clay I’ve ever tried: every brand, every metal, etc. (OK, no, I haven’t done this with gold. It should work, but I don’t feel I can afford to use gold for anything this big. Of course, if you can afford it, I’d be absolutely thrilled to “drape” a gold piece for you on commission!) But all the different brands of silvers, coppers, bronzes, steels: yes! I’ve draped those.
In fact, there’s one very-special thing I do with draping that I teach in my metal clay workshops. Yes, while I do share a lot here on the blog, there’s even more that happens in person! You see, this little post is not only about draping metal clay. It’s also a little bit about workshops. (My plan is to mention workshops a few times, in this and several other posts over the next few months, then tie that together with one specifically about classes and workshops, both ones I offer myself and those offered by others.)
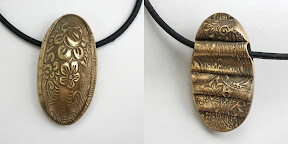
Anyway, the two draped oblong shapes are ones that I made in advance of a recent workshop. They were fun to make. I fired them both before the class; they ended up being about 37 mm long (excluding bail) and 25 mm wide. The idea was for me to have finished polishing one completely, and use the other one in my demonstration illustrating some techniques (and potential issues) in polishing such drapings. They also served to illustrate two of the many different bail-mechanisms that can be used for hanging the piece.
 The long and narrow piece was begun during the in-class demo. It illustrates a different kind of draping, and a different kind of bail structure, both of which are harder to describe (but still easy to show) compared to the first two (oblong) pieces. It’s 66 mm long by 24 mm wide, and contains a little over 24 grams of metal.
 The last photo shows two sides of a fourth piece. Also constructed mostly during in-class demos, it’s the biggest of this lot: 45 mm high by 56 mm wide. It weighs a little over 33 grams (including a CZ on each side, but excluding all the chain on which it’s hung). While I was manipulating it in class, we talked about things like overall size and weight versus maneuverability and polishing constraints. (You may notice this piece has a separate backing, while the two oblong ones do not, and the longer-narrower piece folds over on itself.)
Have you tried draping metal clay yet? If so, please leave a note about it in the comments!
Posted in General Techniques, Teaching Metal Clay | Tagged: bails, bronze, copper, CZs, design, draping, fine silver, Hadar's Clay, steel | 1 Comment »
Posted by C Scheftic on 2014/04/25
Another new formula to play with, another Crystal Bead Bazaar bracelet challenge to enter: guess what I managed to combine … again … eventually! I was incredibly late with my entry but … better late than never!
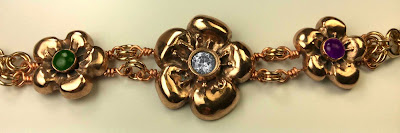
The challenge was to create a bracelet with an “Edwardian” look. Now, that was a real challenge for me: I’m just not a lacy-gossamer-Edwardian kind of person. (The Edwardian era coincided with Art Nouveau. I love Art Nouveau!!!) But, I finally found time to do some research into Edwardian jewelry, and found that these other two trends also fell into that category:
- Botanical influences. OK! I enjoy making flower-designs.
- Settings that included Green + White + Violet stones as a code for Give Women the Vote. Yes! I am delighted to do include those too.
The result: I made my own flower-beads out of Hadar’s Friendly Rose Bronze, set them with Green (nephrite jade), White (cz), and Violet (amethyst) stones, strung them on copper wire, connected everything with bronze jump rings (and a bronze clasp, not shown).
|
If you like it, I’d sure appreciate your voting for my entry.
|
[Note, that “voting” for that piece via a “like” on Facebook worked only during April, 2014. They announce only the first-place winner, which was not me, and not a surprise since I submitted my entry rather late (though I was not the last to do so!). But here’s a big “Thank you!” to everyone who did vote for it! I’m hoping to enter again in a couple of months, and will post that again here….]
Posted in Challenges | Tagged: bronze, copper, Hadar's Clay, rose bronze | Leave a Comment »
Posted by C Scheftic on 2014/04/23
Yes, once again, the last weekend in April brings the wonderful event known as Art All Night. As ever, it’ll be in the Lawrenceville neighborhood of Pittsburgh. This year, it’s going to be held in the same location as it’s been the last two years: just east of the 40th Street Bridge, down next to the Allegheny River.
 If you’re not familiar with the event, it is an absolutely amazing community-based celebration of art!
Details are at the event’s website: artallnight.org
Or, if you prefer, here: http://www.facebook.com/artallnight
No Fees. No Jury. No Censorship. One entry per artist. Drop-off times are 10 am to 2 pm on Saturday: thousands of entries will be hung in that short time-span. (I’m entry #2793, and I’m sure there will be more registered after mine!)
The show will open at 4:00 pm on Saturday, run through the rest of the afternoon and evening, keep going all night (yes, really!), run on into Sunday morning and early afternoon. After tens of thousands of people have explored the exhibits, listened to the music, watched demonstrations and joined in on the various hands-on activities, it will finally close at 2 pm on Sunday….
Participating artists can (must!) pick up their entries between 2:30 and 5:30 on Sunday. Bids are passed on to the artists, and it’s up to them to contact their potential customers after the event. (There’s also an auction of pieces created at the event. Funds from that go to the organization, to help keep Art All Night running every year. This year, 2014, is the seventeenth (17th!) time it’s been held.)
Those who know me “in real life” know that Art All Night is one of my very top-two favorite events of the year. (I can’t rate them against each other: they are too different for that. The other is the Edible Flowers Food Fest, but that’s going on hiatus for 2014 since the leader of the EFFF is also hosting the Garden Writers Association‘s annual symposium (their 66th) here this year. Which makes this year’s Art All Night even-more special!)
I include a photograph of the piece I’m entering this year: The Pittsburgh Point: Three Neighborhoods and Three Rivers in Three Metals. It was made using Hadar’s Clays: Champagne Bronze, Friendly Copper, and Low-Shrinkage Steel. It is, in fact, extra-special to me because I made it in the Accreditation Program workshop I attended out at Hadar’s Studio in Berkeley, CA, this past February. (Hadar herself took this photo with it on a steel cable she had out there! I’m entering it with a bronze-color satin cord to which I added findings.) I really enjoyed making it. Better yet, it inspired me to start a whole new series of Three Rivers pieces for the Three Rivers Arts Festival this June. I’ll again have pieces in the Koolkat Gallery booth there … but I’ll write more about that later on.
Until Sunday afternoon, I’m all Art All Night! Let me know if I should look for you there!
Posted in Events | Tagged: ArtAllNight, bronze, copper, Hadar's Clay, steel | 2 Comments »
Posted by C Scheftic on 2014/04/08
 In addition to the workshops I’ve offered in fine silver for what seems like ages now, I’ve also been teaching classes in these non-precious metals too, mostly on-demand private or semi-private sessions, plus a few in local bead shops. All were relatively short, covering just one or two techniques in one or two day (or evening) events only.
 Now, I’ve taken the best of the best and spiffed them up with some of the things I’ve learned in the last year with Hadar’s group of teachers worldwide. And I’m thrilled to be offering that great new combination in a four-session series, on Sunday afternoons in May, in my studio in the Regent Square (Swissvale) neighborhood, just east of Pittsburgh, Pennsylvania.
 Whether you’re a beginner, or already have some experience with metal clay, you will make at least four separate items: a bracelet, a pair of earrings, and two pendants. Some may involve a single metal; others will combine various bronze formulas with copper and/or steel. You’ll learn every step of the process, from design through basic construction and on to final finishing for your pieces.
You’ll get to use at least three different metals (from yellow bronze, champagne bronze, dark champagne bronze, iron bronze, rose bronze, copper, and/or steel). Don’t know the difference between them? You’ll learn that too!
 We’ll meet each Sunday in May (4, 11, 18, and 25*), from 12 to 5 pm. That’s 20 whole hours of instruction in a small class (max 6 students)!
* Yes, May is such a busy month! We will meet on Mother’s Day. But let me know if you’re hesitant to sign up simply because May 25 is part of the Memorial Day weekend. Several alternatives for that final date are possible!
Posted in Events, Studio, Teaching Metal Clay | Tagged: bronze, Champagne Bronze, class, copper, Dark Champagne Bronze, Friendly Bronze, Friendly Copper, Hadar's Clay, Low Shrinkage Steel, rose bronze, steel, White Satin | 2 Comments »
Posted by C Scheftic on 2014/03/19
While I was out at Hadar’s last month, finishing up my teaching-accreditation requirements, I got a chance to try several of the newest “friendly” (i.e., one-fire) clays that she has produced (and just now made available in her store).
This post is about “Friendly Bronze.” Hadar developed that one specifically to enable the production of various “married metal” designs, which I plan to discuss in some future posts. Before going into such complex designs, I wanted to try out Friendly Bronze just on its own, to get a feel for working with, firing, and finishing it.
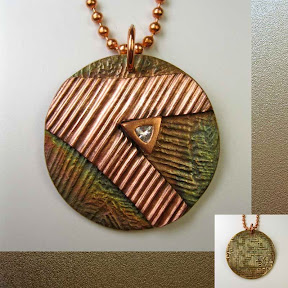
 Long-time readers of this blog will know that I’ve been happily making pieces out of Hadar’s Quick Fire Bronze XT for years (an example from last summer is shown in the first photo, left), despite the fact that it took 8 to 12 hours to complete a firing. (Yes, it takes that long for “quick fire”! But that process includes two firing phases with cool-down in between, so it’s the heating up, cooling down, and reheating of the whole kiln that takes all the time. The sintering part itself is relatively quick.) The whole heating up and firing process of the “friendly” clays, on the other hand, can be completed in just under 3 hours: much better!!! So, back home and on my own, I decided that my first trial run of Friendly Bronze in my own kiln would be a variation on one of my (other, many…) favorite pieces I’d made using some of Hadar’s earlier Quick Fire clays.
 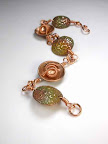 That one was my own metal-clay-based variation of a “Coils and Domes” bracelet that Maria Richmond sometimes teaches (here and elsewhere) that I wrote about a couple years ago. (Photo repeated here, right. I used “Quick Fire” Copper and Rose Bronze for that one…)
The metal elements for that project can be relatively simple, since they’ll be embellished later on. So I thought they would make good “test pieces” for my first firing of Friendly Bronze. I know that some people just make a plain strip to use as their test piece. And that others jump right in and start an elaborate piece without testing first. Me, I prefer a middle ground: fairly simple, but still something that I can use in a product creation. A handful of little domed hearts seemed perfect to use as my test pieces! I’ve included little photos showing how dark and colorful the results can be (hot from the kiln) as well as how they turn a nice yellow-bronze color with even just a light polishing (the photo shows them a little over half-way through my polishing process).
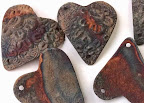
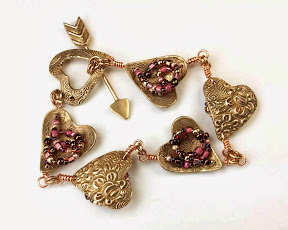
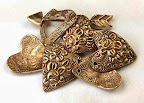 But I will admit that I had yet another reason for doing that: I wanted to enter the February 2014 Bracelet Challenge on Facebook sponsored by one of my local bead shops, Crystal Bead Bazaar. I needed to dream up, make, and photograph something in less than two days! (Well, I did have a month to dream it up, but I had to make it after getting back from several weeks of travel … on a trip that my luggage full of tools took several more days to return from. But that’s another whole story!) The challenge has a theme each month, and the theme for pieces made in February was “Romantic.” So, instead of wire-queen Maria’s wrapped-coils added to antique enameling-domes, I figured I’d add wired-up beads (in sweetheart-pinks, blood-bond red, and romantic-rose shades) to those brand-new rose-patterned domed-bronze hearts that I made (along with an open-domed heart and clay-tipped wire arrow for a toggle clasp). As far as I know, my entry is the only one that used any metal clay processes!
For the metal-clay part, I just mixed up about 20 grams of Friendly Bronze, rolled out five hearts (using a rose-pattern texture sheet on each side — the same one I used for the domed side of the first pendant shown above!) and dried them over the round domes on a paint palette (a slightly shallower one that I’d used for the bracelet shown above). For the bracelet’s clasp, I made a sixth heart that I also domed but, before it dried, I cut out an inner heart opening. Then I cut a piece of 16 gauge bronze wire, added a hanging-loop, scored each end a little bit, and added a bronze-clay arrow-tip and feather-texture end (actually, just between you and me, for the latter I used a tiny segment of a very geometric, non-feathery design). Once they were dried and all cleaned up, I fired them in carbon according to my usual variation on Hadar’s schedule.
(As I’ve mentioned before, my kiln tends to fire a bit hot, and to spike even hotter just as it reaches the goal temperature. To accommodate the former, I drop Hadar’s temperature by a specific amount; and to work-around the latter, I program a two-segment firing, where I stop it short of goal for a few minutes and let it spike there, then ramp the last few degrees very slowly to keep it from doing that any more. But that’s just a case of knowing my own kiln. A terser person would just have said she fired them according to Hadar’s schedule, but I know some of you read this for the tips I hide in my lengthy prose!) Everything sintered beautifully, and was as easy to clean up as any other bronze I’ve ever used. And I’m thrilled with the final result!
If you like it, I’d sure appreciate your voting for my entry!
[Note, that “voting” for that piece via a “like” worked only during March, 2014. They announce only the first-place winner, which was not me. Since the vote-closing time was not announced in advance, I can’t be sure where this one ended up. But it did seem to have a strong hold on second place for most of the month. So here’s a big “Thank you!” to everyone who did vote for it! I’m hoping to enter again at some point, and will post that again here….]
Posted in Challenges | Tagged: bronze, copper, Friendly Bronze, Hadar's Clay, rose bronze | 3 Comments »
Posted by C Scheftic on 2014/03/08
 I thought about using the photo I include here as the “punch line” to the post I wrote yesterday about shopping, then decided it deserved its own little spot.
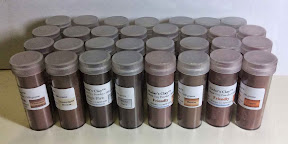
The twenty-four tubes in the front are most (but, aack my wallet cries out, not quite all) of what I had shipped back from the workshop at Hadar’s last month: all five of the new clay powders we were able to try out: Champagne Bronze, Dark Champagne Bronze, Friendly Bronze, Friendly Copper, and White Satin. The seven tubes along the back contain prepared clay (i.e., already mixed with water) that I hadn’t yet finished off so, in addition to the new five, there’s also some Low Shrinkage Steel XT and Pearl Gray Steel XT in that row.
What’s missing from the photo? Well, I store my clay in a repurposed CD cabinet with lots of little cubby-holes. I already had spots for the two older steels; had those put away before I thought to take a photo; and then couldn’t even remember how many new tubes I’d added to the existing stash… The thing is, Hadar has at least one more “friendly” clay coming out (i.e., that debinders and sinters in a single firing comparable in length to that of the much-easier-to-fire fine silver), and it’s a Friendly Rose Bronze. I’ve loved working with her original Rose Bronze since I first got my hands on it, so I know I’ll be ordering some of that before I’ve worked my way through all these.
Not to worry, though, I’ve got a workshop series coming up in April and May. It’s based on the Teacher Accreditation program from which I just graduated, expanding offerings I’ve been offering for several years. I’ll be ordering more clay powders for participants to use in that, and will get myself some Friendly Rose Bronze then. (And, no, I don’t know the date when they’ll be officially released to the public. As an Accredited Teacher of Hadar’s Clays, I can get small amounts early, not enough to stock a reseller’s shop, but all that I need for my own testing and teaching, which is great!)
So I need to stop nattering here and go make some pieces to sell, and teach some workshops (including several more using fine silver this month!), to bring in enough money to pay for all these purchases: the travel and workshop expenses, studio rent and insurance, as well as the clays, beads, chains, and all!
~~~~~
p.s., There are still some openings in my various classes and workshops, so do let me know if you’d be interested in taking any of them! (Although, since some have far fewer open seats than others, I suggest you let me know quickly….)
Posted in Shopping | Tagged: bronze, Champagne Bronze, copper, Friendly Bronze, Friendly Copper, Hadar's Clay, Low Shrinkage Steel, Pearl Gray Steel, rose bronze, steel, White Satin | 4 Comments »
Posted by C Scheftic on 2014/02/19
Another new clay means another trial making rings!
 Though I love rings–both wearing them myself and admiring those on others, in shops, at galleries–and I love making small adornments using metal clays, in general rings are not my favorite things to make. I’ll leave the reasons for that for another post specifically about rings. Why? Because today I want to talk about rings made from another “new” clay! Now that I’m familiar with a number of different types of metal clay, one of the things I often do to try to get myself comfortable with a new one is to make myself some rings out of it–to test what it’s like to work with–and then wear them everywhere–to test how they hold up. And my first question about an iron-bronze formula in particular was whether it would hold up as well as I might expect under all the stresses I put on rings.
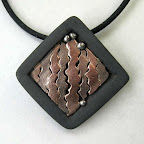
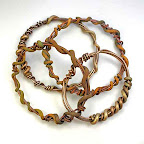
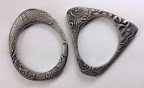
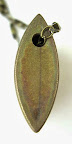
So one of the first things I made when I got my hands on a (pre-release!) tube of Hadar’s new White Satin was to try making a couple of rings. I wasn’t going to be able to make them my favorite way (with iron in it, I was not going to count on being able to fire the shank first and then form it around a mandrel–a method that pretty much guarantees it will come out a perfect fit–and I was too eager to try it to first make a little test strip to see if/how I could manipulate it, though if will try that eventually…). And I didn’t want to make a ring using the “common” metal clay way, shaping a band in the clay-state (with lots of potential shrinkage-issues during firing). So my first White Satin rings were a pair of seamless stackers with each one textured on one side (using the “eastern paisley” design from Cool Tools) and plain on the other side.
 My plan was to make them two different shapes, and wear them with the “plain” sides together. And, no, they didn’t warp during firing: I made the openings oval on purpose!
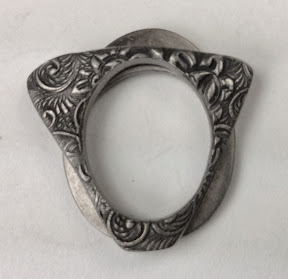
I usually make my rings either oval (as shown here) or square-ish (a rounded-corners trapezoid). The latter is easy with metal I can whack around something like the finger-shape mandrel from Rio Grande. Since I wasn’t yet ready to try that with White Satin, I just cut the clay itself with an oval opening. Hadar said rings would shrink about 3 sizes, so I used that for my beginning estimate.
Though, since I was making my rings oval, I did cut the opening a tad smaller than that. What I really did was to fit a narrow strip of metal inside a ring sizer at the +3 size, but then trim it a tad smaller. I then shaped that into an oval, and used that to cut my clay. The reason for down-sizing a tad is that, to put on an oval ring, I turn it sideways until it’s passed over my knuckles, but then turn it back up to wear. The “twist” allows the larger-direction opening (still at the +3 size) to fit over the larger-dimension part of my finger. But when it gets twisted back again, the straighter side (now smaller and narrower) holds each ring upright better, so I don’t have to keep straightening them.
The rings shown here were fired and then polished. And they did come out fitting the finger for which I was trying to make them! Since they contain iron, which will rust, they were sprayed with an acrylic protectant. Since they are rings, I have no clue how long that protection may or may not last. That’s what I’m now trying to test! I’ve been wearing them off and on for almost two weeks (more on than off, but nowhere near constantly) before taking these snapshots. They seem to be holding up fine in the short term. It’ll just take more time to see how they do over a longer stretch.
In the meantime, I am very happy with the results so far, and I hope you appreciate this early-report.
~~~~~
Update: This post originally referred to White Satin as a form of steel. I have since decided that it is more appropriately described as a form of iron-bronze, and have edited the post to reflect that. (Bronze is an alloy of copper and tin. Different proportions yield metals of a different color. Rose bronze, for example, has more copper than does the typical yellow-bronze. White bronze has more tin. which produces a nice color when used as an accent, but results in a metal that is too “fragile” to be used as a major structural component. Hadar’s White Satin is a bronze formula that contains some iron too, which produces a black-metal that can be polished to a white-metal color but has the strength more like that of a typical bronze….)
Posted in General Techniques, Learning Metal Clay, Technical Details | Tagged: Hadar's Clay, iron bronze, rings, steel, White Satin | 6 Comments »
Posted by C Scheftic on 2014/02/14
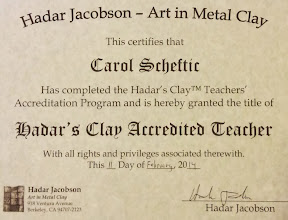
It has been one long, fun, hard, exciting, challenging year, with lots I’ve learned and still more I’ve been inspired to explore further, but I’m now a “graduate” of the Hadar’s Clay™ Teachers’ Accreditation Program.
As I write this, there are about two dozen of us around the world. Maybe a dozen or so more should be added in the next month. There’s a second group that should finish before the end of the year. I feel truly honored to have had the opportunity to spend the past year working with such an amazing and wonderful group of artists and explorers.
I look forward to the adventures we’ll continue to have together, and to continuing to share them with my students and with all my other readers here. Check for links to my workshops down the right side of this blog. My first four-part series based on this program will run in my studio during April and May of this year. (I’m still teaching silver too, and have four individual classes set up for that in March.) Do let me know if you’re interested in either the silver classes or the base metals series … or both!
Posted in Hadar's Teachers, Learning Metal Clay, Teaching Metal Clay | Tagged: bracelets, bronze, copper, earrings, Hadar's Clay, pendants, rings, steel | 2 Comments »
Posted by C Scheftic on 2014/02/08
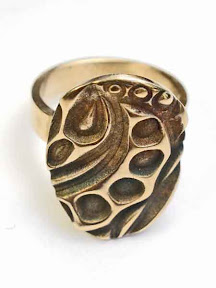
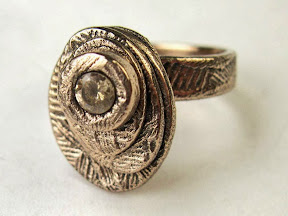 Here’s another Champagne Bronze ring, this one topped by (hey, I just couldn’t resist it) a Champagne CZ. This one took a little while to tell me what it wanted to be….
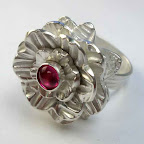
It incorporates several of the other bits I said I’d try to write about another time in an earlier mention of shrinkage. The strip that I bent into this band didn’t shrink anywhere near as much as I’d expected, which caused me to re-think how I’d assemble it. The oval pieces on the top shrank about as much as I was expecting in length by width but, as far as I can tell, they shrank not at all in height. And that height matters in the re-design of this ring too: I’d thought I might make it so that they could spin (like the petals in my fine silver flower ring with ruby), but their thickness made that difficult. Yeah, I know ways around that, but this was just a supposedly-quick little trial piece, so I tried something else, to confirm how well they’d fuse in place. That did work out well and, again, I like the color (even though it still looks a bit more like sparking rose´ than champagne to me, though not quite as much as the first one I tried).
I can of course make a bronze spinner later, when I can find time to do more accurate calculations on the shrinkage and actually plan it out. For now, I’ll just wear this one as-is, and quite happily, as a test of how rings made this way with this new product will hold up. Which is probably all for the good anyway, as I’d’ve treated a spinner as a special-occasion ring, when having another nice Champagne Bronze ring for everyday wear is far more practical.
Posted in General Techniques, Learning Metal Clay | Tagged: bronze, Champagne Bronze, CZs, Hadar's Clay, rings | 2 Comments »
Posted by C Scheftic on 2014/02/05
 Have you been wondering why, so far, all my posts about Hadar’s new One Fire Trio have mentioned shrinkage? Every single metal clay piece of any sort will shrink during processing: as you let it dry (i.e., as the water evaporates), burn off the binder and, finally, sinter it. During each of those steps, things contract a bit. Exactly how much varies by product and technique, but it still happens. For many items, this either isn’t an issue (so what if a lentil bead comes out a tad smaller) or it can even be an advantage (for sculptural pieces, being able to work a bit bigger and have details end up magically smaller can be a real treat).
But, for rings, where the band-size really does matter, then shrinkage matters. A lot. Which is why several of my recent posts have noted shrinkage among the various One Fire Trio products in particular.
Even though I’m still puzzling over that, I have to tell you that there is one feature of Hadar’s new Champagne Bronze powdered metal clay product that I just love: with Champagne Bronze, I can bend ring shanks around a mandrel!
 Years ago, working with fine silver, I figured out a way to make rings that I love (and that I later found out that some, but apparently not a high proportion of, others use and love too), a way that removes most of the shrinkage concerns. I make the strip that will become the band first. And fire it as a strip, so it shrinks. Then, I bend the fired-strip into the ring shape that I want, fiddle and adjust and tweak it so that it’s exactly what I want. I add any top-decoration to that, and refire the whole thing. The bit on top will shrink a bit, but if my estimate of that is off a fraction of a millimeter, it’s rarely noticeable. But the already-fired band should (if it was fired properly the first time) come out the same size it went in. To be sure, that approach does not work for every possible ring design but, for the ones where it does— Voila!—there are simply NO sizing issues.
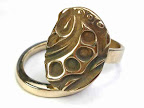
That was a real advantage when I made the spinning-flower ring with ruby, shown first above. When I ventured into Hadar’s Smart Bronze (another one-fire clay), I was advised against trying to bend that, so I had to use the “traditional metal clay” methods with it. Though I like the two rings (second photo) that I made with it, neither ended up sized quite the way I’d wanted. They’re for me, so I just wear them on different fingers than I’d planned; the only problem with that shift is that I can’t wear them in combination with some other rings the way I’d wanted. (I don’t wear rings when I work, but I love wearing lots of them when I’m out and about.)
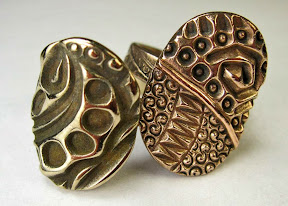
What I’m reporting today, however, is that my first Champagne Bronze ring fits beautifully. I include a photo of it, below, paired with one from my first attempts with Smart Bronze. The difference in the size and shape of the decorative top was intentional (i.e., I’m not trying to illustrate shrinkage this time); the image does, however, give you a good hint as to the difference in the color of the two products. (Next to Smart Bronze, this does look a bit pink. Next to Copper, or even Rose Bronze, this looks to be much more of a yellow-bronze tint. I’ll try to post a few more comparisons, using some other pieces, but it may take me a while. There’s lots to do right now, too much to justify all the time I’ve spent with Champagne Bronze and Friendly Copper. But, me, I just felt I had to try to complete at least one such ring! So … more when I get caught up elsewhere.)
Posted in General Techniques, Learning Metal Clay | Tagged: bronze, Champagne Bronze, Hadar's Clay, rings, Smart Bronze | 2 Comments »
Posted by C Scheftic on 2014/02/01
If you’ve stumbled across this blog / post without a lot of previous metal clay experience, you may want to just click on the photos to enlarge them and read the brief notes there. For the rest of you, I’ll start by asking if you remember the earrings I wrote about last week?
For today’s post, I’ll start by saying a little about the steps I went through in making the bronze-parts of the two-metal earring pair I described earlier.
- Grab a good-size chunk of Champagne Bronze clay.
- Roll it out to a thickness of four cards.
- Position cards around it, two cards high.
- Use a thin, straight edge to cut two distinct sets of five intersecting lines. (This was done freehand, so their positions are similar but not identical.)
- Use a circle cutter to make two “large” circles.
- Use another circle cutter to make a “small” circle inside each of the “large” ones. (Again, done freehand, so their positions are similar but intentionally not identical.)
- Do all the usual clean-up and drying of the various bits of clay.
When the circles had dried, I used the small, matching “inner” circles (where each set of lines all intersect) over some Low Shrinkage Steel XT to make the earrings I mentioned before. So far, so good.
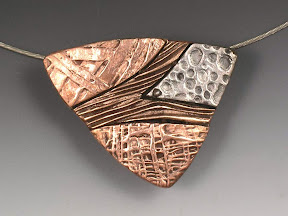
 Looking at the dry “outer” circles (washers, actually: the larger circles with their centers removed), I had another idea. Using a texture sheet with some concentric circles, I rolled out two more sheets of clay, one each from Friendly Copper and Low Shrinkage Steel XT. Then I centered one of the bronze “washers” over each of those, and cut a matching circle out of each clay. Finally, I rolled out another pair of those two clays, this time using two different “flowered” textures, and cut out a third circle of the same size from each of those. Both the circles- and the flower-design were rolled to four cards at first and then, with the textures, down to two cards. (I didn’t roll the clay with textures on both sides because: (a) I hadn’t yet decided for sure how I would use them, and (b) I wanted to center the designs on both sides the way I wanted, and doing that separately for each side was easier.) I set all those aside to dry (as well as a few other bits I’ll try to write about another time), figuring I’d use them for something….
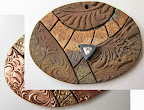
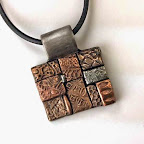
A few days later still, I got to wondering about the “high fire” temperature of these new “one fire” clays. In general, even with this new trio, it’s the bronze that’s going to limit how hot the product can get during the sintering process. Would the “bronze embeddable” bails survive that heat? (I use them myself, on occasion, and I often offer them to students, especially in introductory workshops, because they can save a bit of time when compared to having to make one’s own bail.) So I took one of the bronze washers, attached the copper disk with circles and let that dry, then positioned the embeddable bail and attached the copper flower-design disk. Once all that had dried, I filled in a few little gaps, dried it all some more, and finally fired the piece.
The results were interesting, as shown in the first photo, above. It all sintered just fine. The bail did blister a little bit: not enough to ruin it, but enough that any metal artist “in the know” should be able to spot what happened. But I still think it’s interesting.
There was one small blister on the sintered bronze section. My first thought was that I’d overfired the batch a bit, but then I realized it was exactly over the post on the embeddable bail. Silly me, I didn’t think to capture a photo of that: What I did was to immediately see if I could polish it out. Easy! I’m not done polishing this piece (it was just a spur of the moment creation, not a planned project), but I think the photo I include here (click on it for a bigger version) gives you a hint as to the blistering on the bail (in case you’re someone who uses them too), and to the way it does look like the disk itself will polish up nicely with a little more work.
There’s one other item worth noting: how the bronze in the bail alloyed a bit with the copper on the other side! Look at the side shown to the right in the first photo, up near the bail, and notice the golden-colored patch. Alloying! Again, artistically, I’m OK with its looking like that. But it’s good to know it will happen.
 A few days later, I got to wondering, would the bronze wire I sometimes use with such pieces show the same blistering? [Later clarification: I’ve used that wire in the past with pieces made using Hadar’s Quick Fire bronze. That’s a clay that takes a two-phase firing and only mid-fire temperatures and it’s always held up beautifully in pieces fired that way. Here, I’m otherwise reporting on the newer one-phase high-fire clays.]
So I made a simple wire-loop bail out of phosphor bronze (melting temp listed as 1800°F), then took the other (matching) bronze washer and the Low Shrinkage Steel XT disks, and assembled it the same way as I’d done before. I fired that using the same schedule too.
And, again, I noticed a bit of blistering on the bail and, with this wire-design, a bit of fusing across the loops. Again, I think that slightly grainy look is OK. Other than a quick clean-up, I have not yet stopped to polish this one at all. But I decided to post about it quickly because, this time, the main piece shrank much further away from the bail. In its clay state, the loops were pressed lightly down into the piece, but the post-firing separation is visible in the photo. No alloying with the steel though, which is also good to know.
But you have to see the two together to catch what surprised me the most: the difference in shrinkage! They started out exactly the same size, and look how different they are now. The current (as I write this) Hadar’s Cheat Sheet (.pdf) says that, on their own, Champagne Bronze shrinks about 30%, Low Shrinkage Steel XT about 28%, and Friendly Copper about 25%. Combos will be limited, to some extent, by the least-shinkage clay in the mix. But there’s only a 3% difference between LSStXT and FrCu, and it sure looks to me like there’s more than a 3% difference in the results here. What I can feel, but can’t really show here, is that there is maybe a 3% difference in height but it’s in the wrong direction. The one made from copper is a teensy bit thinner (i.e., more shrinkage, not less).
I really do like the results I’m getting with these clays, and the 3-hour firing time is a huge help compared to some of the others. But, with the others (and any of the “older” clays, both precious and non-precious), I think I have a pretty good feel for the shrinkage. With this new One Fire Trio, I’m still exploring….
What are you finding with them? Do leave a comment!
Posted in General Techniques, Learning Metal Clay | Tagged: bails, bronze, copper, embeddable, firing, Hadar's Clay, shrinkage, steel, wire | Leave a Comment »
Posted by C Scheftic on 2014/01/25
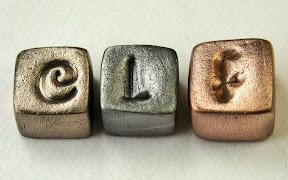 Here’s a photo showing a few more little bits from my first trial firing of Hadar’s One-Fire Trio. Though I didn’t start out by making them as perfectly-similar as would be required for a scientific comparison, I did roll and cut them to the same size. So, in order, from the most shrinkage to the least are: Champagne Bronze (C), Low Shrinkage Steel XT (L), and Friendly Copper (F).
I’ll have to see if the apparent ratios continue to hold with other cubes. (That is, some differences could just be due to my having mixed more or less water into the different products. And I just stamped the letters in by hand, which could have changed the shapes a bit too.) But, with the other pieces I fired at the same time, the ratios do seem to vary depending on the shape of the piece being fired. I don’t have enough data yet to be sure, and these cubes are the only items where I made three matching pieces to start with.
But I will say that, while the Champagne Bronze cube did shrink somewhere around the proposed 30% rate all around (per the Cheat Sheet for Hadar’s Quick-fire Clays on her blog), a ring shank made from the same batch shrank barely 15% in length and a bit less than that in width. (Its height/thickness is just too small for me to accurately measure whether all the remaining shrinkage went into that, or not.)
Still, I figured I’d share the preliminary results. Please add a comment if you try these clays and find results that are either similar or different!
Posted in General Techniques, Learning Metal Clay | Tagged: bronze, copper, Hadar's Clay, steel | Leave a Comment »
Posted by C Scheftic on 2014/01/24
It’s taken me a while to post again as the state of mini-crises has continued, but I won’t bore you with those details. Instead, I’m delighted to report an exciting new development: At the start of the year, Hadar announced a new One Fire Trio that includes two new metal clay powders that, along with one of her older ones, can be de-bindered and sintered in just one firing (rather than the two separate ones that many others require). Their total firing time is just under 3 hours. Wow! Compared to the usual 8 hours (if you fuss in between) or 12 (if you don’t fuss but do sacrifice more carbon), that’s a huge difference!
The older member of the trio is Low Shrinkage Steel XT. On its own, it could be fired in a single kiln-run, but that limited the combinations in which it could be used. Also, it’s a high-fire clay, so it could only be used in small amounts with some of her other clays, the ones fired at lower temperatures. But, with the introduction of two new clays—Champagne Bronze and Friendly Copper, both of which also use high-fire and single-phase processes—it is now possible to produce more combinations.
Each of Hadar’s metal clay powders have their own advantages and disadvantages compared to the others. No one product (or small set of products) from her or (or any other producer) is yet able to achieve everything an artist might want. But each new combination offers new opportunities, which is what makes them so exciting! I am sure that some people got these clays and proceeded to develop complex creations. But me, I prefer to get to know the clays in simpler ways first, to discover their advantages and limitations. I have a few more-complex pieces in the works, and I’ll get around to completing their construction and firing them eventually. This post will show a few of the simpler pieces I tried first.
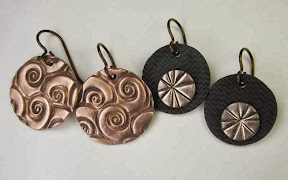 The earring pair to the left was made with Friendly Copper. The pair to the right used Low Shrinkage Steel XT in back, with the embellishment in Champagne Bronze. After firing, the copper and bronze were very lightly polished (just a quick pass with one set of (3M yellow) radial bristle disks); the steel is as it came out of the kiln; the earwires are anodized niobium (that I just happened to have handy). If / when I can find the time, I may fiddle with finishing them a bit more but, for now, I just could not resist offering this quick sneak peek!
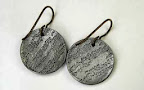 The second (smaller) photo shows the other side of the steel pair, after each piece has been quickly polished in the same way as the copper and bronze on the fronts. I did that because I wanted to show the polished-steel color on its own, even though I liked the black+gold contrast in the combination on the other side of these. (Although ensuring that the black will stay black—neither shining up to gray nor rusting out—will require some of that additional finishing I just mentioned….)
One note on firing: Hadar says that firing any of the clays in this trio takes her 2:45 (2 hours and 45 minutes). For these, I used a brick kiln, outdoors on a covered patio, when the air temperature was around 25°F (-4°C). I also know that this particular kiln tends to overshoot the goal temperature early on in the firing process, regardless of the temperature of the air surrounding it, though it holds the temperature fine once it’s had the chance to swing up and down a few times. My work-around for that is to set a two-step program, where I first get it near the goal temperature and tell it to hold there for a couple of minutes (allowing it to spike higher there), then ramp it slowly to the real goal where it can hold for the required firing time. With those two differences between my set-up and hers, firing these pieces still took only 2:58. As I said above, that’s a real treat!
Another note on my kiln: I don’t leave it outside all the time. I keep it inside and just haul it out when I need to fire it. (If I fire it indoors in winter, when I don’t have any good way to vent it and I’m using carbon to provide an oxygen-reduced atmosphere inside the kiln, my CO detectors signal a problem!) Hauling it in and out takes only a few minutes each way, so it’s not a major problem, even when the temperatures are in the 20s. But, they’re currently hovering around 0°F, and that puts enough of a strain on my furnace, me, and more. I’m not leaving doors open to move kiln, kiln “furniture,” the stand, various tools, power strip, gloves, safety glasses, and more both out and then back in again.
In other words, even though I have more pieces underway, it may be a while before I get around to firing them and posting the results. It’s just winter … and I don’t mind at all living at winter’s pace … for a while.
Posted in General Techniques, Learning Metal Clay | Tagged: bronze, copper, earrings, firing, Hadar's Clay, steel | 1 Comment »
Posted by C Scheftic on 2013/12/14
Have you heard the buzz? Six sites! All in the Pittsburgh area’s “East End” this weekend: Regent Square, Swissvale, and Squirrel Hill. And my studio is one of the locations on it again this year.

I’ve got lots of jewelry on offer, plus a handful of other small adornments.
I also have aloe vera plants that need a new home, babies that i repotted from some of the big ones I keep around. (I do work with hot metals here!) BONUS: small ones are free with a purchase of $35 or more (or a discount can be applied to the price of any of the larger ones if that’s what you prefer).
Plus you’re welcome to share some of my cookies and hot mulled cider. (I also got the makings for cranberry-orange frosties but, with all the snow that’s falling, I’ll save that until there’s a request or I run out of cider, whichever comes first.)
Happy Holidays to all!
Posted in Events, Studio | Tagged: aloe vera, Art Buzz, Art Clay, bails, boxes, bronze, collage, copper, domes, earrings, enamel, fine silver, gemstones, Hadar's Clay, handmade, hollow beads, lentil beads, mosaic, pearl, pendants, PMC, Regent Square, reversible, shows, steel, stones, texture, twists, weaving, WSCC | Leave a Comment »
Posted by C Scheftic on 2013/11/12
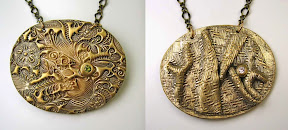
 Back in August, I wrote about one of a series of “pillow” beads I’d made using Hadar’s Quick Fire Bronze powder. In particular, I ended the post with a photo of the amazing colors the kiln provided that time, and a comment that I knew they were somewhat ephemeral.
Well, yes, after only a short time (and despite having tried to “protect” them with several layers of acryllic spray), they became rather dull. Still there, but no longer jump-out-at-you vivid. So I proceeded to do some polishing (moderately aggressively in the center-design area, and more gently around the edges) and then re-coated everything. This provided pieces with clearer bronze-yellow center-designs, while still maintaining a trace of the kiln-colors around the edges. I didn’t really think the vivid colors would last, but the subtle ones shown here have remained much more stable ever since. I’m pleased with these results.
 The thing that did surprise me, however, was something that had not been at all obvious with the vivid coloring, but did jump out at me (peering closely through my bifocal safety glasses for magnification as I worked): my straight pencil-lead “registration” marks — ones that I’ve come to use often (to align parts or holes or … ) on silver clay that is fired in regular air — do not simply burn off when you bury bronze in activated carbon during firing. Who knew?! Did you? It was a surprise to me, so I thought I’d share it with y’all.
If you want to give your piece a bright, shiny polish, it’s very easy to grind (sand) the marks off. (I did that with another piece, just to be sure, though I didn’t think to grab a before-photo to use here.) But I didn’t want to do that with the pieces shown above, especially not to the one towards the right (on a brass chain). I liked its aged, colored look. So I’m just leaving the straight-line mark. I showed the piece to a number of people (metal clay artists and otherwise) and, in person, it didn’t seem to jump out to anyone (until I pointed it out to them). I’m now just calling it a part of this piece’s design.
These are now ready to go off for holiday-season sales. I hope they find good homes!
Posted in General Techniques, Technical Details | Tagged: bronze, color, Hadar's Clay, hollow beads, kiln-colors, pillow beads, polish | 1 Comment »
Posted by C Scheftic on 2013/08/31
 While I’m still thinking of it, here are a couple other hollow beads I’ve made recently, and the armatures on which I built them.
Well, let me start with the armatures. In the first photo, you can see two oval-dome parts of a graduated, five-part “doming plate” that is sold specifically for use with metal clays. (This one actually belongs to a friend, who won it in an online contest!) Below that is a square, blue, glass “rock” that is sold in the floral-arranging section of a craft store. (That is mine, one of three I found in the back of a drawer in a house I rented for a while. I liked their sea-blue color.)
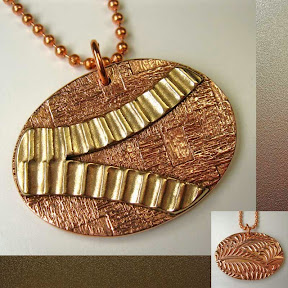
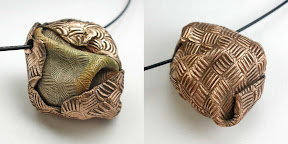 The first piece shown here, reversible with both sides in the photo to the right, was made with the glass rock. I covered it with a plain layer of bronze clay, let that dry, cut it open to remove the rock, and pasted the two parts back together again. Once that seam had dried, I then covered it with what I thought of as three different “blankets” — each with a different woven texture using a different metal (all from Hadar’s Quick Fire clay powders). The first layer was bronze which, when fired, had a lovely sort of blanket-y color that I left alone. The next layer (the wavy weave) is rose bronze, and the outermost later (a straight weave design) is copper. I did them in that order because I’ve found that copper layered over bronze, with air-filled gaps in between, sometimes alloys into odd colors. The rose bronze serves as a sort of buffer to help avoid that. (And, I just like the color of the rose bronze metal!) Both the rose bronze and copper were polished with radial bristle disks and silicone wheels to bring out their shine.
The second piece shown here, also reversible, with both sides in the image to the left, is all bronze, and was made with the second-largest shape on the doming plate, with some additions. First of all, I cut a flat oval shape just a bit larger than the dome. I let that dry, attached the dome, and dried it yet again. Then I rolled out a thin, textured layer and “draped” that over the other side of the flat oval. I used a straw to prop open a place near the top, to serve as a bail, trimmed the rest to match the oval, and let it dry one more time. After cleaning it up a bit, I fired it. I decided to polish this piece using the same tools as I had on the “blanketed rock” piece.
Although these are both relatively simple pieces, they illustrate one of the things I find so very engaging about working with metal clay: the wide range of creativity it brings out, not just in the designs one ends up making, but also in the range of items one can either find or adapt to use as “tools” to aid in the making. Maybe I can remember to show more of those over the next few weeks. In the meantime, feel free to leave a comment describing other such items in your “tool” stash!
Posted in General Techniques, Technical Details | Tagged: Art Clay, draping, fine silver, Hadar's Clay, hollow beads, metal clay, PMC | Leave a Comment »
Posted by C Scheftic on 2013/08/21
 I like making hollow beads. I sometimes wonder how much of my fascination with them is because the first piece I ever made using metal clay was a hollow bead, shown to the right, and how much is simply because they can be both fun and interesting to make. I’ll never know the answer to that, but I expect to continue enjoying making them.
In the class where I made that bead, I dried the pieces for each side over a light bulb. The nice thing about light bulbs is that, if you prop them up with the screw-end down, their tops really are nice and round. Why does that matter? Because it means you don’t have to worry about centering, or otherwise specifically positioning, your clay on it to dry. You just move it onto the bulb, carefully press it down to match that curvature, wait for it to dry, and admire the nicely symmetric results.
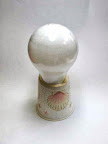 There are a few minor complications with using a light bulb. Nothing serious, but things to consider. How will you prop the bulb? In that first class, the teacher had two kinds of holders: one was a small paper cup turned upside down with a slot cut into the base and the other were small blobs of polymer clay into which she’d pressed the end of a bulb to form it before curing that clay. (Of those two, I have a small preference for the paper cup approach (as shown here, to the left) simply because, when I’m storing enough of those to use for a class, I can stack the cups so they take up very little space.) Another consideration is that you are then working with (i.e., moving around) a piece of oiled (i.e., slippery) glass, where slippery means easy to drop and break. Can’t you just hear the “voice of experience” there?!
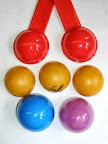 So, what else to use for an armature? A few of the things that I’ve tried (some of which are shown, to the right) include the following:
- plastic eggs (bottom), but you have to take care to use the “round” end because, with the “more-pointy” end, then you do need to take a lot more care with how you position your clay on it to dry;
- measuring spoons (top) but, again, you need to take care to get round ones;
- ping-pong balls (middle row), which I like to cut open so they don’t roll around, and
- plastic paint palettes (not shown) which, like the other items shown in this colorful collection, are also “open” on the other side, so you can turn them over and position your clay on the inside too, should you want to do so.
 Which armature is best? I don’t have any one favorite. So, how to choose which one to use? Me, I think about the size of the piece I want to make, and the amount of curvature I want it to have, and pick whatever happens to match that the best. And sometimes, yes, I do return to the old light-bulb trick, as I did with a piece I made recently out of Hadar’s Quick Fire Bronze clay. This piece was not going to be round (like my first-ever piece); I wanted this one to have more of a “trapezoidal” shape (i.e., a rectangle with only two parallel sides). This piece would be fairly large but, because of its non-round shape (meaning it would end up having four “side” or “edge” areas that I would then have to fill), I did not want it to have a lot of curvature. Instead of a “standard” incandescent bulb (as used with that first-ever piece), this time I used a larger round “vanity” bulb. With those, instead of turning a cup upside-down to hold the bulb, I’ve found that they fit nicely inside a large cup. So that’s how I positioned my two “trapezoid” pieces for drying. Since this was the last piece I started one day, I just positioned them over the bulb, made sure all the edges were tucked down smoothly, and left them to dry over night. As I was packing up my camera, for no obvious reason I decided to snap a quick photo of them before I left.
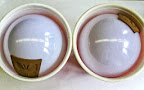 The next morning, I was surprised (which, in fact, surprised me even more: I was surprised at my surprise….) to find that, once dry, they had released themselves from the bulb, and slid down to the side, where they were caught by the cup holding the bulb! Whew! I would have been very disappointed if the dry pieces had fallen from a noticeable height onto the tabletop and, perhaps, even then bounced down to the floor (as could have happened if I’d stuck them into an overturned cup) and, quite possibly in their “dry clay” state, cracked or even broken apart from the fall. (Yes, I know how to patch them should that happen, but it takes time and effort that I’d rather just avoid. And pointing that out to you, dear readers, is the whole reason I decided to write this particular post!)
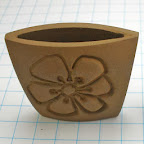 Since I mentioned the “edges” this piece would have, this next photo (left) shows the opening along the “top” of the piece after I’d attached the two main elements. (I hesitate to call them the front and the back because, like most of my work, this piece is fully reversible: it has two different fronts!) I’ve got it standing on quadrille paper (with 1/4 inch squares) to help give you a sense of its size. Once I had covered each of the four edges (the openings that I’d wanted to keep to a relatively small size by using an armature with a relatively shallow curvature), I inserted a bronze “embeddable” bail in the top and fired the piece.
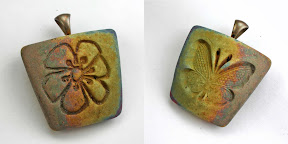 And I was delighted with the result. My original plan had been to finish this piece to a high shine but, given the colors the kiln decided to give it that day, for now at least I’m leaving it like this. Yes, I know, the colors are somewhat ephemeral. I’m experimenting with a new acrylic coating to see if / how it may help to preserve such colors. So this piece won’t officially be going up for sale right away, until I can see how it holds up. You may, instead, see me wearing it as part of the testing process. (Which I find to be another part of the “fun” of making pieces like this.) But, what do you think: if the colors do hold up, should I leave it like this, or remove the coating and polish it until it shines?
Posted in General Techniques, Technical Details | Tagged: Art Clay, fine silver, Hadar's Clay, hollow beads, lentil beads, metal clay, PMC | 2 Comments »
Posted by C Scheftic on 2013/06/30
 Before I wrap up my Smart Bronze test-reporting, I am inclined to take one last post to review and summarize a few of my thoughts about what I just put myself through.
My Test Firings.
Over the last five posts, I outlined the eight firings I called “trials” to master the firing of this particular clay. If I were starting the whole thing today, I think I could hit the right numbers in a mere three trials. Yes, that’s more than one test-firing, but I do find that to be a very manageable number. (Yes, eight was too many!) Why do I say three?
My first two firings were based on Hadar’s earliest information, right as this new product was released, before she had updated her Instruction Manual. Today, I would be starting with the later information, and avoid a couple of initial mis-steps with this new product.
My last two firings were, really, my first two production firings. I counted them as tests mostly because, having encountered some earlier problems, I was being particularly cautious before declaring my testing done.
Finally, the problems I had in one firing in the middle were simply because I’d spaced out and incorrectly programmed my kiln. Those did give me some more “confirmation” of what I thought had been going on but that should have been avoidable.
That leaves me with the three firings I think I would have taken to get it right. And you should be able to hit it right in two or three yourself, because you will know the following….
The “Trick” to Smart Bronze.
The conversion of all metal clays from a powder-form into a metal-structure one (oh, and regardless of whether they are precious metal (silver, gold) or non-precious (elemental copper or various bronze or steel alloy formulations)) requires that both (a) all the binder be burned off and, then, (b) the metal sinter and “soak” into a nice, densely-packed arrangement. In some cases, those can be done in one (sequential) process; in others, it requires two (separate) firing processes. “Smart Bronze” falls into the former category, which is its primary appeal over a number of other bronze formulations.
But you really do have to let Smart Bronze pieces spend a full hour in the “debindering” process. In a single-fire product, all the binder burnout happens during the ramp-phase of a firing. If it’s not taking your kiln an hour to do that ramping, you are probably not removing all the binder, and that will limit the metal’s ability to fully sinter correctly regardless of the temperature or time at which you “hold” it. You have two options for slowing it down: reduce the ramp-speed, or simply build a few minutes of “hold” time partway through the heating-up phase of a firing. (I did the former, as noted in this series of posts, with my brick kiln. I am thinking I may well try the latter when I get around to trying to fire this clay in my ceramic muffle kiln.)
Once you are sure you’ve adequately provided for the binder-burnout phase, only then can you confirm the actual goal-temperature that’s needed to allow sintering to take place. I know that our instinct, when sintering does not seen to happen as we’ve expected, is to try to adjust the final temperature or hold time with the expectations that such tweaking will solve the problem. But, until you get all that binder burned out, your metal will not sinter properly. You have to master the burnout-phase first. Every situation I have heard about where there has been a problem with Smart Bronze (at least so far) has involved inadequate sintering that, at least as far as I could tell, resulted from a problem in the initial heating up part of the process, when the binder should all be burning off.
A Note on the Color of Sintered and Polished Smart Bronze.
The two rings pictured with this post both contain large areas that have been polished smooth. The round, seamless ring has been completely polished. So has the band of the double-fire ring, as well as large, raised areas of its texture. In such cases, the metal polishes up to a bright, golden-yellow color.
On textures with lots of fine detail, however, such as the earring pairs in my last post, where you can’t really polish everything to a super-high shine, then the color looks to me to be more of a greenish-bronze. (During the testing, I tried both: (a) using sanding plus further polishing, and (b) tumbling in a rotary tumbler. And I got a similar greenish tone either way.)
I’m not saying that either one of the colors — golden yellow or greenish bronze — looks better than the other. Just that they are rather different, and seem to be a result of the texture rather than any other construction, firing, or polishing approach that I’ve yet been able to determine. I have definitely begun planning pieces with one shade or the other in mind (e.g., with respect to some particular stone-color I may choose to add to a piece). I’d love to hear whether (or not!) you find a similar pattern in the pieces you make out of Smart Bronze.
Because, my readers, I sure am hoping you’ll try Smart Bronze too. Once you “get it,” it’s great. I’d love to hear how your results compare to mine!
Posted in Learning Metal Clay, Technical Details | Tagged: bronze, firing, Hadar's Clay, Smart Bronze | Leave a Comment »
Posted by C Scheftic on 2013/06/30
This post continues the story I’ve been telling about coming to understand Smart Bronze metal clay….
By now I was feeling time-pressure on top of some test-process frustration. What pressure? The various “test” pieces in Smart Bronze had not taken that much time to make, in and of themselves. But their firings had been eating up kiln-time. I was making and firing pieces in other metals in between so that I’d have enough inventory for the Three Rivers Arts Festival (held June 7 through 16 this year). Aside from the rings, which I’d been doing just for myself, I’d been thinking the “test” pieces might serve as the “loss leaders” in my collection at the Festival: an option for someone who really wanted something of mine but could not afford the higher-end pieces. (I’d make sure to cover my actual costs with them, but would take some loss on my time by just calling that testing-learning overhead.) And I write about all of this, now, as a teacher: to illustrate that even someone who, in general, does know what she’s doing … can also hit roadblocks, make mistakes, continue exploring, and figure things out. Just in time!
Here’s what happened next:
Trial #7: Early June in a Brick Kiln
Hadar (still) said: Ramp at 1400 per hour to 1430°F and hold for 2 hours.
What I entered (correctly, this time!): Ramp at 1350 to 1395 and hold for 2 hours.
Program completed in 2:59.
Test pieces: Taking a risk, I fired all of these: another open-ended ring shank, several botanic pendants and a collection of earring elements. All came out looking fine! Whew!
Trial #8: Early June in a Brick Kiln.
Or, have I moved beyond Trial Firings to Real Firings?!
Hadar said: Ramp at 1400 per hour to 1430°F and hold for 2 hours.
I entered: Ramp at 1350 to 1395 and hold for 2 hours.
Program completed in 2:59.
 Test pieces: Once I’d attached a new “top design” to the ring shank from trial #7, I fired that in the kiln, along with another collection of little earring components. (Shown, here, are ten pieces I included in this particular load.) Once again, all came out looking fine. I could actually wear the ring! In the time since these last two “test” firings and my getting around to writing this report, I’ve sold almost all the earrings and pendants I stuffed into these test-loads. Success, at last!
And the ring, which I wore constantly during the Three Rivers Arts Festival and have continued to wear frequently since, is holding up beautifully:
I’ll close this series with one final post, summing up what I’ve learned in the process.
Posted in Learning Metal Clay, Technical Details | Tagged: bronze, firing, Hadar's Clay, Smart Bronze | Leave a Comment »
Posted by C Scheftic on 2013/06/29
This post continues the story I’ve been trying to tell for the past two days….
Trial #6: End of May in a Brick Kiln, in which you will see how your tester spaced out momentarily….
Why had that last load’s wrap-ring broken: was there a weak spot, or was the firing program still not right? I didn’t want to risk breaking the seamless ring too, but I thought maybe I’d try firing it a second time just to be safe. I’d also made an open-ended ring “shank” for a double-fire ring that I could put into this load, as well as a couple other simple textured butterfly pendants I’d made up while the last load had been firing. And I’d nudge the hold-temperature up just a tiny bit while I was at it.
Hadar (still) said: Ramp at 1400 per hour to 1430°F and hold for 2 hours.
What I thought I entered (which I’ll explain in a moment):
Ramp at 1350 to 1395 and hold for 2 hours.
Program completed in 2:59.
 Test pieces: Now, I had blistering. Just two little blisters on the open-ended shank (shown: first, right). The textured pendants were bubbly all over. So was the seamless band (shown: second, left): it had had a “perfect” finish on it but, since I’d broken the other ring I’d fired with it, I’d stuck it in to see if a second firing would better-sinter it and now it looked a mess. Fixable, I hoped, but still … why?!
 My first reaction was, yes, the load had been slightly larger than the previous one, but why so much blistering? Having felt a little bit frustrated at the start of this trial, now that feeling was building up even more. I’d worked on a few pieces in other metals between trials #5 and #6, and succeeded in gaining a bit of positive reinforcement for myself from their success. So I returned to more of those after trial #6. And. as I went to put those in the kiln, and set up the program to fire those, that’s when I noticed that I’d somehow spaced-out entering the program for trial #6, and gotten wrong both the goal temperature (slipping back to the previous trial’s number) and the ramp (where I’d entered the (wrong) goal number, not the ramp number). And, somehow, the firing time came out to be the same as other test loads, so that was no clue either. Argh…. ( I had actually been starting to wonder if, somehow, the load-timer was malfunctioning and always just returning the last reliable number it had ever had….) But, now, here’s what I’d done:
What I meant to enter: Ramp at 1350 to 1395 and hold for 2 hours.
What it seems I entered: Ramp at 1400 to 1400 and hold for 2 hours.
Little differences can mean a lot! What can I learn from my observations, both before and after I realized my mistake? The textured pieces had bubbles that clearly did not belong to their textures. Ugly! But, though the rings both, at first, looked fix-able, I was even more disappointed by them! The seamless band had blistered, but I was able to work away at it (for a very long time!) with various sanding attachments on my rotary tool until I got it back to a nice condition. Not as pristine as it had been after its earlier polishing, but still very nice. And, it had shrunk another whole size (meaning it had gone down by a total of three ring sizes), which told me that the refiring had resulted in more sintering. At least that was a good sign.  But the open-ended band, on the other hand, did not seen to have shrunk much, if at all; worse yet, it broke into three pieces when I slipped it (carefully!) onto my ring mandrel to check its size. Even though it looked at least reasonably well debindered, was it possible that the faster ramp had prevented all the binder from burning out? Or … what?! Of course, I’d made a mistake. It was just “little differences” here and all I needed to do was to go back to the pattern I’d been developing and it should work. I kept telling myself that.
So, let’s take a little break here, to clear our heads….
Posted in Learning Metal Clay, Technical Details | Tagged: bronze, firing, Hadar's Clay, Smart Bronze | Leave a Comment »
Posted by C Scheftic on 2013/06/29
This post continues the story I started telling yesterday, morning and evening….
By the time I got around to trying Smart Bronze again, a newer version of Hadar’s manual was out. Dated May 15, 2013, it told me that my goal in the first trial, 1420°F, was really only 10° below the (latest) recommendation, of 1430°F, whereas I’d intended to aim for 20° below Hadar’s recommended temperature. My second trial had still gone a bit too fast, yes, but it turns out that one really had been at my typical Hadar-clay adjustment of 20° less than the stated goal. That explained all the melting and left me a bit less worried, now, about whether I could get away with dropping my goal temperature some more as I also slowed the ramp speed.
Trial #3: Just after Mid-May in a Brick Kiln
Hadar (by then) said: Ramp at 1400 per hour to 1430°F and hold for 2 hours; total firing should take 3 hours.
I entered: Ramp at 1365 to 1400 and hold for 2 hours. This should have taken over 3 hours; the program completed in 2:58.
Rationale for my new program: (1) Further slowing the ramp should continue to improve the binder burnoff. (2) This was still only 30° below Hadar’s newer target (hold) temperature.
Test pieces: the last (and smallest) two “golden threads” loops that I’d made along with the ones “lost” in the first two trials.
 Results (shown, held up inside a slit in some green foam): Both test pieces seemed, at first, as though they might be debindered and sintered. But one small segment did break under very slight pressure (i.e., yes, the “threads” were thin, but this felt like a “normal wear” issue; I had not deliberately test-bent them but, instead, just lightly squeezed a wire-like bit with my fingers to get a good grip on it for polishing). It was hard to see the inside of the small ends. They seemed sintered, but perhaps not fully so. Still, this felt increasingly close to a program that should work.
What to try next: Since there had been so much melting in the previous trial, at 1410, I was hesitant to blame any inadequate sintering on too low a firing (hold) temperature. Since any not-burned-off binder will inhibit sintering, I decided to maintain the temperature and try dropping the ramp-speed a bit more….
Trial #4: End of the third week of May, in Brick Kiln
Hadar said: Ramp at 1400 per hour to 1430°F and hold for 2 hours.
I entered: Ramp at 1350 to 1400 and hold for 2 hours.
Program completed in 2:59.
Test pieces: I wasn’t sure if the thinness of the “threads” might have been a factor in the previous failure. So for this trial I reverted to a simple design I know and understand well: two small, round, simple, stamped butterfly pieces. (One each at 3 and 4 cards thick.)
Results: Debindering seemed to have happened as needed. The pieces sintered into a nice, solid metal. A few small blisters appeared, but they were fairly easy to polish down. The results looked lovely but I have no pictures: sorry! The reason for that is great: As I was finishing their polishing and stringing them up to photograph, a delightful fellow walked into my studio looking for a gift for his twin daughters and bought them both!
Trial #5: Brick Kiln
Hadar (by then) said: Ramp at 1400 per hour to 1430°F and hold for 2 hours.
I entered: Ramp at 1350 to 1390 and hold for 2 hours.
Program completed in 2:59.
 Test pieces: I was ready to go for it! I’d had several ring bands ready for weeks! One was made using the “seamless” ring approach; the other was made as a bypass or wrap-ring although I did “connect” the edges of the two ends as they passed each other. I did the latter because I wanted to help keep the piece a bit more stable than it would have been had I left it with “loose” ends.
 Results: Both seemed to debinder and sinter beautifully. My only concern was that they had not shrunk by the predicted 2.5 sizes. I was seeing them as not quite 2 sizes smaller. Was that enough? Had I dropped the temperature a little too much? Maybe. Maybe not. But I was hopeful. I first polished the wrap-ring, which looked gorgeous, so I wore that happily while I worked on the seamless ring. When I left my studio at the end of the day, the seamless ring was sitting there waiting to be photographed with its kiln-mate. (It’s shown, here, alone.) I wore the wrap-ring home. The next two days had me moving some furniture and packing-boxes from a recent home improvement project, along with other normal daily activities. I continued to wear the wrap-ring and, half-way through the second day, it suddenly broke into three pieces.
Admittedly, the wrap-ring design did have one “thin” spot. The band was an even thickness all around (which you can see from its greenware-state photo (brown color) above), but it been cut in a tapered shape, so it had the least “height” right where it met the large starting-edge. Which could have been a point of weakness. Which could have explained its breaking open. Or, maybe even breaking into two pieces. But its breaking into three pieces hinted to me that there was another problem somewhere. Less obvious, of course, was the exact nature of that problem.
Should I worry about the pendants I’d just sold? I think not. They were thinner, and less likely than a ring to get knocked around a lot. Still, there was another pause in my testing so I could think this through some more: and another point at which I’ll pause this record too.
Posted in Learning Metal Clay, Technical Details | Tagged: bronze, firing, Hadar's Clay, Smart Bronze | Leave a Comment »
Posted by C Scheftic on 2013/06/28
This post continues the story I started this morning, reporting activities from last month….
Trial #1: Early May in Brick Kiln
Hadar (back at that time) said: Ramp at 1400 to goal-temp of 1440 and hold for 2 hours.
I entered: Ramp at 1400 to goal-temp of 1420 and hold for 2 hours.
This should have taken just over 3 hours; the program completed in 2:42.
Test pieces: one small stamped disk and one “golden threads” loop (the latter was a simple project from Hadar’s blog when she introduced the product she calls Brilliant Bronze).
Results: Two test pieces were simultaneously under- and over-fired! That is they were under-fired in relation to the debindering phase, and over-fired in relation to the sintering phase.
How did I know this? What I found were small, uneven blobs of bronze (i.e., over-fired at the end) that, when handled and examined, disintegrated into small bits of metal and dust (i.e., under-fired at first). The firing finished late at night and I was tired and a bit frustrated: I tossed them before thinking to try to take a photograph.
What to try next: Even though this material can be fired in just one round, the conditions still have to be right for both (1) debindering and (2) sintering to happen as desired during the (1) ramp and (2) hold phases, respectively. Clearly, this kiln-program was not the right one on either count. I’d have to adjust it in several ways.
Trial #2: Early May in Brick Kiln
Hadar (still, back then, though later revised) said: Ramp at 1400 to 1440 and hold for 2 hours.
I entered: Ramp at 1375 to 1410 and hold for 2 hours.
This should have taken over 3 hours; the program completed in 2:45.
Rationale for my new program: (1) I was hoping the slower ramp would allow for better binder burnoff. (2) Since Hadar’s other clays all worked great for me at 20° less than her posted temperature, I wasn’t yet ready to go plunging further than 30° below her number.
 Test pieces: two more “golden threads” loops that I’d made along with the first-trial one. (Thinking I’d done with testing after one try, I’d added small ball embellishments to these.)
Results (shown): Both test pieces seemed, at first, to be a bit better debindered and sintered than the previous trial. They did show some signs of melting, but nothing like the last time. Still, they broke under very light pressure while holding them to photograph them. It was hard to see the inside of the small ends. They might have been somewhat sintered, but certainly not fully so. Still, this felt like some (if small) progress from the first mess.
At that point, I took some time off from this testing, and will pause my report here. Before I close this post, however, I’ll add one other thought.
A Comment on the Name: Smart Bronze.
As a customer, who is buying this product to use myself, the name almost makes some sense. First of all, unlike many other base-metal clay products (from Hadar and others), it should be possible to process this one in a single (reduced oxygen) firing. Many of the others require two firings of one sort or another, but this product was developed to be “smart” enough to both debinder and sinter all in one go. Which is very convenient! Also, it does polish up to a lovely color, a color that one might call “very smart”…. (And, for anyone familiar with Hadar’s Clays, a curious pun in comparison to her Brilliant Bronze.) But, as a maker, I do find it an awkward name. It’s not one I would want to use on the label of a piece I made using it. More on this in a later post (most likely after I’ve finished this whole series on testing).
Because that’s it for right now. But I’ll be back as soon as I can with more info.
Posted in Learning Metal Clay, Technical Details | Tagged: bronze, firing, Hadar's Clay, Smart Bronze | Leave a Comment »
Posted by C Scheftic on 2013/06/28
 The newest Hadar’s Metal Clay Powder product is called Smart Bronze. I spent over a month playing around with it, and I think I finally figured out some things about it. (Not everything, mind you, but at last I feel well on my way!) After then spending a few weeks catching up on a several other urgent tasks, I’m hoping I can finally find time to post here a collection of thoughts and experiences.
A Bit of Context.
OK, it’s not like a spent a solid month and more figuring this out. The time I spent did cover most of May, slipping into early June, but it was in dribs and drabs. To begin with, I am not a full-time jewelry artist! I do learn, explore, make, sell, write, and teach about it. Some weeks, it does end up being just about all I do. But there are other stretches when I don’t touch the stuff at all. Most of the time it’s somewhere in between those extremes. Averaging out over a whole year, I figure that I do this about quarter-time, or maybe a third (depending on how you count both “this” stuff and “full” time…), but only that. Whatever the actual proportion, it’s a delightful fraction, I must say! But more than that would feel like work and, though I am trying to treat it all in a very professional way, I also really want to keep this for fun. My point is that the fun I had figuring out Smart Bronze was a very part-time part of that part-time activity: though I’ll drag the description out for several posts, in reality it all went rather quickly.
Also, I have two kilns, in two different styles: one firebrick, and one ceramic muffle. So far, I’ve done all my Smart Bronze testing in the firebrick kiln. When I find some more drib-drab time, I’ll try it out in the muffle kiln too. But if you are reading this in the hope of learning from my experience before firing the stuff yourself, it may help you to know that both my kilns have inside dimensions of about 8 by 8 by 6 inches. The firebrick one can reach 2350°F; the muffle, 2000°F. Smart Bronze fires well below both those limits.
To fire base metal powder clay in my firebrick kiln, I most often use a box I’ve folded myself out of stainless steel tool wrap (e.g., the No Flake Foil sold by CoolTools), and the carbon that Hadar Jacobson recommends in her Instruction Manual (coconut shell-based, acid-washed, size 12×40). With that particular combination of kiln + box + carbon, for the majority of Hadar’s clays, through testing I have found that the ramp-speed she suggests works fine, but I should lower the goal-temperature by about 20°F from what she recommends to get full sintering without blistering or other signs of over-firing. (It could just be a difference in our kilns, but another factor could be that my lightweight foil boxes transmit the heat a little better than the heavier stainless steel bowls I think she uses?) I might do a little more adjusting for smaller containers or much fuller loads, but for what I was firing in these trials, I started out thinking that a drop of 20° should be the only adjustment I’d need.
Finally, whenever I first try any new clay, I always do at least one “test” firing first. I know that some artists plunge right in to make a new masterpiece and just fire it, but I can’t bring myself to risk something like that until I feel really certain I’ve mastered enough of the relevant firing details. At the other extreme, some people will just roll out a plain slab of clay about the same size and thickness as their intended masterpiece, and test-fire that. While much safer, I can’t quite bring myself to simply “waste” a good chunk of metal (even if it’s not a precious metal) that way, not to mention the firing -time and –energy. I have found, instead, a middle ground that works for me: I make several very simple pieces. If they fail, I’ve lost a few more minutes of my time than I would have if I’d just fired a plain slab. But I want to believe that the firing will work and, when it does, then I will have a simple little piece that I can sell inexpensively or give as a small token-style gift (instead of just a piece of “waste” material).
Working with Smart Bronze.
I found the working properties of this product to be comparable to other Hadar’s Metal Clay powders. That is, it is easy to mix into a clay form. It’s easy to work with. It has a very nice feel to it. None of Hadar’s clays are sticky, like some metal clays tend to be. (Yes, you do want to use a bit of olive oil between them and any textures, stamps or cutters you press into moist clay, but it’s not like you have to work in a complete cloud of release agents to keep it from sticking to everything!) Smart Bronze has a very good working time, and it’s easy to rehydrate if you work more slowly. It dries to a very hard state, which makes it easy to clean up and polish pre-fire (which is a feature I really appreciate).
Firing Smart Bronze.
Ah, but now, this is where the real testing comes in.
The latest version of Hadar’s Instruction Manual is always available as a .pdf file for free download from her blog. (It’s available from some other sites too, but Hadar’s blog reliably has the most up-to-date edition.) I first tried firing Smart Bronze when the then-latest version of the manual was from April 30, 2013, and it gave this information for firing that new “Smart Bronze” alloy:
Brick kiln: Ramp at 1400°F/778°C per hour to 1440°F/782°C. Hold 2 hours.
Muffle kiln: Ramp at 1400°/778°C per hour to 1495°F/810°C. Hold 2 hours.
By the time I’d completed my first few test loads, there was a newer version, dated May 15, 2013, and it had been updated to read:
Brick kiln: Ramp at 1400°F/778°C per hour to 1430°F/776°C. Hold 2 hours.
Muffle kiln: Ramp at 1400°F/778°C per hour to 1470°F/799°C. Hold 2 hours.
Pieces thicker then 10 cards or mixed with other metals should be pre-fired.
Notice that, while the ramp (speed) remains the same, there are some significant differences in the goal-temperature from one to the next: a ten-degree drop for brick kilns, and a whole twenty-five degree drop for muffle kilns! So the tests I am about to describe involve changes in temperature that are due to both new temperatures recommendations from Hadar and observation of my own results. (And readers of this blog should be able to skip the first few “issues” I encountered by just checking for the very latest version of the Instruction Manual at Hadar’s website! It’s possible there will be yet more modifications as Hadar travels and gets to see for herself how this product works in many other kilns.)
But this post seems long enough for now. I’ll be back soon with what I found out once I really got going! (Yes, in addition to my earlier comments that my testing spanned more than a month, that’s another really big hint that it took me “several” test firings to work this out!)
Posted in Learning Metal Clay, Technical Details | Tagged: bronze, firing, Hadar's Clay, Smart Bronze | Leave a Comment »
Posted by C Scheftic on 2013/05/30
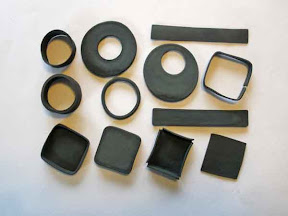 So far, I have not made many pieces out of steel. I have used bit of steel as small accents, but only a few times as the main element in my work.
But, over the last few weeks, a number of us who work with and teach about Hadar’s Clays have been doing some explorations with the “Low Shrinkage Steel XT” product. Shown is a photo of a dozen pieces, which are about half of the ones I made during this exercise. While most of them turned out pretty much as I would have expected, there were a few surprises that I’m still trying to understand. I will likely have to make a few more pieces like the surprise-ones (when I find some more time to just explore), to see if the pattern repeats or if the surprises were nothing more than the occasional surprise.
Specifically, we’ve been looking at shrinkage. All metal clays shrink from when you first shape a piece in that medium to when it ends up as fully-sintered metal. Different products shrink different amounts. Some shrink more as they dry (go from wet clay to what we call greenware); others shrink more as they are fired (as the binder burns out and the atoms sinter (arrange themselves into a regular metal structure)).
Even working with just one product, different pieces will shrink different amounts in different directions. This leads to some interesting results, such as the fact that rings (usually) shrink smaller (though how much depends on the size and shape of the ring), the clay around cracks (usually) shrinks away from the opening (thus making it look larger after it’s been fired), and holes (usually) remain about the same size (depending on how big and what shape they are in relation to the clay around them).
With my background in mathematics and statistics, I tend to think of shrinkage as a “degrees of freedom” issue: if a clay wants to shrink a certain percentage and, for some reason, it can’t shrink that much in one direction, it compensates by shrinking more in the direction where it has more freedom to shrink. Except, it’s nowhere near as exact as that might make it sound…. It may vary from one time to the next. It may also vary from one artist to the next.
Why? Is it the amount of water in the clay? The humidity in the air? The altitude at which you work? The attitude with which you work? Phase of the moon? I could go on, but I think you get the idea: some variations are fairly clear while, for others, your guess is as good as mine! (Feel free to suggest additional ideas in the comments: I could use both solid suggestions and a few good laughs!)
But I write all this simply because I wanted to take a moment to say how much I enjoy exploring this entire “powder metallurgy” process: trying slight variations that go increasingly farther away from an original starting point just to see what happens. That is, in relation to the question in the title of this post (which I’ve been asked more times than I care to count) my answer is this: I hope to continue to learn as long as possible. I want to keep adding more information to my store of knowledge but, at the same time, I hope I’m never done learning!
Posted in General Techniques, Learning Metal Clay | Tagged: boxes, drying, firing, Hadar's Clay, rings, steel | Leave a Comment »


") Artsmiths of Pittsburgh
Artsmiths of Pittsburgh") Hoyt Center for the Arts, New Castle, PA
Hoyt Center for the Arts, New Castle, PA") Portage Hill Gallery, Westfield, NY
Portage Hill Gallery, Westfield, NY") _Open Houses in my Studio
_Open Houses in my Studio _Or…contact me about hosting a private party!