Convergent Series

learning, using & teaching metal clay, and other aspects of life

Archive for July, 2010

Edible Flowers

Posted by C Scheftic on 2010/07/29

OK, since I went off-topic a bit with the pollinator info and the Penn State Extension programs, I can’t resist adding a note about another great event last week. The reason I couldn’t stay any longer at Alice’s is that I wanted to get back in time to help out with the 10th Annual Edible Flowers Food Fest. Yummm!

It’s organized by Denise Schreiber, horticulturist with Allegheny County Parks in (well, surrounding and including) Pittsburgh, PA, and staffed by Denise’s family, friends, and members of the Penn State Master Gardeners of Allegheny County.

The photo is of me holding a tray of Roasted Red Pepper Soup with Nasturtium Leaves and Blossoms. I’m wearing an apron of mostly-edible flowers and a silver butterfly-pollinator pendant (made from metal clay, of course!).

Note: not all flowers are edible. Make sure you know they are safe before trying any particular ones. Also, please use only flowers that have been grown organically: even edible species grown for flower shops are often treated with chemicals that render them inedible. The link above, to the Food Fest, has some more information on this issue.

Posted in House & Home | Tagged: , | 1 Comment »

Pollinator Gardens

Posted by C Scheftic on 2010/07/26

When I stopped at Alice’s on Wednesday (see my last post), I followed her directions for parking in a different (and less expensive) parking lot than I’d used on previous visits.

She has commented that, although it’s a bit farther from her studio, the walk between car and studio involves a nice path next to the river. So, I was happily strolling along, noting the Gingko Tree that she’d also mentioned on her blog, past a couple buildings, and then, suddenly, I found myself looking at the next batch of landscaping and thinking, “This looks like it could be a Pollinator Garden.”

And when I reached the end of the walk, there were signs that this was a Pollinator Garden maintained by the Penn State Master Gardeners of Venango County!

If you are at all curious about Pollinator Gardens, here are a couple links:

The photo used above, of a key pollinator of Pepper, Strawberry, Tomato, Watermelon, is from Identification of Native Bees from Penn State’s College of Agricultural Sciences.

Posted in House & Home | Tagged: , | Leave a Comment »

Bronze and Copper Clays!

Posted by C Scheftic on 2010/07/22

Those little (dime-size) charms are my very first pieces made with Bronze metal clay!

I spent most of Wednesday up at Alice Walkowski’s lovely “Ally’s Art” studio at the National Transit Building in arts-friendly Oil City, PA. We were joined by her delightful student, Virginia, who often takes advantage of Alice’s “studio time” offerings.

Alice had a number of things to accomplish that day, but I spent my time there working with Bronze and Copper clays for the very first time. I’d gotten the powdered form of each from Hadar Jacobson several months ago, but just had not found an extended-enough stretch of time when I could focus on experimenting with these new products. The time I spent up at Alice’s, with no other distractions of my own, turned out to be the perfect opportunity.

And, since Alice had recently written about her trials with a different brand of these clays (the pre-mixed versions, distributed by Rio Grande), it was fun to compare notes with her as we proceeded with our various tasks. In particular, I appreciated having her there to double-check my understanding of the firing schedules, since that’s really the biggest difference between these “base metal” clays (bronze, copper and, most recently, steel) and the “precious metal” ones (silver and gold).

The bronze clay was nice, and the results are shown above. Of the two I worked with, it was the harder one to mix up, retained a kind of grainy feel, and was more of a challenge to clean off my hands (especially from under fingernails). It was a bit stiff to work with, but still easy enough, and the first batch appeared to fire to solid bronze very easily.

The copper clay was incredibly easy to mix up, and the result was a clay that was smooth and flexible and felt absolutely wonderful to work with. It was also terribly tricky to fire adequately (took two tries to get it right).

The photo on the left shows copper pieces straight out of the kiln. Those on the right have had a bit of polishing; eventually they may get some more of that.

Both versions produced pieces that exhibited some cracking in the fired pieces that had not been visible in the clay in the pre-firing (“greenware”) state. This cracking was, however, much worse in the copper than in the bronze pieces (though at this point I’ve no clue how much, if any, of that difference may simply have to do with my having had to fire the copper pieces twice to get them to sinter).

This photo (sorry about the shadows; ignore those) is my attempt to show the cracking in the copper pieces. In theory, one should be able to repair those cracks and refire the whole thing. I’ll probably do that with these pieces eventually (but I may well leave that for a time right before I actually need to repair a copper clay piece, so that the process will be fresher in my mind when I actually need it.)

All-in-all, between the companions and the new clays, it was a fun day. I’m still thinking about my reaction to these clays, and what it was like to work with them. I will most likely write a few follow-up notes in the coming days and/or weeks.

Posted in Learning Metal Clay | Tagged: , | 1 Comment »

Quick interim update (revised).

Posted by C Scheftic on 2010/07/18

I will fill in details eventually. (Hopefully, with some more photos besides just those above the relevant links in the column to the right: it always seems to be the photos that slow me down….)

Upcoming new classes include Spool Beads and Linked Segments. Although they introduce completely different techniques (and, no, you can’t sign up for the one at the closest site and make the other project … we do aim to please but we also need a bit of focus to really succeed!), the thing they have in common is that you’ll get to make several pieces, and then you can wear them all together, or use them in separate adornments. Hold on … more info should be coming.

Posted in Teaching Metal Clay | Leave a Comment »

Lots of little details.

Posted by C Scheftic on 2010/07/12

On Saturday I taught for the first time at the newly-relocated Mars Beads. It’s a great space, lots of room, and owner-Carolyn has a wide selection of reasonably-priced beads. (If you want the more unique — and pricier — stuff, your choices are somewhat limited here. If you want a good deal on a good intermediate-level selection (that, say, you can use to enhance a major focal piece without pricing it out of range) then Mars Beads should definitely be on your shopping list.)

The class was on how to make a reversible hollow “lentil” bead. I think that’s a good class for a number of reasons: it covers a lot of the basics of working with metal clay that are applicable to a number of other projects; and you come out of it with a unique piece that is reversible, so it’s almost like you are getting two different pieces for the (not inexpensive, I know) price of one.

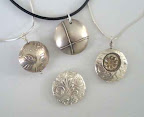
Since there are lots and lots of little details to keep straight as you’re starting out, I’m happy if it’s a relatively small class. That way, I have a better chance of being able to give everyone the individual attention they need. In describing the class to potential students, there was the photo of four sample pieces shown above, plus I left a selection of about seven or eight pieces at Mars Beads for a month prior to the class.

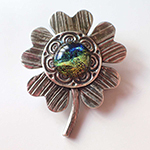
Below is one piece I constructed while doing in-class demos. It is not quite as “polished” (in either design or finish) as some of my other pieces, but it illustrates what I think a typical student should be able to do in an introductory session. (Some will do even better, more like some of my other pieces, but everyone should be able to achieve this.)

It covers rolling, texturing, and cutting the clay. Cleaning up edges in the moist-clay state. Cutting holes versus drilling them. Making, shaping, and attaching appliques. Working with little coils and balls of clay for decoration. A little bit of each basic activity.

Although I try to teach using methods that reduce or eliminate the need for sanding dry clay, hollow beads like these are among my few exceptions: we do sand to get the edges down to a “knife edge” before attaching the two separate sides to each other. While doing that sanding, I talk casually but deliberately about safety issues, especially those related to eating, absorbing, or breathing any of the materials students will be working with. I am not a “purist” who insists that “all sanding is bad” but do tell cautionary tales, urging people to realize that every act of sanding should be a deliberate choice, best taken only when no other option exists, and should then be done with care and adequate precautions.

As I’m both sanding and talking about that, I carefully pass each half of the bead around the room several times, asking people to identify when it has been sanded “enough.” I also pass around samples with sharp versus rounded edges where the pieces were attached. I find it interesting how different people react quite differently to that whole part of the session.

Well, on Saturday I had one student who did an absolutely perfect job of identifying when my sample pieces were and were not adequately sanded, and of picking out the samples that corresponded to stopping at various stages along the way. But when she went to do her own bead, of course, she happily moistened her clay and stuck the pieces securely together and then asked, “Now what do I do about all these gaps and ridges?” Aack! Her edges were nowhere near ready to have been stuck together yet, and way too lumpy to resolve by more sanding at that point. All of that should have been handled before attaching the pieces. And, yes, she had done a wonderfully good job of getting them stuck together.

Soooo, the workaround we came up with was to roll out a “string” of clay and use that to surround the piece. We pushed the bottom of it down into the gaps while trying to keep the outside nicely rounded. (Aside from the poor quality of the lighting in the photos I snapped quickly before giving the final result back to this student) how do you think that idea worked out? What else might we have done?
Posted in Teaching Metal Clay | Tagged: | 1 Comment »

Gosh, it’s hot.

Posted by C Scheftic on 2010/07/07

Several days of this already, and more predicted to come. Heat index in triple digits, actual daytime temperatures well into the 90s, and barely dropping into the 70s over night.

This heat and humidity remind me of South Florida, where I grew up. And from which I left, one August many years ago. And, though I went back regularly to visit while my folks were still there, I didn’t return during the summer.

Call me a wimp if you want, but I simply cannot comprehend the thought of working with metal clay until things cool off a bit. Even though I normally move a kiln outside to fire it, at the moment I just cannot form a thought that involves generating any more heat anywhere.

I’ve spent a bit of time cutting out little paper templates, trying to figure out the mechanics of a few new designs. That’s as close as I can get, however, until the temperature breaks. Which is predicted for a few days. Loooonnnggg days. More here then!

Posted in Misc. Musings | Tagged: | Leave a Comment »