") Artsmiths of Pittsburgh
Artsmiths of Pittsburgh") Hoyt Center for the Arts, New Castle, PA
Hoyt Center for the Arts, New Castle, PA") Portage Hill Gallery, Westfield, NY
Portage Hill Gallery, Westfield, NY") _Open Houses in my Studio
_Open Houses in my Studio _Or…contact me about hosting a private party!
 In other words, this is merely a follow-up to my earlier “second report” on PMC Flex (which I thought I’d posted earlier but just noticed I had not…) I’ll use subsequent “numbers” on later projects.
I really am working on some other designs using PMC Flex, but must-do-now tasks keep interrupting my explorations, and then I get inspired to try something else, and I end up having lots in-the-works but not yet finished and ready for reporting. As usual! But my earlier post had stopped before I’d gotten through the entire process with even my first little pair of earring elements. They are now finished, so I’ll at least take the time to finish their documentation too.
Since I last wrote, somewhere I viewed a series of pages (annotated images, but I forget where, and even whether it was a slide show or a .pdf file or…) that contained another “introduction” to the PMC Flex product. But I’d started playing with the stuff even before that was available, so I’d been just sort of guessing as I went along … based on my prior experiences with diy-flex (where you add glycerin to various regular metal clays). That “intro” also talked about heating the clay at 300°F for some amount of time, not so you could sand it (as I’d mentioned in my last post) but in order to help it hold its shape during firing. OK, now, the do-it-for-sanding idea makes a little bit of sense to me (even though I long ago learned how to work with clay in a way that will greatly minimize (though not always eliminate) sanding) but that one baffles me even more. If it’s going to distort, I’d think it would do so at the binder-burnout and/or early-sintering stages; either way, if it’s going to need support to get through that part of the firing process, I just don’t see how having “hardened” it for room-temperature handling is going to make much if any difference. (Hmmm, maybe that file was taken down and that’s why I can’t find it again now when I want to reference it? Or, if you truly understand what I’m missing about all this “baking” please contact me to discuss it! Yes, there are a few instances where I can imagine it would help, and I’m trying to explore that a bit too. But I simply don’t see why it should, in general, be required….)
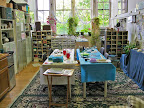
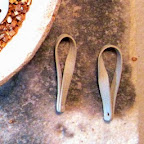 Anyway, long before I saw that, I’d already fired my first two little pieces by just placing the still-flexible greenware flat and unsupported on my kiln shelf.
Now, to be honest, I had thought I might place them on some vermiculite in a little silica crucible I have. Except, I’d just taught a morning-only workshop where students made at total of 19 pieces (using PMC3 and PMC Plus that had been ordered well before the Flex was released). I had to get those pieces fired and returned to the participants. With this particular group I was not going to have a follow-up finishing session, where I could show them how to re-shape any that had “shifted” during firing. Though many were ones I could place flat on my kiln shelf, there were enough that had gentle curves I wanted to support, so I squeezed all of those into the vermiculite. Since I didn’t want to wait to fire my two little earring pieces, flat on the shelf they went too (as shown in the second photo with this post).
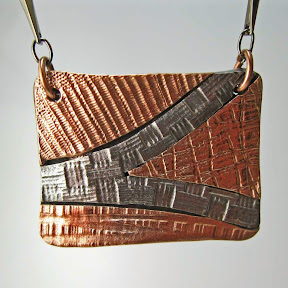
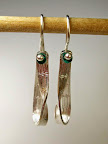
And I think they came out fine! I added a small glass bead to each for a touch of color, and hung them on ball-end sterling earwires. I’m calling the “Almost Möbius #1” (the number because, though I’m sure I’ll never make another pair exactly like this, I can imagine myself playing around some more with the Möbius-band idea).