For a number of reasons not worth going into here, I’ve been a bit distracted lately. No crises, just too many things that need my attention all at once. (Yes, like most 21st Century American women, there are always a lot of demands on my time. But sometimes the number just sneaks up over the top of what is manageable.) And then, there are the days when you think you really are accomplishing something, at last, only to find out that was not the case. This post is a tale of both of those at once.
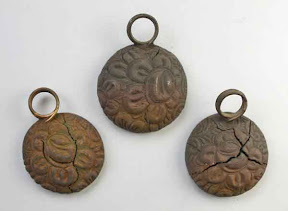
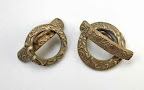
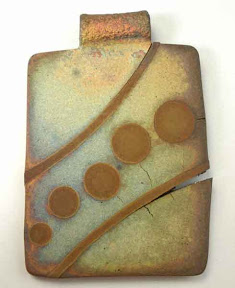
But, since this is a metal clay blog, let me begin by reviewing the process for firing items made from Hadar’s clay powders. 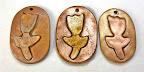 The first photo with this post shows three pieces that had been fired earlier, had cracked a bit in that process, were then patched, and had just been refired in the session to be discussed here. That kind of cracking happens sometimes when mixing copper and bronze, as in these pieces, and the patching and refiring—often multiple times—is just part of the game if you want those mixed-metal (sometimes referred to as “married metal”) looks. (I’ll talk more about that more some other time….)
For full details on the firing process, of course, you should always check Hadar’s blog itself. But, in general, there’s a multi part process:
0. You mix the clay, form the piece, let it dry, and then…
1. You burn off the binder, taking as long as you need according to the size of the piece(s) as well as the method you are using (for jewelry-size pieces, this can often range from a quick 1/4 hour to 2 full hours; larger pieces can take even longer) and, finally
2. You “sinter” the remaining powdered metal into a more solid form during a two-hour firing process.
This discussion addresses only steps 1 and 2. (I started counting at 0 because the final two steps are often referred to as Phase 1 and Phase 2 firings.)
When Hadar first introduced her clays, the basic process went like this:
A1. Fire the pieces buried in carbon, uncovered, in the kiln. Let everything cool back to room temperature.
A2. Top up the carbon, if needed, and refire the still-buried pieces, uncovered, in the kiln.
Later, although she says that the above process still works, Hadar introduced this alternative approach:
B1. Fire the pieces on top of a layer of carbon, covered, on a gas stove-top.
B2. Immediately and carefully cover the pieces with carbon, then fire them (cooled or not, either way is OK), uncovered, in the kiln.
(There is more to all of it, but we can ignore that for now….) In each case, between step 1 and 2, the pieces are fragile: you have the formed-shape, but it’s then composed entirely of metal powder with no binder holding it together any more. It’s very fragile. I have been under the impression that a few of the main differences between the A and B approaches where that:
– The full B-process takes much less time and consumes less energy than A, but…
– Pieces in the B-method are at a very slightly higher risk of being cracked as you move and bury them.
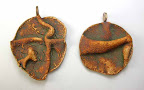
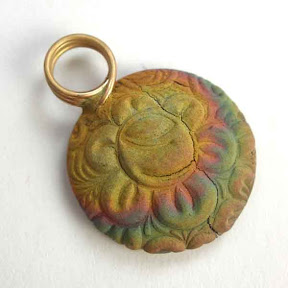
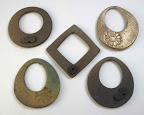
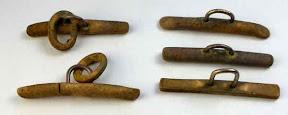
I’ve been using both, off and on / back and forth, depending on whether I had time to actually watch Phase 1 (B) or didn’t want to watch but could wait longer (A). All the pieces photographed for this post were fired, in a single batch, using the B-process. Two of the three oval pieces (above) were polished up a bit after being fired in the same batch; the third one (left-most) and both of the two round pendants are shown just as they came from the kiln. The thing you can’t really tell from a photo of the two “draped” ones is that they feel, oh how to say this, sort of “crisp”!?
Yes, and the point of this whole post is to admit that I’m the one who crisped them up!
As I said at the start, I had a lot of things on my mind as well as a few people doing things in my studio as I began firing these. I was carefully watching the Phase 1 firing on top of a propane camp-stove on a rolling cart. Some unexpected visitors arrived, adding to the activity in the room. While enjoying the company, all I really wanted was to finish this firing, finish answering questions, go home, and have a nice dinner. I was trying to keep everyone moving along, introducing and talking and answering questions and what-not. When Phase 1 finished, I had to figure out where to put the hot lid safely out of range of the curious visitors, as I rolled carts around and proceeded to the two-hour Phase 2 in a kiln. I got everything situated, got the kiln going, spent the next hour getting questions answered and projects finished, got everyone out of the room, and was walking back to my little “office” area to finish up some paperwork when I looked at the table next to the kiln and thought, “Why is that cup-full of carbon just sitting there?”
OH, NO! I had forgotten to pour it over the pieces after Phase 1. They were in the kiln un-buried in carbon! The whole thing with these clays is they need to be fired in a “reduction atmosphere,” that is, with the carbon reacting with the oxygen in the air inside the firing chamber and thus reducing how much of that oxygen is available to react with the copper at kiln-temperatures. How much? Well, that’s not as clear. But that’s the basic principle, the way to avoid damaging the structure of the metal….
 No, NO, NOOOO! If it had just been a few minutes, well, maybe. But we were an hour into a two-hour firing. Were they all ruined? Was there anything I could do?!!
I quickly increased the amount of heat-resistant material I had in front of the kiln, put on my high-heat gloves and IR-safety glasses, grabbed a few tools, took a deep breath, and opened the kiln. One obvious concern: what might the “thermal shock” do to the pieces or even to the kiln itself?!! I whipped the bowl out, set it down, closed the door as quickly as I could. Everything was glowing! In another context, it might have been considered a lovely color, but not here. I gently poured the cup of carbon over the pieces, took another deep breath, re-opened the kiln, replaced the bowl, closed it all back up, took off the safely gear, sat down, and started shaking. What had I just done? Would it work? Should I have just given up on that load? What about the kiln?
And the phone rang. I answered it. A long-time friend, someone I talk with only occasionally, was on the line (er, with cell phone, perhaps I should say in the air?). It had been no more than a minute since I’d closed the kiln back up. (As I reached over to answer the call I was, in fact, thinking how glad I was that the phone had not rung while I was in the midst of that attempted “recovery” process! Even if I had not stopped to answer it, that would have been another distraction at a crucial moment: whew!) My caller asked how I was. I was still shaking a bit, and surprised by the call. I said, “I don’t know. I may or may not have just ruined a whole bowl-full of jewelry pieces.” He’s a sweetheart, someone who has been all “You go, girl!” about my journey down this jewelry-making path, and he launched right into some nice little comments about how “things” sometimes happen and I shouldn’t beat myself up or question my abilities, I was good at this and he knew I knew it, …. When he finally paused for a moment I said, “Thanks. I love your support here. But what really has me worried is that, between the time I spent making pieces, firing some of them once, patching them, making a few new ones, firing those …. if I’ve lost them all, then I may just have lost hours that I simply do not have to spare right now. And it’ll be almost an hour before I know how much time I have just wasted by letting myself be distracted.” Luckily, there was nothing more in danger right at that moment, so we quickly moved on to chat about other things for a while. I didn’t get the paperwork done but doubt I could have concentrated on that anyway. I did get to catch up a bit with someone who’s known me since my teens, and we talked for longer than I’d’ve given myself if I’d still been focused on … paperwork.
So, what’s the outcome?
There was one small crack in the kiln-wall beforehand, and it’s now a bit bigger. Not a serious problem, I think, just one burst of extra-quick aging. I’ll simply continue to keep my eyes on that, and hope there’s nothing more.
The three mixed-metal tulip-ovals had been previously sintered (and were just in that load having some cracks patched) all look like they survived. The patches sank down too much, which may or may not have happened anyway. I can try to polish out the cracks, or else patch the patches and refire them. They don’t seem to exhibit much in the way of the various copper-oxides that we’re trying to avoid via the carbon firings. At this point, though they may not end up being quite as strong as I’d like, I still think they may be OK.
The other two all-bronze draped pendants, well, as I said, they are crisp. The slightly-bigger, slightly-more-irregular one is criss-crossed with cracks and holes. Yes, not just cracks (which I would not have expected from in this single-metal piece) but also little holes that you can actually see light through (which I’ve never seen before, and which are too small to really see in the photo, even if you click to see a larger version). I figure that piece can go into one of my “teaching moment” displays. The other one, well, it doesn’t have all the same cracks and holes, but there’s something odd about it. Maybe it’s just the way the edges curled up, and I’ll get used to it over time, but it sounds a bit crisp too. I may hold onto it, but it’s not one I’d wear because I don’t want to “advertise” a piece I’m unsure about. I may give it to one good friend who I’m pretty sure will be OK with my saying, “I can’t sell this because I’m not sure it will hold up. But if you want it, you can have it on one condition: if/when it breaks or does something odd, give it back to me so I can what happened. I’ll replace it with something else.”
And, finally, there’s that thing about time, and being overloaded just now: which clearly means it’s time to end this post, get some other things done and write about those later on, once I’ve managed to catch my breath again. Oh, and I’m sorry this is so long. It takes me longer to write shorter pieces—to do the editing needed to end up with a shorter piece—and I’m still feeling waaaay behind. So I hope you’re OK with this rambling version of the tale….


") Artsmiths of Pittsburgh
Artsmiths of Pittsburgh") Hoyt Center for the Arts, New Castle, PA
Hoyt Center for the Arts, New Castle, PA") Portage Hill Gallery, Westfield, NY
Portage Hill Gallery, Westfield, NY") _Open Houses in my Studio
_Open Houses in my Studio _Or…contact me about hosting a private party!
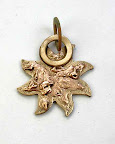
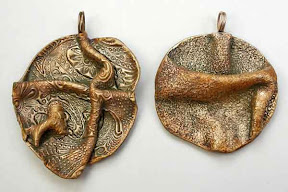 The two draped pieces actually polished up nicely. Somehow that even helped with the clunky sound they were making, that had made me even more dubious about their quality. The more-irregular one, of course, is still riddled with cracks and tiny holes: it will just look prettier in my “do as I say, not as I do” box of “teaching moments.” But none of the polishing added to the disintegration of that piece, nor did it reveal any holes in the rounder one. OK, so far.
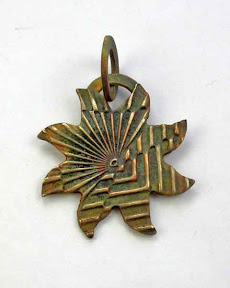
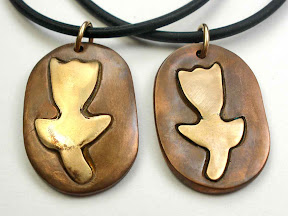 I have not yet tried to polish the tulip with a copper flower on a bronze background because I know that one will take a good bit of work. The other two tulips turned out OK, but not as nice as I’d’ve liked. The bronze (flower) on the one to the left had actually bubbled a tiny bit and, although that did look OK after some grinding, sanding, and polishing, once I exposed it to the patina solution, small spots appeared where the edge of the blisters had been. I’m thinking that the tin in the bronze must have somehow “disappeared” at those points, leaving more copper to react with the patina chemicals. And, despite a lot of grinding on the other one, I did not seem to have eliminated all signs of the earlier cracking.