Convergent Series

learning, using & teaching metal clay, and other aspects of life

Archive for February, 2012

A Three-Metal Mosaic

Posted by C Scheftic on 2012/02/23

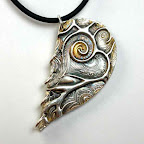
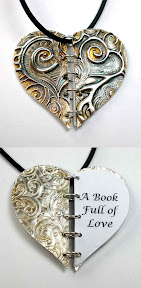
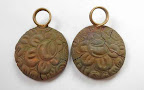
Almost a year ago, I wrote a post describing and showing a pendant I think of as The Little (Oblong) Piece that Could (because, with each problem, I’d pick it up, dust it off, say a few words of encouragement, and keep it going to completion…).

On one side of that, trying to develop a collage (or mosaic) design, I was applying a series of pieces that went straight across the “base” piece. I’d moisten the base and the mosaic piece, press them together, and wait for that to dry. Then, I’d repeat the process with the next collage piece. But the backing piece, which would of course soften a bit as I applied each next piece, kept cracking along those long and straight borders, so I ended up adding a series of elements to the other side to reinforce it all. That was not a problem, of course, because I like making reversible pieces; I actually found it interesting to think about what I might add from both visual and structural considerations.

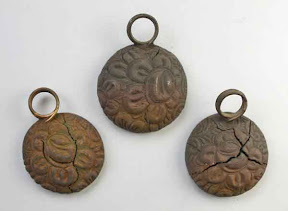
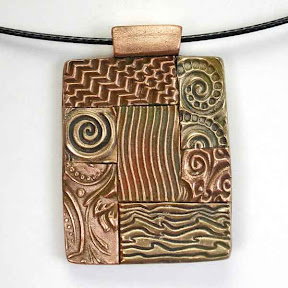
Still, there is another way to approach this issue right from the start: design the piece so that no border between the mosaic elements goes entirely across the piece! That is, use the collage pieces to provide the necessary structure right from the start. A very basic example of that is one of the Three-Metal Mosaic pieces I made earlier this winter.

The base of this piece (not shown) was made from Rose Bronze, as was the center rectangle (which is shown in the photo to the right here). Then, going clockwise and starting in the upper left corner, I added alternating “mosaic tiles” of copper and yellow bronze. Although there is some lining up of pairs, I was careful to have no “line” extend the whole way across the piece in any direction! This is the simplest way I know of to avoid the problem I kept having with The Little (Oblong) Piece that Could.

Once I had all these tiles fully assembled, I tidied up the edges as needed (with just a damp sponge; sanding only a tiny bit at the corners, to round them off slightly), and added the Rose Bronze bail. The colors you see are mostly just the differences between the three separate metals, enhanced a bit by some green kiln-produced coloring on both the yellow and rose bronze textured “tiles” in the mosaic (but not, curiously, on the smoothly-extruded bail).

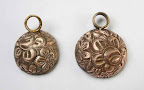
Who knows why, but I don’t seem to have a photo of the other side. Still, trust me, this piece is another of my fully-reversible designs! The other side was made using a delicate texture of tiny flowers, and then embellished with “vines” and “coils” in the three different metals. Since it was while looking at some mosaics in one of the museums I visited last week when I began thinking that I didn’t remember writing a follow-up post to the one about The Little (Oblong) Piece that Could, however, at least I do have this shot of the side that matters for this comparison.

Posted in General Techniques | Tagged: , , , | Leave a Comment »

Posted by C Scheftic on 2012/02/21

Laissez les bon temps roulez!

Sorry about the scarcity of posts recently.
I’ve been off visiting kids, grandkids, colleges, museums, and more.
I am back home now, and should be getting back
to metal clay by the end of the week.
In the meantime, best wishes all around…..

Posted in Events | Tagged: | Leave a Comment »

Posted by C Scheftic on 2012/02/14


Happy
Valentine’s
Day!

Posted in Misc. Musings | Tagged: , , , , , | Leave a Comment »

That sure was fun….

Posted by C Scheftic on 2012/02/08

Off and on for several weeks now, I’ve been battling a sinus-plus infection. I vaguely recall calling Trish (the owner of Zelda’s Bead Kit Company) a few days before one of my recent workshops, right before a doctor’s appointment, sort of hoping to learn that it was looking under-enrolled and I could use that as excuse to just cancel it and sleep another day. And the night before the class, after I’d been on antibiotics for a few days (resulting in a portion of the head-malady improving but digestive tract upset), though I knew I’d learned I really should go out and lead it, I thought I must have been sick enough to hallucinate a conversation that I was thinking had gone something like this:

“Do I have enough folks signed up for Saturday.”

“Yes, I’m sure you do. A good crowd. Let me check the book. Oh, yes, very good: Let me count. 1, 2, 3, breath, pause, breath, breath, 9. You have nine this time! Isn’t that wonderful!”

“Sure, but, um, Trish, with all the stuff I haul over there, my max is typically six. Aside from the question of where I’m going to find enough extra tools for that many, I cannot even imagine where you think everyone will sit.”

“Don’t worry. With that many enthusiastic people, we’ll clear out the whole front room for you.”

“OK. Thanks. Gotta go now. See you then.”

[Aside: Even during the Instructors’ Trunk Show before Christmas, she didn’t fully clear out the front room! Where might all that stuff go? I still was not imagining how this might work.]

I had a bit of leftover PVC pipe that I could cut up to get a few more rollers. For classes, I make up card sets that people can use as thickness guides: I actually glue together stacks of 2, 3, 4, 5, and 6 cards, with the “top” card showing the number in the stack (which makes it really easy to check what you’ve got … and I can keep an eye on things from across the table)! I didn’t have enough extra cards on hand to make more. For this project, however, I figured I could just limit folks to 5-card and 3-card rolls. Then we could split the sets and, for a few of the more-experienced folks in the group, I’d give them the 1, 2 and 4-card pieces to use (since 4+1=5 and 2+1=3).

For all the other tools, we’d just have to share…. I don’t normally stockpile a lot of extra silver clay, but I did have enough clay for nine because I’d gone ahead and made sure I had what should have been enough for my next two sessions.

Well, I arrived early to find that Trish had fully cleared out the front room. (And made a crock-pot full of wonderful soup too. Talk about customer service!) There really were two whole tables for folks to sit at. She disappeared in back for a few minutes and re-appeared from I-know-not-where with four extra chairs. Added to the seven she normally has around the one big table, that came to eleven. Oh, yes, Trish wanted to sit in on this one too, so there’d really be ten people (plus me)! Oh, and I backed myself up against the front wall to get the photo I’m using here, so I’m missing more than half of the front table.

I know I was not at my best that day, but I think I held things together pretty well. And, since a number of participants signed up right away for my next workshop, I’m guessing that wasn’t a fevered delusion. So this is really just a note to say a slightly belated “Thank you!” to Ellie, Sally, Valli, Marie, Glenda, Jan, Ruth, Ronna, Bill, and Trish for helping me have such a good day!

Posted in Teaching Metal Clay | Tagged: , , , , | 2 Comments »

What I did last week (part 3…)

Posted by C Scheftic on 2012/02/01

Well, by the time I’ve managed to get around to posting this, I’m really talking about the week before last, but I figured I’d keep the same basic post-title I’d started this series with, and just keep going.

After writing last week about making some textured domed disks, so that I could use them in a bracelet inspired by Maria Richmond, now I’ll talk about how I’d imagined completing the project with an idea inspired by a post by Hadar Jacobson about making magnetic clasps from steel metal clay.

I thought I’d do pretty much just what Hadar suggested. The only difference was that I used a textured layer of her rose bronze clay, rather than the smoother layers of yellow bronze and copper she showed in her instructions. I draped that over a dried layer of her pearl gray steel. After letting it all dry, inserting a bronze wire bail, and “refining” everything, I fired it as recommended.

The rose bronze cracked. The steel under-side (not shown) seems fine.

I tried again, this time using textured copper draped over pearl gray steel.

Again, the steel under-side (not shown) came out fine but, also again, the copper over the top cracked.

I patched and otherwise repaired all three pieces, and refired them.

You can see that much of the wonderful kiln-induced coloring disappeared. (Compare that photo to the first two above; the colors were also mentioned in part 1….) No crisis there. One copper piece (top, above) shows only a tiny bit of cracking, at its edge. That’s not ideal but, at this point, I’m likely to leave that alone because, sigh, the other two came out worse than before! What happened? My guess (and this is only a guess), is that the steel (which sure had seemed to be sintered) had sintered some more (that is, it became denser and thus shrank some more) and the movement associated with that further shrinkage in the steel is what led to the additional cracking in the copper or bronze layer.

If I’d known that was coming, I could have measured everything much more carefully at each step along the way, and used that as a way to test my hypothesis (i.e., the guess, above). But I didn’t know; I just didn’t think to stop and take the time to measure….

Since I’d been stuck with refiring anyway, I tried a couple more. Shown, below, are the initial results from again using rose bronze and copper, respectively, but this time draped over clay made from Hadar’s newer Pearl Gray Steel XT powder. (They differ in size because I made my original textured dome elements in two different sizes as well; I point that out simply so you won’t think any difference you see could be due to variations in shrinkage. That was just my own doing….)

OK, much better! Much less cracking with that mix! Again, sanding the steel on the other side shows that it appears to be sintered. I’m not about to test that by refiring either of these. I’ll just live with a few hairline-crack issues on these pieces; all that means is that I’ll have to think especially carefully about how I use them.

Sometimes, even when I don’t think to do pre- and post-fire measurements, I do still come up with “Plan B” ideas. So, while I was at it, I made a couple toggle clasps using Hadar’s regular (i.e., yellow) bronze powder, to put in the box when I was (re-)firing the other clasp elements. Again, they were made in two different sizes. Their textures, curvature, and size match the domes I made to use with the coils; I added a heavy-gauge bronze wire loop to the toggle bars. In this photo (and the last one above), I show them after firing and after I’d brushed them just enough to confirm that they’ve sintered. I’ll shine them up a bit more before I go to use them in a piece.

Though none of the pieces from my last firing show the lovely kiln-coloring I got with the earlier batches, I do believe that there will be enough acceptable elements in all this that I can finish off my first round of bracelets with a few components left over. Earrings, perhaps? Or the start of a necklace?

[Update: I just added the “oops” tag I’d oops-ily omitted from the original post.]

Posted in General Techniques | Tagged: , , , , , , , | Leave a Comment »