

") Artsmiths of Pittsburgh
Artsmiths of Pittsburgh") Hoyt Center for the Arts, New Castle, PA
Hoyt Center for the Arts, New Castle, PA") Portage Hill Gallery, Westfield, NY
Portage Hill Gallery, Westfield, NY") _Open Houses in my Studio
_Open Houses in my Studio _Or…contact me about hosting a private party!
 “Nests” are a workshop-project that I teach every now and then. It’s scheduled again for next Friday, June 29, at the North Hills Art Center. Online registration is available. If you’re interested, please sign up asap: the last day you can register is this Friday, June 22. There are two sessions listed, for afternoon OR evening. Sign up for your preferred time, but please let someone (me or NHAC) know whether or not you’d be able to participate in the other one (in case one or the other ends up over- or under-subscribed).
Having gotten the “promo” stuff out of the way, I’ll get down to the reason I decided to write a whole blog post on it: I’ll use that workshop to talk a bit about how an instructor builds up the ideas for a class. Different teachers may look at theirs in different ways, but this is the approach I favor.
Some “consumer arts & crafts” classes are designed so that participants all make exactly the piece illustrated. Others use the image as a starting point to explore a process or technique. I tend to teach the latter, simply because those are the classes I enjoy taking the most. Of course, participants are always welcome to make something very close to the illustration; it’s just that I encourage exploration, experimentation, and creative variations too.
Unless noted otherwise, I try to design each workshop so it will be great for beginners with metal clay, serve as a refresher for those with limited experience, and offer specific techniques so you can continue to build both your repertoire and your local metal clay community with each new class.
We start with the basics of rolling and texturing clay, cutting it into an interesting shape, giving it some dimension, deciding how to hang it, and more. Students are welcome to make a pendant and / or a pair of earrings.
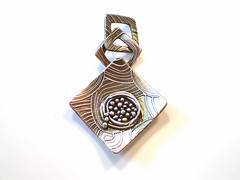
What varies across my classes is what else we do each time. In this one, we explore ways to hand-decorate those creations with silver strings and balls. So I call the class Lovely Silver Nests because it’s really easy, and fun, to shape those into an interesting “nest” design, as shown in the first photo with this post, my usual illustration for this class.
But once you know the process, you are free to arrange the strings and balls in various other patterns, instead of or in addition to nests! We also consider several ways to decorate the other side of each piece: with more strings and balls, by using more complex textures, by adding layered embellishments, and more. My goal is to help you create a unique piece of silver art that is reversible.
As usual, those with some previous experience with metal clay are welcome in this class too. My target audience here is not folks who’ve mastered the medium and seek advanced challenges (those, more advanced, sessions are usually just held with a small group in my studio); here, it is people who are curious and interested in learning more about manipulating metal clays in their creations. They may work right along with the beginners, perhaps finding time to create a more complex bail for hanging their piece, or they may add this style of decoration to a more complex project they’ve already mastered. I’m often surprised when folks tell me how hesitant they’ve been to try these specific techniques before this class, and I’m delighted when I see the designs they come up with as soon as they’ve learned how to follow a few specific steps to make this work.
 So, while I call the class Lovely Silver Nests, it’s not a nest-project class. It’s a strings and balls techniques class. They can be used in so many ways: on some of the simplest pieces, on many very elaborate designs, and even for pieces constructed solely using them!
That’s why I’m also including in this post a quick snapshot with (a) one pair of basic earrings, and then (b) the back sides (or as I tend to think of them: the simpler, other sides) of three pendants. Even if you only know it as the “back” you can still know that there’s another little piece of art hidden back there!
Hmmm, I wonder if I should call this workshop Dots & Lines then, or leave it as Lovely Silver Nests? I’d love to see photos (or even just links to photos) of what other folks have done with their own dots & lines!
 This Saturday, June 9, is a “Second Saturday”! So I am, once again, planning a little
  Some people call these “lentil” beads, because their underlying shape is similar to a very oversized lentil. Others call them “saucer” beads, though I never imagined flying saucers that looked quite like these. Long-time readers of this blog will know, however, that I love making lentil beads, and I think they make a great class projet too. The photos with this post are meant to show that even a complete beginner can master the making of a relatively simple one that is still impressive! Those with some prior metal clay experience can work a few more advanced techniques into their designs, but you’ll have to come to class to see some samples of those!