Posts Tagged ‘class’
Posted by C Scheftic on 2022/09/07
If you subscribe to my very-occasional newsletter, you have a clue as to why I’ve been quiet for a while. Overall, the reason isn’t important. What matters is that, beyond simple pandemic issues, I’m slowly getting back to business, with some new, upcoming events!
My First-Ever Solo Show!
Throughout September, 2022, I am so honored to be Cranberry Artists Network’s “Glass Case Artist”!
- Cranberry Twp Municipal Center, 2525 Rochester Road, Cranberry Twp, PA.
While the show is running all month, I encourage local folks to join me for my Artist’s Reception. While you are welcome to just show up, it’d help me to have a clue if you’re planning to attend (since I’m trying to figure out how many light refreshment treats to bring!).
- Tuesday, September 20, from 6:30 – 8:30 pm
Studio Sessions Return Next Month!
At the moment, I’m planning them as mostly-Second, now-mostly-Sunday events in my studio in the Wilkins School Community Center in Regent Square. These are times when I set up a little mini-show – I have only a handful of things on display but if there’s something in particular you’d like to see, let me know a day or two in advance and I can be sure to have that sort of thing to show you. I have one table set up so I can work on some chores, and students from my previous classes are welcome to come by and use my tools to do something of their own (as long as I have a couple days notice!). These are the dates I have set up so far:
- Second Sunday, October 9, 1 to 5 pm
(I’ll likely be cleaning up pieces I’ve brought back from the display case in Cranberry.)
- Third Sunday, November 20, 1 to 5 pm
(Can’t be the second one: see classes, below)
- Second Sunday, December 11, 1 to 5 pm
(I may well extend the time for this one as we get closer to the holidays!)
New Classes Coming!
Regular readers here will know I’ve been involved with The Artsmiths of Pittsburgh for years now. They sell a good share of my pieces for me, and I teach classes there on how to make pieces along the lines of many of the ones I offer. They moved from Mt Lebanon to Carnegie early in 2020 (what timing!) and if you haven’t made it over to check out the new facility, you should! Here are the workshops I have set up there for this fall:
- Sunday, October 23, Noon to 3:30 pm
Textured Reversible Silver
(pendant or earrings)
Register Here
- Sunday, November 13, Noon to 3:30 pm
Tiny Silver Pendants
(make several: pendants-earring pieces-charms, for yourself and/or as gifts!)
Register Here
Beyond These?
Who knows?! Let’s enjoy all of these for now, and see what happens next!
Posted in Events, Studio, Teaching Metal Clay | Tagged: class, Cranberry Artists Network, shows, Studio Sessions, The Artsmiths of Pittsburgh | Leave a Comment »
Posted by C Scheftic on 2019/01/07
Happy New Year! OK, I am a few days late with that thought, but where has the time gone? How can it have been just over ten years already since I started this blog?! I want to thank everyone who has helped to make the past ten years so wonderful!
And here are a few of the things coming up early this new, coming year:
After a break for the Holidays, my (mostly) Second (mostly) Saturday Studio Sessions return on January 12!
This month the time will be from about 2 to 6 pm. I’m setting it a little later than usual so it will run into the International Pot Luck Dinner that Global Pittsburgh is hosting in the same building from 6 to 9 pm, to make it easy for folks who want to attend both.
I’ll have a little mini-shop open. Mostly it’ll have my newer enameled pieces on copper or steel, along with a selection of silver earrings and a few of the smaller silver pendants. (If you missed getting something special that you wanted last year, let me know ahead of time and I can try to bring that in too!).
And I’m planning to have one worktable set up, so there should be room for one or two students to join me. Again, give me a heads-up … otherwise, I’m likely to just spread out over the whole thing myself since I have several deadlines looming. (But company is always welcome!)
The next two Studio Sessions are tentatively, hopefully, scheduled for:
- Saturday, Feb 9, 1 to 5 pm
- Saturday, Mar 9, 1 to 5 pm
If I make any adjustments to the dates or times for February or March, I will post updated information for those events over here.
My first workshop for the year will be on Friday, January 18.
Petites on a Post is scheduled to be held from 6 to 9 pm that Friday night at the North Hills Art Center. You’ll learn how to make a pair of fine silver post-style earrings. But my classes are always flexible: No holes in your ears: join us anyway and make a couple lapel pins! Not into posts: they’re the “bonus step” in this class, but you can join us and make dangles instead. Not into tiny things: join us anyway and just work larger! (NHAC’s course fee includes enough silver clay for two petite items, but I’ll have more that you can purchase from me in class.)
Technically, registration closes a week ahead, so that’d be Friday the 11th. But since I’ll be able to show off samples and answer questions during my Second Saturday open house, I’m hoping they’ll still let folks sign up that weekend. But registration will definitely be closed before that next Monday, so if you’re interested, please sign up as soon as you can! (Click on the link at the workshop title, above.)
I’m currently recruiting students for two workshops in my studio.
- February (date & time TBA): Learn to Make Buttons!
- March (dates & times TBA) A Two-Day Introduction to Bronze.
If you’re interested in being kept in the loop for one or both of those, let me know! Send me an email, or leave a comment with this post, and you’ll be included in the discussion of when we’ll meet and some specifics on the possible projects.
Posted in Events, Studio, Teaching Metal Clay | Tagged: bronze, buttons, class, copper, earrings, enamel, enamel on copper, enamel on steel, fine silver, lapel pins, silver, steel, workshops | Leave a Comment »
Posted by C Scheftic on 2018/07/30
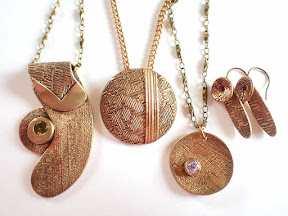
One of the questions on the evaluations I ask participants in my workshops to fill out is, “Please describe one of the best things about this class.” And one of the most common responses to that goes something like, “I could use your samples for inspiration but then, with your help, I was encouraged to make whatever I wanted!”
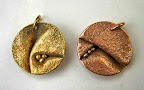
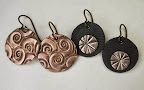
The photo with this post shows four pieces related to a class I taught last month. The three to the left of the pencil (included to indicate size) show three of the samples I brought with me. The piece to the far right was made by one of the students.

The “nest” piece to the far left is the one that was included in the venue’s printed and online catalogs. But the description said that the techniques could be used to make other designs; participants would not be limited to that exact nest design. And I took several dozen others, showing lots of different ways to apply the techniques.
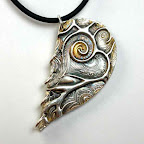
Reading left to right in this photo, the next piece shows one of those variations. It was a quick sample (done in a previous version of this class) as a demonstration of how to work “balls” (aka dots) into an existing design, how to create a spiral, and how to nestle that up against a dot-filled design. (In-class comment: Had I made that in my studio, instead of in a quick demonstration, I’m sure I would have domed the disk first before adding the embellishments. The flat disk is fine, and was quick to make for the demo, but in the design part of my workshops, I do bring pieces, like the one to the far left, to illustrate how even a little bit of dimensionality adds so much to a final product!)
The third piece was my smallest sample, showing how to fill a little nest inside a cut-out opening (rather than inside a nest from coils). It may be the second-smallest pendant-piece I’d ever made at that point. (I do make smaller pieces, but typically use those as earring components or as elements in larger designs, rather than on their own as pendants.)
I didn’t have time to set up a tripod and fiddle with camera settings, so I don’t have a decent photo of what everyone made (and even the bits farthest to the side on this one are slightly out of focus). But here’s what surprised me about the class: seven out of the total of fourteen pieces that students made in that class were smaller than my smallest sample! And the one in the photo I include here was the biggest of those!
Clearly, the students made what they wanted! I hope they were as happy with their pieces as I was with teaching them.
And I can go with the flow: one of the new workshops I’m now designing for the fall is tentatively called Tiny Is In!
Here’s hoping for a big turn-out for a making-tiny-pieces class! Full details should be available later in August.
Posted in Teaching Metal Clay | Tagged: class, fine silver, nests, pendants, silver | Leave a Comment »
Posted by C Scheftic on 2018/07/07

If you haven’t been over to The Arsmiths of Pittsburgh to see their great Instructors Show yet, you still have two more chances, this Saturday or Sunday (July 7 or 8). Not only does the show include a range of different styles from the various artists who teach there, but Artsmith’s proceeds from this show will be targeted specifically to support their great education programs!
If you’d like to talk with me in person, I’ll be over later in the afternoon on Sunday. (I should get there at or very soon after 2 pm, and I’ll stay until the closing, at 4.)
Whether or not we manage to connect in person this weekend, we’ll have another chance next weekend! You’ll be able to shop some of my creations and / or talk with me about any of my upcoming classes (at four separate venues), when I’ll hold another Second Saturday Open House session in my studio. That’ll be Saturday, July 14, and I should be there from about 1 to 5 pm. Stop by any time!
Next weekend’s bonus for one or two of my students: If you’d like to come over and use the tools & equipment in my studio during the Open House, I can have part of one table set up for that on the 14th too. Because I’ll have a few of my own projects going too, for students it’s really best if you reach out in advance to be sure I’ll have a spot for you.
(Since I’m still getting questions about these sessions, let me repeat that they are not the same as my private lessons or small group classes: I’m not saying I won’t speak to you at all, because I’ll help as I can. But they’re meant as an opportunity for students, working pretty much on their own, to continue or follow up on projects they’ve already learned how to do … but without having to invest in the great range of tools and supplies I bring to my workshops!)
Posted in Events, Studio | Tagged: class, lentil beads, pendants, SecondSaturday, silver, The Artsmiths of Pittsburgh, WSCC | Leave a Comment »
Posted by C Scheftic on 2018/06/21
 “Nests” are a workshop-project that I teach every now and then. It’s scheduled again for next Friday, June 29, at the North Hills Art Center. Online registration is available. If you’re interested, please sign up asap: the last day you can register is this Friday, June 22. There are two sessions listed, for afternoon OR evening. Sign up for your preferred time, but please let someone (me or NHAC) know whether or not you’d be able to participate in the other one (in case one or the other ends up over- or under-subscribed).
Having gotten the “promo” stuff out of the way, I’ll get down to the reason I decided to write a whole blog post on it: I’ll use that workshop to talk a bit about how an instructor builds up the ideas for a class. Different teachers may look at theirs in different ways, but this is the approach I favor.
Some “consumer arts & crafts” classes are designed so that participants all make exactly the piece illustrated. Others use the image as a starting point to explore a process or technique. I tend to teach the latter, simply because those are the classes I enjoy taking the most. Of course, participants are always welcome to make something very close to the illustration; it’s just that I encourage exploration, experimentation, and creative variations too.
Unless noted otherwise, I try to design each workshop so it will be great for beginners with metal clay, serve as a refresher for those with limited experience, and offer specific techniques so you can continue to build both your repertoire and your local metal clay community with each new class.
We start with the basics of rolling and texturing clay, cutting it into an interesting shape, giving it some dimension, deciding how to hang it, and more. Students are welcome to make a pendant and / or a pair of earrings.
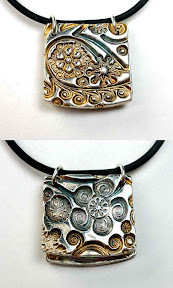
What varies across my classes is what else we do each time. In this one, we explore ways to hand-decorate those creations with silver strings and balls. So I call the class Lovely Silver Nests because it’s really easy, and fun, to shape those into an interesting “nest” design, as shown in the first photo with this post, my usual illustration for this class.
But once you know the process, you are free to arrange the strings and balls in various other patterns, instead of or in addition to nests! We also consider several ways to decorate the other side of each piece: with more strings and balls, by using more complex textures, by adding layered embellishments, and more. My goal is to help you create a unique piece of silver art that is reversible.
As usual, those with some previous experience with metal clay are welcome in this class too. My target audience here is not folks who’ve mastered the medium and seek advanced challenges (those, more advanced, sessions are usually just held with a small group in my studio); here, it is people who are curious and interested in learning more about manipulating metal clays in their creations. They may work right along with the beginners, perhaps finding time to create a more complex bail for hanging their piece, or they may add this style of decoration to a more complex project they’ve already mastered. I’m often surprised when folks tell me how hesitant they’ve been to try these specific techniques before this class, and I’m delighted when I see the designs they come up with as soon as they’ve learned how to follow a few specific steps to make this work.
 So, while I call the class Lovely Silver Nests, it’s not a nest-project class. It’s a strings and balls techniques class. They can be used in so many ways: on some of the simplest pieces, on many very elaborate designs, and even for pieces constructed solely using them!
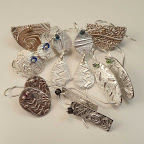
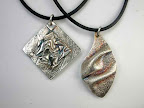
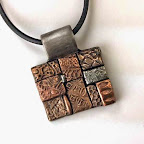
That’s why I’m also including in this post a quick snapshot with (a) one pair of basic earrings, and then (b) the back sides (or as I tend to think of them: the simpler, other sides) of three pendants. Even if you only know it as the “back” you can still know that there’s another little piece of art hidden back there!
Hmmm, I wonder if I should call this workshop Dots & Lines then, or leave it as Lovely Silver Nests? I’d love to see photos (or even just links to photos) of what other folks have done with their own dots & lines!
Posted in Events, Teaching Metal Clay | Tagged: class, fine silver, nests, pendants, silver | Leave a Comment »
Posted by C Scheftic on 2018/06/07
 This Saturday, June 9, is a “Second Saturday”! So I am, once again, planning a little Studio Open House. For more reasons than it’s worth listing here, this month I’m shifting the time a bit later than usual: 2 to 6 pm. I’ll have pieces for sale, along with information about the various workshops I have scheduled for this summer or might still add to the calendar.
The main reason for the slightly-later time is that the Regent Square Civic Association’s Second Saturday event will be at my building, and that’s scheduled for 4 to 7 pm. So I tried to plan my Open House to overlap: you can visit me from 2 to 6, if you’re able to come later in that range you can check RSCA out too, and I can still join them from about 6 until 7.
Follow either link above for a little more information on what each event offers. Stop by for the full effect!
Next Saturday, June 16, is my first workshop of the summer, where The Artsmiths of Pittsburgh will offer my reversible hollow silver bead class.
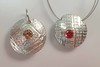
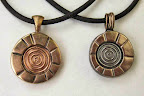
 Some people call these “lentil” beads, because their underlying shape is similar to a very oversized lentil. Others call them “saucer” beads, though I never imagined flying saucers that looked quite like these. Long-time readers of this blog will know, however, that I love making lentil beads, and I think they make a great class projet too. The photos with this post are meant to show that even a complete beginner can master the making of a relatively simple one that is still impressive! Those with some prior metal clay experience can work a few more advanced techniques into their designs, but you’ll have to come to class to see some samples of those!
At Artsmiths, we will cover ways to make yours so it can be worn all by itself as a pendant. Or, if you’re into beading, we’ll cover ways that are ideal for stringing it with a bead selection of your choice. Hint: the pieces in the photos here are designed for beading, but can be worn alone as pendants, as shown. Follow the class link, above, to see some more basic samples and to find out how to register for this session.
~~~~~~~~~~
And one miscellaneous musing…
Again, I’m really sorry I haven’t been posting much here lately. (I’m apologizing both to myself and to you!) Facebook is such a thought-sink! I’m not talking about how it can be a general time-sink; I miss all sorts of posts because I don’t spend much time browsing there. But I do spend some participating in a few relevant groups (on specific techniques and on art and jewelry in general; not all the possible ones, but a few!) where I oten find myself anwering questions or making comments there that, pre-Fb, I would have written up as posts here or on public blogs by others.
This bothers me: the class-link above goes to a public page I’ve written, while the two event-links above go to publicly-available Facebook-page events (perhaps with an annoying banner asking you to sign in / up to Facebook, but at least visible). But there’s no way for me to link here to something I’ve written in a “closed” art / jewelry group. I do understand the use of “closed” groups to help reduce the risk of spam, trolls, etc., but I’m still struggling with the idea of spending my time writing up useful information that is then limited in how far it can be shared.
If I’m going to write it up, I want it to be available to anyone who’s interested! Well, of course, I could copy my comments and post them here, but they’re often part of a thread, and I wouldn’t feel comfortable copying all that from a private to a public space; so that would mean re-writing everything to build up my own context. And that’s just more effort than seems worth it when I’d rather be making than writing in the first place!
Have you solved this dilemma? Do you know anyone else who has? Your thoughts (comments, links, pointers, whatever) would be much appreciated!
Posted in Events, Misc. Musings, Studio, Teaching Metal Clay | Tagged: class, lentil beads, pendants, RSCA, silver, The Artsmiths of Pittsburgh, WSCC | Leave a Comment »
Posted by C Scheftic on 2017/08/09
Well, I managed to get three posts up last month as I traipsed up and down the west coast, even though I got little jewelry made and did very little teaching. (The few exceptions will get their own posts eventually!)
Right now, I’m putting together my fall teaching and show (sales) schedules for September through December. I’ll post full details once I’m sure of all the dates various but, since several folks have asked for updates, the general plan goes something like this:
- Single Session Workshops: a mix of topics, mostly at either the Artsmiths of Pittsburgh, or in my own Studio;
- Multi-Session Classes: one series using precious metals (four meetings using either sterling or fine silver; Sept – Oct) and another series using base metals (five meetings using mostly bronzes, possibly accented with some copper or steel; Oct – Nov) at the North Hills Art Center;
- An Open House (with both demos and pieces for sale) in my studio during the community center‘s big fall open house day, and another Open House to coincide with Indie Knit & Spin (aka IKS).
- Because of the IKS-day Open House, I don’t plan to hold either type of button-making class at that event this year. But for those wishing to make buttons, I will be offering two separate classes on that at NHAC this fall.
- There will, of course, be pieces out for sale at all my “usual” locations, Artsmiths, the Hoyt, and Portage Hill.
- And I’m hoping to have pieces out for sale at various other market-places, though most of that may be more in the Thanksgiving to Christmas range … with details to follow!
- Then in the new year, I may try to tweak the plan a bit for winter into spring, swapping some multi-session classes into Artsmiths and my studio; and then offering some single session ones at NHAC.

But in addition to just offering a heads-up about what’s to come, there’s another reason for this post. I have a one-day Easy Earring Extravaganza project scheduled for next week, on August 16, and the deadline for you to register is looming!
Although I promote it as being a chance to make several pairs of earrings, what is an earring but an charm or a small pendant or other such element, where the maker may have just put the hole in a different place! Most of my other sessions go into depth on a particular technique applied to one specific design, but the Earring Extravaganza is different: with that one the goal is to help you go a bit more free-form for quantity, where you produce a number of simple pieces, whether that’d be to give yourself a little treat or to grab a chance to get started on holiday-season gifts.
Now, officially, the deadline is a week before the start of the first class, which is a week from the day I’m posting this! So if you want to join in on that one, please register right away!!! Technically, registration should close at the end of the day on Wednesday, August 9, but I think they’ll hold off closing it until early on Thursday morning. As long as I have the count by 10 am on Thursday, I can still get my order for materials in by that vendor’s 11 am cut-off for shipping, and we’ll be fine. Should you happen to try to register later today, or very early tomorrow, before I have to place the order, and for some reason you can’t get the form to work, please just call or email me on Thursday morning (best time would be between 9 and 10 am), and I’ll be glad to help you!
Posted in Events, Studio, Teaching Metal Clay | Tagged: bronze, class, metal clay, North Hills Art Center, shows, silver, The Artsmiths of Pittsburgh, WSCC | Leave a Comment »
Posted by C Scheftic on 2017/02/16
Great news! My four-week introductory series on working with silver metal clay still has a few seats available in “Session 2” — from 6 to 9 pm — starting next Thursday (Feb 23) at the North Hills Art Center, and we’ve agreed not to close the registration this afternoon, but leave it open until next Tuesday!
So if you forgot to sign up, there is still time. Or, if you didn’t notice the listing among my classes down the right side of this blog, didn’t check the Classes section of my website, and you’re not on my mailing list nor the one for the North Hills Art Center … well, now you know about the series and that it’s still possible to sign up.
 Just register now! Right here!
We’ll cover the basics of designing, texturing, shaping, cutting, and refining pieces. You’ll make a woven piece. And a hollow one (open or closed design: you choice!). With every piece you make, pendant or earrings, you’ll have the option of making it reversible! By the end, we will also have covered various ways to polish and add patinas to your pieces, to help bring out the textured designs. And we’ll have lots of fun doing it all!
For my one- or two-day workshops, registration is usually cut off a week ahead: I need time to order the silver we’ll be using (and I sure don’t want to charge students for overnight shipping)! I have ordered silver clay for those who already signed up for this but, since I’m getting enough to cover all four weeks, I can sneak enough out of that for late-comers to use the first week, and replenish it in time for later evenings.
If you’re in the area, I hope you’ll be able to join us!
 Also please notice (e.g., down the right side of my blog) that this session will be followed at NHAC by a simple, two-night introduction to making a beautiful piece out of bronze metal clay. Registration for that one will close on March 16. (Bronze is a little trickier to work with than silver, so you may end up making only one piece … but the materials cost less, so bronze worth risking for big “statement” pieces!)
Posted in Events, Teaching Metal Clay | Tagged: bronze, class, draping, fine silver, lentil beads, metal clay, powder metallurgy, reversible, silver, sterling silver, weaving | Leave a Comment »
Posted by C Scheftic on 2016/09/23
To help my local reader or potential visitors with planning their metal clay adventures, here’s a summary of the next round of workshops I have on the schedule at the wonderful Artsmiths of Pittsburgh. The link at the title for each one takes you to the registration service for it.
For the rest of September and on into October, I’ve chosen to offer a mix of classes where you can learn to create pieces that make a definite statement, or elements to use in more complex designs of your own.
 Monday, September 26, Noon-5 pm: Sparkle-Dome: Make a Hollow, Reversible Pendant with Bling!
As mentioned in my last post, “lentil” beads are always gorgeous, and now you can learn to make yours even more special by adding a sparkly cubic zirconia in a simple yet elegant way! Sunday, October 2, 1-4pm: Wrap A Straw in Silver and See What Happens!
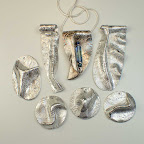
Simple tools can be the best: We’ll texture some silver clay and explore different ways to wrap it around a straw. The end result will be a large, stunning “tube” pendant-bead … unless you’d prefer to make a whole little collection of smaller ones. (The latter make great earrings, but they also pair perfectly with the mini-beads from the October 11 class!) Tuesday, October 11, Noon-5 pm: Mini-Beads: So Cute You Can’t Stop at Just One!
Another session making lentil beads, this time learning some of the extra tricks for making little minitature ones! These are great for beaders, or earring-makers, of all sorts. Making these little beads is easy and addictive, and you will find so many different ways to use them. (Hint: they fit wonderfully with the little-tubes you could make in the session on October 2!) Thursday, October 20, 6-9pm: Lovely Silver Nests
Tiny silver balls are easy and fun to make. They’re a great way for beginners to get a sense of metal clay, and they’re a wonderful way for others to use up bits of clay that’s left at the end of a session. And once you have such a collection, one fun thing to do with them is to collect them into a little “nest” design. (Or, if you prefer, spread them along a coiled “track”!) Explore the possibilities.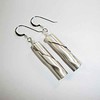 Thursday, October 27, 12-4 pm: Simply Stupendous Cylinders
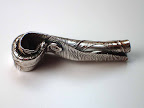
Whether or not you’ve ever made a tube bead before (which you could have done on October 2), this is the afternoon when you can practice making one or two more and learning how to close one end, which will let you hang them in any of several different ways. (The ones shown in the photo can rotate the whole way around!)
Then, in November, I’ve chosen to focus on sessions were you (yes, you, even if you are a total beginner at this!) can quickly make several simpler pieces … where the emphasis will be on making items you can give as gifts in the coming holiday season:
 Saturday November 6, 1-4pm: How Charming!
OK now, the Holiday Season will be approaching, and you’ll be thinking about gifts, won’t you? But why spend an afternoon shopping, when you can spend it making several adorable little silver charms, ones you can hang from a bracelet, zipper pull, fine chain, earwires, etc. They make wonderful gifts … if you can bear to part with them! Thursday November 17, 6-9pm: So Precious!
Once again geared for gift-giving, the idea behind this session is to make a very special pendant piece (or two, depending on how carried away you get with embellishing your first one!).
Beginners are welcome at all of these, while the projects are designed so that those with some previous metal clay experience are still likely to learn some new techniques with each one.
Note: the links on each session will open a new browser page where you can read a bit more about each class and register for the session. You may notice some minor discrepancies between what’s shown here and what’s there. Having tried (without success, for technical reasons not worth going into) to set up some the sessions I offer in my studio using the Eventbrite system, I have a LOT of sympathy for the several folks at Artsmiths who worked on setting up the registration pages there. It is not easy! The thing I will say is that the descriptions, date, time, price, etc., on the Eventbrite pages ARE correct. It’s just a few photographs that got mixed up, and a few titles that somehow got changed, from what’s shown above (here is what I submitted for these sessions). So … look at the titles, photos, and summaries here, then click the link and get the full description and registration information there. I hope to see you before autumn has passed!
Posted in Events, Teaching Metal Clay | Tagged: class, earrings, fine silver, gift-making, pendants, silver, sterling silver, The Artsmiths of Pittsburgh | Leave a Comment »
Posted by C Scheftic on 2016/09/21
 Registration has closed for my class on making silver buttons this week, but if you missed it, don’t worry. I’ll be offering that one again, in my studio, in November AND I’ve got one on making bronze buttons on the studio schedule for February. Those dates are set to coincide with Indie Knit & Spin, which is a great event that happens in the building where I have my studio. More on all that next month … because I’ve got several other great classes lined up before those.
The next one will be at The Artsmiths of Pittsburgh, this Monday, September 26, from Noon to 5 pm. We’ll make hollow, domed, reversible, silver “lentil-style” beads—one of my most favorite basic shapes to work with! If you want to add some extra bling to yours, you’ll learn a great way to set a lovely, sparkly cubic zirconia too, using an easy technique that lines up the top of your CZ with the top of your bead in a very elegant design.
If you’d like to sign up for it, details on how to register are here.
 Should you arrive early, consider having lunch at the Koolkat Cafe. You’ll want to start out well-nourished, from there or otherwise, so you’ll be ready to have lots of fun for the rest of the afternoon! During our session, there will be no specific time designated for everyone to take a break at once, but each person will reach stopping-points now and then where it’ll make sense to relax briefly.
 The beads shown here are all just under an inch in diameter. That’s a good size to start out with: somewhere between 3/4 and 1.25 inches across.
We’ll be using a silver-rich version of sterling silver!
In class, I’ll help you understand the major differences (both advantages and disadvantages) of fine silver (99.9% silver), standard sterling silver (must have at least 92.5% silver, with the remaining 7.5% usually copper), and our class-clay (which is 96% silver and a mere 4% copper).
This class makes a great introduction to metal clay: the very first piece I ever made with the stuff was a lentil bead! Then again, if you already follow any metal clay discussions online, you’ll know that this “960” sterling silver is still relatively new in clay form but working with it is being explored by many metal clay artisans. This will be a chance for you to work with it yourself! Until recently, I taught classes using “999” fine silver; I still use that for a lot of my pieces and classes, and choose among brands and formulations according to which seems to be the best one for the various designs I have in mind. But I’m thrilled to have a number of “960” versions available now too, as yet another choice, and I’m selecting projects to offer as classes that allow me to highlight the advantages (or avoid the disadvantages) among the many wonderful metal clay varieties that are now available.
I’ve been doing some additional behind-the-scenes testing of the various forms of 960: don’t hold your breath waiting, but know that those results will appear here eventually too. In the meantime, besides that testing, I’m keeping busy in this part-time activity of mine through teaching some private lessons, planning for a guest lecturer session next week on metal Art Jewelry for the Costume Design (undergrad) and Costume Production (graduate) programs in the Drama Department at Carnegie Mellon University, and trying to build up inventory for the holiday-sales season. And the ‘net connection at my studio still varies from wonky to non-existent. I do have some great 960 information in the writing-queue, and I am trying to get it in condition to be posted!
Posted in Events, Teaching Metal Clay | Tagged: class, CZs, lentil beads, silver, sterling silver, The Artsmiths of Pittsburgh | Leave a Comment »
Posted by C Scheftic on 2016/09/05
What with all the ‘net-connection issues and photo-sharing dilemmas I’ve been going on about recently, I am waaaay behind in posting about upcoming workshops: sorry! I actually have a bakers-dozen on my schedule already, and I’ll write about the bulk of them as soon as I can. For now however: coming along soon are two metal clay workshops that are not my typical stand-alone jewelry-projects!
Funny thing is, I really didn’t get into this metal clay arena because I wanted to go off making pendants and earrings and bracelets and more. My original goal was simply to find a relatively easy way to make an array of different elements because I couldn’t find ones that I wanted to use in my other creations: bead caps and clasps for my bead-work, buttons for my fiber-work, etc. If you are anything like I was, you should know that my first two classes this month harken back to those beginnings!

| Thursday Sept 8, 6-9pm,
Make Your Own Unique Silver Bead Caps
This one is especially for Beaders: Learn to make your own fine silver bead caps, designed to go perfectly with some of the favorite beads in your stash!
|
Thursday Sept 22, 6-9pm
Silver Button Originals!
This one is especially for Fiber-Artists of all sorts: Hand-made creations deserve hand-made buttons, don’t they?! Whether they will be functional or simply decorative, they might as well be your own hand-made sterling silver treats!
| 
|
Click on the title of each workshop, above, and it should take you to a page where you can sign up for that particular session. Beginners are welcome! These are fun ways to add both decoration and value to your lovingly-made creations.
Along with my other ‘net- and photo-woes, however, for some reason the folks at Artsmiths who’ve been setting up those registration pages have been adding the sessions, then changing, fixing, and again changing … the names of my classes. Some are showing the names I gave them; others show something that does fit but is not what I was calling them. Who knows? Problem is, the session name shows up in the URL I need to use to add the links! Not to worry, though, I think I’ve (finally!) found a way to add reliable links above but, should they fail, you can also get to them either of these ways (these will require an extra click or two, but they should be more stable…):
I hope I’ll see you there! Then again, if you’re just learning about these now, and the notice is too short for you to make it work with your schedule, let me know!
- I can find a time to schedule the Bead Caps one again, either at Artsmiths or at my studio. I’m also happy to do one in my studio on making your own toggle clasps: as soon as enough folks tell me they’re interested, I’ll email you about picking a date that will work for everyone.
- And I plan to hold button-making sessions again when Indie Knit and Spin is on: we’ll be making the same sterling-silver-with-holes buttons on November 12 and, depending on interest, I’ll either repeat that one or lead a session on making shank-style buttons in bronze during their February 25, 2017, gathering. More on those, and other button-options, shortly.
Posted in Events, Teaching Metal Clay | Tagged: bead caps, buttons, class, fine silver, silver, sterling silver, The Artsmiths of Pittsburgh | Leave a Comment »
Posted by C Scheftic on 2016/07/24
 Another workshop I have coming up is one I’m calling Golden Bronze Beauties! It is this week! And there are only a few seats left! (Click the link in the class name to get to the official announcement and registration pages.)
This workshop will offer a simple introduction to working with bronze metal clay. If you’ve been wondering about metal clay, I hope you’ll jump in with this one. Or, if you’ve already worked with silver clays, this will be a great chance to explore a different formula. (Should you know enough to wonder about this, the clay I’ve chosen for us to use in this session is Hadar’s One Fire Brilliant Bronze.)
Everyone will be led through the process of developing your own unique, reversible design for a pendant and / or a pair of earrings, and then working with bronze clay to implement that idea.
This is a two-day workshop! Most of the classes at the Artsmiths of Pittsburgh (at least so far) have been one-session-only events. But I asked for two so I could offer one using bronze, and was delighted when they agreed to try this!
We’ll do all the making on day one. I’ll fire everyone’s pieces overnight and, in the second class, we’ll see how they all turned out, and explore a handful of finishing techniques. With all the base metals, there can be surprises in how they come out of the kiln. On the plus side, your piece may have acquired one of the stunning, but unpredictable, “kiln colors” that, although ephemeral, you may want to try to preserve for as long as you can. Alternatively, it may come out a dull tan or gray color, one that you’ll want to polish off your piece to reveal the golden-bronze color underneath.
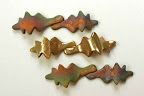 Kiln-colors? Consider the photo of three small hashi oki (chopstick rests) that I made several years ago. While the pendants and earrings in the “promo shot” for this class have all been polished to a high shine, two of the three of these rests came out with such beautiful kiln-colors that I couldn’t bear to polish them the same way I did the third one. (I still have these: I actually use them in my studio as dohgu oki (tool rests) to keep brushes and burnishers and other round-handled tools from rolling off my workbench!) I have polished the bright one lightly a few times, but have let the colored ones slowly darken with age naturally and they are still lovely!
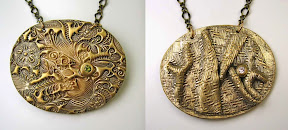
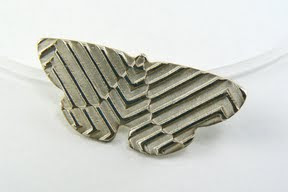
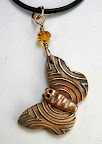 Alternatively, on this butterfly pendant with bronze wings (and a copper body), I left kiln-colors in the hollows of the texture, while selectively polishing the high points. That’s the thing with bronze: you can be determined and just polish the whole thing once it’s been fired, no matter what, or you can wait to see what the kiln provides and make your final finishing decisions based on what you’ve been given. Leading you through those options will be the focus of our second meeting this week.
FWIW, that is why all my base metal classes are longer than a single session. If we use just a single metal (bronze, copper, or steel), we meet at least twice: once to cover making and again to cover finishing. And when we start to combine metals, we meet at least three times (more is even better). Mixing metals increases the chance that the pieces will come out of the kiln with some cracking that will need to be dealt with on our second day (i.e., given some simple repairs & refired, and/or otherwise designed-around). Thus, with mixed metals, we need at least one additional day to ensure that everyone can complete their final finishing steps too.
Important Note!
I’m really hoping that this offering garners a good bit of interest! (This, and a four-day one I’ll discuss in my next post: an introductory silver class covering a range of techniques, including several for incorporating some bling that we often skip over in single-session lessons.) If Artsmiths sees that there’s interest in being able to “go deeper” in these processes, that’s what it will take for them to let me offer more like this! If you are interested, and can join us, please do! If your interest has been piqued, but you just can’t make it for those days (or at those hours), please let the folks at The Artsmiths of Pittsburgh know: we can modify the scheduling for future sessions if we know what would work better! (And, if we can’t make the timing work in their classroom, I can offer the same thing at my own studio.)
Posted in Teaching Metal Clay | Tagged: bronze, class, CZs, dohgu oki, earrings, pendants, The Artsmiths of Pittsburgh | Leave a Comment »
Posted by C Scheftic on 2016/07/21
It’s time to follow up on an earlier statement, and write a little bit about some upcoming classes. But since this is (what is often called in social media circles) Throwback Thursday, I thought I’d include a few notes on how the ideas and directions for two popular sessions have evolved over time, since I’m repeating them on a couple of Saturday afternoons this month (soon!) and next.
Reversible Draped Silver
Saturday, July 23, 2016 from 1:00 PM to 4:00 PM (EDT)
 I must admit that the idea for this came from Hadar Jacobson. I’ve made pieces, and then been asked to teach classes, using both precious metals (silver) and base metals (bronze, copper, steel).
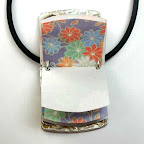
We texture the clay and then roll it thin in order to get it to drape nicely. With .999 fine silver, that produces pieces that seem to me to be a bit too fragile, risking bending or breaking at the thinnest points. We can solve that problem by adding a backing layer, or at least a frame, to provide additional stability.
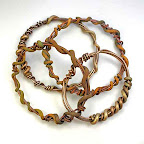
 When we use base metals (like these in bronze and copper), we get pieces that are a bit harder. Thus, most of our pieces can just be folded and embellished. They rarely seem to require extra layers for sturdiness, though of course those can always be added if desired from a design standpoint.
I will admit that I never tried making these with .925 sterling silver: I don’t particularly like fussing with the firing schedule for that clay, and have only used it for a handful of different designs. 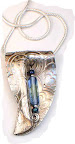 But last winter I started making these with .960 sterling which is much easier to fire than is the .925 form, and they turned out great. So that’s what we used the last time I offered this as a class, and it’s what we’ll be using again this week.
 At this point, we’ll still be using “homemade” .960, that will come from mixing .999 and .925 clays. There is a commercial version now available, EZ960, that’s recently been released. We won’t be using that here simply because I haven’t yet had enough time to experiment with that to feel as comfortable as I’d like using it in a class. I want to learn any and all potential pitfalls with it myself before foisting it on a room full of students! Stay tuned for news in that arena.
Reversible Woven Silver
Saturday, August 27, 2016 from 1:00 PM to 5:30 PM (EDT)
 The way I began to make these pieces, and lead students in making them, has had a number of inspirations. Hadar, again, was one of them, but so were CeCe Wire, a project in the RioRewards certification program, plus a whole range of others (such as some of Mary Hettmansperger’s metal-weaving projects).
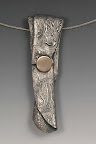
Sometimes, as in the silver pieces above, the weaving would be the main element in the design. 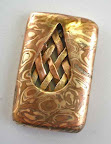 Other times, as in the mixed-metals piece shown next, the woven portion is more of an accent to another important part of the design. Because of the thin nature of the strips used in the weaves, however, I always made sure that their ends were securely tucked into a frame.
 Ahh, but do you remember the .960 silver I just mentioned above? Yes! While I’ll still guide students through some dos and don’ts in letting small ends hang out, we can now be far more adventurous in allowing that. We no longer need to be completely constrained by framing. Again, we can use solid frames if we want that in our designs, but it’s now an option, not a requirement. This class is going to be another one that’s lots of fun!
If you’re in the western PA area, or can get here for one or both of those dates, I hope you’ll join us!
 Please note: The links in the title of each session above take you to the site from which you can reserve a seat at that particular class. In each case, the materials provided will be enough to make an interesting pendant. If you want to divide it in half and make earrings instead, that’s fine with me. If you want to buy a bit more material and make something big or even (if you find yourself so comfortable with this material that you are able to work quickly enough to…) make both a pendant and a pair of earrings, that’s yet another option.
Also: I’ve got two other workshops coming up this summer, both of which are multi-day events. I’m hoping to write about those soon too, but the ‘net access in my studio is getting increasingly less reliable (we’re hoping for a fix next month…), so I’m struggling to keep up with online announcements. But you should know that all my workshops at The Artsmiths of Pittsburgh are announced on the Eventbrite system. If you are interested in a specific class but for some reason can’t make it on the given date(s), please let me know. I’m happy to repeat any of my sessions on another date, whether it’s back at Artsmiths again, in my studio, or at another site.
Posted in General Techniques, Teaching Metal Clay, Technical Details | Tagged: .960 silver, class, draping, weaving | Leave a Comment »
Posted by C Scheftic on 2016/04/30
Some days I think to take photos, other days I don’t. I can find no pattern at all to which is which!
But, whether or not I remembered at any point to stop and take photos, I want to say how much I enjoyed my first month of teaching at The Artsmiths of Pittsburgh!
 Our very first class, on April 14, was an easy introductory session, where we covered learning how to texture metal clay, give it some shape (e.g., by drying it over a dome), and embellish it for a bit of extra oompth (e.g., with balls or coils of clay). In all, in three hours, six students completed twenty-one different pieces!
Now, if you’ve worked with metal clays, one thing you know is that you usually should start out with a little more clay than you actually need to make a piece. You’ll roll it out, but then cut it down to the size and shape you want, and trim away the excess. And the question is, always, what to do with the excess? I’ve already written here about this, but the basic options seem to be: make something else (small) with what you have left; get some more clay and add your leftovers to that to make another piece (bigger); or, go to the bother of saving it to do one of the above later on. (Clearly, I lean towards either of the first two!)
 And I have to give this group credit for finding ways to use all their clay. First-timer Linda, in particular, kept making smaller and smaller pieces, using the bits she cut out of one piece as elements on their own, and using the final dregs to make tiny ball embellishments.
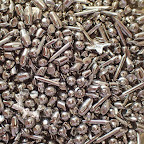
Everyone’s pieces fired beautifully, but I didn’t think to get a photo of that. No, what I did capture was when, after I’d fished Linda’s last three teensy pieces out of the shot, someone surprised me by pounding on my studio door, and I dropped them back onto the shot. At least, they landed on top, so I didn’t have to search through the whole barrel-full again. Still, can you spot all three pieces in this photo?!! (I think two are pretty obvious, but not the third, which was the center she’d cut out of the little gear/sun-shape.)
Then, on February 21, I taught a “Draped Silver” class. Didn’t take a photo of that group at work…. Don’t have a good photo of all my samples either, but I include here two older pics of two pieces each, one pair in .999 fine silver, and one pair in bronze and copper (because that’s my best one of little “ball nest” embellishments).
In this class, we worked in .960 silver. That allowed us to roll the pieces nice and thin, which is the key to making draped metal clay pieces. It also let us make them fairly thin without having to add a backing or frame for protection.
 Several of the folks in this session had taken one of my earlier classes (at Artsmiths or my studio) and had seen a wide range of my textures; for this workshop, however, I took only shallow-texture choices.
The last photo with this post shows the fired and tumbled pieces from this class (though, for some reason I don’t understand, it is not a good representation of any of the colors, nor the textures; though you can see the range of interesting shapes that folks made). The one with wire, beads, and chain (middle of top row) is the one I made as an in-class demonstration. It’s a slightly different color from the other pieces because, before I added the beads and chain, I gave it a very light Liver of Sulphur (LOS) patina and then polished off most of it. But I returned the students’ pieces all shiny-silver, and will let them decide if they want to leave them like that, or if they want to add a patina. I do love patinas but, sometimes, and especially with broad, shallow textures like many of these, I think that pure silver shine is wonderful!
I did have a third class scheduled for April, Woven Silver on April 26 but, as I mentioned before, April was a killer month. (I mean that literally: suddenly, randomly, several friends and parents of friends all died.) It got to the point that I just couldn’t swing that class. I didn’t get a clay order in on time (to get it without express shipping charges) and, even if I had made it to class with clay, it’s not clear where my head would have been. I want workshop participants to know that I am there with them, ready to present, encourage and help! So we rescheduled that one, for May 21.
I’ve got two other classes scheduled for May too. I’m really looking forward to those! More on all that shortly!!
Posted in Teaching Metal Clay | Tagged: .960 silver, class, domes, draping, fine silver, pendants, The Artsmiths of Pittsburgh | Leave a Comment »
Posted by C Scheftic on 2016/01/26
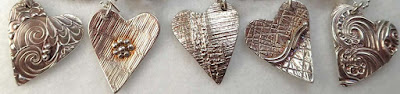
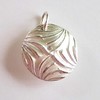
The five reversible domed-heart fine silver pendants shown above have all been delivered to The Artsmiths of Pittsburgh in Mt. Lebanon and are now available for purchase there. I was thinking about making a few more to have on hand during the studio sale I’ll be holding when Indie Knit and Spin returns to the building where I have my studio.
But they are fun and easy to make so I’m also proposing a class: you can make one as a gift for someone dear to your heart; or come with a partner and make them for each other; or ask your sweetheart to buy you this class as a gift; there are lots of options, even if you’re a complete beginner!
When: Sunday, January 31, 12 Noon to 3 pm
Where: Wilkins School Community Center in Regent Square.
Cost: $50 / person
That price includes both the class and enough silver to make one pendant (approximately 1 inch long). Extra material will be available for purchase if you’d like to make more than one pendant (or, say, a pair of earrings too). Several different styles of chain will also be available for purchase.
You have two days to decide! I know this is short notice, but I need to have at least four (4) people sign up by 10 pm on Thursday, January 28, in order to run this class. (And the maximum number is seven (7) so I can give everyone enough attention.) To sign up, please either send me an email or leave a comment with this post. I will accept people in the order in which they respond! By around noon on Friday, I will send an email to everyone I’ve heard from with: (a) whether enough people signed up to run the class and (b) whether your request was received before the class filled.
I sure hope that a few of you will be able to join me this weekend!
~~~~~
Update (8 pm on Thursday): Yes! Thanks so much to everyone who emailed me: this class WILL run on Sunday, as indicated. I’ll email everyone (either later tonight or else tomorrow morning, as noted above) with a few little details.
Posted in Events, Teaching Metal Clay | Tagged: class, fine silver, hearts, Valentine's Day, WSCC | Leave a Comment »
Posted by C Scheftic on 2014/04/08
 In addition to the workshops I’ve offered in fine silver for what seems like ages now, I’ve also been teaching classes in these non-precious metals too, mostly on-demand private or semi-private sessions, plus a few in local bead shops. All were relatively short, covering just one or two techniques in one or two day (or evening) events only.
 Now, I’ve taken the best of the best and spiffed them up with some of the things I’ve learned in the last year with Hadar’s group of teachers worldwide. And I’m thrilled to be offering that great new combination in a four-session series, on Sunday afternoons in May, in my studio in the Regent Square (Swissvale) neighborhood, just east of Pittsburgh, Pennsylvania.
 Whether you’re a beginner, or already have some experience with metal clay, you will make at least four separate items: a bracelet, a pair of earrings, and two pendants. Some may involve a single metal; others will combine various bronze formulas with copper and/or steel. You’ll learn every step of the process, from design through basic construction and on to final finishing for your pieces.
You’ll get to use at least three different metals (from yellow bronze, champagne bronze, dark champagne bronze, iron bronze, rose bronze, copper, and/or steel). Don’t know the difference between them? You’ll learn that too!
 We’ll meet each Sunday in May (4, 11, 18, and 25*), from 12 to 5 pm. That’s 20 whole hours of instruction in a small class (max 6 students)!
 * Yes, May is such a busy month! We will meet on Mother’s Day. But let me know if you’re hesitant to sign up simply because May 25 is part of the Memorial Day weekend. Several alternatives for that final date are possible!
Posted in Events, Studio, Teaching Metal Clay | Tagged: bronze, Champagne Bronze, class, copper, Dark Champagne Bronze, Friendly Bronze, Friendly Copper, Hadar's Clay, Low Shrinkage Steel, rose bronze, steel, White Satin | 2 Comments »
Posted by C Scheftic on 2012/02/08
Off and on for several weeks now, I’ve been battling a sinus-plus infection. I vaguely recall calling Trish (the owner of Zelda’s Bead Kit Company) a few days before one of my recent workshops, right before a doctor’s appointment, sort of hoping to learn that it was looking under-enrolled and I could use that as excuse to just cancel it and sleep another day. And the night before the class, after I’d been on antibiotics for a few days (resulting in a portion of the head-malady improving but digestive tract upset), though I knew I’d learned I really should go out and lead it, I thought I must have been sick enough to hallucinate a conversation that I was thinking had gone something like this:
“Do I have enough folks signed up for Saturday.”
“Yes, I’m sure you do. A good crowd. Let me check the book. Oh, yes, very good: Let me count. 1, 2, 3, breath, pause, breath, breath, 9. You have nine this time! Isn’t that wonderful!”
“Sure, but, um, Trish, with all the stuff I haul over there, my max is typically six. Aside from the question of where I’m going to find enough extra tools for that many, I cannot even imagine where you think everyone will sit.”
“Don’t worry. With that many enthusiastic people, we’ll clear out the whole front room for you.”
“OK. Thanks. Gotta go now. See you then.”
[Aside: Even during the Instructors’ Trunk Show before Christmas, she didn’t fully clear out the front room! Where might all that stuff go? I still was not imagining how this might work.]
 I had a bit of leftover PVC pipe that I could cut up to get a few more rollers. For classes, I make up card sets that people can use as thickness guides: I actually glue together stacks of 2, 3, 4, 5, and 6 cards, with the “top” card showing the number in the stack (which makes it really easy to check what you’ve got … and I can keep an eye on things from across the table)! I didn’t have enough extra cards on hand to make more. For this project, however, I figured I could just limit folks to 5-card and 3-card rolls. Then we could split the sets and, for a few of the more-experienced folks in the group, I’d give them the 1, 2 and 4-card pieces to use (since 4+1=5 and 2+1=3).
For all the other tools, we’d just have to share…. I don’t normally stockpile a lot of extra silver clay, but I did have enough clay for nine because I’d gone ahead and made sure I had what should have been enough for my next two sessions.
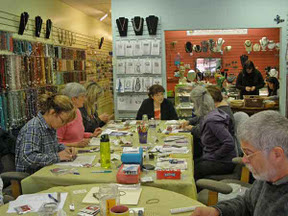
Well, I arrived early to find that Trish had fully cleared out the front room. (And made a crock-pot full of wonderful soup too. Talk about customer service!) There really were two whole tables for folks to sit at. She disappeared in back for a few minutes and re-appeared from I-know-not-where with four extra chairs. Added to the seven she normally has around the one big table, that came to eleven. Oh, yes, Trish wanted to sit in on this one too, so there’d really be ten people (plus me)! Oh, and I backed myself up against the front wall to get the photo I’m using here, so I’m missing more than half of the front table.
I know I was not at my best that day, but I think I held things together pretty well. And, since a number of participants signed up right away for my next workshop, I’m guessing that wasn’t a fevered delusion. So this is really just a note to say a slightly belated “Thank you!” to Ellie, Sally, Valli, Marie, Glenda, Jan, Ruth, Ronna, Bill, and Trish for helping me have such a good day!
Posted in Teaching Metal Clay | Tagged: Art Clay, class, fine silver, metal clay, PMC | 2 Comments »
Posted by C Scheftic on 2011/08/27
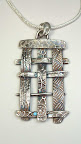
 Jane and Rose, delightful students both, have taken several of my workshops. The last time we were together, Jane asked if I could please offer a workshop on making little fine silver books that could be worn as pendants. Yes, of course, great idea!
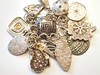
I asked Jane to show me sort of what she had in mind, just to be sure we were thinking in compatible ways. Shown with this post, are two of my simplest interpretations of her ideas. I’m working on a few others too, in between everything else that’s a part of life, but I wanted to let folks know this is in the works via a couple of the simplest interpretations, ones that anyone can do. Yes, anyone: that does include even those of you who keep reading and thinking about metal clay without ever trying it to actually see and feel what it’s like!
Before I offer a workshop, I always make a collection of sample pieces. Partly, that’s so participants will be able to see some variations (to get their imaginations going); but, even more, it’s so I can try to do some things right, and some things wrong—I can be sure of what works how and where I can and cannot safely push the limits of what folks might want to try. So far, I’ve focused on the metal covers, not so much the contents. But I believe it’s the inside that makes this project particularly special: you can put anything inside your special little book that you want. You can put in blank pages, and write little notes on them. You can print something out. Or cut pictures or bits of text out of magazines. Or include photographs. Even little bits of pretty fabric, or would work. So could relatively thin “found objects” such as pieces of plastic or metal trimmed to fit. That part is entirely up to you!
In the piece shown above, I used little bits of origami paper, white on one side with a design on the other; you could add drawings or text to the white side, or used papers with patterns on both sides, or…. Note how it hangs from its “binding” loops: that turns out to be a great yet easy way to handle both the “binding” of the book and how to “hang” it as a pendant.
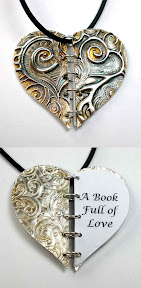
 I made another piece, “A Book Full of Love” (shown both closed and fully open) in order to illustrate how you’d actually have to factor in gravity if you wanted the “binding” to run down the side: because the top loop is in a corner, it’s going to want to hang with that at the top, and the rest will just naturally angle down from that. If you want that look (which, conveniently, also helps to keep the book closed), great: gravity just gives it to you! If you don’t, however, then you’ll have to think of other ways to counteract the way it will want to balance. You could, for example, embellish the whole thing with some additional elements (e.g., beadwork), and then dangle some more beads from the bottom hinge piece to pull it down and into place. There are lots of other options too, of course, which is yet another way in which this is a very versatile project. (I’ll get some more photos up, eventually, though it might not be until after the actual workshop….)
Here are a just few other points, to keep you thinking about this: while the jump rings I used to hold everything together in these particular samples are an easy way to do this, what else could you use to bind the pages and covers together? How many places do you want to loop through (these samples used two sets of holes, and then five, respectively) and how much might that vary depending on whether you chose a different mechanism for your binding (or content for your insides)? Where and how do you anticipate this piece being worn: that is, do you need to make sure the pages are waterproof (or, at least, water resistant)? Jane specifically requested a pendant, so that’s what I’m showing in this particular post, but what else might you do with a little silver-covered book? Or what other designs might you come up with, that used a book-binding sort of approach, but didn’t end up being a book at all?
I’ll be working with Rose and Jane in the next few weeks to come up with a time and place to offer this workshop. We’d love to have a few other folks join us, so please let me know if you’re interested.
Posted in Teaching Metal Clay | Tagged: bookbinding, class, fine silver, inspiration, intro, metal clay, postaweek2011 | Leave a Comment »
Posted by C Scheftic on 2011/08/21
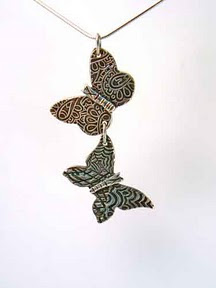
 Since I’ve been writing about workshop inspirations, here’s another one: My annual “Fine Silver Butterflies!” workshop is coming up! So many folks signed up for it (this year, I’m offering it down at Zelda’s Bead Kit Company in Bridgeville, PA) that we had to add a second session! With two of them now (both afternoon and evening on Wednesday) I think there may still be a seat or two open, so check it out if you’re interested.
But where did that idea come from? Regular readers of this blog may have picked up the fact that, in addition to my passion for metal clay and related topics, another interest of mine is gardening. And not just my own garden either: I also volunteer with the Penn State Master Gardeners of Allegheny County, which means both helping out in their various Demonstration Gardens, and also helping to prepare materials, give talks, and teach workshops on a range of gardening topics throughout our area.
 Before my latest move to PA and joining the PSMG program (as well as visits to Pittsburgh’s Phipps Conservatory with its lovely Butterfly Forest), I lived near a couple of different Monarch Butterfly sanctuaries. The first of those is in Pacific Grove, CA. Later, after a stint in MN, I lived near another such grove in Pismo Beach, CA. (Did you know that those monarchs and their descendants, since they wintered along the Pacific coast, then all summered west of the Rockies? Monarchs that summer all over east of the divide then winter in one specific place in Mexico!) And, although south Florida’s Butterfly World came into being only after I’d headed off in search of cooler climates, when I’d head back south to visit the folks down where I’d grown up, I felt a little bit of relief when I found that sort of development amidst all the seemingly relentless “expansion” there.
All of which made it sort of obvious, to me at least, that when I took up metal clay, I’d then try making some butterflies out of it and even add a Butterflies class to my offerings.
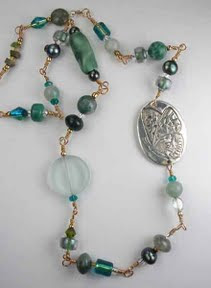 For the workshops, it took me a little while to collect a reasonable number of butterfly stamps and cutters and such so participants would have a nice set of choices, but I’ve been offering this workshop each summer for several years now. (I schedule them then, but am happy to offer this at other times of the year if people request it.) In addition to my usual metal clay handouts, I get some brochures from the Penn State extension office on butterflies and other pollinators, and I provide a few links to information that’s online. (I mention our pollinator-friendly program with respect to bees too, since they seem to be having such a hard time with their colony collapse disorder these past few years, and it seems increasingly important to mention those as well.) Workshop participants are welcome to take brochures home with them if they want, and to look at some of the butterfly (and insect) books I bring along. During the moments in the hands-on time when everyone is working but some chatter still goes on, I provide an introduction to the value, care, and feeding of pollinators.
I usually take with me a good number of lovely but fairly simple examples (such as the ones that accompany this post) plus a couple more advanced samples. I find it interesting to watch the choices participants make: do they stick with simpler designs and go for quantity; do they focus on one piece but add more intrigue and complexity to it (e.g., using shaped drying forms, adding movement mechanisms, constructing detailed little 3-part butterfly-bodies and antennae, etc.); do they make only butterflies or add one or more flowers to hold or accompany that piece?
Even if these fine silver butterflies do not themselves contribute to the important task of plant pollination, it’s my ongoing hope that the wearing of them—along with the relevant gardening information provided in the class—will help to both draw attention to, and spread the word about, the value of these wonderful little creatures in real life.
Posted in Teaching Metal Clay | Tagged: class, fine silver, inspiration, intro, metal clay, pollinators, postaweek2011, travel | Leave a Comment »
Posted by C Scheftic on 2011/08/13
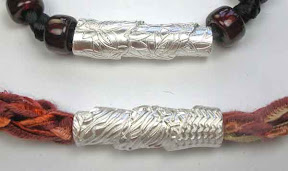 I sure do think that it’s loads of fun to wrap strips of clay into cylindrical shapes … and, then, fire them so they turn into sturdy but lovely metal tubes! Do you? Have you tried it? Would you like to come to a workshop and make a few?
One fairly easy thing—something even an absolute beginner can do—is to overlap the material as you twist it around. This gets you a shape I think of as a “lapped cylinder,” one that’s open at both ends. Depending on the texture / design you have chosen, the pattern can remain the same along the full length of the cylinder (upper tube in photo to the right), or it can vary noticeably as you turn it around (lower tube in upper photo at right).
You can hang one or more of these cylinders from some fancy ribbon and you’ll have your very own one-of-a-kind piece of art-jewelry! You can use ribbon just as it comes from its package, or you can use any of a range of braiding and/or beading techniques to make it fancier. It can be as quick and easy, or as elaborate, as you want it to be.
(Not shown in that photo is the way you can even use a matching tube as part of a toggle clasp! I’ll write about bracelets again in a little while, and show that then.)

 An interesting variation on the cylinder involves capping one end and putting a small hole in that, just large enough for a piece of wire to pass through. Then, you can use a headpin (I often make my own!) to either: make a wrapped loop so you can hang the whole thing from an earwire (first photo to the left) or even use a headpin that’s long enough so you can bend it directly into a hand-made earwire (second photo, to the left). Though I illustrate only the second approach with additional beads here (I used crystal and glass), it’s possible to include them (or not) with either style, as you desire.
All of the cylinders described so far are possible outcomes for the workshop I offer periodically called Simply Stupendous Cylinders. Where did that idea come from? I wanted to find a way to offer a shorter, simpler version of a couple of my other favorite projects.
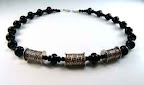 (1) Silver Spools involves another great project. It’s also appropriate for beginners, while those with prior metal clay experience will often have the chance to learn some new techniques. But the strategy used to construct spools just takes a bit longer to complete than does that for simple cylinders. Spools also use up some more material. So I like to offer the simpler version sometimes too, for those who want to try making some tubes but at a slightly lower cost.
 (2) I also love making and teaching others to make “twistie” earrings (or pendants) like the ones shown to the left here. I like their twisted shape, and I especially like the way they can be made to spin on their handmade ear-wires. Surprisingly, however, they are much harder than they may look to make! The Do the Twist workshop where we make these is one of the few I teach involving silver metal clay that I do not recommend for absolute beginners….
Here’s why: The “open twist” shape of this construction is just incredibly fragile in the greenware shape. The end result is sturdy enough, but even the slightest “wrong” move as you do any finishing or cleaning prior to firing can cause a “twistie” to snap into pieces. Then you have to decide: stick them back together (and risk snapping it somewhere else in the process), smooth off the ends of the pieces and just end up with shorter twists (though that smoothing can also lead to more breakage), or rehydrate the clay and try again another day (since, though no clay is lost, it still takes time to get it workable again)? That’s just not a set of choices I want to foist on metal clay beginners! You need not be an expert to make these, but I do recommend waiting until you feel comfortable working with metal clay in both its moist (lump clay) and dried (greenware) states before you tackle this approach. And the cylinders-class is one great way to gain the relevant experience.
If you’re reading this note within about a month of when it was first posted, you can look over to the right sidebar to see when I’ll next be offering the relatively quick and easy Simply Stupendous Cylinders workshop in my studio (in “Regent Square” in western Pennsylvania, where Pittsburgh, Swissvale, Edgewood, and Wilkinsburg intersect…). If you’re interested, just let me know that you want to sign up for it.
If you’re reading this more than a month after it was first posted, you may not see it listed on my evolving workshop schedule. But, at any time, you are welcome to request any of my workshops (regular ones or something special), including the ones discussed here. I’m always happy to offer any of them (at my studio or even at your site) as long as I know there are folks interested in taking them!
Posted in Misc. Musings | Tagged: class, fine silver, inspiration, intro, metal clay, postaweek2011, tubes, twists | Leave a Comment »
Posted by C Scheftic on 2011/08/07
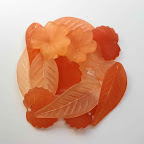 I was over at Zelda’s Bead Kit Company a week or so ago, and noticed a box with these cute and colorful little Lucite beads. I think they’re so adorable—with several different leaves and flowers and butterflies—and I just couldn’t decide which color or design to buy.
How could I justify getting a whole collection of them? Even a single strand of one color and design contained more than I’d be likely to use myself. Why? Well, while I may make “similar” pieces in a “series,” I don’t go around making lots of multiples of the same design. So I rarely use lots of the same kind of bead.
But … I got to thinking, in workshops, my participants are encouraged to take my ideas, demonstrations, and samples as inspiration and then make something that adds their own special twist to it.
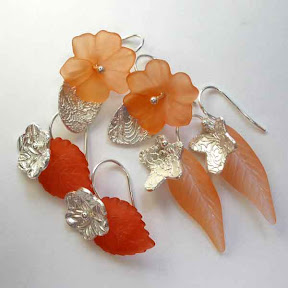 So … could I justify buying a collection of these in different designs and colors, and offer a workshop where I’d make these available as materials? Clearly, given the presence of these photos, the answer was, “Of course!”
Garden Delight Earrings is now on the schedule as one of the workshops I’ll offer in my studio at the Wilkins School Community Center soon after the fall series opens. This one will be on the evening of September 21. Though returning students are certainly welcome, this is one of the classes I’ve designed as a super-easy one for beginners. And because the silver elements themselves are likely to be relatively small, the materials fee for this one should also be very affordable!
Posted in Misc. Musings | Tagged: class, earrings, fine silver, inspiration, intro, metal clay, postaweek2011 | Leave a Comment »
Posted by C Scheftic on 2011/06/10
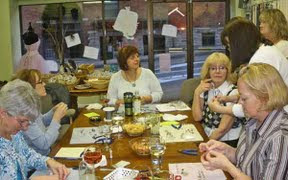 I said I’d try to get to it eventually, and it’s only taken about six weeks to get around to trying to organize some of my workshop snapshots. This shows a happy crew on the second evening of the custom bracelets session at Zelda’s Bead Kit Company at the end of April.
I tried to get some quick snapshots of the final results. If you were there and want copies of the ones I took of you, please let me know. I’m not sure if it was the wine, or the lighting, or what, but there were a lot of rather blurry shots from that batch. Which is a real shame, because the results were fabulous.
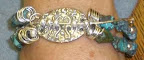 I was able to find a small section of one that did a decent job of showing Ellie’s creation: click on the small image at the left if you’d like to see a slightly larger version of that one.
To illustrate that all the fine silver components can be made to be fully reversible if you want, I’ll close with a shot of one of the pieces that I made during various demonstrations (taken later, once I was back in my studio with better lighting) with little inserts showing the reverse sides of those elements. (As always, click to enlarge the image.)
Posted in Teaching Metal Clay | Tagged: clasp, class, postaweek2011 | Leave a Comment »
Posted by C Scheftic on 2011/06/08
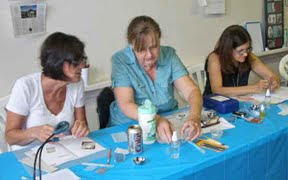 I had a relatively small “Big Links” workshop scheduled to be held at Koolkat Designs at the end of May.
For a number of reasons not worth going into, it became necessary to reschedule it. Three of the participants and I were all available to gather on Sunday, June 5. Except, the Koolkat folks were all tied up with the Three Rivers Arts Festival that day, meaning they were not available to open and later close the shop for us.
Not to worry, however, because Abby, Jane, and Rose were all willing to come over to my studio instead. So that’s what we did. Everyone learned several tricks needed to make metal clay links connect to each other without obvious joins, and everyone had a little bit of clay left over to make a few other trinkets of their choice.
And since I’d dashed out on the Friday before the Memorial Day weekend (the first hot weekend of the year) to buy and then install and connect to the new electrical line (that the board at the Wilkins School Community Center had approved & installed for my studio), we even had a room at a great temperature to work in. (Yes, the dehumidifying nature of the A/C led the clay to dry out quickly, but I just helped everyone to keep kneading in more water between each step, and things came out fine.)
So it was great to have a place where we could do this, and everyone seemed to agree that it was a great place to work. Thanks to all for coming over there!
Posted in Studio, Teaching Metal Clay | Tagged: appreciation, class, links | Leave a Comment »
Posted by C Scheftic on 2011/04/20
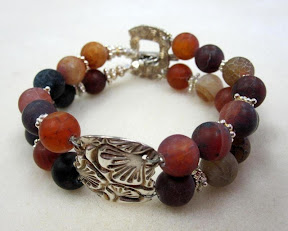 My head is still swirling with ideas for working with copper, bronze, and steel metal clays, but I need to get back to silver again for at least a little while. I’ve got several classes coming up, scheduled months ago but now looming, and I need to prepare some sample pieces, plus some components at various intermediate steps in the process to use as illustrations.
I really do enjoy teaching this stuff for its own sake, but I find a big side-benefit of teaching to be the way that forces me to make up more samples than I might otherwise be driven to try. I keep a few pieces on hand, but this leads me to make extra variations each time. I think it’s good for class participants to see a range of examples, which is just the “kick” I need to move beyond my own comfort zone, try different designs, think of new approaches, and thus make different pieces that I can sell to fund the next round of explorations.
Or, sometimes, to just give away. The fairly simple focal piece and matching clasp in the photo that accompanies this post were made in my last workshop on clasp-making: I just picked up some paper-crafting scissors and used those to cut some of the edges while I was talking about how you can adapt tools from almost any medium for work with this one. I then gave them to my friend, Trish, to use in a bracelet. Next week, on April 26 and 27, we’ll be teaching that one at her shop, Zelda’s Bead Kit Company.
If you can’t make it to that session, check out the bar down the right-side of this blog for some of the other workshops that I have in the works. If you’d like a class on another topic, or at another time, do let me know: one of the great things about now having my own studio to work in is that I can also schedule “semi-private” sessions at the last minute, as long as I know that enough people are interested. Or, if you prefer, I can travel to your site. Even when I don’t remember to stop and blog about all this, I’m always happy to create opportunities for sharing the delights of how to play with clay.
Posted in Teaching Metal Clay | Tagged: clasp, class, postaweek2011 | Leave a Comment »
Posted by C Scheftic on 2011/03/15
I haven’t finished posting my notes on working with copper, but I got sidetracked teaching half a dozen workshops and private lessons.
Those all used silver metal clay. (Ahh, the reliable stuff that I understand!) We made boxes (both lidded and sealed). We wove “flexible greenware” clay into interesting shapes. We made pieces that move via the use of “metal clay” rivets. Of course, I get so involved in the moment, that I don’t think to stop and take many photos. But here’s a small sampling, from three of my workshops this past week.
I love working with this stuff, but I also love helping others to create something with it that they can proudly wear–or give away–saying, “I made that myself!”
Posted in Teaching Metal Clay | Tagged: box, class, weaving | Leave a Comment »
Posted by C Scheftic on 2011/02/26


I taught a “reversible hollow domed” (aka “lentil”) bead workshop earlier this week at my studio in the Wilkins School Community Center.
Of course, I didn’t think to stop and get good photos of finished student work (lovely as it was, I was overly eager to get it into student hands!) so I illustrate this post with the element I made to demonstrate a number of relevant techniques.
(Except, bezel-setting a stone was not a part of that particular workshop: after class, I added the 6 mm bezel cup, refired the whole thing to secure that, and set the jade cabochon.)
I love the end result, and hope you do too! I’m reasonably satisfied with the photo that shows the jade cab. In my ongoing attempt to learn how to take better photographs of small, shiny, silver objects, however, I will admit that I’m really not happy with the amount of reflection in the other image. (It is, however, the best of about 30 attempts.) Yes, I know ways to solve the problem, just not affordable ones! The month is almost over (Feb is a short one!) and I haven’t make quite enough to cover rent on my studio (and I really do love that space!) let alone the other expenses involved in doing all of this, so the cost of photos (whether by hiring a photographer or investing in additional equipment myself) is one big issue behind this problem.
Still, I love making reversible hollow beads. After my students left this week, I stayed behind and made a number of samples for the three box workshops I have set for early-March. Aside from the fact that I just enjoy making and teaching those (and the way their “reversible” aspect means you get two distinct adornments for the price of one!), I’m also hoping I’ll earn enough from those to cover that month’s rent and, maybe, even this month’s shortfall. (The latter isn’t huge, but it does need to be covered somehow!)
Posted in General Techniques | Tagged: class, domes, lentil beads, postaweek2011 | 2 Comments »
Posted by C Scheftic on 2010/10/18
 The late fall / early winter newsletter from WSCC is out, with a nice little opening-page blurb about my new studio and my “open house / demo” sessions, and listing my first introductory silver clay classes at the top of the “mini-courses” section.
If you missed all that news when I first mentioned it, feel free to go back and check my post from October 1.
Posted in Studio | Tagged: class | Leave a Comment »
Posted by C Scheftic on 2010/10/01
It will likely take me a few weeks before I feel really settled in to my new studio, but I’ve begun to schedule workshops there for later this year. They should be listed in the last newsletter of 2010 from the Wilkins School Community Center (WSCC), whose last course series of the year runs through November and December (and whose “entry door” logo I snagged to use with this post), so that’s the timeframe I’m planning for.
I don’t often write actual posts announcing upcoming classes. They (and, sometimes, a few recently-past ones) are typically listed in one of the collections off to the side of this ‘blog (currently, down the right side). But with this new venue, I figure I should highlight them for a moment:
- Demonstrations & Discussions — These are free, so just stop by whenever you can.
- Weds, Nov 3, 5-8 pm
- Sat, Nov 20, 1-4 pm. Stop by the WSCC Art Show that day too.
- Introductory Workshops — These three are each $35 + materials and pre-registration is required.
- Weds, Nov 10, 6-9 pm: How Charming! Make several small charms.
- Weds, Nov 17, 6-9 pm: So Precious! Make a simple reversible pendant or focal bead.
- Sat, Dec 4, 1-4 pm, Use Your Head(pin). Sculptural headpins, especially for beaders. Stop by the WSCC Holiday Gift Shop that day too.
As I do with each new site, these are tailored for total beginners. In the new year, I’ll also start adding some advanced-beginner, intermediate, and other sessions to the mix. But most of my workshops are designed so that total beginners can fit right in, continuing students can learn new techniques to add to their repertoires, and everyone will end up with results they’ll be proud to wear, give as a gift, or otherwise show off.
I’ll also continue to teach at some of my other favorite local shops (and will continue to list those in a sidebar too). But I’m really excited to have sessions at the WSCC Studio in the mix as well.
I hope you’ll soon be able to join me at one of these events. (Or more than one! A small discount may be available to those who sign up for multiple sessions with me at WSCC.)
Posted in Studio | Tagged: class | Leave a Comment »
Posted by C Scheftic on 2010/06/28
Periodically I teach a beginning metal clay workshop on Fine Silver Butterflies. I had a wonderful time at one of those this past Saturday, at the delightful Your Beading Heart in Irwin, PA. (Follow owner-Linda’s directions, but not your GPS, if you want to find the place!)
This is a very wide-open, do-what-you-want, workshop, but the butterfly-theme gives us a definite starting-point for our designs. In all my beginner classes, I take an assortment of tools for participants to use, and samples for them to consider if they want. I have neither the space nor time to haul everything around to each workshop but, for the Butterflies class, I make a point of taking all the butterfly-related doo-dads that I have: texture sheets, stamps, pastry cutters, paper punches, etc. Folks can make one or more of: pendants, charms, earrings, key fobs, etc.
(I’ll try to remember to revise this post by adding a photo once they’ve been fired…) I meant to add a photo once they’ve been fired but then I was so eager to get them back to their makers that, sigh, I forgot that step.
I also take other textures, cutters, and such, in case someone comes because they were really interested in the beginner-class, not so much inspired by the butterflies themselves. (The one person in Saturday’s class who fell into that category wanted to make a piece in a shape for which I have an ideal drying-form which, of course, I’d left out of my kit when I added the extra butterfly-theme items! Not to worry, though, we improvised quite well. Have I ever mentioned how much I love this medium for its flexibility?)
Out in my garden at this time of year, however, I start trying to figure out how to make pieces that resemble lightning bugs. I can sculpt the creatures themselves, but how might I best represent their intermittent light, their lovely glow, their gentle motion? I haven’t yet come up with a solution I like for that.
I lived in England for several years and, much as I loved other aspects of gardening in that green land, during my time there I did miss the blinking yellow courtship signals of these critters. (Even though I know about variations in native species, I was stunned to realize they didn’t have lightning bugs! And I’ve encouraged friends I made there to come over at this time of year, to experience for themselves what I was talking about.)

I also spent one spring and early-summer in China. (The photo shows our lodgings near Baoguosi. It was taken one afternoon, walking back from Southwestern Jiaotong University, a day or two before we headed up Emei Shan.) Here, we slept under mosquito-netting while watching the lightning bugs flitter around the room, glowing in a wonderful pale green color. What a delightful surprise that was!
Posted in Teaching Metal Clay | Tagged: class, pollinators, travel | Leave a Comment »


") Artsmiths of Pittsburgh
Artsmiths of Pittsburgh") Hoyt Center for the Arts, New Castle, PA
Hoyt Center for the Arts, New Castle, PA") Portage Hill Gallery, Westfield, NY
Portage Hill Gallery, Westfield, NY") _Open Houses in my Studio
_Open Houses in my Studio _Or…contact me about hosting a private party!