Way More Photos of My Work
(on Picasa, which Google took over, and broke the links; I’m still trying to figure out how to link to the album collection there…)
Like so many of us over the last year, I have missed getting together in person with a lot of my usual people although, except for the worst of winter, I have been able to share outside activities with many of the local ones. In another way though, I have missed even more all the different, random people I would interact with at the Wilkins School Community Center (WSCC) where I have my studio.
Still, I am very happy to have two pieces in WSCC’s current exhibit, Artists Choice IV, even though is yet another virtual show. It looks as though I have the only 3D entries in this one! There are two pendants and, once again, I was able to make both of them reversible!
I Will Always Hold a Piece of Your Heart in Mine has two golden-bronze (“brilliant bronze”) hearts, one nestled inside the other, and hangs on a gold-plated chain. It is fully reversible: you can wear it with the pairing facing forward, or you can turn the chain around to keep the little one snuggled in, closer to your own heart. To me, the difference in the size of the hearts indicates a visual illusion, a sort of perspective, where the smaller one represents the heart of someone at a distance, for the moment at least, but the two are still firmly anchored together.
What do you see in it?
Spring is Peeking Out at Last! is another reversible bead, this time a hollow one made from fine silver (.999). One side is textured with an array of cute little spring blossoms. The other side shows a different flower eagerly peeking out through an opening in the ground. Like so many of us, all of the flowers are ready to get out into the sunshine and to get on with their lives!
What are your plans for this spring, and beyond?!
~~~~~~~~ Both pieces are available for purchase, so do let us know if you’re interested! There’s info on the show page, or you can simply get in touch with me directly and I can process it for you.
Happy Winter! Happy New Year! Happy Second Saturday!
This is now the fourth of what has become a pattern: spending the Second Saturday of each month in my Studio. I’ve been considering whether to continue the pattern, at least for a while, and make it a more-or-less recurring event.
So, if you’d like to join me for a Studio Session on a Second Saturday in the future, please let me know! At this point, I do not plan to offer actual classes then but will open my studio to others for a small fee: If you already have some clue what you’re doing with metal clay, you’re welcome to just come over and use the facilities in my studio! I will plan to get some of my own making-work done those days too, and we can chat about it as we go. I will have a bit of clay available for purchase too: I don’t promise to maintain a complete stock of every variety, however, so if you want to purchase a particular one, do check with me in advance. (I can get most of them with a week’s notice; if you ask later, however, we may have to add your express shipping fee to what I’d normally charge.)
Since there is a certain amount of clean-up involved in switching between precious and base metal clays, on many Saturdays I am likely to restrict things to precious (silver) metals only. If there is enough interest in base metals, however, I’m happy to occasionally set a session specifically for those instead.
Note that I am qualifying this: I’m not really calling it SSSS, for Studio Sessions every Second Saturday. I’m thinking more along the lines of SSmSmS: Studio Sessions, mostly on a Saturday, and mostly on the Second one of the month.
I may have to shift a few of them to the Friday. (If Friday would, in general, be better for you, let me know. Most months I should be able to accommodate that!) Or maybe the subsequent Sunday. In the occasional months where the second Friday is ajacent to the Third Saturday, I may switch my in-studio time for one or the other so they are consecutive days.
Why didn’t I post earlier about today? Well, I had already agreed to let a few folks come over and use my studio! Space is limited, so please PM me if you want to come in future months.
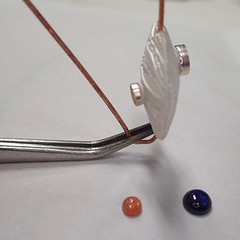
FYI, here’s one of the things I worked on today: adding bezel cups to a lentil bead. I’d taught a workshop on using fine silver metal clay to make lentil beads last month, at the Appalachian Rock Shop & Jewelry Emporium in Harmony, PA, and made this bead as part of my demonstration. I hadn’t added any embellishments to this particular bead, but fired it along with all the class pieces anyway, despite knowing it needed something! How about a gemstone? Which stone: either this sunstone or the sapphire would look nice with the texture I’d used. Which side: each one has an area where a little stone would fit. Hey, why not put one on each side?!! So I used PMC3 paste supplemented with a few drops of lavender oil to add a bezel cup to each side. And fired it today while working on other projects. This photo shows how I propped it up as the paste on both sides dried, along with the sunstone and sapphire I’ll add after I’m done with patina and polish:
As a teacher of metal clay techniques and processes, there is one thing I particularly like about that photo! Notice how the bead, having been fully sintered in a previous firing, has a sort of matte-white look, while the bezel cups, made from fine silver sheet metal, look more shiny like we typically imagine silver to be. Well, it is all fine silver. The “white” look is just a result of the way the silver crystals form as the powdered-metal pieces in the clay sinter into the solid-metal final form. (It is NOT, as some novices assume, some sort of outer crust that needs to be removed. It IS silver that we want to keep!) With polishing, the invisible-to-naked-eye peaks in the silver crystals will all get pushed over in one direction, and only then will we be able to see the shine that we normally associate with silver. I’ll try to remember to post a picture of this piece once I’ve finished it. (Though I have several others I must finish first….so this one may have to wait until my next Second Saturday Studio Session, in February…!)
What’s this mythical concept of “lazy days” of summer? Summers just seem so busy, with all sorts of events and happenings and things to do that one really does not want to miss. That’s not a complaint: it’s just a puzzle to me, where the lazy-days idea came from!
Anyway, amidst all the many things to do all summer, this is a super-busy weekend. Since I post here mostly about art & jewelry / teaching & learning types of activities, I’m going to skip over the truly “personal” events this weekend. I can fill a long post with places my jewelry and other art-creations are going themselves this weekend.
Arts on the Riverwalk, in New Castle, PA: The art show that the Hoyt Art Center is running at The Confluence, in conjunction with this event, has its opening tonight, 4 to 6 pm. The show itself will run through August 26. I’ve had two pieces accepted for this, one of which is shown below. Although I was thinking of all the ocean-shore walking I’ve done in my life as I created it, I do enjoy walking along any sort of waterfront, so this still seemed to be an appropriate choice for this show:
Community Days in Cranberry Township, PA: The Cranberry Township Community Chest and the Cranberry Artists Network are partnering (for the first time this year) on a show in the Cranberry Municipal Building in conjunction with this annual celebration. The opening reception for the show, Martinis with Monet, held on Wednesday night (for which I managed a post on Facebook, but not here…) was the kick-off event for the weekend-long celebration. The show itself will run through August 3. I’m thrilled to have had two pieces accepted for this show, one of which is shown below. I created Flowers Burst Even Through the Garden Paths for several reasons: primarily to honor Monet’s Gardens in line with the theme of the show, but also as one I could use as demonstration pieces for classes (layering, on the title side, and basic stone setting, on the other side) until it took off for Cranberry and, one hopes, a new home:
At the Panza Gallery, in Millvale, PA: The Pittsburgh Society of Artists is having a Members Choice show there this summer. The opening reception is tonight, from 6 to 8:30 pm, and then the exhibit will run through July 29, and be open Wednesdays through Fridays 10-5 and Saturdays 10-3. Silly me, I didn’t take photos of my entry before I dropped it off (because I thought I already had several) but now I can’t find any of them. What’s in the show is the latest piece in my Three Rivers series; an early piece from that is shown below. Both of them have bronze rivers (with “expansion joints” designating the major bridges) flowing through copper neighborhoods, with a cubic zirconia noting the location of Point State Park and its fountain. The one in the show has flowery-garden neighborhoods (not the metropolitan geometry of this one), and by the time I made it I was much better at getting the rivers to work as an inlay in the copper, like actual rivers (as compared to the onlay shown here). And it’s on a fancier chain. But anyone seeing one should recognize the other as different but similar / familiar…
ArtBrew at the Sweetwater Center for the Arts in Sewickley, PA: Last but certainly not least, from 7 to 10 pm tonight and tonight only (for this year) we have ArtBrew, the Arts & Crafts Fair where the “crafts” are the beers on tap. I was one of just thirty local artists who were invited to provide pieces for sale in the “arts” arena. Some worked in very beer-specific art forms, while others simply created works that the organizers found interesting. I’m in the latter category, and I’ve no clue how my pieces will do, but figured it was worth a shot. Sweetwater is a great place, and I’m happy to support this summer-fundraiser of theirs through commissions on sales of my work. Most of what I submitted are my earrings and pendants. Some were made using typical “metal clay” techniques, while some reflect other directions I’ve also been exploring. There are, for example, some enamel-on-copper pieces that I made on a whim in the spring. And some pendants and earrings, like the silver earring-elements shown below, that were cut out of clay in the “dry but still flexible” state using an electronic cutting machine on a design I created to fit the amount of material I happened to have on hand at the moment:
I also had a dozen pottery items accepted for this event! I don’t often post about my clay-clay work here, but you can get a glimpse of the twelve I sent to Sweetwater below. Note:you really should click on this photo! I hope everyone who does will let me know (e.g., via a comment, either on this blog or at the photo-sharing site the click will take you to) whether you were surprised at what you found there, or whether, especially if you feel you know me and my interests, it was what you imagined as soon as you saw this photo.
Here’s wishing everyone a pleasant summer weekend, full of kindness and friendship.
And Happy 200th Birthday to Pittsburgh, PA, today too!
Life tends to get crazy-busy this time of year, for multiple reasons, some of which I’m sure you can imagine and others would take too long to explain. So I’m just going to list a few events you may want to know about should you be interested in seeing some of my work in person:
November 30 – December 7: H*liday mART at Sweetwater Center for the Arts, Sewickley, PA
December 5-6-7: Holiday Gift Shop at the Wilkins School Community Center, Swissvale, PA
December 5-6-7: Open House in my Studio, to coincide with WSCC’s Holiday Gift Shop
December 13: Open House at the Hoyt Center for the Arts, New Castle, PA
December 13-14: Open House in my Studio, to coincide with an Art Studio tour in Regent Square (Swissvale, Pittsburgh, Edgewood, Wilkinsburg), PA
For other venues, please see the list of Ongoing locations down the right side of this blog.
If you find yourself missing any of those, no problem. Just get in touch with me: leave a comment on this post, or message me via Convergent Series page on Facebook (and, while you’re at it, a Like there would be very much appreciated…). We’ll find a way for you to explore my creations!
I’m not sure how much else I’ll manage to post this month. But I have new designs in the works, new workshop pieces I’m testing out plus, of course, new variations of ongoing favorites in both those categories … and lots more for 2015! I look forward to posting about all of those in the New Year, and I hope you’ll enjoy reading about them too.
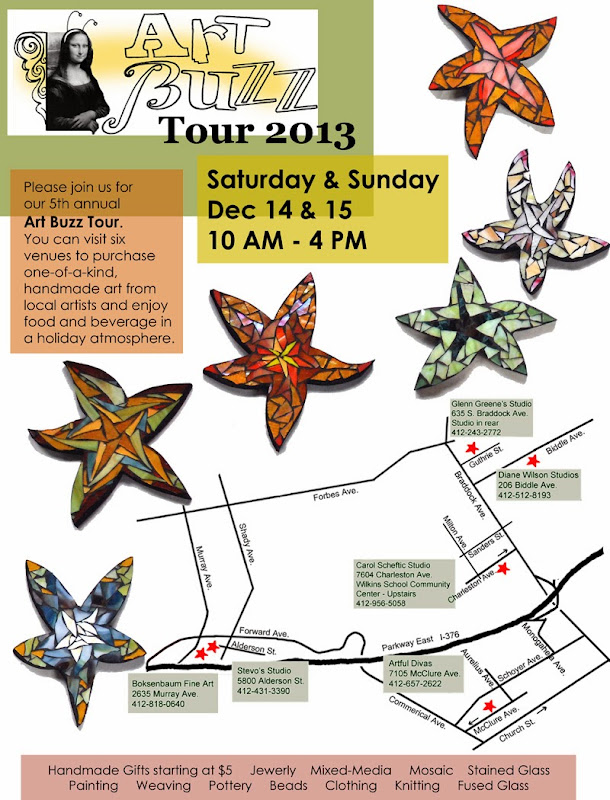
Have you heard the buzz? Six sites! All in the Pittsburgh area’s “East End” this weekend: Regent Square, Swissvale, and Squirrel Hill. And my studio is one of the locations on it again this year.
I’ve got lots of jewelry on offer, plus a handful of other small adornments.
I also have aloe vera plants that need a new home, babies that i repotted from some of the big ones I keep around. (I do work with hot metals here!) BONUS: small ones are free with a purchase of $35 or more (or a discount can be applied to the price of any of the larger ones if that’s what you prefer).
Plus you’re welcome to share some of my cookies and hot mulled cider. (I also got the makings for cranberry-orange frosties but, with all the snow that’s falling, I’ll save that until there’s a request or I run out of cider, whichever comes first.)
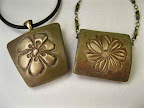
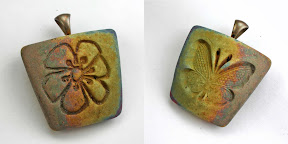
Back in August, I wrote about one of a series of “pillow” beads I’d made using Hadar’s Quick Fire Bronze powder. In particular, I ended the post with a photo of the amazing colors the kiln provided that time, and a comment that I knew they were somewhat ephemeral.
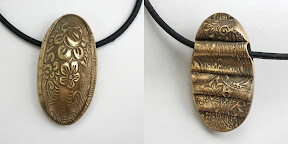
Well, yes, after only a short time (and despite having tried to “protect” them with several layers of acryllic spray), they became rather dull. Still there, but no longer jump-out-at-you vivid. So I proceeded to do some polishing (moderately aggressively in the center-design area, and more gently around the edges) and then re-coated everything. This provided pieces with clearer bronze-yellow center-designs, while still maintaining a trace of the kiln-colors around the edges. I didn’t really think the vivid colors would last, but the subtle ones shown here have remained much more stable ever since. I’m pleased with these results.
The thing that did surprise me, however, was something that had not been at all obvious with the vivid coloring, but did jump out at me (peering closely through my bifocal safety glasses for magnification as I worked): my straight pencil-lead “registration” marks — ones that I’ve come to use often (to align parts or holes or … ) on silver clay that is fired in regular air — do not simply burn off when you bury bronze in activated carbon during firing. Who knew?! Did you? It was a surprise to me, so I thought I’d share it with y’all.
If you want to give your piece a bright, shiny polish, it’s very easy to grind (sand) the marks off. (I did that with another piece, just to be sure, though I didn’t think to grab a before-photo to use here.) But I didn’t want to do that with the pieces shown above, especially not to the one towards the right (on a brass chain). I liked its aged, colored look. So I’m just leaving the straight-line mark. I showed the piece to a number of people (metal clay artists and otherwise) and, in person, it didn’t seem to jump out to anyone (until I pointed it out to them). I’m now just calling it a part of this piece’s design.
These are now ready to go off for holiday-season sales. I hope they find good homes!
While I’m still thinking of it, here are a couple other hollow beads I’ve made recently, and the armatures on which I built them.
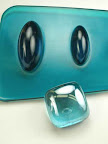
Well, let me start with the armatures. In the first photo, you can see two oval-dome parts of a graduated, five-part “doming plate” that is sold specifically for use with metal clays. (This one actually belongs to a friend, who won it in an online contest!) Below that is a square, blue, glass “rock” that is sold in the floral-arranging section of a craft store. (That is mine, one of three I found in the back of a drawer in a house I rented for a while. I liked their sea-blue color.)
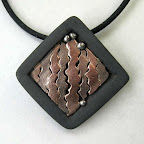
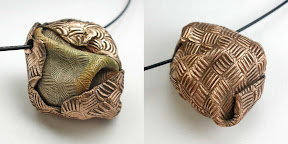
The first piece shown here, reversible with both sides in the photo to the right, was made with the glass rock. I covered it with a plain layer of bronze clay, let that dry, cut it open to remove the rock, and pasted the two parts back together again. Once that seam had dried, I then covered it with what I thought of as three different “blankets” — each with a different woven texture using a different metal (all from Hadar’s Quick Fire clay powders). The first layer was bronze which, when fired, had a lovely sort of blanket-y color that I left alone. The next layer (the wavy weave) is rose bronze, and the outermost later (a straight weave design) is copper. I did them in that order because I’ve found that copper layered over bronze, with air-filled gaps in between, sometimes alloys into odd colors. The rose bronze serves as a sort of buffer to help avoid that. (And, I just like the color of the rose bronze metal!) Both the rose bronze and copper were polished with radial bristle disks and silicone wheels to bring out their shine.
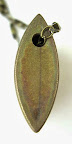
The second piece shown here, also reversible, with both sides in the image to the left, is all bronze, and was made with the second-largest shape on the doming plate, with some additions. First of all, I cut a flat oval shape just a bit larger than the dome. I let that dry, attached the dome, and dried it yet again. Then I rolled out a thin, textured layer and “draped” that over the other side of the flat oval. I used a straw to prop open a place near the top, to serve as a bail, trimmed the rest to match the oval, and let it dry one more time. After cleaning it up a bit, I fired it. I decided to polish this piece using the same tools as I had on the “blanketed rock” piece.
Although these are both relatively simple pieces, they illustrate one of the things I find so very engaging about working with metal clay: the wide range of creativity it brings out, not just in the designs one ends up making, but also in the range of items one can either find or adapt to use as “tools” to aid in the making. Maybe I can remember to show more of those over the next few weeks. In the meantime, feel free to leave a comment describing other such items in your “tool” stash!
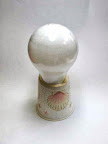
I like making hollow beads. I sometimes wonder how much of my fascination with them is because the first piece I ever made using metal clay was a hollow bead, shown to the right, and how much is simply because they can be both fun and interesting to make. I’ll never know the answer to that, but I expect to continue enjoying making them.
In the class where I made that bead, I dried the pieces for each side over a light bulb. The nice thing about light bulbs is that, if you prop them up with the screw-end down, their tops really are nice and round. Why does that matter? Because it means you don’t have to worry about centering, or otherwise specifically positioning, your clay on it to dry. You just move it onto the bulb, carefully press it down to match that curvature, wait for it to dry, and admire the nicely symmetric results.
There are a few minor complications with using a light bulb. Nothing serious, but things to consider. How will you prop the bulb? In that first class, the teacher had two kinds of holders: one was a small paper cup turned upside down with a slot cut into the base and the other were small blobs of polymer clay into which she’d pressed the end of a bulb to form it before curing that clay. (Of those two, I have a small preference for the paper cup approach (as shown here, to the left) simply because, when I’m storing enough of those to use for a class, I can stack the cups so they take up very little space.) Another consideration is that you are then working with (i.e., moving around) a piece of oiled (i.e., slippery) glass, where slippery means easy to drop and break. Can’t you just hear the “voice of experience” there?!
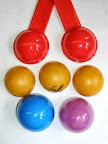
So, what else to use for an armature? A few of the things that I’ve tried (some of which are shown, to the right) include the following:
plastic eggs (bottom), but you have to take care to use the “round” end because, with the “more-pointy” end, then you do need to take a lot more care with how you position your clay on it to dry;
measuring spoons (top) but, again, you need to take care to get round ones;
ping-pong balls (middle row), which I like to cut open so they don’t roll around, and
plastic paint palettes (not shown) which, like the other items shown in this colorful collection, are also “open” on the other side, so you can turn them over and position your clay on the inside too, should you want to do so.
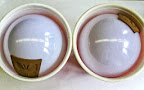
Which armature is best? I don’t have any one favorite. So, how to choose which one to use? Me, I think about the size of the piece I want to make, and the amount of curvature I want it to have, and pick whatever happens to match that the best. And sometimes, yes, I do return to the old light-bulb trick, as I did with a piece I made recently out of Hadar’s Quick Fire Bronze clay. This piece was not going to be round (like my first-ever piece); I wanted this one to have more of a “trapezoidal” shape (i.e., a rectangle with only two parallel sides). This piece would be fairly large but, because of its non-round shape (meaning it would end up having four “side” or “edge” areas that I would then have to fill), I did not want it to have a lot of curvature. Instead of a “standard” incandescent bulb (as used with that first-ever piece), this time I used a larger round “vanity” bulb. With those, instead of turning a cup upside-down to hold the bulb, I’ve found that they fit nicely inside a large cup. So that’s how I positioned my two “trapezoid” pieces for drying. Since this was the last piece I started one day, I just positioned them over the bulb, made sure all the edges were tucked down smoothly, and left them to dry over night. As I was packing up my camera, for no obvious reason I decided to snap a quick photo of them before I left.
The next morning, I was surprised (which, in fact, surprised me even more: I was surprised at my surprise….) to find that, once dry, they had released themselves from the bulb, and slid down to the side, where they were caught by the cup holding the bulb! Whew! I would have been very disappointed if the dry pieces had fallen from a noticeable height onto the tabletop and, perhaps, even then bounced down to the floor (as could have happened if I’d stuck them into an overturned cup) and, quite possibly in their “dry clay” state, cracked or even broken apart from the fall. (Yes, I know how to patch them should that happen, but it takes time and effort that I’d rather just avoid. And pointing that out to you, dear readers, is the whole reason I decided to write this particular post!)
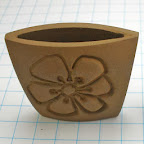
Since I mentioned the “edges” this piece would have, this next photo (left) shows the opening along the “top” of the piece after I’d attached the two main elements. (I hesitate to call them the front and the back because, like most of my work, this piece is fully reversible: it has two different fronts!) I’ve got it standing on quadrille paper (with 1/4 inch squares) to help give you a sense of its size. Once I had covered each of the four edges (the openings that I’d wanted to keep to a relatively small size by using an armature with a relatively shallow curvature), I inserted a bronze “embeddable” bail in the top and fired the piece.
And I was delighted with the result. My original plan had been to finish this piece to a high shine but, given the colors the kiln decided to give it that day, for now at least I’m leaving it like this. Yes, I know, the colors are somewhat ephemeral. I’m experimenting with a new acrylic coating to see if / how it may help to preserve such colors. So this piece won’t officially be going up for sale right away, until I can see how it holds up. You may, instead, see me wearing it as part of the testing process. (Which I find to be another part of the “fun” of making pieces like this.) But, what do you think: if the colors do hold up, should I leave it like this, or remove the coating and polish it until it shines?
Have you heard the buzz? It’s even louder this year! Over forty artists! Seven sites! All in the Pittsburgh area’s “East End” this weekend. And my studio is one of the locations on it again this year.
At WSCC (where I’ll be), the Holiday Gift Shop will still be running downstairs, and I am pretty sure that Daviea Davis will have her glass mosaic studio open too, upstairs across the hall from mine.
If you’re in the area, I sure hope you can stop by. To say, “Hello” and “Happy Holidays” at least. If, for some reason, you can’t get yourself there in person, how about leaving a holiday greeting as a “comment” on this blog post. Even having you say just “Hello” or “Happy Holidays” would be much appreciated!
I look forward to seeing / hearing from you, dear readers, so I can extend my best wishes for this holiday season to you too, in return, in a more personal way.
Have you heard the buzz? Eighteen artists! Seven sites! All in the Pittsburgh area’s “East End” this weekend. And my studio is one of the new locations added this year….
If you’re in the area, I sure hope you can stop by. To say, “Hello” and “Happy Holidays” at least. If, for some reason, you can’t get yourself there in person, how about saying “Hello” or “Happy Holidays” or something else even more interesting as a “comment” on this blog post.
I look forward to seeing / hearing from you, dear readers, so I can extend my best wishes for this holiday season to you too, in return, in a more personal way.
I keep thinking up very complex designs: what can I say, I simply love “puzzle boxes” of all sorts!
But, for silver boxes, at the moment, I’m trying to keep the designs fairly simple because what I’m really making right now are samples for a class I have coming up in my studio early in March (the afternoon of the 3rd or the 6th, as you prefer). [Update: And we’ve added another “section” for those of you south of the ‘burgh: I’ll repeat it again on Saturday, March 12 at Zelda’s down in Bridgeville!] And I really want these particular samples to be ones that even people trying metal clay for the very first time can easily make!
I hope to post several more next month, but I’ve got two ready to share now. The first one, shown here, has been sealed into a “closed” box shape so that it can be worn as a pendant. It’s about an inch across, a little under a quarter-inch deep, and weighs 11.1 grams. Both sides are finished, so it’s fully reversible. (You’ll see another one like that in my next post, which will show something extra-special about that one…) The ones that should appear here a bit later have lids that open.
And, once Spring is on its way, my plan is to have some samples of hinged boxes to show off too. Those are my ultimate goal, but I’m hoping that some of these will help pave (i.e., pay!) the way for those!
Of all the pieces I made in the second class with Tim, once again a lentil bead is my favorite individual piece.
But, between the two classes over five days, the reception our metal clay guild put on Friday night for Tim and metalsmiths from the area, putting up a friend for the duration, and more, I’m just too wiped out to say much more now. I’m fine, just tired…
Here’s a triplet of fun spool-shaped beads that I made last November:
They are delightfully easy to make. They are a bit fragile when you have the dried looped parts, before you apply the ends, so you have to work carefully. And they take a bit of “elapsed” time while you wait for each end to dry, before you can fire them and end up with such fine silver pieces. But I hope you agree with me that they’re well-worth the effort!
Here’s what I’ve done with them:
Personally, I do love the patterns in the black beads, as well as the silver beads.
The necklace uses a simple commercial clasp. I guess if I’m going to make more of these spool-beads (and I do think I will!), then I’ll have to come up with a home-made clasp to accompany them.
Back to the design-board… Your suggestions are welcome!


") Artsmiths of Pittsburgh
Artsmiths of Pittsburgh") Hoyt Center for the Arts, New Castle, PA
Hoyt Center for the Arts, New Castle, PA") Portage Hill Gallery, Westfield, NY
Portage Hill Gallery, Westfield, NY") _Open Houses in my Studio
_Open Houses in my Studio _Or…contact me about hosting a private party!