Convergent Series

learning, using & teaching metal clay, and other aspects of life

Archive for January, 2016

Button Class Reminder

Posted by C Scheftic on 2016/01/30

Thanks to Cosy for posting this on the Indie Knit and Spin site. If you want in on the fun next Saturday morning (Feb 6), please sign up as soon as possible!

Note: this is a basic “intro” session so, if you want to make a pair of earrings or a few little charms instead of buttons, that’ll be fine too!

Indie Knit & Spin

Don’t forget to register for Carol Scheftic’s Button Making Class! Learn to make your own silver buttons. We need at least a few more folks for this class to happen. More information can be found here. We need registrations in by Sunday evening so Carol can order clay.

buttons2

View original post

Posted in Uncategorized | Leave a Comment »

Flash class offer: just in time for Valentine’s Day!

Posted by C Scheftic on 2016/01/26


The five reversible domed-heart fine silver pendants shown above have all been delivered to The Artsmiths of Pittsburgh in Mt. Lebanon and are now available for purchase there. I was thinking about making a few more to have on hand during the studio sale I’ll be holding when Indie Knit and Spin returns to the building where I have my studio.

But they are fun and easy to make so I’m also proposing a class: you can make one as a gift for someone dear to your heart; or come with a partner and make them for each other; or ask your sweetheart to buy you this class as a gift; there are lots of options, even if you’re a complete beginner!

When: Sunday, January 31, 12 Noon to 3 pm
Where: Wilkins School Community Center in Regent Square.
Cost: $50 / person

That price includes both the class and enough silver to make one pendant (approximately 1 inch long). Extra material will be available for purchase if you’d like to make more than one pendant (or, say, a pair of earrings too). Several different styles of chain will also be available for purchase.

You have two days to decide! I know this is short notice, but I need to have at least four (4) people sign up by 10 pm on Thursday, January 28, in order to run this class. (And the maximum number is seven (7) so I can give everyone enough attention.) To sign up, please either send me an email or leave a comment with this post. I will accept people in the order in which they respond! By around noon on Friday, I will send an email to everyone I’ve heard from with: (a) whether enough people signed up to run the class and (b) whether your request was received before the class filled.

I sure hope that a few of you will be able to join me this weekend!

~~~~~

Update (8 pm on Thursday): Yes! Thanks so much to everyone who emailed me: this class WILL run on Sunday, as indicated. I’ll email everyone (either later tonight or else tomorrow morning, as noted above) with a few little details.

Posted in Events, Teaching Metal Clay | Tagged: , , , , | Leave a Comment »

A couple of ideas evolve into Cranberry Artist Network “Membrrrs Show” entries….

Posted by C Scheftic on 2016/01/26

Winter has arrived and the Cranberry Artists Network has an appropriately-named “Membrrrs Show” opening today! The prospectus for the show was covered in images of snow and icicles and more that made one go “Brrr!” just thinking about them. What might I decide to enter?!!

Well, from fine silver, I’d made a small collection of long pieces, sort of a tube shape, but not all neat and even ones. I’d been playing around with them: I had sort of an idea what i wanted to do (i.e., I really had made them with a vague design in mind), and at one point I’d assembled them into the first necklace shown here (photo at left).

Except, that still wasn’t quite what I wanted. When I got the invitation to apply for the “Membrrrs” show, however, it came to me: ice cubes and cracked crystal, and a few bits to acknowledge that snow does get blackened after a while, and I ended up with the necklace and earring set Warmth & Hugs Ease Icy Days, made from fine silver, crystal, clear and black glass, black onyx, and copper, all hung from an antiqued copper chain with a copper clasp, shown in the larger image to the right.

OK, but I could submit a second entry too. What else? Had my brain, my creativity, frozen? No, I just had a number of other deadlines looming, and multiple experiments with the silver “hugs” had eaten up a lot of my “spare” time to think about this. But, wait, I had a few “spare parts” I’d made “just in case” I needed them for the Love & Commitment bracelet last fall, which evolved into the Love Warms Our Hearts necklace (bronze hearts with copper and glass bead coils, hung from a bronze chain with a bronze clasp; the last photo, left).

I took them up yesterday, and both entries were accepted into the show! It will be running at the Cranberry Township Municipal Building from January 26 through March 3, 2016. Although, technically, it does open today, the “opening reception” will be on Wednesday, February 3, from 6 to 8 pm. I hope I’ll see some of my friends there!

Posted in Events | Tagged: , , , , , | Leave a Comment »

And now, my original reason for taking the photos with my last post….

Posted by C Scheftic on 2016/01/17

I may to have to try to do this again in the summer, when the natural lighting situation is better, because I don’t think these photos tell the tale as distinctly as I’d hoped. But this is one thing I’ve been experimenting with over the past week…. The point is to look at the difference in the color (and size) of the silver pieces at different points in their process. (Next time, instead of trying to capture so many, I think I’ll try to focus specifically on just one or two, with close-ups.)

But here is a shelf-load of pieces, ready to go into the kiln. They don’t look silver-colored at all, do they, even though they are at least 90% silver! Next time, I’ll try to burnish one in the clay-state, to try to show that the silver really is there, but for now:

And here we have that same shelf-load of pieces, after being fired, when the shelf had cooled just enough to safely remove it from the kiln. Note the “white” color of these pieces: this is normal for just-fired metal constructed from silver clay. Comparing this to the previous photo, you can also get a sense of the shrinkage that took place.

And here is that same shelf-load of pieces, after having been run through either a rotary tumbler (with mixed-size and -shape stainless steel shot) or a magnetic finisher (with tiny stainless steel pins). I need to work on the lighting for each of the different versions (and I really struggled with the meager equipment I have to get all of the shined-up ones together without too many shadows or too much glare!), but I hope you can see that they are, at last, starting to look like silver!

Posted in General Techniques, Teaching Metal Clay, Technical Details | Tagged: , , , | Leave a Comment »

Take a deep breath and “Don’t Panic!”….

Posted by C Scheftic on 2016/01/16

On the day I’m going to write about, I was already thinking about The Hitchhiker’s Guide to the Galaxy when this thing occurred. (I’ll get to the thing in a moment….)

Why THHGTTG? Well, my favorite version remains the original radio plays; and within months I was volunteering with a radio theatre group that was forming at community-radio station WYEP-FM! (Over the decade or so that the group existed, I served as sound man (technical term for that role!), technical director, director, and producer.) When I saw the TV series, there were a few scenes that definitely impressed me, but mostly I thought that my imagination had produced a much richer galaxy than they’d been able to capture on screen (which is a huge part of what I love about audio productions). I went to the movie when it came out (much later, 2005) and I probably would have loved it if I hadn’t already been so spoiled by the earlier versions, but I remember two specific thoughts about that movie:

  • Though it seemed odd to have Simon Jones, who’d played Arthur Dent in both the radio and TV versions, replaced by Martin Freeman, that was still the moment when I realized that MF was an actor I hoped I’d be able to continue watching, and
  • Though it seemed odd to have Stephen Moore, who’d been the voice of Marvin the Paranoid Android in the earlier versions, replaced by another actor, I just melted into my seat when I realized it was Alan Rickman‘s voice I was going to have the opportunity to listen to that evening.

So I was thinking about THHGTTG because I’d been thinking about the various times I’d seen / heard / watched Alan Rickman because this was on the day his death was reported. And when I thought I’d lost a student’s piece, I was already primed to quote from THHGTTG, “Don’t Panic (in friendly orange letters)”!

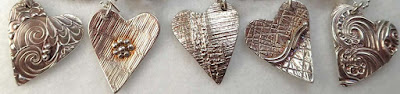
Lost a piece?! A student’s piece?!! Let me back up from the start. Late last week I got an email from some folks who’d “found me” online, checked my website and saw I wasn’t promoting any classes in the short term, but wrote me anyway. With a friend coming in for the weekend, they’d been hoping to find an introductory metal clay class. I responded that, though I didn’t have an “official” class scheduled, I could free up a couple hours on Sunday afternoon for a “semi-private / custom” lesson on basic techniques. My schedule was tight enough for the day that we wouldn’t have time to make anything elaborate, but there’d definitely be time for a few basic pendant and/or earring pieces: textured on both sides, cut into interesting shapes, embellished a little bit, domed for drying if they wanted, and finished nicely all over. They’d get a feel for working with the clay and, if they wanted, we could cover something more involved later on.

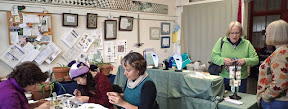
I’m very glad I made the offer: they came on Sunday and were lots of fun to work with! I showed some sample pieces where I’d embellished them with metal clay decorations, but also others where I’d kept the clay-design simple and embellished with beads and wire and such afterwards. It’s always interesting to see different techniques resonating with different people, and that afternoon was no different.

Having fit this into my schedule at the last minute, I said I’d fire and tumble the pieces over the next few days, would have them ready at some point, by the next weekend at the latest, and would send a note as soon as they were ready. So far, so good.

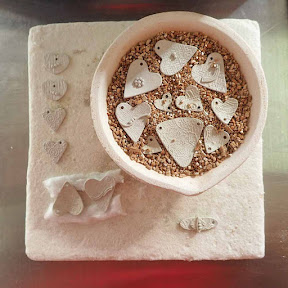
Now, most of the pieces were domed, so my plan was to fire them in a small crucible and provide some support for their shape by nestling them into fine vermiculite. Between all their pieces plus a few I’d made during demonstrations, the bowl was feeling pretty crowded. I wasn’t worried about pieces being so close they’d fuse. But I was a tiny bit concerned that, because having a lot of metal in a close space can help hold heat in that one area, I might have to drop the temperature and/or speed a bit. I could have just poured vermiculite on the shelf to spread things out, but I had a few scraps of fiber blanket, so I took a couple items out of the crucible and placed them on the kiln shelf with a bit of that for support, and it all seemed better.

What I did next is something I learned to do a long time ago: I take a photo of everything on a kiln shelf before I put the shelf into the kiln. I don’t necessarily keep those photos for very long. It’s just that, if I notice anything “odd” when the pieces come out of the kiln, sometimes it’s just useful to be able to go back to the pre-firing photo and double-check what a piece had looked like then.

So I fired them one afternoon, did a quick check once the kiln had cooled a little bit, saw that everything looked fine, and headed off to an evening meeting on another of my activities. I came back the next day, prepared to work on something while the pieces tumbled. In the workshop, I’d talked a bit about the different results I could get if I tossed them with mixed steel shot in my rotary tumbler for a couple of hours versus if I ran them for 20 minutes or so in my magnetic pin finisher. So I was sitting there, lining up the pieces according to which they’d asked to have treated each way, when I realized that one of the smallest hearts was missing.

No panic: I must have just missed taking it out of the bowl. I poured the vermiculite from the crucible into another bowl. No sign of it. Don’t panic! I started looking around my studio. No sign of it. Don’t panic! Because I hadn’t felt like taking time to set up the exhaust system (works fine in the summer; doesn’t have quite a good enough seal for use in cold, wintry weather … another project to finish), I’d just put the kiln on a cart and wheeled it into an unused room to fire the day before. Don’t panic! And I’d moved the pieces around, placing a few with support on the shelf in order that the crucible would have fewer pieces crowded in there, so could I have set it down and just missed putting it back in the kiln? No sign of it in the other room either. Don’t panic! I just kept repeating that to myself. I poured the little bits of vermiculite back and forth yet another time, still no sign of it. Don’t panic!

The missing piece was a tiny domed heart. Had it been something I’d made, I would have not had to repeat that mantra as many times: I would just have made another one and found something else to do with the first one if it ever turned up again. But this was not my piece; it had been made by a student. I could offer her some more clay and a chance to remake it. But the missing piece was one by the out-of-town visitor, and apparently she had been the person who’d been most enthusiastic to learn about metal clay and had encouraged a friend in Pittsburgh to find a class they could take together when she’d be here … and this was one of her very first ever pieces. I do remember how attached I felt to my first piece. I had to find this one.

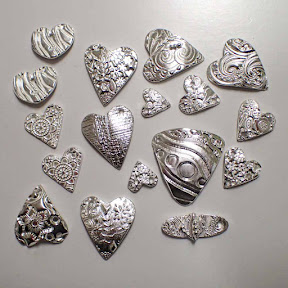
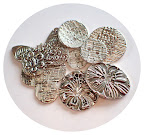
Take it easy, Carol. Don’t panic! Just sit there and think. You took a photo before putting anything in the kiln. See if it’s in that photo (the one shown above). Yes! It was there. So … where did it go?!!

Hold on a minute. Don’t panic! You did something else, not your usual routine, when you checked the pieces last night. You’d been thinking it would be nice to have a good set of before-and-after photos, to show what “dried clay” looks like going into the kiln and how “just-fired silver” looks more white than silver. You took a photo last night so there really is no reason to panic: just check whether the piece was still there afterwards too.

Do my blog readers ever do those “Identify all the differences between these two images” puzzles? (1) One photo of these pieces was taken in the daytime; the other, after dark; so there is a slight change in the overall color tone besides just what is there in the dried- versus just-fired-clay. (2) In the pre-fire case, the shelf is sitting on my metal-top cart; in the post-fire one, I’d put a double layer of black “welder’s cloth” and “kiln posts” on the cart before setting down the then-still-hot kiln shelf. (3) The shrinkage that goes on with the binder-burnout and sintering=phase is visible, which I think is great! (4) But have you, my readers, found the missing piece yet? Is it there, after firing, or not? If it’s not, where could it have gone?

I’ll let you think about that for a moment. I’ll answer, and continue the story, in the comments section of this post. I’d love to see some of your comments there, too.

Posted in General Techniques, Misc. Musings, Teaching Metal Clay | 1 Comment »

One more thought on using my tumbler…

Posted by C Scheftic on 2016/01/15

Well, it’s about time! Last night, I finally took two minutes to figure out how to “publicize” a blog post on Facebook. (That time was split between finding where the settings were and choosing among the options available.) And I used that feature for the first time with my last post. This morning, I found the following exchange over there:

Now, Alice is correct. So I could have just “liked” her comment but, well, I admit I don’t know how to be terse, and I thought it was worth trying to be clear about what was going on, for anyone else who might stumble across the discussion here. So I decided that another blog post was in order. Once I’ve got it ready, then I’ll go “like” her comment and share this post too.

This is what my rotary tumbler looks like when I’m ready to use it:

There’s a brown paper bag folded in thirds and stuck under one end. Why?

Well, I don’t think it’s specific to this style of tumbler, though it may be a bit more common with these than with some others. But I discovered this trick with the very first tumbler I ever used: a little, all-plastic, undersized for its intent, rock tumbler for kids. The key is that the barrel has to be in good contact with both rollers, both of which have to be able to turn smoothly.

In an ideal setting, the base would be flat on a table. The motor would turn and the belt attached to it would turn the roller in the middle of the base. That would turn the barrel. Because the barrel is also supported by the other roller–the one at the end–that one would turn too. Thus, the motor, belt, both rollers, and the tumbler would all roll around together.

But, with this particular unit, if I simply put the base flat on the table and set the filled barrel on it, then the roller in the middle–the one that’s driven by the motor–that one turns just fine. That’s my clue that the “belt” connecting it to the motor is adjusted correctly. (If that roller slips, or seems to stick, that’s a sign that the belt needs to be adjusted which, for the record, is a routine maintenance task.)

In my case, however, this barrel would just turn in fits and starts. The “other” roller turns only when the barrel turns, so it’s not helping either. It seems to me that there are two possible solutions (though I do welcome other informed suggestions…):

  1. Slightly raise the end with the motor on it. This pushes the barrel onto the roller at the “end,” which forces that one to move along with the barrel.
  2. Slightly aise the end opposite the motor. This pushes the barrel onto the roller in the “middle,” which reduces the role of the one at the outside end.

I’ve tried it both ways and, in fact, both seem to work. But, as shown in my photo, above, I tend to set things up the first way, so the end with the motor is just slightly higher than the other end. In my logic, the second way seems like it’s putting extra pressure on the motor to do all the work. The first way seems to force both rollers to contribute to the effort, and that’s why I prefer to set it up that way.

If you have any other suggestions, or a better way to explain what’s going on here, please contribute to the discussion via the comments below!

Posted in General Techniques, Misc. Musings, Technical Details | Tagged: , , , | Leave a Comment »

I love my clear plastic hexagonal tumbler barrels!

Posted by C Scheftic on 2016/01/13

An art-jewelry-friend of mine, Zoe Nelson, posted this in a metal clay group on Facebook last week. But I check Facebook only sporadically, so I didn’t see it until a day and a half later, by which time she’d already received dozens of suggestions and found a neighbor whose car-repair tool (an oil filter wrench) actually helped to solve the problem.

Until then though, none … none! … of the suggestions were how I would have responded: a few were halfway-decent alternatives, a few were complaints rather than solutions, some were simply sympathetic notes, and the rest were ideas that were far more complicated than I’d’ve thought necessary, a few even likely to damage the barrel. Thus, this blog post, at last, that Zoe knows I’m writing for her (and any others in a similar predicament!) to have for future reference.

I did make a range comments about my tumbler that uses these barrels, and more, a few years ago. (Looking for the link — gosh, that was way back in 2012!) So I have over three more years experience with it since then.

Yeah, the clear plastic lid can be a bit tricky. But (just as Zoe said in her Facebook exchanges with her readers) I’ve had as much trouble, in different ways, with the lid on the kind of barrel that’s made out of black rubber. While your experience may differ, I will take the clear plastic ones any day!

You can follow the link above to read the pros and cons I wrote back in 2012 (and see a few more photos, plus other alternatives, if you landed here without a lot of knowledge of tumblers), but here are the things I want to say now that relate specifically to Zoe’s problem and anyone else who may encounter a similar one.

First of all, let’s try to prevent the problem from the start:

  • After you’ve filled your barrel with shot, water with either a bit of dish soap or burnishing compound, and the pieces you want to tumble, do this: Dip your fingertip in the liquid and run it around the rubber ring that seals between the barrel and the top. You don’t need to soak it, just get it slightly damp. This seems to help it form a good seal.
  • Then put the lid on and turn it backwards until it feels like it is seated correctly and fits smoothly. (I don’t do this all the time, but if it seems to stick at all at the next step, then I always back up and do this!)
  • Turn the lid forward to tighten it. It should turn smoothly and freely: if it doesn’t, stop! If you have trouble getting it on, you will have more trouble getting it off! It should tighten easily. If it’s catching, it’s not seated correctly. Back up a step, and repeat that one and this until you get it to close up easily.
  • Then, tighten it a bit more so that it seals. The lid does need to be tight, but not super-tight. Tip the barrel sideways and turn it around a couple of times (like it will turn on the base), and see if it leaks.

    • If it doesn’t leak, proceed to start tumbling.
    • If it does leak, try to tighten it a little bit more and repeat the test. (If there is some liquid in the little “gaps” in the big part of the barrel, where the straight edges connect to the rim, that might be all that’s leaking. So test it for a bit longer and see if it stops dripping once that has emptied out.)
    • If it continues to fail, don’t over-tighten it! Spin the lid backwards and, if it moves smoothly, go ahead and try to re-tighten it. If it doesn’t move smoothly or still continues to fail, just take it off and start from the first, seal-lubricating step above (checking to see if it may be time to replace that rubber ring).
  • When you’re done tumbling, the lid should come off…. It may take a bit of effort (you did have it sealed up well, you know, so it wouldn’t leak!), but set it down flat on a table, hold the barrel, and figure out how to push down (to press against that great seal you managed to make) and turn the top, let up and turn if you can, push a bit more if necessary and keep trying to turn, until it starts to move.

Now, if that last step doesn’t work, ignore all the suggestions about things like cooling the bottom while heating the top, or hitting the edge of the lid with a knife, or trying to pry the lid off, or any of the other tricks that people have tried in their kitchen, and use the method that I always use in mine and which has always worked on my clear plastic tumbler barrels too. I will quote it directly from the funny but still useful book by John and Marina Bear that is illustrated to the right (just so you get an idea of what the whole book is like, in addition to the tip on what to do…):

Problems with Utensils
Stuck bottle or jar tops

H. Allen Smith revealed to the world the technique for opening all screw-top containers. Now there are untold millions of us who face Mount Kisco or wherever it is he lives and say thank you every time we are faced with an obstinate top.

The technique: Bang the top flatly on a hard surface, like the floor. Not the edge, but the flat surface of the top. Just once. Hard. That’s all. And to think of all those jars we used to hold under hot water.


(Not that I want to date myself here, but I found that book in what must have been just a few months after this version was published. I have the 1973 UK edition: that’s the year I moved there — my second real full-time job after college — and I suddenly found myself cooking in a somewhat different kitchen using a number of unfamiliar local ingredients, and in London at that time there was a waiting list of over a year and a half to get a phone installed! (I was there for only two years, to the day! So I never even applied to the waiting list. We had postal service twice a day, and lots of people I knew didn’t have a phone either: we could simply write letters back and forth to make plans for the evening! But I digress…) Transcontinental phone calls back then would have been way too expensive anyway… so I had no way to call my family or old friends for help and there were times when I just wasn’t ready to admit to my new English friends some things that tripped me up. The book was a hoot — written by former New Yorkers living in the UK — so although it did use the British terminology I was just beginning to learn, the attitude sometimes felt familiar. And it was helpful too! People seem to either love or hate that book, and I’m one of the former….)

Anyway, there may be a few “bad” clear plastic tumbler barrels out there (and others that have been damaged by mis-use) that are harder to tighten, and those will also be harder to open. But I have two myself: one marked A for the Latin Argentium aka silver (or other precious metal) pieces, and the other, marked B, for pieces containing any form of Base metal. I’ve used a few others at meetings or workshops. I’ve seen people struggle to get them to seal and I’ll admit I struggled with mine the first few times I tried to use them, until I got a feel for it. Like riding a bike (or rolling out metal clay) once you "get" it, it seems easy!

And, every time I’ve had a problem closing any of those barrels, I’ve just loosened the lid, spinning it backwards until I’m sure I’ve got it seated right, and closed it back up with little difficulty. If I tighten it just enough to get a seal (and even that does take a bit of practice to get the feel, but it will come if one remains calm and pays attention), it may take a bit of oomph to get it to start to open, but it will come loose again. Or, if it does resist, just use the tip above: lid down, flat, once, hard.

Because we do need to be able to retrieve our beauties once they’ve completed their tumble-burnishing, don’t we?!!

Posted in General Techniques, Misc. Musings, Technical Details | Tagged: , , , | Leave a Comment »

Buttons, Buttons, Yet More Silver Buttons!

Posted by C Scheftic on 2016/01/12

Did you miss the button-making class at Indie Knit and Spin last November? If so, you’re in luck: I’m offering it again at the February 6 session, from 10 am to 12:30 pm!

We had a great time last year! A number of folks wandering along the hallway, checking the vendors and classes in other rooms, stopped in to see what we were doing and said they wished they’d signed up. There aren’t going to be many (if any) other classes at the February event but, since I’ll be using my own studio (i.e., Cosy doesn’t need to pay to rent another whole room for the class, and WSCC doesn’t need to schedule other events around IKS’s use of yet another of the by-the-hour classrooms), I said I’d be happy to offer this one again.

Please note: You don’t have to make actual buttons in this workshop! If you’d prefer to make a focal piece to serve as an embellishment on your fiber work, or just want to make some other type of decoration, that’s OK too. Unlike most of my workshops, where I make a point of showing how to make two-sided pieces, for buttons which are typically sewn down onto some fabric, we will just be texturing the “front” side of our pieces. But all it takes is a shift in the placement and/or size of the holes we’ll make in our pieces, and you can have another form of decoration for your work or even a few charms, earrings, or a pendant. It’s up to you!

  • For more details, see the Button Making post at the Indie Knit and Spin website.
  • As described there, to sign up for the class, send an email to cosymakes@gmail.com
  • Please sign up by 8 am on Monday, February 1, so I can have time to place an order that morning for enough material to use in the class. Seating is limited but, if spaces remain after that deadline, I’ll allow others in if but only if I have enough material for late-comers to use.


Once again, I forgot to tell Cosy to change the write-up but, as I discussed last fall, I’m planning to use .960 Sterling Silver for the class. If anyone has problems with that alloy, I will have on hand the .999 Fine Silver mentioned in the class description for you to use. The techniques used are the same either way.

(What problems, you may wonder? .999 means it’s 99.9% silver, and only silver; it’s not certified at 100% simply because no manufacturer is going to swear that not even an atom or two of something else managed to sneak in there somehow, but it’s as pure as reasonably possible. Whereas .960 means it’s only 96% silver and 4% copper has deliberately been added, so if you are someone who reacts badly to copper (or to traditional .925 sterling silver, which contains up to 7.5% copper), then you may want to stick to fine silver. It is extremely rare for anyone to have a bad skin-contact reaction to silver alone; most people who say they’re allergic to silver are actually reacting to the copper in sterling (not the silver element itself), or else to some patina chemical or polishing compound applied to their silver (which I am happy to omit for anyone with a sensitivity–there are several products I’ve learned to avoid myself!).)


Here’s looking forward to another fun class with more great participants: it’s only a little over three weeks away now, so please sign up soon.

Posted in Events, Studio, Teaching Metal Clay | Tagged: , , , , , | Leave a Comment »

Year #7: Here we come!

Posted by C Scheftic on 2016/01/07

Am I really already into my seventh (7th!!!) year of musings here?!  Hard to believe that, but it’s true.

I’m a few days late with this one, but things got even crazier than usual at the end of the year.  So instead of posting on my New Year’s Day blogging anniversary, I’ve managed to do this on an alternative holiday, one of several for Christmas as calculated on the Julian Calendar.  What can I say: I do understand the math involved, and why not find another reason for a celebration!

Part of my year-end disruption was due to the main interstate highway near my house (locals call it the Parkway East) being closed for a week so the city could demolish a deteriorating bridge that crossed it.  (How bad?  So bad it had made it onto 60 Minutes last year!)  There had been a temporary fix a while ago: they built a second bridge underneath it, not for anyone to cross mind you, just to serve as a sort of diaper to catch the bits that were falling off the upper bridge so they wouldn’t land on cars driving down the interstate highway!  So the demolition involved covering the interstate with lots of dirt, imploding both bridges down onto the pile, and then hauling everything away.

Now, I tend to use the back roads and simply avoid that stretch of freeway, so the closed road itself was not the problem. No, the problem was that no matter where I wanted to go, I’d’ve had to drive on, or at least try to cross, the detours. For a day or two, no problem; but for a whole week, well, I just left town. Here’s what I missed:


(I like the angle of that video: it shows both structures being taken down, but it definitely plays with the speed (slowing it at the beginning, and speeding it up later on). A more accurate idea of how it went can be found here, though that one was shot from much farther away in a city park, the closest that a “civilian” could get … while I was hundreds of miles away!)

I hadn’t decided exactly how long I’d be gone.  I had friends coming to town from across the country that week and I did want to see them.  But then there arose another complication: if I stayed in town, there were to be several days when I couldn’t get into my studio!  The general community center activities that go on in the building were on hiatus for the week between Christmas and the New Year, and they decided that would be a good time to paint all the public-area floors.  So I left late the night before I thought both the highway and the building were closing, only to learn the next time I checked email that, at the last minute, the painting had been delayed for a few days.   And the Parkway was still closed.  So I didn’t come back early, but instead stayed away a while longer.  And then … yes, there’s more!  The painters took longer than expected, and didn’t quite finish everything, but their time was running out because the community center did have events planned.  I never got the all-clear notice I’d been promised but, finally, I went over yesterday and found that I could get in.  So, now I’m writing!

Happy New Year!  Here’s hoping that everyone’s complications are finished from last year, and we can just get down to some serious work in the realm of having fun in this new one!  The photos with this post showing a pendant from several different angles are one that I started making last year….  It’s made from .960Plus silver clay (a mixture of .925 PMC Sterling and .999 PMC Plus).  That’s the clay we used for the Button Making class at Indie Knit and Spin last November.  I had some mixed clay left over after I’d finished doing my demonstrations in the class but, rather than think about how to store it, I went the route I usually take and just made something with it! (For technical accuracy: the spiral is from plain .999 PMC Plus that I had left over from the previous day….)

Because having several layers loop over the top to form the bail meant that area was thicker (and thus, likely to take longer to fully dry), I didn’t fire it right away with the class pieces.  Instead, I waited until the next month when I made some earrings.  I’d used .960Flex for those, but the same firing schedule works for any form of .960, so I fired this pendant with those earrings.

Having made the earrings just in time for my last Holiday-season show last year, I polished and added a patina to them, but I ran out of time before I got to this big piece.  The first thing I did when I got back into my studio was to finish it up, so I’d have art-jewelry photos to accompany my first post of the year!  I’m happy with how it turned out.  I still have to select a chain on which to hang it.  But I’m back in the groove for the year, and looking forward to new adventures.  And I hope you are too!


Posted in Misc. Musings | Leave a Comment »