Convergent Series

learning, using & teaching metal clay, and other aspects of life

Posts Tagged ‘metal clay’

A Quick Workshops Update

Posted by C Scheftic on 2017/08/09

Well, I managed to get three posts up last month as I traipsed up and down the west coast, even though I got little jewelry made and did very little teaching. (The few exceptions will get their own posts eventually!)

Right now, I’m putting together my fall teaching and show (sales) schedules for September through December. I’ll post full details once I’m sure of all the dates various but, since several folks have asked for updates, the general plan goes something like this:

  • Single Session Workshops: a mix of topics, mostly at either the Artsmiths of Pittsburgh, or in my own Studio;
  • Multi-Session Classes: one series using precious metals (four meetings using either sterling or fine silver; Sept – Oct) and another series using base metals (five meetings using mostly bronzes, possibly accented with some copper or steel; Oct – Nov) at the North Hills Art Center;
  • An Open House (with both demos and pieces for sale) in my studio during the community center‘s big fall open house day, and another Open House to coincide with Indie Knit & Spin (aka IKS).
  • Because of the IKS-day Open House, I don’t plan to hold either type of button-making class at that event this year. But for those wishing to make buttons, I will be offering two separate classes on that at NHAC this fall.
  • There will, of course, be pieces out for sale at all my “usual” locations, Artsmiths, the Hoyt, and Portage Hill.
  • And I’m hoping to have pieces out for sale at various other market-places, though most of that may be more in the Thanksgiving to Christmas range … with details to follow!


  • Then in the new year, I may try to tweak the plan a bit for winter into spring, swapping some multi-session classes into Artsmiths and my studio; and then offering some single session ones at NHAC.

But in addition to just offering a heads-up about what’s to come, there’s another reason for this post. I have a one-day Easy Earring Extravaganza project scheduled for next week, on August 16, and the deadline for you to register is looming!

Although I promote it as being a chance to make several pairs of earrings, what is an earring but an charm or a small pendant or other such element, where the maker may have just put the hole in a different place! Most of my other sessions go into depth on a particular technique applied to one specific design, but the Earring Extravaganza is different: with that one the goal is to help you go a bit more free-form for quantity, where you produce a number of simple pieces, whether that’d be to give yourself a little treat or to grab a chance to get started on holiday-season gifts.

Now, officially, the deadline is a week before the start of the first class, which is a week from the day I’m posting this! So if you want to join in on that one, please register right away!!! Technically, registration should close at the end of the day on Wednesday, August 9, but I think they’ll hold off closing it until early on Thursday morning. As long as I have the count by 10 am on Thursday, I can still get my order for materials in by that vendor’s 11 am cut-off for shipping, and we’ll be fine. Should you happen to try to register later today, or very early tomorrow, before I have to place the order, and for some reason you can’t get the form to work, please just call or email me on Thursday morning (best time would be between 9 and 10 am), and I’ll be glad to help you!

Posted in Events, Studio, Teaching Metal Clay | Tagged: , , , , , , , | Leave a Comment »

“Instructors Show” at the North Hills Art Center

Posted by C Scheftic on 2017/07/15

Wow! Another event in the North Hills! Since I only added the Norbth Hills Art Center (NHAC) to my set of teaching venues at the start of 2017, this month provides me with my first opportunity to participate in their annual “Instructor’s Show.”

This post will let you know about the opening of the show, which is, umm, today, Saturday, July 15, from 7 to 9 pm! That just happens to be a few days before I’ll manage to sort out a few specifics of my fall schedule but, as usual, I’ll add them to the bar down the right side of this blog in just a few weeks.

Now, if you’ve already taken a class with me, you probably know that most of them are single-session events: you complete the making of a piece during the class, I fire and tumble-polish it afterwards, and it is returned to the class site about a week later (I am specific about timing in each individual class, depending on my schedule, how much firing time is involved, expected road construction delays, etc.).

And I’ll be offering my two button classes (silver or bronze) exactly that way. In the silver-buttons class, we will make ones that you attach via holes in the surface of the buttons. In the bronze one, you will have the option of using holes or of adding a shank on the back!

Then, the other classes I have on NHAC’s fall schedule are a pair of multi-session, multi-project events: one each in silvers (both fine and sterling silver) and base metals (several bronze formulas and copper). We’ll start out with the basics and add new techniques as we go along. I will fire pieces between classes and bring them to the next session. About half the projects will be similar in the two versions although, with the different metals, the results will be very different. So if you choose to take both, you’ll be able to reinforce your skills in slightly different ways. The other half will be entirely different, chosen to take advantage of the differences among the metals. The base-metals course will have one additional session so we will have enough time to cover a few extra finishing techniques appropriate for those.

~~~~~~~~~~

Note:

I’d’ve sworn I’d queued up a post about this show, but it hasn’t appeared and I don’t see it now, so I must have dreamt that post!

Thus this last-minute re-do is short notice for the opening, but the show itself runs through July 28. I’m posting it from a train as I head off for some family-time this weekend. I hope to update it with photos for these classes, not the one from a different class I taught last year at the Artsmiths of Pittsburgh (just so there’d be something pretty with this post), once I get back and onto my main computer.

So if you are interested in any of those class ideas, feel free to check back for updates, and let me know if you have any questions or other requests. What’s in this instructors show is what I’ll be teaching at NHAC this fall, but I’m still working on my schedule for south and east of the city. I’ll be announcing the rest of my fall schedule in just a few weeks.

Posted in Events, Teaching Metal Clay | Tagged: , , , , , , , , | Leave a Comment »

Silver Metal Clay on Pottery

Posted by C Scheftic on 2017/02/22

For reasons I’ll explain at the end, here are a few examples of pottery I’ve made over the past few years to use in some of my early experiments in adding silver metal clay decorations to them.  Since I’m showing here my first experiments with various techniques, for those I chose to not risk my best pottery pieces and the decorations were deliberately kept very simple. But each of them does seem to have a little story to tell!

  1. I threw, bisqued, glazed, and fired these pieces.  The same electric kiln was used for both firings.  The relatively rough glaze was a deliberate choice … I then smushed some clay onto the surface and fired that with a creme brulee torch to sinter the silver.  For my first-ever attempts at these, I was happy with these results.
    Two Bowls with Fine Silver Silver
  2. I threw several pieces, cutting ridges into their outside surfaces. After bisque-firing those (in a different electric kiln), I glazed the inside and smushed silver clay onto the outer ridges, then fired those (in a gas kiln).  Most turned out wonderfully, and I’ve already sold all of those but the one shown here.  Part of the back of this one did break off. (I used the same glaze inside this one as on the piece in item #3, below.) The fault could have come from either a flaw in the pottery (perhaps I’d cut a ridge a little too deeply?) or because I’d applied the metal clay a bit thicker there (and the shrinkage as the binder burned off and it sintered was too much for the pottery clay), or even from both of those combined… I haven’t yet gotten around to trying to distinguish among those possibilities.
    Bowl with Fine Silver (glazed inside, silver outside)
  3. I threw, bisqued, glazed, and fired this piece.  (Those firings were done in the same electric / gas pattern as #2, above.)  Then I rolled out some “snakes” of a low-shrinkage silver metal clay and spread a tiny bit of overlay paste onto them (in the setting where I made this–not my own studio and I’d forgotten to take a tiny paintbrush for this step–that was far easier than applying paste to the pot). I pressed those onto the vase, and fired this piece yet a third time (and in yet a different electric kiln, a small one that another artist had for firing metal clay molds).  The clay shrank: the upper snake held at the ends but cracked open at roughly 1/4 of the way from one end; the lower one held along its length but pulled up into itself leaving a little smudge of silver paste at the end and at a few places along its side. The little “splats” of silver must have been a bit of clay/paste from my fingers as I was sticking it all together. I didn’t notice those until after the firing, but I really like that accidental result. Now I want to figure out a way to reliably recreate those, especially like the one above and to the right of the top snake!
    Pot with Fine Silver
  4. I threw this piece and bisque-fired it (in an electric kiln).  I applied glaze to the outside.  I rolled several “snakes” of a low-shrinkage metal clay, wet them on the bottom, and applied them in a “spray” pattern to the unglazed inside bottom and edge.  The piece was fired in a gas kiln.  When removed, the silver looked sintered and the patterns were all still intact.  The piece was immediately (i.e., still hot!) dropped into a newspaper-filled can, and covered.  (Those who know the process will recognize that as a “raku” firing!)
    Wide Bowl with Fine Silver (balled by raku)
    This outcome was my biggest surprise! The gas kiln did not over-fire the silver, but the fire from the raku-process did then get the inside of the can hot enough to completely melt the silver!  You may just be able to see some faint hints of where part of the pattern had been: tan spots where some of them were even show little trails of tiny silver balls.  But most of it pulled up into two balls in the center! (Another small bit from the edge must have just fallen off in the raku-can and disappeared as it was emptied out. That’s experimentation!) I was able to get a number of pieces with ball-decorations to survive the raku process (similar look to both #1 and #2 above) and turn out beautifully, but I have yet to figure out how to approach, in raku, designs like those that later developed from the technique I first tried with #3.
  5. While I’m sure that many readers with metal clay experience will have taken their clue from the size of the silver balls and snakes above, I will end with another little pot from that session.  The pencil is there to give you a sense of scale for all these pieces! And if you look carefully, you should be able to see the small (3 mm) clear cubic zirconia I’d set into the wet clay.  All the ones I made with those did survive all three firing steps (bisque and two-part raku).
    Green Crackle Pot with CZ
    While the previous items all show my very first attempt at each technique, this was my second try. The very first piece did have one very tiny crack just off to the side of the CZ, visible but with no obvious damage to the structure. That was probably due to my having used too-wet clay until I figured out that I could set CZs in stiffer clay. That bowl did have a great shape, and another artist really wanted to swap me some art-glass for it!

I’ve been playing around with miniature pottery, off and on, with and without such embellishments, for several years now. Though I have been offering my miniature pottery for sale at various shows, I haven’t taken the experimentation seriously enough to feel inclined to write much about it. (And I’m not teaching this, at least not yet, so I don’t have that inspiration for writing about it either…)

But I decided to post these examples after seeing some experimentation that Terry Kovalchik has been doing, and writing about, with painting silver clay paste onto pottery shards, and reading some of the reactions he’s gotten to that in the Metal Clay Now group on Facebook. (Metal Clay Now is a “closed” group, but readers of my blog who use Facebook are certainly welcome to ask to join it!)

While many of his results are superb (as usual!), Terry has reported some further breakage of the clay shards during the sintering process. But, like my #2 above, that could be from any or all of: a weak spot in the pottery (at initial construction or from whatever created the “shards”), the shrinkage of the silver clay (how thickly or how evenly it’s applied, exactly how it aligns with any weakness in the clay body), or any number of other little peculiarities. So I thought it was time for me to bring out a few of my explorations too, and maybe others will start to chime in with what they’ve tried and how it’s worked out for them.

If you are working with similar combinations, please leave a comment: I’d love to hear from you, see some of your results, and compare more notes!

Posted in Misc. Musings, Technical Details | Tagged: , , , , | Leave a Comment »

Four-week Intro Class: Deadline Extended!

Posted by C Scheftic on 2017/02/16

Great news! My four-week introductory series on working with silver metal clay still has a few seats available in “Session 2” — from 6 to 9 pm — starting next Thursday (Feb 23) at the North Hills Art Center, and we’ve agreed not to close the registration this afternoon, but leave it open until next Tuesday!

So if you forgot to sign up, there is still time. Or, if you didn’t notice the listing among my classes down the right side of this blog, didn’t check the Classes section of my website, and you’re not on my mailing list nor the one for the North Hills Art Center … well, now you know about the series and that it’s still possible to sign up.

intro class samplesJust register now! Right here!

We’ll cover the basics of designing, texturing, shaping, cutting, and refining pieces. You’ll make a woven piece. And a hollow one (open or closed design: you choice!). With every piece you make, pendant or earrings, you’ll have the option of making it reversible! By the end, we will also have covered various ways to polish and add patinas to your pieces, to help bring out the textured designs. And we’ll have lots of fun doing it all!

For my one- or two-day workshops, registration is usually cut off a week ahead: I need time to order the silver we’ll be using (and I sure don’t want to charge students for overnight shipping)! I have ordered silver clay for those who already signed up for this but, since I’m getting enough to cover all four weeks, I can sneak enough out of that for late-comers to use the first week, and replenish it in time for later evenings.

If you’re in the area, I hope you’ll be able to join us!

big reversible bronze, both sides with CZsAlso please notice (e.g., down the right side of my blog) that this session will be followed at NHAC by a simple, two-night introduction to making a beautiful piece out of bronze metal clay. Registration for that one will close on March 16. (Bronze is a little trickier to work with than silver, so you may end up making only one piece … but the materials cost less, so bronze worth risking for big “statement” pieces!)

Posted in Events, Teaching Metal Clay | Tagged: , , , , , , , , , , | Leave a Comment »

Two More Hollow Beads

Posted by C Scheftic on 2013/08/31

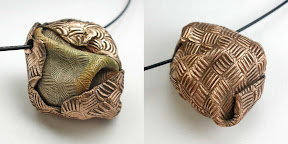
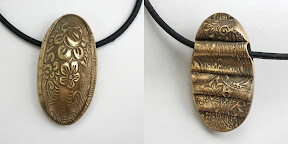
While I’m still thinking of it, here are a couple other hollow beads I’ve made recently, and the armatures on which I built them.

Well, let me start with the armatures. In the first photo, you can see two oval-dome parts of a graduated, five-part “doming plate” that is sold specifically for use with metal clays. (This one actually belongs to a friend, who won it in an online contest!) Below that is a square, blue, glass “rock” that is sold in the floral-arranging section of a craft store. (That is mine, one of three I found in the back of a drawer in a house I rented for a while. I liked their sea-blue color.)

The first piece shown here, reversible with both sides in the photo to the right, was made with the glass rock. I covered it with a plain layer of bronze clay, let that dry, cut it open to remove the rock, and pasted the two parts back together again. Once that seam had dried, I then covered it with what I thought of as three different “blankets” — each with a different woven texture using a different metal (all from Hadar’s Quick Fire clay powders). The first layer was bronze which, when fired, had a lovely sort of blanket-y color that I left alone. The next layer (the wavy weave) is rose bronze, and the outermost later (a straight weave design) is copper. I did them in that order because I’ve found that copper layered over bronze, with air-filled gaps in between, sometimes alloys into odd colors. The rose bronze serves as a sort of buffer to help avoid that. (And, I just like the color of the rose bronze metal!) Both the rose bronze and copper were polished with radial bristle disks and silicone wheels to bring out their shine.

The second piece shown here, also reversible, with both sides in the image to the left, is all bronze, and was made with the second-largest shape on the doming plate, with some additions. First of all, I cut a flat oval shape just a bit larger than the dome. I let that dry, attached the dome, and dried it yet again. Then I rolled out a thin, textured layer and “draped” that over the other side of the flat oval. I used a straw to prop open a place near the top, to serve as a bail, trimmed the rest to match the oval, and let it dry one more time. After cleaning it up a bit, I fired it. I decided to polish this piece using the same tools as I had on the “blanketed rock” piece.

Although these are both relatively simple pieces, they illustrate one of the things I find so very engaging about working with metal clay: the wide range of creativity it brings out, not just in the designs one ends up making, but also in the range of items one can either find or adapt to use as “tools” to aid in the making. Maybe I can remember to show more of those over the next few weeks. In the meantime, feel free to leave a comment describing other such items in your “tool” stash!

Posted in General Techniques, Technical Details | Tagged: , , , , , , | Leave a Comment »

Hollow Bead Armatures

Posted by C Scheftic on 2013/08/21

I like making hollow beads. I sometimes wonder how much of my fascination with them is because the first piece I ever made using metal clay was a hollow bead, shown to the right, and how much is simply because they can be both fun and interesting to make. I’ll never know the answer to that, but I expect to continue enjoying making them.

In the class where I made that bead, I dried the pieces for each side over a light bulb. The nice thing about light bulbs is that, if you prop them up with the screw-end down, their tops really are nice and round. Why does that matter? Because it means you don’t have to worry about centering, or otherwise specifically positioning, your clay on it to dry. You just move it onto the bulb, carefully press it down to match that curvature, wait for it to dry, and admire the nicely symmetric results.

There are a few minor complications with using a light bulb. Nothing serious, but things to consider. How will you prop the bulb? In that first class, the teacher had two kinds of holders: one was a small paper cup turned upside down with a slot cut into the base and the other were small blobs of polymer clay into which she’d pressed the end of a bulb to form it before curing that clay. (Of those two, I have a small preference for the paper cup approach (as shown here, to the left) simply because, when I’m storing enough of those to use for a class, I can stack the cups so they take up very little space.) Another consideration is that you are then working with (i.e., moving around) a piece of oiled (i.e., slippery) glass, where slippery means easy to drop and break. Can’t you just hear the “voice of experience” there?!

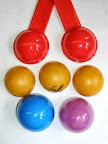
So, what else to use for an armature? A few of the things that I’ve tried (some of which are shown, to the right) include the following:

  • plastic eggs (bottom), but you have to take care to use the “round” end because, with the “more-pointy” end, then you do need to take a lot more care with how you position your clay on it to dry;
  • measuring spoons (top) but, again, you need to take care to get round ones;
  • ping-pong balls (middle row), which I like to cut open so they don’t roll around, and
  • plastic paint palettes (not shown) which, like the other items shown in this colorful collection, are also “open” on the other side, so you can turn them over and position your clay on the inside too, should you want to do so.

Which armature is best? I don’t have any one favorite. So, how to choose which one to use? Me, I think about the size of the piece I want to make, and the amount of curvature I want it to have, and pick whatever happens to match that the best. And sometimes, yes, I do return to the old light-bulb trick, as I did with a piece I made recently out of Hadar’s Quick Fire Bronze clay. This piece was not going to be round (like my first-ever piece); I wanted this one to have more of a “trapezoidal” shape (i.e., a rectangle with only two parallel sides). This piece would be fairly large but, because of its non-round shape (meaning it would end up having four “side” or “edge” areas that I would then have to fill), I did not want it to have a lot of curvature. Instead of a “standard” incandescent bulb (as used with that first-ever piece), this time I used a larger round “vanity” bulb. With those, instead of turning a cup upside-down to hold the bulb, I’ve found that they fit nicely inside a large cup. So that’s how I positioned my two “trapezoid” pieces for drying. Since this was the last piece I started one day, I just positioned them over the bulb, made sure all the edges were tucked down smoothly, and left them to dry over night. As I was packing up my camera, for no obvious reason I decided to snap a quick photo of them before I left.

The next morning, I was surprised (which, in fact, surprised me even more: I was surprised at my surprise….) to find that, once dry, they had released themselves from the bulb, and slid down to the side, where they were caught by the cup holding the bulb! Whew! I would have been very disappointed if the dry pieces had fallen from a noticeable height onto the tabletop and, perhaps, even then bounced down to the floor (as could have happened if I’d stuck them into an overturned cup) and, quite possibly in their “dry clay” state, cracked or even broken apart from the fall. (Yes, I know how to patch them should that happen, but it takes time and effort that I’d rather just avoid. And pointing that out to you, dear readers, is the whole reason I decided to write this particular post!)

Since I mentioned the “edges” this piece would have, this next photo (left) shows the opening along the “top” of the piece after I’d attached the two main elements. (I hesitate to call them the front and the back because, like most of my work, this piece is fully reversible: it has two different fronts!) I’ve got it standing on quadrille paper (with 1/4 inch squares) to help give you a sense of its size. Once I had covered each of the four edges (the openings that I’d wanted to keep to a relatively small size by using an armature with a relatively shallow curvature), I inserted a bronze “embeddable” bail in the top and fired the piece.

And I was delighted with the result. My original plan had been to finish this piece to a high shine but, given the colors the kiln decided to give it that day, for now at least I’m leaving it like this. Yes, I know, the colors are somewhat ephemeral. I’m experimenting with a new acrylic coating to see if / how it may help to preserve such colors. So this piece won’t officially be going up for sale right away, until I can see how it holds up. You may, instead, see me wearing it as part of the testing process. (Which I find to be another part of the “fun” of making pieces like this.) But, what do you think: if the colors do hold up, should I leave it like this, or remove the coating and polish it until it shines?

Posted in General Techniques, Technical Details | Tagged: , , , , , , | 2 Comments »

Translation, please…

Posted by C Scheftic on 2013/02/28

Here’s something else I make at times, something that ties in with the theme of my last post about using bits & pieces of clay that may be left at the end of a session. (Well, sometimes I deliberately save little bits of clay during a workshop, so I’ll have some left in case a student has a question that’s best answered with a quick demo. That’s actually how I ended up with so many of the oak leaf bits shown here….)

Can you help: I’m trying to figure out what to call the resulting pieces!

My inspiration for little pieces like these are “chopstick rests.” In transliterated Japanese, I am familiar with the term hashi oki for that use. According to Wikipedia, the transliterated Chinese term is kuaizi zuo. Shown are examples of such little items that I sometimes make with the remaining bits of clay at the end of a session. All of these are bronze. If the kiln happens to produce lovely colors, I leave them as-is; otherwise, I polish them up well; I tend to combine them in non-matching mixes. (Having three such pairs itself is unusual! And, yes, the photo deliberately shows an odd number of them!)

Sometimes I make slightly larger, more complex ones too, and do that more-deliberately (that is, not just with leftover bits of clay!). I’m completely sold out of those right now, however, and don’t seem to have any good photos of ones that have moved on to new homes. But in his excellent book, Metal Clay Fusion, Hawaii-based artist Gordon Uyehara includes a sample project for making several different styles of seashore-themed hashi oki, so metal clay artists may want to check that out.

The thing is, now that I’m located in Southwestern PA, I don’t come across many chopstick-users. When I host a dinner where I set the table with those, I often have to teach diners how to use them! Even when people are already comfortable with them, often they are still not familiar with the use of little stands to keep the chopsticks both in place and off the table / tablecloth itself.

I do, however, know lots of artists and craftspeople who use specific hand tools that might benefit from a creative little resting-place. Shown farther down this post are two of the tools I often use, a colour shaper and a ball burnisher resting on another such piece on my own worktable.

What should I call these items when used that way? Now, I do believe that oki is fine to use for the “stand” or “rest” part of the name. But hashi for “chopstick” is not. What is?

I asked the person who teaches Aikido Kokikai down the hall from my studio (and has spent time studying that in Japan). She was, of course, a bit concerned by my “westernization” of this “traditional” idea: why not just call it a tool rest? When I explained how much I valued the “art” aspect of hashi oki, rather than the strict utilitarianism of a “tool rest,” she was a bit more willing to consider this. Not a native speaker of Japanese, however, she said that the best phrase she could come up with was dohgu oki. Except, she said, dohgu expresses the idea of equipment, more than a simple hand tool, but she could not think of a Japanese word or phrase for the generic idea of a small hand tool like this.

If you can help me out with this, please leave a comment on this post. (Make sure to leave your email address–this is something I can see but it is not automatically posted in public with your comment.) If I end up using your suggestion for this, I’ll be happy to send you a little set of these pieces if you’d like. (If several people suggest the same name, and I pick that, then I’ll draw one at random.) The offer remains open until I pick one and post my choice in the comments.

Please help, if you can! Thanks….

Posted in Misc. Musings | Tagged: , , , | 3 Comments »

Bits & Pieces

Posted by C Scheftic on 2013/02/23

I’ve been meaning to write for a while about several questions that often come up in workshops, especially with beginners when each person is allocated a package of clay and then finds they don’t use all of it: why did you give me more than I need and how do I save it for later use?

I see the answers to these questions as being connected, but let’s start with the first one: for many “projects” it is just worth having a bit extra as you roll it out, so you’re sure to get a big enough area to cut out the shape you want. While this remains true no matter how experienced you become, it is especially important for beginners who are just learning the various ways to manipulate clay.

The answer to the second question is a bit more complicated. Silver clays come in a well-sealed package, and can remain in great condition for a rather long time inside that. The trick is that, once the package has been opened, all sorts of things can happen. At a minimum, the clay dries out. If that happens, it can be rehydrated: ways to add water to get it back to working consistency is something I’ll try to remember to write about at some point in the future (even though it’s not something I encounter myself on a regular basis any more…). If you’re going to use the remaining clay again fairly soon, you can just try to keep it moist. There are all sorts of products you can buy, or build yourself, to create a little humidified storage environment. The problem with doing that for any length of time (and something that the product vendors rarely address) is that your clay can easily become contaminated with mold. Now, you can add something to the environment (not to the clay itself, but simply inside your storage box) that can help retard mold growth. White vinegar or lavender oil are examples of some mold retardants. And, even if your clay does acquire a bit of visible mold, it’s not a crisis. At that point, your options are to scrape off the mold or to just work with it. (You do have to take care with the latter because the extra “space” taken up by the growing mold may create spaces in your fired piece that may influence its look and/or interfere with its strength.) But, in my experience, there’s a much better solution: don’t even try to store it!

That is, my general answer to both of the original questions is this: why not see if you can just use up any remaining clay in some creative and productive way?! Add to your current piece, or make something else.

One of the earliest “lentil” shape beads I ever made is shown in an old photo here, to the left, strung with some Russian jasper and green glass beads. (It’s also one of the pieces that led me down the path of making reversible pendants!) Its other / first side had a more elaborate design; what at the time I thought of as the “back” had the simple, low-relief, fleur-de-lis pattern shown here. After decorating the first side, I had a bit of clay left. I rolled it all out, just two cards thick, which got it big enough that I could cut out a small square. I put that on the same drying form I’d used for the lentil (so it would have the same curvature) and cut a circle out of the center of that. With the clay left over from trimming the square and cutting the circle, I made a number of little balls and let those dry too. Then, I moistened the center of the fleur-de-lis side and the underside of the open square, and stuck those two pieces together. Once those seemed secure, I added more water inside the open circle, and pressed the little balls into place. Having the circle around the outside of the balls gave me a way to make sure I could attach all of them securely, to that ring and to each other, rather than trying to count on a small point of connection on the bottom of each ball. And, suddenly, after investing only a few more minutes and a tiny bit of “left-over” clay, the piece became reversible, which sure seems like a good deal to me!

Of course, if you have more clay left over, you can always make something else with it. All of the elements in the silver and bronze earrings shown in the smaller image to the right were made when I had some larger leftover bits. After completing other pieces I’ve often used any remaining clay to make little patterned disks, or cut out little textured designs, and just set them aside to dry. When I’m firing up a load in my kiln, if I have a bit of extra room, I pop them in. When I have a few spare minutes–with metal clay, one always seems to have moments of waiting for something else to happen … to dry, to rehydrate, to finish firing or cool off, for example–I will go through these bits and pieces, and assemble them into something interesting. Their small size, of course, means they often (but not always) become elements in earrings.

Sometimes I’ll add other elements to such “bits and pieces” too. The orange-and-silver earrings shown at the very top of this post were done that way. When I fell in love with the little colored lucite flowers, I bought a small collection of them to use both for my own creations and during workshops. For several months, whenever I’d have a little bit of clay left over, I’d make a little flower disk or leaf of some sort. I kept track, so that I’d end up with matching pairs, but I didn’t worry about completing any particular number at once. I just used up what I could for some larger shapes, made smaller ones when I had less clay left, and made other small elements or even just tiny balls with the very end of the clay I had on hand.

In fact, for silver pieces that I intend to fire first and figure out how to use later, those I make flat. Then, when I do decide where I want to use them, if they need some shaping for that particular purpose, I can use the “traditional metalsmithing” technique of dapping the fired pieces to shape them as needed. That’s what happened to the little flowers I set on top of the blue-and-white glass beads shown with the earrings in the final photo here. In fact, though I made those flowers specifically to use with these beads, I could not have domed them to match their shape in the “dry” state because I punched them out of a little bit of extra / scrap clay that I had mixed up so it would remain flexible as greenware. I had finished the project I wanted to make with that clay and had some left then too. Since I knew that “flex greenware” clay that has been rolled out is great for using with paper punches, I used some of my leftover clay to make a small sheet for punching. I then made these flowers but they had to be fired flat … since they were too flexible to hold any other shape. (I also rolled the final bits of that flex-clay into long “snake” shapes that would remain flexible and could be used to embellish other pieces later on.)

I will note that, while fired silver and copper clays can be dapped after they’ve been fired to metal itself, the various bronze clays that I enjoy working with cannot be formed much (if at all) after firing. That’s just the nature of bronze, not simply the fact that it came from metal clay.

I do sometimes wonder how much this is something I do, myself, verus what other metal clay artists do with their leftover bits of clay. I know that a number of you do read this blog (without commenting) but I sure hope you will speak up now: Do you do this too? Or what?? And, why?

Posted in General Techniques, Teaching Metal Clay | Tagged: , , , , , , , , , , , , , | Leave a Comment »

Productivity!

Posted by C Scheftic on 2012/11/05

I led a “woven silver” workshop at the weekend. The first photo (right) shows the pieces that were made that afternoon and, um, once everyone got a roll, that evening too. (Yes, a few didn’t involve weaving. That’s OK too.) In that image, no finishing has taken place: it shows the “white” appearance of the silver crystal structure straight out of the kiln. I just wanted to grab a quick photo, while I could, to show how productive the session had been.

The second photo (left) of the folks at the west-side table at work is mostly a sort of visual note to myself to try to remember to take photos more often, in class but also elsewhere. Because the caption for that image should be, “No! I won’t look up! I will not look at the camera! No!” Still, I’d like to thank everyone who was there for being such good sports … in every other way.

I haven’t posted over the past couple of weeks because I’ve done all sorts of things where I just did not think to take any photos. You might think that I would have taken photos while attending a workshop on photographing artwork. But no, there were lots of handouts and images of copyrighted work and discussion and more. Even though I had both of my cameras with me, the only times either one came out of its bag were to show a few images that were already on their memory cards.

You might think I’d’ve taken some shots at our recent metal clay guild chapter meeting but, no, I didn’t even think to take a camera to that. We had an opportunity to play with the Silhouette Cameo cutter that one of our members has gotten; we did lots of great planning for next year; and there was all the usual sharing and showing and telling and hand-on time and more. But no photos….

I also didn’t think to take a camera on any of my recent shopping expeditions. But, now that I think of it, I have added a few interesting items to “the stash.” Maybe I can manage to (remember to) take photos and write in the next week or so, before those elements finish going to into pieces and out for holiday sales events.

It is such a busy time of year, with all the autumn chores and the lead-in to the season of holidays, I am sure you, dear reader, are keeping busy too. Please know that I hope you are feeling productive!

Posted in Teaching Metal Clay | Tagged: , , , , , , , | Leave a Comment »

Yep, I’m still a bit baffled….

Posted by C Scheftic on 2012/09/10

This will just be a relatively quick little follow up on my recent load of “crispy” bronze and copper pieces.

The two draped pieces actually polished up nicely. Somehow that even helped with the clunky sound they were making, that had made me even more dubious about their quality. The more-irregular one, of course, is still riddled with cracks and tiny holes: it will just look prettier in my “do as I say, not as I do” box of “teaching moments.” But none of the polishing added to the disintegration of that piece, nor did it reveal any holes in the rounder one. OK, so far.

I have not yet tried to polish the tulip with a copper flower on a bronze background because I know that one will take a good bit of work. The other two tulips turned out OK, but not as nice as I’d’ve liked. The bronze (flower) on the one to the left had actually bubbled a tiny bit and, although that did look OK after some grinding, sanding, and polishing, once I exposed it to the patina solution, small spots appeared where the edge of the blisters had been. I’m thinking that the tin in the bronze must have somehow “disappeared” at those points, leaving more copper to react with the patina chemicals. And, despite a lot of grinding on the other one, I did not seem to have eliminated all signs of the earlier cracking.

I have enough else to do right now anyway, I may just put those into the “seconds” bin that’s always seemed popular among my teenage visitors. Less than ideal, but perhaps not a total loss.

Posted in General Techniques, Technical Details | Tagged: , , , , , , , , , | Leave a Comment »

Well, gosh, was that ever exciting…!

Posted by C Scheftic on 2012/09/09

For a number of reasons not worth going into here, I’ve been a bit distracted lately. No crises, just too many things that need my attention all at once. (Yes, like most 21st Century American women, there are always a lot of demands on my time. But sometimes the number just sneaks up over the top of what is manageable.) And then, there are the days when you think you really are accomplishing something, at last, only to find out that was not the case. This post is a tale of both of those at once.

But, since this is a metal clay blog, let me begin by reviewing the process for firing items made from Hadar’s clay powders. The first photo with this post shows three pieces that had been fired earlier, had cracked a bit in that process, were then patched, and had just been refired in the session to be discussed here. That kind of cracking happens sometimes when mixing copper and bronze, as in these pieces, and the patching and refiring—often multiple times—is just part of the game if you want those mixed-metal (sometimes referred to as “married metal”) looks. (I’ll talk more about that more some other time….)

For full details on the firing process, of course, you should always check Hadar’s blog itself. But, in general, there’s a multi part process:

0. You mix the clay, form the piece, let it dry, and then…
1. You burn off the binder, taking as long as you need according to the size of the piece(s) as well as the method you are using (for jewelry-size pieces, this can often range from a quick 1/4 hour to 2 full hours; larger pieces can take even longer) and, finally
2. You “sinter” the remaining powdered metal into a more solid form during a two-hour firing process.

This discussion addresses only steps 1 and 2. (I started counting at 0 because the final two steps are often referred to as Phase 1 and Phase 2 firings.)

When Hadar first introduced her clays, the basic process went like this:

A1. Fire the pieces buried in carbon, uncovered, in the kiln. Let everything cool back to room temperature.
A2. Top up the carbon, if needed, and refire the still-buried pieces, uncovered, in the kiln.

Later, although she says that the above process still works, Hadar introduced this alternative approach:

B1. Fire the pieces on top of a layer of carbon, covered, on a gas stove-top.
B2. Immediately and carefully cover the pieces with carbon, then fire them (cooled or not, either way is OK), uncovered, in the kiln.

(There is more to all of it, but we can ignore that for now….) In each case, between step 1 and 2, the pieces are fragile: you have the formed-shape, but it’s then composed entirely of metal powder with no binder holding it together any more. It’s very fragile. I have been under the impression that a few of the main differences between the A and B approaches where that:

– The full B-process takes much less time and consumes less energy than A, but…
– Pieces in the B-method are at a very slightly higher risk of being cracked as you move and bury them.

I’ve been using both, off and on / back and forth, depending on whether I had time to actually watch Phase 1 (B) or didn’t want to watch but could wait longer (A). All the pieces photographed for this post were fired, in a single batch, using the B-process. Two of the three oval pieces (above) were polished up a bit after being fired in the same batch; the third one (left-most) and both of the two round pendants are shown just as they came from the kiln. The thing you can’t really tell from a photo of the two “draped” ones is that they feel, oh how to say this, sort of “crisp”!?

Yes, and the point of this whole post is to admit that I’m the one who crisped them up!

As I said at the start, I had a lot of things on my mind as well as a few people doing things in my studio as I began firing these. I was carefully watching the Phase 1 firing on top of a propane camp-stove on a rolling cart. Some unexpected visitors arrived, adding to the activity in the room. While enjoying the company, all I really wanted was to finish this firing, finish answering questions, go home, and have a nice dinner. I was trying to keep everyone moving along, introducing and talking and answering questions and what-not. When Phase 1 finished, I had to figure out where to put the hot lid safely out of range of the curious visitors, as I rolled carts around and proceeded to the two-hour Phase 2 in a kiln. I got everything situated, got the kiln going, spent the next hour getting questions answered and projects finished, got everyone out of the room, and was walking back to my little “office” area to finish up some paperwork when I looked at the table next to the kiln and thought, “Why is that cup-full of carbon just sitting there?”

OH, NO! I had forgotten to pour it over the pieces after Phase 1. They were in the kiln un-buried in carbon! The whole thing with these clays is they need to be fired in a “reduction atmosphere,” that is, with the carbon reacting with the oxygen in the air inside the firing chamber and thus reducing how much of that oxygen is available to react with the copper at kiln-temperatures. How much? Well, that’s not as clear. But that’s the basic principle, the way to avoid damaging the structure of the metal….

No, NO, NOOOO! If it had just been a few minutes, well, maybe. But we were an hour into a two-hour firing. Were they all ruined? Was there anything I could do?!!

I quickly increased the amount of heat-resistant material I had in front of the kiln, put on my high-heat gloves and IR-safety glasses, grabbed a few tools, took a deep breath, and opened the kiln. One obvious concern: what might the “thermal shock” do to the pieces or even to the kiln itself?!! I whipped the bowl out, set it down, closed the door as quickly as I could. Everything was glowing! In another context, it might have been considered a lovely color, but not here. I gently poured the cup of carbon over the pieces, took another deep breath, re-opened the kiln, replaced the bowl, closed it all back up, took off the safely gear, sat down, and started shaking. What had I just done? Would it work? Should I have just given up on that load? What about the kiln?

And the phone rang. I answered it. A long-time friend, someone I talk with only occasionally, was on the line (er, with cell phone, perhaps I should say in the air?). It had been no more than a minute since I’d closed the kiln back up. (As I reached over to answer the call I was, in fact, thinking how glad I was that the phone had not rung while I was in the midst of that attempted “recovery” process! Even if I had not stopped to answer it, that would have been another distraction at a crucial moment: whew!) My caller asked how I was. I was still shaking a bit, and surprised by the call. I said, “I don’t know. I may or may not have just ruined a whole bowl-full of jewelry pieces.” He’s a sweetheart, someone who has been all “You go, girl!” about my journey down this jewelry-making path, and he launched right into some nice little comments about how “things” sometimes happen and I shouldn’t beat myself up or question my abilities, I was good at this and he knew I knew it, …. When he finally paused for a moment I said, “Thanks. I love your support here. But what really has me worried is that, between the time I spent making pieces, firing some of them once, patching them, making a few new ones, firing those …. if I’ve lost them all, then I may just have lost hours that I simply do not have to spare right now. And it’ll be almost an hour before I know how much time I have just wasted by letting myself be distracted.” Luckily, there was nothing more in danger right at that moment, so we quickly moved on to chat about other things for a while. I didn’t get the paperwork done but doubt I could have concentrated on that anyway. I did get to catch up a bit with someone who’s known me since my teens, and we talked for longer than I’d’ve given myself if I’d still been focused on … paperwork.

So, what’s the outcome?

There was one small crack in the kiln-wall beforehand, and it’s now a bit bigger. Not a serious problem, I think, just one burst of extra-quick aging. I’ll simply continue to keep my eyes on that, and hope there’s nothing more.

The three mixed-metal tulip-ovals had been previously sintered (and were just in that load having some cracks patched) all look like they survived. The patches sank down too much, which may or may not have happened anyway. I can try to polish out the cracks, or else patch the patches and refire them. They don’t seem to exhibit much in the way of the various copper-oxides that we’re trying to avoid via the carbon firings. At this point, though they may not end up being quite as strong as I’d like, I still think they may be OK.

The other two all-bronze draped pendants, well, as I said, they are crisp. The slightly-bigger, slightly-more-irregular one is criss-crossed with cracks and holes. Yes, not just cracks (which I would not have expected from in this single-metal piece) but also little holes that you can actually see light through (which I’ve never seen before, and which are too small to really see in the photo, even if you click to see a larger version). I figure that piece can go into one of my “teaching moment” displays. The other one, well, it doesn’t have all the same cracks and holes, but there’s something odd about it. Maybe it’s just the way the edges curled up, and I’ll get used to it over time, but it sounds a bit crisp too. I may hold onto it, but it’s not one I’d wear because I don’t want to “advertise” a piece I’m unsure about. I may give it to one good friend who I’m pretty sure will be OK with my saying, “I can’t sell this because I’m not sure it will hold up. But if you want it, you can have it on one condition: if/when it breaks or does something odd, give it back to me so I can what happened. I’ll replace it with something else.”

And, finally, there’s that thing about time, and being overloaded just now: which clearly means it’s time to end this post, get some other things done and write about those later on, once I’ve managed to catch my breath again. Oh, and I’m sorry this is so long. It takes me longer to write shorter pieces—to do the editing needed to end up with a shorter piece—and I’m still feeling waaaay behind. So I hope you’re OK with this rambling version of the tale….

Posted in General Techniques, Technical Details | Tagged: , , , , , , , | 2 Comments »

Posted by C Scheftic on 2012/02/14


Happy
Valentine’s
Day!

Posted in Misc. Musings | Tagged: , , , , , | Leave a Comment »

That sure was fun….

Posted by C Scheftic on 2012/02/08

Off and on for several weeks now, I’ve been battling a sinus-plus infection. I vaguely recall calling Trish (the owner of Zelda’s Bead Kit Company) a few days before one of my recent workshops, right before a doctor’s appointment, sort of hoping to learn that it was looking under-enrolled and I could use that as excuse to just cancel it and sleep another day. And the night before the class, after I’d been on antibiotics for a few days (resulting in a portion of the head-malady improving but digestive tract upset), though I knew I’d learned I really should go out and lead it, I thought I must have been sick enough to hallucinate a conversation that I was thinking had gone something like this:

“Do I have enough folks signed up for Saturday.”

“Yes, I’m sure you do. A good crowd. Let me check the book. Oh, yes, very good: Let me count. 1, 2, 3, breath, pause, breath, breath, 9. You have nine this time! Isn’t that wonderful!”

“Sure, but, um, Trish, with all the stuff I haul over there, my max is typically six. Aside from the question of where I’m going to find enough extra tools for that many, I cannot even imagine where you think everyone will sit.”

“Don’t worry. With that many enthusiastic people, we’ll clear out the whole front room for you.”

“OK. Thanks. Gotta go now. See you then.”

[Aside: Even during the Instructors’ Trunk Show before Christmas, she didn’t fully clear out the front room! Where might all that stuff go? I still was not imagining how this might work.]

I had a bit of leftover PVC pipe that I could cut up to get a few more rollers. For classes, I make up card sets that people can use as thickness guides: I actually glue together stacks of 2, 3, 4, 5, and 6 cards, with the “top” card showing the number in the stack (which makes it really easy to check what you’ve got … and I can keep an eye on things from across the table)! I didn’t have enough extra cards on hand to make more. For this project, however, I figured I could just limit folks to 5-card and 3-card rolls. Then we could split the sets and, for a few of the more-experienced folks in the group, I’d give them the 1, 2 and 4-card pieces to use (since 4+1=5 and 2+1=3).

For all the other tools, we’d just have to share…. I don’t normally stockpile a lot of extra silver clay, but I did have enough clay for nine because I’d gone ahead and made sure I had what should have been enough for my next two sessions.

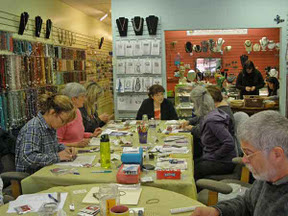
Well, I arrived early to find that Trish had fully cleared out the front room. (And made a crock-pot full of wonderful soup too. Talk about customer service!) There really were two whole tables for folks to sit at. She disappeared in back for a few minutes and re-appeared from I-know-not-where with four extra chairs. Added to the seven she normally has around the one big table, that came to eleven. Oh, yes, Trish wanted to sit in on this one too, so there’d really be ten people (plus me)! Oh, and I backed myself up against the front wall to get the photo I’m using here, so I’m missing more than half of the front table.

I know I was not at my best that day, but I think I held things together pretty well. And, since a number of participants signed up right away for my next workshop, I’m guessing that wasn’t a fevered delusion. So this is really just a note to say a slightly belated “Thank you!” to Ellie, Sally, Valli, Marie, Glenda, Jan, Ruth, Ronna, Bill, and Trish for helping me have such a good day!

Posted in Teaching Metal Clay | Tagged: , , , , | 2 Comments »

What I did last week (part 3…)

Posted by C Scheftic on 2012/02/01

Well, by the time I’ve managed to get around to posting this, I’m really talking about the week before last, but I figured I’d keep the same basic post-title I’d started this series with, and just keep going.

After writing last week about making some textured domed disks, so that I could use them in a bracelet inspired by Maria Richmond, now I’ll talk about how I’d imagined completing the project with an idea inspired by a post by Hadar Jacobson about making magnetic clasps from steel metal clay.

I thought I’d do pretty much just what Hadar suggested. The only difference was that I used a textured layer of her rose bronze clay, rather than the smoother layers of yellow bronze and copper she showed in her instructions. I draped that over a dried layer of her pearl gray steel. After letting it all dry, inserting a bronze wire bail, and “refining” everything, I fired it as recommended.

The rose bronze cracked. The steel under-side (not shown) seems fine.

I tried again, this time using textured copper draped over pearl gray steel.

Again, the steel under-side (not shown) came out fine but, also again, the copper over the top cracked.

I patched and otherwise repaired all three pieces, and refired them.

You can see that much of the wonderful kiln-induced coloring disappeared. (Compare that photo to the first two above; the colors were also mentioned in part 1….) No crisis there. One copper piece (top, above) shows only a tiny bit of cracking, at its edge. That’s not ideal but, at this point, I’m likely to leave that alone because, sigh, the other two came out worse than before! What happened? My guess (and this is only a guess), is that the steel (which sure had seemed to be sintered) had sintered some more (that is, it became denser and thus shrank some more) and the movement associated with that further shrinkage in the steel is what led to the additional cracking in the copper or bronze layer.

If I’d known that was coming, I could have measured everything much more carefully at each step along the way, and used that as a way to test my hypothesis (i.e., the guess, above). But I didn’t know; I just didn’t think to stop and take the time to measure….

Since I’d been stuck with refiring anyway, I tried a couple more. Shown, below, are the initial results from again using rose bronze and copper, respectively, but this time draped over clay made from Hadar’s newer Pearl Gray Steel XT powder. (They differ in size because I made my original textured dome elements in two different sizes as well; I point that out simply so you won’t think any difference you see could be due to variations in shrinkage. That was just my own doing….)

OK, much better! Much less cracking with that mix! Again, sanding the steel on the other side shows that it appears to be sintered. I’m not about to test that by refiring either of these. I’ll just live with a few hairline-crack issues on these pieces; all that means is that I’ll have to think especially carefully about how I use them.

Sometimes, even when I don’t think to do pre- and post-fire measurements, I do still come up with “Plan B” ideas. So, while I was at it, I made a couple toggle clasps using Hadar’s regular (i.e., yellow) bronze powder, to put in the box when I was (re-)firing the other clasp elements. Again, they were made in two different sizes. Their textures, curvature, and size match the domes I made to use with the coils; I added a heavy-gauge bronze wire loop to the toggle bars. In this photo (and the last one above), I show them after firing and after I’d brushed them just enough to confirm that they’ve sintered. I’ll shine them up a bit more before I go to use them in a piece.

Though none of the pieces from my last firing show the lovely kiln-coloring I got with the earlier batches, I do believe that there will be enough acceptable elements in all this that I can finish off my first round of bracelets with a few components left over. Earrings, perhaps? Or the start of a necklace?

[Update: I just added the “oops” tag I’d oops-ily omitted from the original post.]

Posted in General Techniques | Tagged: , , , , , , , | Leave a Comment »

What I did last week (part 2…)

Posted by C Scheftic on 2012/01/23

OK, so why did I go off making those domed disks described in my last post? Well, I started them as soon as I received this photo in the mail:

That’s not a piece of mine. It was made by the very talented Maria Richmond, and it was included in an email from the delightful Zelda’s Bead Kit Company, to illustrate a workshop that Maria was to teach there last week.

I’ve wanted to take one of Maria’s workshops for quite some time now; but never managed to have both time and money available to coincide with the projects of hers that interested me the most. But when I saw this one, I contacted her right away, to ask about the size of the disks, and learned that they were some “antique enameling disks” that Maria had bought online to include in the materials-kits for the sessoin. Yes, they are very nice disks, and it’s great that they are now going to good use. But I saw that bracelet and immediately pictured making it with hand-made, textured domed disks, designed and developed using metal clay techniques!

Thus the little collection I made last week: two different metals (copper and rose bronze, from Hadar’s metal clay powders), some of each in two different sizes, all with a deep “rose” pattern on their convex (domed) side, and with either a much finer “rose” pattern or a shallow “fern” or “swirl” on the other (inner, bowl) side (varying in such a way that I could easily tell which was made from which metal). I made those to take to Maria’s class, about twice as many as I thought I’d need, plus a few smaller ones in case I needed some minor adjustments in length.

Now, my larger pieces are slightly bigger than Maria’s disks, and my smaller ones were not quite as big as hers. It looked like five of my bigger ones would come out to just a smidge under six of hers, which seemed like a size I could wear. So I just used those, rather than try to tweak the length any further by varying the size of the pieces.

Following Maria’s instructions in all other regards, the photos to the left and right here show how my bracelet came out. I was delighted.

Maria’s sample, and all of those made in the workshop except for mine, were made entirely of copper elements (not just the disks, but also the coils, links, jump rings, and clasp pieces) and, as a last step, darkened with Liver of Sulphur (“LOS”). I chose, however, not to use LOS on mine. I figured that would overpower the kiln-colors that I liked; the metals will darken soon enough on their own with age.

Then, a few minutes after I finished mine, as I looked at it on my arm, trying to decide which side should face out, I had a real “Aha!” moment. I took it completely apart and, when I reassembled it, I alternated both metals (rose bronze – copper – rose bronze – copper – rose bronze) and the orientation of each piece (rose up, coils up, rose up, coils up, rose up). I then bent the wire-wrap connectors a bit to encourage everything to lie in a particular orientation.

But, even if it rolls up and down my arm, this way I am more likely to have some elements land wire-coil up, and others, rose-dome up, thus featuring both Maria’s wire-work idea and my own metal-clay approach, respectively. (We’ve already discussed the possibility of jointly offering something along this line as a two-part class later in the year.)

And, yep, it’s a two-sided bracelet. Somehow, I just can’t help but make fully reversible pieces. Stay tuned: I’m hoping to find time to finish up yet another variation or two on this in the next week or so.

Posted in General Techniques | Tagged: , , , , , , | Leave a Comment »

What I did last week (part 1…)

Posted by C Scheftic on 2012/01/22

The simple answer to, “What did you do last week?” would be, “I made up a handful of textured, domed disks to play with.”

In the rest of this post, I’ll discuss (with illustrations) just what I did. In my next post, I’ll explain why I did that. I hope to add another post, eventually, where I’ll review a few little tweaks I just happened to add to the plan…

I didn’t think to stop and take photos of the earlier stages in the construction of these pieces. Mostly, it was just the usual routine for working with metal clay. I began by mixing up small batches of several of Hadar’s metal clay powders that I wanted to use. The clay was then rolled out, textured (in general, on both sides), cut, shaped, dried, drilled, and in just a few cases, further “refined” (e.g., a few pieces had their edges sanded down just enough so the final result would be even and smooth) before going into the firing pans.

At this point, I started taking photos. (I have found myself tending to take a quick snapshot of each shelf or pan as it goes into the kiln. That way, if anything seems odd afterwards, I’ll have a record of what was where. Though, my usual load involves one-of-a-kind work; with so many similar pieces in this load, that isn’t going to tell me very much, is it? Oh, well.)

This photo shows the thirteen pieces I made. Ten are basic domes. The other three (to be discussed later) are the ones with little wire loops attached to them. (Click on photo to enlarge it, if necessary, to really see any such details….)

The pan to the left contains pieces made mostly using quick-fire copper clay; to the right, mostly using rose bronze metal clay. (One or two of each also contain some pearl gray steel, but those are the ones I’m going to hold off discussing for a while yet.)

The next photo shows two of the copper domes, just as they came out of the kiln. Note the lovely color on the one to the right (convex side up). That was a surprise! (And it’s what prompted me to start my tale here, with the disks themselves, rather than just with how I used them.) I am not used to seeing much color variation on fired copper, at least not seeing it as vividly as I often see with the bronzes. My fired copper usually just looks dark, like the one on the left. Several (though not all) of the copper pieces showed delightful color this time. And the brightest colors all appeared on the convex sides, the side that I had placed face-down during the firing.

This next photo shows two other copper pieces, less colorful from the kiln, and therefore all polished up to a reasonably bright shine:

Here are four rose bronze domes, straight from the kiln. Again, these all show the side I’d fired face-down. In the past, when the bronze pieces came out with colors, it has seemed that the nicest ones seem to appear on the side positioned that way. (Though you can’t count on seeing that at all: you just have to be thankful when you do!)

Then again, this time I noticed some pretty interesting colors on the sides that were face-up as well! The pieces shown in this next photo are just the same four, from above, turned over.

A side note: All thirteen pieces had the same “rose” texture on their convex side. The other side, however, got a slightly different treatment, depending on which metal I was using. I wasn’t sure how much I might care to know which was which as I was later working with them, but that seemed a simple yet unobtrusive way to distinguish the different metals if I wanted to quickly tell them apart.

Here are a couple more rose bronze disks. On the piece to the left, note the little red dot just to the left of the hole at the bottom.

Now, I admit, I didn’t note anything particularly memorable about that dot, itself, until I turned the piece over. Hmmmm. I wonder what tiny bit of something got into my carbon, to create the little, tan “washer” image on this side? You should be able to see it clearly at the bottom of the piece here on the left, just to the right of the hole. Its center matches the position of the red dot.

Well, I’ll never know the answer to the question of what caused that. But, here, you can see all ten disks after I finished polishing them up by varying amounts:

Knowing that the kiln-induced patina-colors are rather ephemeral, that they’ll wear off the high points, at least, as the piece is touched, worn, jostled in a jewelry box, etc., I decided to polish that off all the high points on the convex sides, while still leaving some down in the hollows. (I did give a full polish to a few select pieces that did not show much range in color.) Then I fully polished the concave sides—for several reasons, the decision to go for a full shine there was somewhat beyond my control. Partly, it had to do with how I intend to use these (see my next post). Also, it was due to the polishing tools I have that made it easy for me to limit what I’d polish on the “outside” to just the high points, but that meant I pretty much had to do a full-scale polish down in the “inside” anyway (or else, spend a lot more time on these than I thought they warranted). That was fine. I am happy with the results so far.

Please stay tuned to see what I’ve begun doing with these….

Posted in General Techniques | Tagged: , , , , , , | Leave a Comment »

Snowy White versus Shiny Silver

Posted by C Scheftic on 2011/11/28

As I was polishing up a few pieces recently, I decided to take a “comparative” photograph that I could save and use when discussing a certain point in some of my workshops. (In my studio, I often have a few examples available, but sometimes I don’t think to pack them up when I teach at other sites…) And, while I was at it, post about it here too, for anyone curious about the topic.

Q: What topic? A: When you work with fine silver metal clay, and fire it (either with a torch or in a kiln), what’s the “white stuff” (or, sometimes even, “glittery white stuff”) you see on the piece?

The answer to that question is: it’s the silver! When the clay is fired, and the binder burns away, and the silver atoms move in closer and re-organize themselves, then they tend to form a crystal structure such that they are all lined up and the light reflects off them in all directions, giving a white appearance. Depending on exactly how they line up as they cool, it may be more of a white-white or a glittery-white, but it’s still white. (I’ve no idea if this is technically accurate but, in the mental model I have of this, I think of it as comparable to how snowflakes form. As in how, under different circumstances, it will end up heavy or fluffy, etc.) Metal artists then use one or more of a range of techniques for burnishing the silver, polishing it, forcing the crystal bits to lie down all in the same direction so the light reflecting off them has that normal, shiny, metallic color. (Other metal clays will produce a similar effect in their all-metal end-product. On a number of occasions already, I’ve posted about the range of colors one sometimes gets when firing copper and, especially, various bronzes. It also happens with gold and steel, though I don’t recall ever stopping to capture that in a photo … yet.)

In the shot near the top of this post, the bottom two pieces remain in that “kiln-white” color, while the top two have been polished to more of a silvery-metallic look. More polishing could get them even shinier, but I thought that was enough for those pieces, at least for the time being.

As for the snowy-white ones, they do have to be polished: That finish is not stable. Anything you do to it (from the lightest rubbing to bumping it and so on) will undo-that “white” look. It won’t necessarily make it all shiny, but it will turn that part so it’s more clearly a silver shade. So the safest thing is to just polish it from the start, to whatever extent seems most appropriate (to both your artistic vision and your technical skills; for example, one could polish the high points to a very shiny state, and leave the more-protected valleys with some of the white look).

I’ve just finished adding a patina to one of the polished pieces with some “liver of sulphur,” so I will close for now with a photo of that.

Posted in Teaching Metal Clay | Tagged: , , , , | Leave a Comment »

What constitutes a “fair” price? (part 2 of 3)

Posted by C Scheftic on 2011/10/26

In Part 1 of this series, I raised the issue of how to determine reasonable prices for the pieces I create, prices that appear consistent across various designs and media. This is getting trickier as I have added materials such as bronze, copper, and steel to my repertoire, and thus moved beyond the silver and, occasionally, gold that I started with. In that previous post, I talked about issues such as the time directly involved in various aspects of creation, including that devoted to preparation, firing, and finishing of each piece. In this one, I will address a number of business-side issues: they include some aspects of creation that are perhaps better grouped together under the category known as …

Overhead. Even though the bronze / copper / steel raw material itself costs less than silver, there are many other higher or additional cost involved in working with the non-precious metals. Here are just a few examples from “behind the scenes” with those:

  • Beyond how the firing requirements of these metals impact my time (discussed last time), each piece that size also puts 8 times the wear & tear on my kiln when compared to a similar piece made from fine silver. On top of that, other kiln-related factors like the time and temperature combinations and the oxygen-reduced atmospheres used with these clays will further shorten the expected lifetime of the kiln. While I do still expect the kiln to last for years, I also figure that I need to add a bit more to the price of each base-metal piece so that, when the time comes, I will be able to replace that relatively expensive piece of equipment earlier than might otherwise be expected.
  • Covering the cost of firing boxes and carbon will also add a little bit to each copper, bronze, and/or steel piece too; they are not needed with the precious metals.
  • Each time I use a new kind of box or of carbon, there’s both time and material involved in testing the firing schedule. I should somehow spread that (small but real) cost over a range of subsequent pieces too.
  • I’m still working out which tools to share across the various metals (meaning I have to spend time cleaning them thoroughly each time I switch between the precious and non-precious metals) versus which tools I use often enough that I should just buy another copy of the same one to use with the base metals (and clearly label each so I don’t get them confused, and have to spend time washing anyway). Either way, however, there are small portions of the total cost to be spread across a number of items I’ll make with them.
  • I ended up buying a small refrigerator for my studio too: while there is a nice little bonus in having that to keep some lunch and beverage items cold, I see it as overhead for these pieces because I need to freeze any pre-mixed clay that I don’t use in a single session.
  • For pieces that require extra finishing time, there is also the cost of extra items used for sanding and finishing since they will thus wear out much more quickly. That also adds a little more to the cost of each such item.

That’s not even a complete list of the extra costs, but it’s a good sample of them. Now, none of those involve earth-shattering amounts. But there are other forms of “overhead” to be accounted for with every piece made, regardless of medium, and then every time you add a few cents for this, and then a few more for that because you’re working with base metals, and then you apply the appropriate mark-up factors (e.g., gallery commissions) to the whole thing …. well, the sum-total of such additions simply runs up the final price of any artwork.

(It is probably worth noting that some price formulas treat various overhead costs in entirely different ways. Some approaches do exclude a lot of factors directly, on a theory that goes something like this: If, for example, Ethel’s studio rental is $X / month, while Fred’s studio costs half that and Lucy works out of her home, and they all do comparable work, does that automatically make Ethel’s products twice as valuable as Fred’s, and even Fred’s more valuable than Lucy’s? Instead, all three could charge an appropriate amount for their time, and then pay any rent out of those earnings. If Lucy and Fred are able to work in cheaper spaces than Ethel, then any money left over after paying the rent would result in a “bonus” for finding economical work-space. Even if I go that route, however, I still need to be sure I’m charging enough somehow to cover “overhead” costs out of earnings.)

But that’s enough from me now on overhead for now. Have you encountered any other important factors, ones that I’ve overlooked here, in working with base-metal clays, that you feel drive up their price? Stay tuned, too, because I’ve got one more post dancing around in my brain that addresses a few other issues related to all this. (The big question, as ever, is when I’ll find the time to get those ideas to move from my brain down to my fingers and onto a blog post! It’s likely to be at least a week, maybe more….)

[Update: Yes, well, that “maybe more” was right. I got sidetracked into a variety of other projects in a number of other areas. And, with metal clay, I’ve been trying to work out a number of new ideas. I’ll be discussing a few of those next. I do still plan to return to this topic but, when I didn’t finish it up in October, I’m thinking I may now just put it on hold until after the holiday season. More shortly….]

Posted in Misc. Musings | Tagged: , , , , , | 1 Comment »

What constitutes a “fair” price? (part 1 of 3)

Posted by C Scheftic on 2011/10/21

I sure like working with many of the “base metal” clays (various versions of copper, bronze, and steel). I like the results I can achieve. But I also struggle with how to price these: How do I find that balance point where customers think my prices are fair while I feel adequately compensated?

Now, I do understand the various “formulas” that makers might use to calculate the price for their work. I’m fine with numbers, whether straight from such a formula or even after “tweaking” them a bit. I can figure the cost of the materials, a price for my time and/or an amount for general overhead (rent, insurance, equipment, consumables, etc.), plus a factor for the retail side (to cover commission to a gallery, entry costs for shows, etc.). I will price a number of pieces, sort them by price, compare that to recent history of items that have sold or remain unsold, and look to see if anything seems out of line. I may adjust individual items up or down a small amount: I’ll then bring in a bit more or less on some individual pieces but, overall, I want prices to look both consistent and reasonable.

I have been getting some very positive responses to the look of pieces I’ve made this year in copper, yellow- and rose-bronze, and steel. But a few people have indicated that they would expect those to be very inexpensive, because of the material. I try to explain that the price includes factors for both material and time, and that the time for design and basic construction does not go down for a unique “art jewelry” piece just because the metal itself costs less. At that point, I’ll try to steer the discussion away from price and more into the artistry involved in various pieces.

But, really, there’s more to it even than that, things I don’t tend to go into with a typical customer. (I may cheerfully offer something like, “You’d be welcome to take one of my workshops, and learn what all is involved! This material is relatively easy to work with, and fun, and you’ll see how making a piece can take a number of hours. Give it a try!” If that gets a positive response, then I may add a few more details: “a minute or so of free lesson right now!” Though I aim to keep that light and non-technical, I may point out something like the extra steps it takes to combine several metals in a single piece.) Still, I find myself wanting to think through a bit of what else is involved, to get a better grasp on it myself. I figure I can share some of those details here … and welcome your comments!

Once I’ve figured out what seem to be the most important factors, I can try to figure out how to distill those down for a short response to a potential buyer. In this post, I plan to address prep time, firing time, and finishing time. In a day or two or three, I’ll add a second post looking at overhead costs; and finally (it may take me a bit longer to get to that one) I hope to post about some other factors, like learning curves, brand variations and, perhaps, a few other issues.

Preparation Time. I really like working with Hadar’s delightful clays. Each of those comes as a powder that must be mixed with water before you can use it. This is not difficult, but it takes some time. How much to mix? If you don’t mix enough for a particular session, then you have to take the time to stop and mix up more. So it seems better to mix up a bit more than you think you will need (although you then have to find a way to store the excess, which I’ll address in my next post, on overhead costs). That mixing-time adds to what you have to include in the time it took to make each individual piece: it doesn’t take a lot of extra time, but there is enough to count.

Firing Time. This is probably the biggest issue. Together, those four rose bronze pieces I posted about last week “filled” the firing box in my kiln. Because I need not worry about creating an oxygen-reduced atmosphere when I fire precious metals, had I made silver pieces the same size I could have fit at least four times as many into a single firing. (I could have fit at least twice as many on a kiln shelf (probably more!), and I certainly could have fired two shelves at a time.) And, since these clays must be fired twice, that means I could have fired thirty or more silver pieces in the time it took me to fire those four bronze ones!

(And, this particular issue gets magnified even more when you consider the “overhead” issues involved in all the extra firing. I’ll discuss that further in part 2.)

Finishing Time. Some designs (e.g., inlays and mokume gane effect) are very interesting to see and lots of fun to make, but do require that a lot of time and effort be expended on post-fire polishing to come out looking really great. Other styles (e.g., basic textures) are more comparable in the time they take to finish across all the different products (precious and non-precious metals alike). Still others, however, seem to come out somewhere in between (e.g., various “draped” pieces), and I’m still exploring how best to approach building those so that they are appealing to look at yet not way out on the difficult end of the scale to finish.

Those three aspects are probably the easiest to address, in very simple terms, concerning “hidden factors” in the price of a product. In subsequent posts, I’ll outline a few others. As ever, I welcome comments from fellow artists, students, customers, and other readers of this blog….

Posted in Misc. Musings | Tagged: , , , , , , | 1 Comment »

Trying Rose Bronze (Part 4 of 4 … for now, at least)

Posted by C Scheftic on 2011/10/15

Before I end this series of posts about rose bronze, I’ll note the one major lesson learned (or, more accurately, re-learned) while working with that form of metal clay for the very first time:

Precious Metal Clays (silver, gold) and Non-precious ones (bronze, copper, steel) differ in how they dry! I can’t quantify the difference, but it’s there, mixed in with a number of related factors. With silver, for example, I will often just let pieces air-dry. I will have several pieces under construction at once so, while one is drying, I’ll work on others. If I want to finish a particular piece more quickly, I’ll put it in dehydrator. (I have a very old Excalibur that I use in my studio. For workshops elsewhere, I cart around a hairdryer and a cardboard box with a hole for the dryer nozzle.) I have several mug warmers, but rarely use them.

With non-precious metals, “the word” is that they may not sinter as well if they’ve been air-dried: It’s best to dry them as quickly as possible. When Hadar was here last March, we did use mug warmers in that workshop. I’ve done that with other pieces made since then too: not a deliberate choice, but more because I was rearranging furniture in my studio and didn’t have a good place for the dehydrator during the stretch when I made a lot of other bronze and copper pieces. With these, however, I just stuck them into the dehydrator, like I do with silver I want to dry quickly. Wrong!!! ‘Tis best to keep this stuff right in front of you, on a mug warmer, so you can flip them over frequently to avoid warping. (Silver may warp too, but there’s a difference: either it takes a bit longer to happen, such that it’s easier for me to catch before it gets really bad, or else I somehow work more quickly with the product, such that I’m setting a new piece off to dry and thus checking on previous ones more quickly. I am tempted to believe it’s the former but, since before this I never thought to time it all, I can’t rule out the latter.)

I had to apply some serious repair techniques to several of these, to restore flat surfaces that had warped so much that elements I’d planned to pair up and attach together no longer fit snugly against each other. It wasn’t that difficult to do, but having to re-moisten the warped surfaces and press them between two flat surfaces did take up both time and workspace area that could have been used more productively.

Hadar does say that flat pieces are the most likely to warp while drying but, in this case, even the simple domed piece (lower left) warped slightly out of round. I did not try to repair that. I decided that, by sheer luck, that piece looked fine even if it is slightly oval. But I’ll have to pay more attention to domed pieces in the future too, because there are times when that will matter.

Still, I think the all turned out fine in the end and I had lots of fun making these pieces. Plus, working on them helped to generate some other ideas I want to try out with these clays too. As ever, the question remains: how to find the time to make them! Please stay tuned for reports on that….

Posted in General Techniques, Learning Metal Clay | Tagged: , , | Leave a Comment »

Trying Rose Bronze (Part 3 of 4)

Posted by C Scheftic on 2011/10/14

So far, I’ve polished five of the eight sides, plus just the edge of a sixth. I may or may not polish the remaining three.

The thing about polishing is that it removes all the really vivid coloring that often comes out during the firing. And, although you can still see a bit of contrast between the yellow- and rose-bronze colors, even that is no longer anything like the difference that was there before the pieces were fired. But polishing does give that more-expected “metal” look to the pieces. I like the result of polishing, but I also like the look from not polishing absolutely everything. What about you?

The one thing that is tempting me to polish at least part of the double-drape piece in the upper right position is to check its color. (Or, I could just wait and check this with some other pieces later on.) Because it seems that the “rose” of the domed circle (lower left), as shown on its one fully-polished side, is darker than the “rose” of the two that have some yellow bronze elements in addition to ones in rose bronze (upper left and lower right). Did the addition of the yellow bronze lead to that? Or is it, at this point, just a spurious correlation from insufficient data?

Time will tell, I guess: How might the color of these pieces change over time? Will I see the same effect in future pieces of pure rose bronze, of rose with yellow bronze, of rose bronze with copper, etc.? What if I made several more “pairs” of pieces, with half having different “color” elements attached as I’ve done here, and the other half with elements attached (perhaps riveted?) together after firing? Hmmm, thinking about how to test that has prompted a few new designs entirely in my mind.

That’ll take me a while to get to. In the meantime, I’ll finish this series shortly, with one more post where I’ll share some notes to myself about what I want to remember from the making of these pieces.

Posted in General Techniques, Learning Metal Clay | Tagged: , , | Leave a Comment »

Trying Rose Bronze (Part 2 of 4)

Posted by C Scheftic on 2011/10/13

Returning to the same four pieces I introduced in my last post, the photos here show what they looked like straight from the kiln. All the colors, from the vivid yellow and rose ones to the charred black, are simply what the kiln chose to give me.

Perhaps I should add that the “charred” black is just a “color” — the texture of the metal itself held up just fine.

Notice that, at this point, only the flat side of the square one (lower right in the second photo) really seems to show that I used two different colors of bronze.

The other thing I notice is that the “convex” sides are, in general, darker than the “other” sides. When placed in the firing box, I just happened to position them so all the convex sides faced up (i.e., like the first photo in each pair that I’m using with the posts in this series). At this point, I suspect that positioning, not doming, is the cause of that darkening, but it’s something I’ll try to remember to keep checking in the future.

After taking those photos, it was time to go do some post-fire polishing. I’ll show the results from that shortly….

Posted in General Techniques, Learning Metal Clay | Tagged: , , | 2 Comments »

Trying Rose Bronze (Part 1 of 4)

Posted by C Scheftic on 2011/10/10

As I’d mentioned a couple of posts ago, I finally got around to seeing what it’s like to work with some of Hadar Jacobson’s Rose Bronze metal clay. Shown with this post are the first four pieces I tried.

Let me begin with this question: what is rose bronze? To answer that, it helps to know what bronze is, in general: an alloy of copper and tin. If you put in “enough” tin, the result moves from the reddish “copper” color to more of a yellow or brown that we typically think of as the “bronze” color (as well as giving it the strength and other characteristics of bronze). If you use less tin, and thus more copper, the final product retains more of that coppery-color while still acting much like bronze in general. (Similarly, rose gold is an alloy that contains both gold and copper, such that it there is enough copper to give it that rosy-coppery color.)

So the questions that I had about this product were:
(a) How would it work, in general (would it act much like regular bronze)?
(b) How would it work in combination with other metal clays (starting with the standard yellow bronze, for now, but eventually I’ll check others too)?
(c) What would it look like, in comparison with, and contrast to, copper and bronze?

For my first attempts then, until I was sure of how it would work, I didn’t spend very much time either designing or making the pieces. Then again since I had every reason to believe it would work much like cooper and bronze do, my first pieces involved more than the simple “charms” I often use for testing a completely new product. Still, I did not go much beyond the very basic techniques of rolling, texturing, draping, layering, and doming, though I did try a mix of flat and curved shapes.

Of course, this being me … I did make all four of my first “test” pieces reversible! In the first photo, above, you can see that each of them has some curvature to it, with one side that is clearly convex (like the bottom or underside of a bowl). The second photo, to the left, shows the range I first tried on the “other” side of each one: perhaps concave (like the inside of a bowl), or else flat and layered, or even another convex draped shape. I don’t consider the sides shown in the second set to be the “back” of any piece: I just consider those to be the “other” sides, ones which could easily be worn in front.

Note that, while I used mostly the darkish reddish “rose bronze” clay, three of the eight sides also contain one or more elements made from regular “yellow bronze” too. While the difference in color between the two is highly obvious with pieces in the greenware (dried clay) state, I suspected that they’d end up almost similar after being fired. And I was right!

More on that shortly….

Posted in General Techniques, Learning Metal Clay | Tagged: , , | Leave a Comment »

Making My Ring Come Out the Size I Wanted.

Posted by C Scheftic on 2011/09/16

Given how many pieces of various sorts I have made out of the different metal clays over the years, relatively speaking I have not made many rings. What’s the difference? I do make rings for myself; I will teach others how to make them; I may give the occasional one as a gift; but, at this point at least, I rarely make rings to sell.

Sizing is an issue for any ring-maker. Since metal clays shrink as they sinter into a more-solid metal form, however, size is a detail that really matters when making rings. (This is one reason why I would never use a mix of clays for a basic band ring. If I can’t be sure of the shrinkage, I may have to spend more time post-fire in resizing it. Using “fresh” clay is a simple way to reduce the chance of that! That’s also why I held off posting this item until I could write the two entries that preceded it this month….)

When I do make rings, I often start by making a flat piece that will become my ring’s band, firing that, then shaping, sizing, and adjusting the resulting piece of metal as needed, all before adding the top and re-firing. While that method does require two firings, there are several very simple ways to test and adjust the ring band before proceeding. The already-fired band won’t shrink any more, so I can be pretty sure what size the ring will come out to be before I start on its decorative top.

The recent class I took at the Valley Art Center with Gordon Uyehara, however, used a different technique. We formed the clay around a ring mandrel, let that dry, then added the top, and fired everything at once. It’s a hold-your-breath situation waiting for the rings to come out of the kiln, to see what size you end up with. Yes, there are methods for adjusting size, if necessary, to make rings larger (relatively easy with a simple band) or smaller (can be trickier, depending on the ring, and does require yet another firing, whether in kiln or via soldering). Personally, I find it more thrilling to have the ring go into the kiln and come back out the right size in the first place, but I was happy to venture down the other route for that one day.

Also, while I’ve used both PMC and Art Clay for rings with the double-fire method, I’ve only used PMC-brand clays for band-rings made the way we did at that workshop. (Why? Because I’ve only done them that way in workshops, specifically, in ones where the clay was included in the class price.) For Gordon’s Pearl Box Ring class, however, we could bring whatever clay we wanted. Since he works mostly with Art Clay, that’s what I took. If I had questions about working with it on the ring, I could get help from someone with lots of experience using it. Here’s what happened with sizing (sorry, but rings require simple math):


  • My goal was a size 8 ring. Anything from 7.75 to 8.25 would be OK. A little smaller would be tolerable. But 8.5 would be bigger than I wanted, and I did not want to have to do anything to reduce the size afterwards.

  • Gordon reported that Art Clay says to make a ring 2 sizes larger, to account for shrinkage.

    • Thus I should make it a 10, so it’d shrink to an 8.


  • But, he added, since you’re covering your ring mandrel with a teflon strip or another easy-release surface, you should figure that adds about a half-size. Position it 1.5 sizes beyond your goal.

    • If I made it on the mandrel mark of 9.5 then, with wrap, that would give me the 10 that would shrink to an 8.


  • With rings, I always try to “work-harden” them a bit after they’ve been fired. The “99.9% pure” fine silver of regular metal clay comes out of the kiln annealed (i.e., soft). Fine silver will always be softer than sterling or Argentium silver (and even those are not necessarily the strongest choices for rings). But any form of silver will harden up, at least to some extent, if you “work” it for a while: hit it (gently…) between two hard surfaces (e.g., a between a hammer or mallet and ring mandrel or a steel bench block), to “re-align” the silver crystal structure. But, in my experience, that hitting tends to increase the ring size at least a little. (If a ring comes out to small, that’s one of the easiest ways to size it up as needed!) In the end, I chose to position mine only 1 size larger, and use the work-hardening, along with a little reshaping, to get it back up where I wanted.

    • I built it on the mandrel at 9. I had some moderately heavy teflon wrapped around it so, per Gordon’s logic, I guess that took it up just a tad above 9.5.


  • It came out just a tad above 7.5.


    • Once I finished hardening and reshaping the band, it ended up right at 8, maybe a hair over that. Perfect!


Why did I reshape the band to no longer be the perfect round I had out of the kiln? (The round band is shown in the first photo with this post, above. The slight change should be just visible in the second photo above.) Because I find that round rings with heavy tops tend to topple over on my finger. The thing that really controls the ring size you wear is rarely the space where you’re wearing it! In most cases, it’s the knuckle the ring must pass over to reach that spot. (And the extra size of the knuckle often helps to keep the ring from just falling off the finger.)

With an oval band shape, you can make it a bit smaller than you think you need, turn the ring sideways to put it on, then straighten it back up to wear. Or, with a squarer band, the sides of the band and the sides of your finger are fairly well matched up, so the ring sits in place as intended.

(If I’d made this in my studio, rather than in a class, I’d’ve taken the extra time to add a few embellishments to the top. In the workshop, we didn’t have that much extra time, and I wanted to wear mine home. But, at least, I got the “fronds” to sort of sprout from the space where I set the pearl, so I’m OK with it as it is.)

What’s your favorite “tip” for making metal clay rings, using whatever method you prefer?

Posted in General Techniques, Learning Metal Clay | Tagged: , , , , | Leave a Comment »

Silver Metal Clay “leftovers” — Mixing & Matching

Posted by C Scheftic on 2011/09/12

In my last post, I described some little elements I’ll make at the end of a session when I have only a little bit of clay left over. But there are times (I’m sure you have these too!) when I’ll be at the end of a session and just not have much time left to fiddle with the leftover bits. In that case, if what’s left is just a small amount, I may mix it in with some other opened clay. The important thing is to remember to mark what I’ve done: that is, if I’ve mixed, say, PMC3 with PMC+, or PMC+ with Art Clay Low Fire, then I make a note of that.

Why is the note important? Well, in those examples, it’s because PMC3 and PMC+ have different minimum firing requirements, while PMC+ and Art Clay Low Fire have both that and different shrinkage rates. Each clay has its own specific characteristics but, at one point or another, I think I’ve mixed up leftover bits of just about every possible combination of silver clays!

Yes, there are a few exceptions: Leftover sheet or paper clays don’t mix in well, but they are essentially “dry” elements that I just stash for later use as-is. Art Clay’s Oil Paste is a special formulation with a specific purpose–as a bond between pure metal pieces (not clays)–so it shouldn’t be mixed in with other products. PMC Pro contains copper, and should not be mixed with the fine silver varieties. But I have no qualms about mixing together with abandon the various fine lump clays, regular paste, and unusable dribbles from syringe-clay.

Also, though I try to minimize the amount of sanding that I do on dried clay, there are still times when doing that really is necessary. I save up any “silver dust” as I go and then, at the end of my session, I spritz the whole thing with a little bit of water, knead everything together well (whether it’s just all “dust” or a mix of dust and lump clay), and let it sit to finish rehydrating until the next time I sit down to work. Easy! And economical!

And, yes, I’ve mixed clay-dust of one sort with moist-clay of another. Same thing if I work on a piece, let it dry, decide it has some major issue that I just don’t want to deal with. I do try to mix it back in with some other clay of the same kind but, if I don’t have any of that handy and open when I want to recycle it, I’ll mix it with what I do have. Makes life simpler!

[Aside: I hear about other artists who suddenly go on a binge and “reclaim” huge amounts of dried clay at once. I can’t imagine letting clay just sit around in the quantities I’ve heard reported (many, many ounces). Any clay I have on hand gets used up as quickly as I can find the time to get to it!!!]

The main tricks that I see are:

  • I really want to knead any mix well, to be sure both the silver particles and the binders from the different clays are thoroughly distributed (I find that my experience with making both pie crusts and bread has paid off here);
  • I have to fire according to the “strictest” clay in the mix (though, with fine silver, I usually just fire everything at 1650°F for two hours anyway); and
  • I have to remember the effect of mixing on shrinkage: if the two clays have different shrinkage rates, then the mix will shrink a sort of in-between amount (and, how close to one end or the other of the range between the two will depend on how much of each kind is in the mix).

Because of the last factor, I do take a bit of care with how I use mixed-clays. They are just fine for simple, stand-alone pieces. The round one in the photo shown with this post (which is domed, textured on both sides, with added embellishments on the concave (hidden here) side) could well have been made with a clay mix. For the oval one (which was made from two ovals, each textured on only one side, dried, re-moistened on their plain sides and “squidged” together, then embellished a little bit more), I deliberately chose a “pure” clay, fresh from the pack. I could have used a “mixed” clay for the individual pieces but, in that case I’d want to be sure I had enough so I could use the exact same clay for all the elements. Otherwise, I’d risk having one layer shrink more than the other, thus distorting the shape. With clay straight from the pack, I can be sure I can have enough that’s all the same. An alternative, which I have done but can’t find a photo of just now, is to build a little bit of distortion into your design, and use elements made from clays with different shrinkage to achieve that effect. That’s your choice!

If you are wondering how all this applies to “base metal” clays (such as copper, bronze, steel), for now I’ll just say that there are possibilities but it’s not quite as simple. I’ll probably write about that eventually, but I’ve got a lot of other things higher on my to-do list, so that may not happen for a while…. I my next post, however, I will mention the one and only time I never use a batch of silver mixed-clay, myself, even if I’m sure I have enough to complete the project. (Your choice, of course, may differ.)

Posted in General Techniques | Tagged: , , , | Leave a Comment »

Silver Metal Clay “leftovers” — Components

Posted by C Scheftic on 2011/09/12

The first metal clay I ever heard about was Art Clay Silver (from Aida Chemical Industries) but the first one I ever got my hands on to try was PMC (from Mitsubishi Industries). Over the years, I’ve made pieces from both brands and, in fact, just about every product available in both lines.

There are things I like more and less about each one, though I’m not planning to go into details of the (mostly relatively minor) differences right now. For the moment at least, I will say simply that, when I’m starting a new project, I pick whichever clay seems most appropriate to me at the moment.

But when you work with metal clay, and you’re rolling and trimming, taking a little bit off here and adding some more there, you generally want to have some extra clay on hand. And what is one to do with that when the project at hand is complete?! You can just mist and knead it to be sure it’s still in a workable state, seal it away appropriately, and use it in your next project. But, there are other possibilities to consider! The ones I’ll discuss in this post are useful in many situations, but they are my absolute favorites when I think it may be a while before I will find time to work with my clay again.

If I have just a little bit of that clay left over, often I will take a moment to form what’s left into some little element that I can use in another piece later on (e.g., bail elements, toggle bars, washer- or loop-shapes, some little decoration which could be anything from a few tiny flower petals or a butterfly body to even just a few small balls, etc.). Or I may use it to add a new embellishment to a piece that’s sitting there in the dried (“greenware”) state, waiting for some final element in its design before I consider it complete.

Magic Carpet (striped frame side)Other times I may mix in some glycerin, which prevents it from ever really drying out. That means it will remain flexible in its near-dry “greenware” state, which allows me to weave, twist, and knot it in that state. (Information on how to do this is contained in Hadar Jacobson’s first book, The Handbook of Metal Clay: Textures and Forms. This does seem to work better with PMC+ or PMC3 than any of the others from PMC or from Art Clay.) I’ll then shape it into a long rope or roll it into a little textured sheet—sort of like making my own metal clay “paper” except that mine is now textured! Once the rope or sheet has “dried” I can work with those pieces without smushing their texture or leaving fingerprints everywhere!

Will all of the above approaches, you can see that I let these new elements dry, and then set them aside for later use. I like that approach for several reasons: it is very convenient later on to have this little stash of pieces from which I can just pick one up and use it to complete a piece, and silver metal clay keeps just fine in this “greenware” state (unlike lump clay, which needs to be kept both moist and protected from mold, neither of which are problems with “dry” clay). I do try to keep track of which elements were made from which clay, of course, so that I know what are their firing temperature limitations or shrinkage rates. I’ll talk a bit more about those in my next post.

Posted in General Techniques | Tagged: , , , | Leave a Comment »

How I Spent Last Weekend.

Posted by C Scheftic on 2011/09/04

With a bit of island-themed whimsy, in honor of the workshops led by Gordon Uyehara at the Valley Art Center in Chagrin Falls, OH, last weekend, I open this post with a photo of the “Cosmic Honu” turtle pendant made last Saturday by one of my local guild-friends, Michelle Glaeser (who is also the developer of rose gold clay), checking out the “Pearl Box” ring that I made on the Sunday. As I’d mentioned in my last post, not everyone who went had been able to stay for all the events, but Michelle and I met at my studio for an hour or so a few days later to talk about the different workshops each of us had taken.

There are several ways to approach the making of a ring using metal clay, and this class from Gordon uses the method I practice the least myself. So, why did I take this class? First of all, I wanted to push myself to practice this method. Even though I don’t find it particularly easy, if you look at book and magazine articles plus a range of on-line posts, it appears to be the one most commonly used by metal clay artists. (I don’t know how many are just starting from the same point they first learned and extending that for their project, or if they have tried others and simply prefer this one. It is the first method I learned too, but I later figured out, read about, and otherwise explored others that I find easier (not necessarily quicker, just easier) and have, myself, mostly expanded on those. I guess I’d better think about making, and writing about, some of those this winter….) In the meantime, rather than struggle on my own to master this technique, I figured I’d take it (again) from someone reported to have many happy customers (both product buyers and workshop students), and maybe I’d be able to pick up a few tips I’d missed. Besides, there can actually be two ring-bands in this particular design: one that goes around the finger and another that goes around the decorative top. So, this offered double the practice all in one day!

[Several asides: I wasn’t the only one with questions either. At left, you can see Gordon doing a little demonstration for Carole B from Columbus. It was fun to meet her in person at last! We’d emailed each other for months, first over organizing workshops in separate cities when our three groups brought in Hadar Jacobson, which I wrote about early last April, and then there was more mail setting up this combined effort with Gordon last week.]

The finished samples Gordon brought, one of which was shown in my last post, all had the pearl set into a flat-topped, circular box, with the pearl off from the center of the box but positioned centrally in line along the finger when worn. He also discussed, had unfired versions of, and constructed during demos, some other styles: different box shapes, different top-shapes, various wall heights, with the pearl positioned in different ways (e.g., centered or offset relative to the top or to the textured design). At the right, in a snapshot that shows eight of the sixteen pieces that participants made (one kiln-load), you can get a clue about their choices: I can see oval, oblong, and triangular as well as circular, and having flat, curved, or fully-domed tops.

Those who know my work, especially those who take my classes, know that I love various curved shapes: domes, waves, loops, and more. And that, although I often use some fairly “subtle” textures, I do tend to put textures just about everywhere: fronts and backs (making pieces reversible), inside little openings (whether visible in public or a little secret about the space known only to the wearer), and so on. Also, having gotten some of my design sense through working within the math world as a geometer, I know how to find centers and figure angles and such. So one funny thing about this ring, for me, is that I made it with:

  • a flat top;
  • a simple satin-finish on both the wall-sides and finger-ring;
  • the pearl at some almost-random off-center, not-aligned position; and
  • the whole box deliberately set ever-so-slightly off-center on the band (both left-to-right and front-to-back) because it just seemed while I was assembling it as though it would sit nicely that way (too far off might want to topple, but a tiny bit off just felt better to me).

But another, even-funnier thing is that, without us ever discussing any of this during the session (because we were so busy working away on our own projects), both Alice (another local guild-friend, and my traveling companion for the weekend) and I made almost identical choices all along the way! (And this is not her typical style either, which usually has lots of curls and swirls.) We had brought different textures to use, and hers (left) was one that comes out a tiny bit deeper than mine (right). Other than that, however, I don’t think we could have made more-matching rings if we’d tried! We had a good laugh when we each saw what the other had done….

Posted in Guild, Learning Metal Clay | Tagged: , , , , | Leave a Comment »

Where I Spent Last Weekend.

Posted by C Scheftic on 2011/09/03

Three Metal Clay guild groups–in Pittsburgh / Western Pennsylvania, Cleveland / NorthEast Ohio, and Columbus Ohio–got together (with the help of a small grant from the PMC Guild) to sponsor four days of workshops, held at the Valley Art Center in Chagrin Falls, OH, over the last full weekend in August this year. (Sorry, but I don’t have links for websites of those Ohio groups. If anyone reading this can provide them, I’ll be happy to add the links here! In the meantime, if you’re trying to find either one, you might try checking the guilds listing at Metal Clay Today.)

One of the features involved a series of workshops by Hawaii-based metal clay artist, Gordon K. Uyehara:

  • “Fabulous Bail Link Bracelet” (two days: Thursday and Friday);
  • “Cosmic Honu” (stencilled turtle) pendant (Saturday); and
  • “Pearl Box Ring” (Sunday).

All the photos with this post show Gordon’s delightful pieces, samples for the various workshops. Two bracelets, above. One turtle is with the bracelets, and a second one is visible on Gordon himself during one of his demos in the ring class. (Click to see a larger version of either of those snapshots, which I took.) And, shown further down this post is one of Gordon’s own photos of an example of his ring project. (Beyond those, if you’re not already familiar with his work, do check his website to get a better clue of his style and range. I remain in awe of the work I know goes into making most of his pieces.)

There were a number of other sessions too, for which I have no photos (sigh…). The other major hands-on workshop, led by Ohio-based artist Catherine Davies Paetz, covered making a series of carved, seamless rings (stackable, if you wanted to wear them that way) using PMC Pro. Other scheduled sessions involved topics like design, photography, and flexshaft maintenance. And there was a big pot-luck dinner on Saturday night.
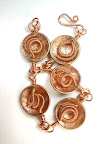
Now, it just so happens that all this got scheduled over days when I had tons of stuff already going on. And, in fact, I wasn’t the only one! So, while a few people stayed for the entire four days, there were lots of others who did their best to find an opening somewhere in their schedule when they could participate in at least some part of the weekend. Though that posed a bit of a challenge (would all the costs be covered by the registration fees that had been set?!) in another way it was OK: because there were a few openings, it was possible to accommodate requests from others to join the fun, which ended up including folks from Colorado, Maryland, Florida (and those are just the ones I caught; there may have been others).

So, on Saturday I drove up to Franklin, PA, to meet with Alice Walkowski, and we headed over to Chagrin Falls together. On my way to Alice’s, however, I hit a major traffic jam. I knew there was construction and, based on previous trips through that area, I’d factored in a 40 minute delay; online sites I checked en route then told me it would set me back 45 minutes; there is an alternate route, but it normally takes 45-50 minutes longer than the other route and due to lots of traffic lights, so I figured I’d risk the interstate construction for an easy drive the rest of the way. Wrong decision! In reality, that single three-mile stretch added well over two hours to my trip!!!

But we still managed to arrive in Chagrin Falls just in time to make a quick stop at the delightful Village Herb Shop. I wanted to get there because it’s a great source for edible flowers (which you should know by now that I love to cook with). But I mention it here specifically because they also carry the lavender oil that many metal clay artists use in joining pieces of metal! In fact, they carry both the essential oil (alone) and a tincture (with alcohol), in several sizes. I already have a bottle of that, but this time I picked up some organic edible flowers, both in the Village Herb Shop’s special mix (where I may have gotten the last jar of this season!), and some separate, individual varieties (including some delightful little button roses whose petals can go into my next few batches of rose petal ice cream!) Alice is not quite the edible flower fan that I am but, while I shopped, she explored the yarn shop upstairs and the garden outside. So we were both happy with that stop.

After we were done there, we headed over to meet up with all the various guild members for that delicious pot-luck dinner. We spent the night in a near-by hotel, and were thus able to arrive promptly for a 9 am start for Gordon’s “Box Ring with Pearl” workshop. More about that in my next post.

Posted in Guild, Learning Metal Clay | Tagged: , , , , , , , , | Leave a Comment »

Workshop ideas can come from workshop participants too!

Posted by C Scheftic on 2011/08/27

Jane and Rose, delightful students both, have taken several of my workshops. The last time we were together, Jane asked if I could please offer a workshop on making little fine silver books that could be worn as pendants. Yes, of course, great idea!

I asked Jane to show me sort of what she had in mind, just to be sure we were thinking in compatible ways. Shown with this post, are two of my simplest interpretations of her ideas. I’m working on a few others too, in between everything else that’s a part of life, but I wanted to let folks know this is in the works via a couple of the simplest interpretations, ones that anyone can do. Yes, anyone: that does include even those of you who keep reading and thinking about metal clay without ever trying it to actually see and feel what it’s like!

Before I offer a workshop, I always make a collection of sample pieces. Partly, that’s so participants will be able to see some variations (to get their imaginations going); but, even more, it’s so I can try to do some things right, and some things wrong—I can be sure of what works how and where I can and cannot safely push the limits of what folks might want to try. So far, I’ve focused on the metal covers, not so much the contents. But I believe it’s the inside that makes this project particularly special: you can put anything inside your special little book that you want. You can put in blank pages, and write little notes on them. You can print something out. Or cut pictures or bits of text out of magazines. Or include photographs. Even little bits of pretty fabric, or would work. So could relatively thin “found objects” such as pieces of plastic or metal trimmed to fit. That part is entirely up to you!

In the piece shown above, I used little bits of origami paper, white on one side with a design on the other; you could add drawings or text to the white side, or used papers with patterns on both sides, or…. Note how it hangs from its “binding” loops: that turns out to be a great yet easy way to handle both the “binding” of the book and how to “hang” it as a pendant.

I made another piece, “A Book Full of Love” (shown both closed and fully open) in order to illustrate how you’d actually have to factor in gravity if you wanted the “binding” to run down the side: because the top loop is in a corner, it’s going to want to hang with that at the top, and the rest will just naturally angle down from that. If you want that look (which, conveniently, also helps to keep the book closed), great: gravity just gives it to you! If you don’t, however, then you’ll have to think of other ways to counteract the way it will want to balance. You could, for example, embellish the whole thing with some additional elements (e.g., beadwork), and then dangle some more beads from the bottom hinge piece to pull it down and into place. There are lots of other options too, of course, which is yet another way in which this is a very versatile project. (I’ll get some more photos up, eventually, though it might not be until after the actual workshop….)

Here are a just few other points, to keep you thinking about this: while the jump rings I used to hold everything together in these particular samples are an easy way to do this, what else could you use to bind the pages and covers together? How many places do you want to loop through (these samples used two sets of holes, and then five, respectively) and how much might that vary depending on whether you chose a different mechanism for your binding (or content for your insides)? Where and how do you anticipate this piece being worn: that is, do you need to make sure the pages are waterproof (or, at least, water resistant)? Jane specifically requested a pendant, so that’s what I’m showing in this particular post, but what else might you do with a little silver-covered book? Or what other designs might you come up with, that used a book-binding sort of approach, but didn’t end up being a book at all?

I’ll be working with Rose and Jane in the next few weeks to come up with a time and place to offer this workshop. We’d love to have a few other folks join us, so please let me know if you’re interested.

Posted in Teaching Metal Clay | Tagged: , , , , , , | Leave a Comment »

Fine Silver Butterflies!

Posted by C Scheftic on 2011/08/21

Since I’ve been writing about workshop inspirations, here’s another one: My annual “Fine Silver Butterflies!” workshop is coming up! So many folks signed up for it (this year, I’m offering it down at Zelda’s Bead Kit Company in Bridgeville, PA) that we had to add a second session! With two of them now (both afternoon and evening on Wednesday) I think there may still be a seat or two open, so check it out if you’re interested.

But where did that idea come from? Regular readers of this blog may have picked up the fact that, in addition to my passion for metal clay and related topics, another interest of mine is gardening. And not just my own garden either: I also volunteer with the Penn State Master Gardeners of Allegheny County, which means both helping out in their various Demonstration Gardens, and also helping to prepare materials, give talks, and teach workshops on a range of gardening topics throughout our area.

Before my latest move to PA and joining the PSMG program (as well as visits to Pittsburgh’s Phipps Conservatory with its lovely Butterfly Forest), I lived near a couple of different Monarch Butterfly sanctuaries. The first of those is in Pacific Grove, CA. Later, after a stint in MN, I lived near another such grove in Pismo Beach, CA. (Did you know that those monarchs and their descendants, since they wintered along the Pacific coast, then all summered west of the Rockies? Monarchs that summer all over east of the divide then winter in one specific place in Mexico!) And, although south Florida’s Butterfly World came into being only after I’d headed off in search of cooler climates, when I’d head back south to visit the folks down where I’d grown up, I felt a little bit of relief when I found that sort of development amidst all the seemingly relentless “expansion” there.

All of which made it sort of obvious, to me at least, that when I took up metal clay, I’d then try making some butterflies out of it and even add a Butterflies class to my offerings.
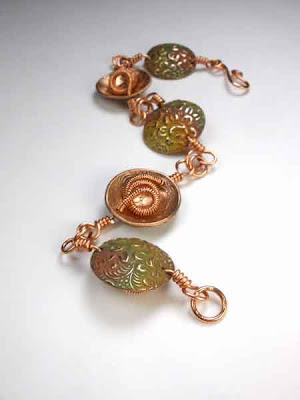
For the workshops, it took me a little while to collect a reasonable number of butterfly stamps and cutters and such so participants would have a nice set of choices, but I’ve been offering this workshop each summer for several years now. (I schedule them then, but am happy to offer this at other times of the year if people request it.) In addition to my usual metal clay handouts, I get some brochures from the Penn State extension office on butterflies and other pollinators, and I provide a few links to information that’s online. (I mention our pollinator-friendly program with respect to bees too, since they seem to be having such a hard time with their colony collapse disorder these past few years, and it seems increasingly important to mention those as well.) Workshop participants are welcome to take brochures home with them if they want, and to look at some of the butterfly (and insect) books I bring along. During the moments in the hands-on time when everyone is working but some chatter still goes on, I provide an introduction to the value, care, and feeding of pollinators.
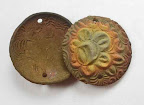
I usually take with me a good number of lovely but fairly simple examples (such as the ones that accompany this post) plus a couple more advanced samples. I find it interesting to watch the choices participants make: do they stick with simpler designs and go for quantity; do they focus on one piece but add more intrigue and complexity to it (e.g., using shaped drying forms, adding movement mechanisms, constructing detailed little 3-part butterfly-bodies and antennae, etc.); do they make only butterflies or add one or more flowers to hold or accompany that piece?

Even if these fine silver butterflies do not themselves contribute to the important task of plant pollination, it’s my ongoing hope that the wearing of them—along with the relevant gardening information provided in the class—will help to both draw attention to, and spread the word about, the value of these wonderful little creatures in real life.

Posted in Teaching Metal Clay | Tagged: , , , , , , , | Leave a Comment »