Convergent Series

learning, using & teaching metal clay, and other aspects of life

Archive for February, 2014

Trying Hadar’s White Satin

Posted by C Scheftic on 2014/02/19

Another new clay means another trial making rings!

Though I love rings–both wearing them myself and admiring those on others, in shops, at galleries–and I love making small adornments using metal clays, in general rings are not my favorite things to make. I’ll leave the reasons for that for another post specifically about rings. Why? Because today I want to talk about rings made from another “new” clay! Now that I’m familiar with a number of different types of metal clay, one of the things I often do to try to get myself comfortable with a new one is to make myself some rings out of it–to test what it’s like to work with–and then wear them everywhere–to test how they hold up. And my first question about an iron-bronze formula in particular was whether it would hold up as well as I might expect under all the stresses I put on rings.

So one of the first things I made when I got my hands on a (pre-release!) tube of Hadar’s new White Satin was to try making a couple of rings. I wasn’t going to be able to make them my favorite way (with iron in it, I was not going to count on being able to fire the shank first and then form it around a mandrel–a method that pretty much guarantees it will come out a perfect fit–and I was too eager to try it to first make a little test strip to see if/how I could manipulate it, though if will try that eventually…). And I didn’t want to make a ring using the “common” metal clay way, shaping a band in the clay-state (with lots of potential shrinkage-issues during firing). So my first White Satin rings were a pair of seamless stackers with each one textured on one side (using the “eastern paisley” design from Cool Tools) and plain on the other side.

My plan was to make them two different shapes, and wear them with the “plain” sides together. And, no, they didn’t warp during firing: I made the openings oval on purpose!

I usually make my rings either oval (as shown here) or square-ish (a rounded-corners trapezoid). The latter is easy with metal I can whack around something like the finger-shape mandrel from Rio Grande. Since I wasn’t yet ready to try that with White Satin, I just cut the clay itself with an oval opening. Hadar said rings would shrink about 3 sizes, so I used that for my beginning estimate.

Though, since I was making my rings oval, I did cut the opening a tad smaller than that. What I really did was to fit a narrow strip of metal inside a ring sizer at the +3 size, but then trim it a tad smaller. I then shaped that into an oval, and used that to cut my clay. The reason for down-sizing a tad is that, to put on an oval ring, I turn it sideways until it’s passed over my knuckles, but then turn it back up to wear. The “twist” allows the larger-direction opening (still at the +3 size) to fit over the larger-dimension part of my finger. But when it gets twisted back again, the straighter side (now smaller and narrower) holds each ring upright better, so I don’t have to keep straightening them.

The rings shown here were fired and then polished. And they did come out fitting the finger for which I was trying to make them! Since they contain iron, which will rust, they were sprayed with an acrylic protectant. Since they are rings, I have no clue how long that protection may or may not last. That’s what I’m now trying to test! I’ve been wearing them off and on for almost two weeks (more on than off, but nowhere near constantly) before taking these snapshots. They seem to be holding up fine in the short term. It’ll just take more time to see how they do over a longer stretch.

In the meantime, I am very happy with the results so far, and I hope you appreciate this early-report.

~~~~~

Update: This post originally referred to White Satin as a form of steel. I have since decided that it is more appropriately described as a form of iron-bronze, and have edited the post to reflect that. (Bronze is an alloy of copper and tin. Different proportions yield metals of a different color. Rose bronze, for example, has more copper than does the typical yellow-bronze. White bronze has more tin. which produces a nice color when used as an accent, but results in a metal that is too “fragile” to be used as a major structural component. Hadar’s White Satin is a bronze formula that contains some iron too, which produces a black-metal that can be polished to a white-metal color but has the strength more like that of a typical bronze….)

Posted in General Techniques, Learning Metal Clay, Technical Details | Tagged: , , , , | 6 Comments »

I Made It Onto “Hadar’s List”!!!

Posted by C Scheftic on 2014/02/14

It has been one long, fun, hard, exciting, challenging year, with lots I’ve learned and still more I’ve been inspired to explore further, but I’m now a “graduate” of the Hadar’s Clay™ Teachers’ Accreditation Program.

As I write this, there are about two dozen of us around the world. Maybe a dozen or so more should be added in the next month. There’s a second group that should finish before the end of the year. I feel truly honored to have had the opportunity to spend the past year working with such an amazing and wonderful group of artists and explorers.

I look forward to the adventures we’ll continue to have together, and to continuing to share them with my students and with all my other readers here. Check for links to my workshops down the right side of this blog. My first four-part series based on this program will run in my studio during April and May of this year. (I’m still teaching silver too, and have four individual classes set up for that in March.) Do let me know if you’re interested in either the silver classes or the base metals series … or both!

Posted in Hadar's Teachers, Learning Metal Clay, Teaching Metal Clay | Tagged: , , , , , , , | 2 Comments »

Update on the Lifespan of a No-Flake Foil Firing Box

Posted by C Scheftic on 2014/02/10

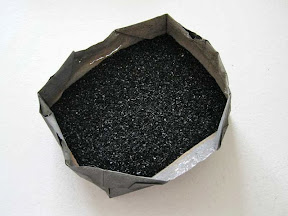
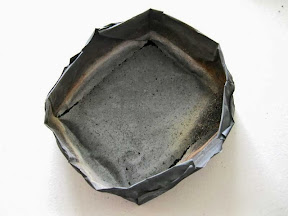
A few days ago, I was talking with another metal clay artist about how I fire bronze, copper,and steel in vessels I “fold” myself from sheets of steel “no-flake” foil, when I realized it had been two years since the last time I’d mentioned them here.

Which I find interesting: in three years, I’ve used three boxes! Counting them up, I figure I put a box through a firing somewhere between 1 and 2 times a week, on average. But few things in my life are average…! No, really, it’s more like 6 or 7 times a month, but even that tends to happen in maybe two “bursts” of several firings in quick succession, then it’s several weeks before I do that again.

Something I learned from my first no-flake foil box, plus discussions with others after I wrote about that, is that the foil tends to crack open along the top edge of however much carbon is typically used. So, with my second box, I started out by piling the carbon a a little bit higher than I’d been doing. Then, when some cracking started to appear, I could just lower the level a bit, and get a number of additional uses out of it (because the holes–eventually stretching into a longer tear–were then above carbon, it didn’t leak out)! With the extra firings, it also began to crack along the top-most folds: what that meant is that I tried to be a bit more careful as I handled it, especially when moving it in and out of the kiln. Eventually, though, I decided I was carrying conservation perhaps a bit too far: after at least 75 firings over the course of a year, I took its picture and retired it!

Box #3 has lasted even longer! It has handled 80-some firings over almost 14 months. I did not keep fully-detailed records but, between the notes I do have and my general memory of the past year, I’d say that for its first year, I did a higher proportion of firings in the mid-fire range, and a smaller share in the high-fire range, than I had done with the first two boxes. That seems to have reduced the number of little holes it developed, so there were fewer to spread into wide-open cracks.

That is, until the start of this calendar year. That’s when I started playing with Hadar’s One-Fire High-Fire Trio. The single firing needed to both de-binder the clay and sinter the metals is a real treat, but when I started firing batch after batch in the high range, I noticed that the sides started warping out. So, even though Box #3 does not have any big holes, it is now being retired because I can barely fit it in he kiln any more: it is in danger of hitting the kiln’s thermocouple!

But. I still think that these boxes are well-worth their cost! Do you?

Posted in General Techniques, Technical Details | Tagged: , , , , | Leave a Comment »

Another Quick Peek—Another New Ring

Posted by C Scheftic on 2014/02/08

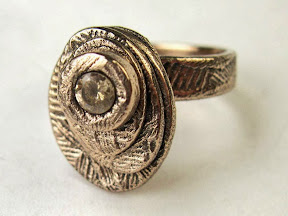
Here’s another Champagne Bronze ring, this one topped by (hey, I just couldn’t resist it) a Champagne CZ. This one took a little while to tell me what it wanted to be….

It incorporates several of the other bits I said I’d try to write about another time in an earlier mention of shrinkage. The strip that I bent into this band didn’t shrink anywhere near as much as I’d expected, which caused me to re-think how I’d assemble it. The oval pieces on the top shrank about as much as I was expecting in length by width but, as far as I can tell, they shrank not at all in height. And that height matters in the re-design of this ring too: I’d thought I might make it so that they could spin (like the petals in my fine silver flower ring with ruby), but their thickness made that difficult. Yeah, I know ways around that, but this was just a supposedly-quick little trial piece, so I tried something else, to confirm how well they’d fuse in place. That did work out well and, again, I like the color (even though it still looks a bit more like sparking rose´ than champagne to me, though not quite as much as the first one I tried).

I can of course make a bronze spinner later, when I can find time to do more accurate calculations on the shrinkage and actually plan it out. For now, I’ll just wear this one as-is, and quite happily, as a test of how rings made this way with this new product will hold up. Which is probably all for the good anyway, as I’d’ve treated a spinner as a special-occasion ring, when having another nice Champagne Bronze ring for everyday wear is far more practical.

Posted in General Techniques, Learning Metal Clay | Tagged: , , , , | 2 Comments »

Quick Comparison of Two Bronzes

Posted by C Scheftic on 2014/02/05

Have you been wondering why, so far, all my posts about Hadar’s new One Fire Trio have mentioned shrinkage? Every single metal clay piece of any sort will shrink during processing: as you let it dry (i.e., as the water evaporates), burn off the binder and, finally, sinter it. During each of those steps, things contract a bit. Exactly how much varies by product and technique, but it still happens. For many items, this either isn’t an issue (so what if a lentil bead comes out a tad smaller) or it can even be an advantage (for sculptural pieces, being able to work a bit bigger and have details end up magically smaller can be a real treat).

But, for rings, where the band-size really does matter, then shrinkage matters. A lot. Which is why several of my recent posts have noted shrinkage among the various One Fire Trio products in particular.

Even though I’m still puzzling over that, I have to tell you that there is one feature of Hadar’s new Champagne Bronze powdered metal clay product that I just love: with Champagne Bronze, I can bend ring shanks around a mandrel!

Years ago, working with fine silver, I figured out a way to make rings that I love (and that I later found out that some, but apparently not a high proportion of, others use and love too), a way that removes most of the shrinkage concerns. I make the strip that will become the band first. And fire it as a strip, so it shrinks. Then, I bend the fired-strip into the ring shape that I want, fiddle and adjust and tweak it so that it’s exactly what I want. I add any top-decoration to that, and refire the whole thing. The bit on top will shrink a bit, but if my estimate of that is off a fraction of a millimeter, it’s rarely noticeable. But the already-fired band should (if it was fired properly the first time) come out the same size it went in. To be sure, that approach does not work for every possible ring design but, for the ones where it does— Voila!—there are simply NO sizing issues.

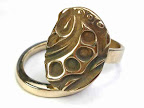
That was a real advantage when I made the spinning-flower ring with ruby, shown first above. When I ventured into Hadar’s Smart Bronze (another one-fire clay), I was advised against trying to bend that, so I had to use the “traditional metal clay” methods with it. Though I like the two rings (second photo) that I made with it, neither ended up sized quite the way I’d wanted. They’re for me, so I just wear them on different fingers than I’d planned; the only problem with that shift is that I can’t wear them in combination with some other rings the way I’d wanted. (I don’t wear rings when I work, but I love wearing lots of them when I’m out and about.)

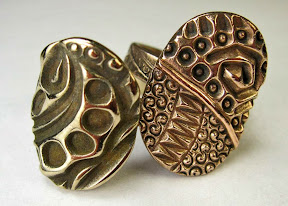
What I’m reporting today, however, is that my first Champagne Bronze ring fits beautifully. I include a photo of it, below, paired with one from my first attempts with Smart Bronze. The difference in the size and shape of the decorative top was intentional (i.e., I’m not trying to illustrate shrinkage this time); the image does, however, give you a good hint as to the difference in the color of the two products. (Next to Smart Bronze, this does look a bit pink. Next to Copper, or even Rose Bronze, this looks to be much more of a yellow-bronze tint. I’ll try to post a few more comparisons, using some other pieces, but it may take me a while. There’s lots to do right now, too much to justify all the time I’ve spent with Champagne Bronze and Friendly Copper. But, me, I just felt I had to try to complete at least one such ring! So … more when I get caught up elsewhere.)

Posted in General Techniques, Learning Metal Clay | Tagged: , , , , | 2 Comments »

One Thing Just Leads to Another

Posted by C Scheftic on 2014/02/01

If you’ve stumbled across this blog / post without a lot of previous metal clay experience, you may want to just click on the photos to enlarge them and read the brief notes there. For the rest of you, I’ll start by asking if you remember the earrings I wrote about last week?

For today’s post, I’ll start by saying a little about the steps I went through in making the bronze-parts of the two-metal earring pair I described earlier.

  • Grab a good-size chunk of Champagne Bronze clay.
  • Roll it out to a thickness of four cards.
  • Position cards around it, two cards high.
  • Use a thin, straight edge to cut two distinct sets of five intersecting lines. (This was done freehand, so their positions are similar but not identical.)
  • Use a circle cutter to make two “large” circles.
  • Use another circle cutter to make a “small” circle inside each of the “large” ones. (Again, done freehand, so their positions are similar but intentionally not identical.)
  • Do all the usual clean-up and drying of the various bits of clay.

When the circles had dried, I used the small, matching “inner” circles (where each set of lines all intersect) over some Low Shrinkage Steel XT to make the earrings I mentioned before. So far, so good.

Looking at the dry “outer” circles (washers, actually: the larger circles with their centers removed), I had another idea. Using a texture sheet with some concentric circles, I rolled out two more sheets of clay, one each from Friendly Copper and Low Shrinkage Steel XT. Then I centered one of the bronze “washers” over each of those, and cut a matching circle out of each clay. Finally, I rolled out another pair of those two clays, this time using two different “flowered” textures, and cut out a third circle of the same size from each of those. Both the circles- and the flower-design were rolled to four cards at first and then, with the textures, down to two cards. (I didn’t roll the clay with textures on both sides because: (a) I hadn’t yet decided for sure how I would use them, and (b) I wanted to center the designs on both sides the way I wanted, and doing that separately for each side was easier.) I set all those aside to dry (as well as a few other bits I’ll try to write about another time), figuring I’d use them for something….

A few days later still, I got to wondering about the “high fire” temperature of these new “one fire” clays. In general, even with this new trio, it’s the bronze that’s going to limit how hot the product can get during the sintering process. Would the “bronze embeddable” bails survive that heat? (I use them myself, on occasion, and I often offer them to students, especially in introductory workshops, because they can save a bit of time when compared to having to make one’s own bail.) So I took one of the bronze washers, attached the copper disk with circles and let that dry, then positioned the embeddable bail and attached the copper flower-design disk. Once all that had dried, I filled in a few little gaps, dried it all some more, and finally fired the piece.

The results were interesting, as shown in the first photo, above. It all sintered just fine. The bail did blister a little bit: not enough to ruin it, but enough that any metal artist “in the know” should be able to spot what happened. But I still think it’s interesting.

There was one small blister on the sintered bronze section. My first thought was that I’d overfired the batch a bit, but then I realized it was exactly over the post on the embeddable bail. Silly me, I didn’t think to capture a photo of that: What I did was to immediately see if I could polish it out. Easy! I’m not done polishing this piece (it was just a spur of the moment creation, not a planned project), but I think the photo I include here (click on it for a bigger version) gives you a hint as to the blistering on the bail (in case you’re someone who uses them too), and to the way it does look like the disk itself will polish up nicely with a little more work.

There’s one other item worth noting: how the bronze in the bail alloyed a bit with the copper on the other side! Look at the side shown to the right in the first photo, up near the bail, and notice the golden-colored patch. Alloying! Again, artistically, I’m OK with its looking like that. But it’s good to know it will happen.

A few days later, I got to wondering, would the bronze wire I sometimes use with such pieces show the same blistering? [Later clarification: I’ve used that wire in the past with pieces made using Hadar’s Quick Fire bronze. That’s a clay that takes a two-phase firing and only mid-fire temperatures and it’s always held up beautifully in pieces fired that way. Here, I’m otherwise reporting on the newer one-phase high-fire clays.]

So I made a simple wire-loop bail out of phosphor bronze (melting temp listed as 1800°F), then took the other (matching) bronze washer and the Low Shrinkage Steel XT disks, and assembled it the same way as I’d done before. I fired that using the same schedule too.

And, again, I noticed a bit of blistering on the bail and, with this wire-design, a bit of fusing across the loops. Again, I think that slightly grainy look is OK. Other than a quick clean-up, I have not yet stopped to polish this one at all. But I decided to post about it quickly because, this time, the main piece shrank much further away from the bail. In its clay state, the loops were pressed lightly down into the piece, but the post-firing separation is visible in the photo. No alloying with the steel though, which is also good to know.

But you have to see the two together to catch what surprised me the most: the difference in shrinkage! They started out exactly the same size, and look how different they are now. The current (as I write this) Hadar’s Cheat Sheet (.pdf) says that, on their own, Champagne Bronze shrinks about 30%, Low Shrinkage Steel XT about 28%, and Friendly Copper about 25%. Combos will be limited, to some extent, by the least-shinkage clay in the mix. But there’s only a 3% difference between LSStXT and FrCu, and it sure looks to me like there’s more than a 3% difference in the results here. What I can feel, but can’t really show here, is that there is maybe a 3% difference in height but it’s in the wrong direction. The one made from copper is a teensy bit thinner (i.e., more shrinkage, not less).

I really do like the results I’m getting with these clays, and the 3-hour firing time is a huge help compared to some of the others. But, with the others (and any of the “older” clays, both precious and non-precious), I think I have a pretty good feel for the shrinkage. With this new One Fire Trio, I’m still exploring….

What are you finding with them? Do leave a comment!

Posted in General Techniques, Learning Metal Clay | Tagged: , , , , , , , , | Leave a Comment »