Way More Photos of My Work
(on Picasa, which Google took over, and broke the links; I’m still trying to figure out how to link to the album collection there…)
Great news! My four-week introductory series on working with silver metal clay still has a few seats available in “Session 2” — from 6 to 9 pm — starting next Thursday (Feb 23) at the North Hills Art Center, and we’ve agreed not to close the registration this afternoon, but leave it open until next Tuesday!
So if you forgot to sign up, there is still time. Or, if you didn’t notice the listing among my classes down the right side of this blog, didn’t check the Classes section of my website, and you’re not on my mailing list nor the one for the North Hills Art Center … well, now you know about the series and that it’s still possible to sign up.
We’ll cover the basics of designing, texturing, shaping, cutting, and refining pieces. You’ll make a woven piece. And a hollow one (open or closed design: you choice!). With every piece you make, pendant or earrings, you’ll have the option of making it reversible! By the end, we will also have covered various ways to polish and add patinas to your pieces, to help bring out the textured designs. And we’ll have lots of fun doing it all!
For my one- or two-day workshops, registration is usually cut off a week ahead: I need time to order the silver we’ll be using (and I sure don’t want to charge students for overnight shipping)! I have ordered silver clay for those who already signed up for this but, since I’m getting enough to cover all four weeks, I can sneak enough out of that for late-comers to use the first week, and replenish it in time for later evenings.
If you’re in the area, I hope you’ll be able to join us!
Also please notice (e.g., down the right side of my blog) that this session will be followed at NHAC by a simple, two-night introduction to making a beautiful piece out of bronze metal clay. Registration for that one will close on March 16. (Bronze is a little trickier to work with than silver, so you may end up making only one piece … but the materials cost less, so bronze worth risking for big “statement” pieces!)
It’s time to follow up on an earlier statement, and write a little bit about some upcoming classes. But since this is (what is often called in social media circles) Throwback Thursday, I thought I’d include a few notes on how the ideas and directions for two popular sessions have evolved over time, since I’m repeating them on a couple of Saturday afternoons this month (soon!) and next.
I must admit that the idea for this came from Hadar Jacobson. I’ve made pieces, and then been asked to teach classes, using both precious metals (silver) and base metals (bronze, copper, steel).
We texture the clay and then roll it thin in order to get it to drape nicely. With .999 fine silver, that produces pieces that seem to me to be a bit too fragile, risking bending or breaking at the thinnest points. We can solve that problem by adding a backing layer, or at least a frame, to provide additional stability.
When we use base metals (like these in bronze and copper), we get pieces that are a bit harder. Thus, most of our pieces can just be folded and embellished. They rarely seem to require extra layers for sturdiness, though of course those can always be added if desired from a design standpoint.
I will admit that I never tried making these with .925 sterling silver: I don’t particularly like fussing with the firing schedule for that clay, and have only used it for a handful of different designs. But last winter I started making these with .960 sterling which is much easier to fire than is the .925 form, and they turned out great. So that’s what we used the last time I offered this as a class, and it’s what we’ll be using again this week.
At this point, we’ll still be using “homemade” .960, that will come from mixing .999 and .925 clays. There is a commercial version now available, EZ960, that’s recently been released. We won’t be using that here simply because I haven’t yet had enough time to experiment with that to feel as comfortable as I’d like using it in a class. I want to learn any and all potential pitfalls with it myself before foisting it on a room full of students! Stay tuned for news in that arena.
The way I began to make these pieces, and lead students in making them, has had a number of inspirations. Hadar, again, was one of them, but so were CeCe Wire, a project in the RioRewards certification program, plus a whole range of others (such as some of Mary Hettmansperger’s metal-weaving projects).
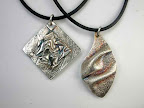
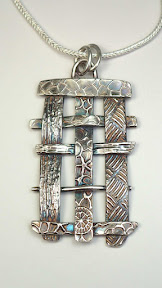
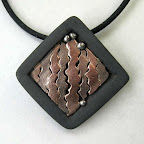
Sometimes, as in the silver pieces above, the weaving would be the main element in the design. Other times, as in the mixed-metals piece shown next, the woven portion is more of an accent to another important part of the design. Because of the thin nature of the strips used in the weaves, however, I always made sure that their ends were securely tucked into a frame.
Ahh, but do you remember the .960 silver I just mentioned above? Yes! While I’ll still guide students through some dos and don’ts in letting small ends hang out, we can now be far more adventurous in allowing that. We no longer need to be completely constrained by framing. Again, we can use solid frames if we want that in our designs, but it’s now an option, not a requirement. This class is going to be another one that’s lots of fun!
If you’re in the western PA area, or can get here for one or both of those dates, I hope you’ll join us!
Please note: The links in the title of each session above take you to the site from which you can reserve a seat at that particular class. In each case, the materials provided will be enough to make an interesting pendant. If you want to divide it in half and make earrings instead, that’s fine with me. If you want to buy a bit more material and make something big or even (if you find yourself so comfortable with this material that you are able to work quickly enough to…) make both a pendant and a pair of earrings, that’s yet another option.
Also: I’ve got two other workshops coming up this summer, both of which are multi-day events. I’m hoping to write about those soon too, but the ‘net access in my studio is getting increasingly less reliable (we’re hoping for a fix next month…), so I’m struggling to keep up with online announcements. But you should know that all my workshops at The Artsmiths of Pittsburgh are announced on the Eventbrite system. If you are interested in a specific class but for some reason can’t make it on the given date(s), please let me know. I’m happy to repeat any of my sessions on another date, whether it’s back at Artsmiths again, in my studio, or at another site.
I’m really excited: The Artsmiths of Pittsburgh has scheduled five of my metal clay workshops in July and August, and two of them are special multiple-day events so I’ll be teaching there for nine days in all during those two summer months!
Layered Silver on Wednesday, July 13, from 11 am to 3:30 pm
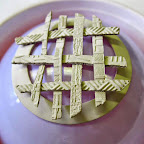
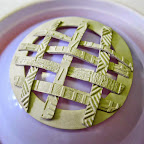
(Some day, I hope to arrange a lighting set-up that will give me a consistent color background regardless of the time of day when I take my photos … sigh! The shots above show the range from morning to afternoon to after dark at night; and, yes, all of them DID have the same three bright “daylight” bulbs trained on them in addition to the room’s ambient lighting.)
The length of the various sessions does give a hint about the complexity of the different projects, but everything I’ve scheduled at Artsmiths for this summer should be do-able even by complete beginners. The reason I set aside more time for some of them is so that I can welcome even first-time clayers into any of these classes! Folks with some prior experience with metal clay are likely to learn some new techniques, and may well be able to apply their existing knowledge to kick their designs up a notch.
If you follow the links above to get more information and/or sign up for a class, you may notice that the descriptions there often talk about making a pendant (and the corresponding photos show a range of possibilities for how you might construct yours piece). Anyone who’s taken my classes already knows that, while I often demonstrate a pendant design, I’m happy to support reasonable variations on any given project. By reasonable, I mean variations that are appropriate to the materials we will be using, appropriate to the skill level of the student wanting to make something else and, tied to both of those, appropriate in the sense of the amount of support you’ll need to succeed at your idea while also being “fair” to others who are trying to complete the specified project. But I want everyone to make a unique piece they are happy with, so there’s a lot of leeway in exactly what you might make! Get in touch with me directly if you have any questions about that aspect of my classes. Or, just come and make some gorgeous, unique, and (probably) reversible pendants!
Also, if you have time and material left once you’ve completed the main project, I’m always happy to have you make a little something else with what’s left, often a pair of earrings or a few small charms, or even embellishments that you might add to future projects. I’ll fire those along with the regular class pieces.
With my one-day classes, I fire pieces for you after class, tumble-polish them to an even, high shine, and return them to the site of the class in about a week. This time, I’m especially happy about the two- and four-day sessions, because I’ll fire everyone’s pieces before the last session listed and then, on that last day, we’ll review and practice a number of different finishing techniques, ones that often get overlooked in the one-day sessions (unless you schedule a time to come to my studio for a private or semi-private lesson on finishing).
I’m going to try to post a little something about each session in the coming week or two but, given how spotty my blog-posting has been recently, I figured I should get the overview up for you to consider all at once now…
ALSO / alternatively …
Is Mt. Lebanon too far for you? Would you prefer another date and time? I’d be happy to teach any of these classes in my studio (in Regent Square) or at another location (that you arrange). Let me know if you’d like to discuss any other possibilities!
As I said in my last post in April, I sure had a great time teaching at The Artsmiths of Pittsburgh last month, and I’m thrilled to have been invited back to offer more courses there this May! Here are the three that are on the calendar for this month. Clicking on each course title should take you to a page where you can read a bit more about the projects and, if you want, actually register for the various sessions.
This will be the simplest, most fun, yet easy-going introduction to metal clay that’s possible! In three hours, each participant will create lovely, unique, art jewelry: fine silver (.999) earrings!
There will be lots of options for texture, shape, and small embellishments, so everyone will come out with their own unique pieces. And, we’ll texture both sides, so each pair will be reversible!
There will definitely be enough time and materials for each participant to make (at least!) two pairs of earrings … but, remember, since they’ll be reversible, it’ll almost be like getting four pairs from just this one class!
The very first piece I ever made using metal clay was one of these “lentil shape” beads, and it can be the first one you make too, if you want.
Then again, even if you’ve been working with the stuff for a while, this project involves a few special techniques that are also applicable for a range of more “advanced” projects … which makes this a special (and easy) project on which to learn and begin practicing them.
I find that lentil-beads always seem to be such fun to make: join us, if you can, and see for yourself!
There’s a long story here, not worth going into but, although I’d hoped to offer this class last month, several situations conspired to prevent that. So we simply rescheduled this one for May! I hope that those who had signed up for April will be able to come to this one; plus, there were a few seats still open in that session so there should still be room for some new-comers!
There are lots of things I love about this woven-silver project. The one I’ll mention here is that this is a great session for people who like to make and / or wear silver pieces that are big! At times, the sheer cost of the materials can seem somewhat intimidating but, because these designs have so much open space, they require far less material. Relative to many other designs or approaches, you can stay small, and keep your material costs down, or go big, and not have those costs skyrocket. Your choice!
As I said last month, there’s no significance to the specifics of dates and times. That is, if you want to take a workshop and those date/time combos don’t work for you right now, please let me (or Artsmiths) know! All of us are trying out different combinations to figure out what will work for folks who are interested in the classes. As long as we know there’s interest, we can work out other day/time combos for future months, either repeating these topics or adding new projects to the offerings. And I’m willing to offer any of them as small (private or semi-private lessons) or group sessions (if enough people express interest) in my Regent Square studio as well as at The Artsmiths of Pittsburgh.
Personally, I think that all of these are lots of fun to make!
Yes, once again, the last weekend in April brings us the wonderful community celebration of art that is known as Art All Night.
For this, the nineteenth such event, they’ve returned to switching locations again (hey, it’s a project of the Lawrenceville Development Corporation so besides all the art, part of the point is to get tens of thousands of people circulating through an “empty” site in the hopes that someone will see its potential…!), so I’m eager to see what this one will be like.
Though I had finally gotten comfortable with finding my way to, finding parking relatively near, and finding my way back out of the site they’ve used for the last few years, it’ll be interesting to see what it’s like down on the other side of the 40th Street bridge this year. It’ll also be fun to see all the entries.
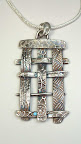
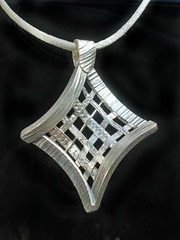
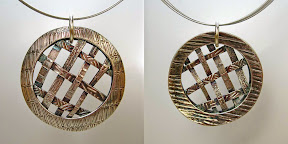
I submitted a “woven textured silver” piece that I made, originally, as a sample piece for a workshop at The Artsmiths of Pittsburgh. Entering it for Art All Night is sort of a full-circle thing, because I made my first woven silver pieces in 2008, with the clay I’d used while doing my first-ever public demonstrations anywhere that used metal clay, and that was at Art All Night. (Talk about starting big!) I’d over-worked and over-lubricated the clay in the many hours of demos, and I’d heard it might be possible to salvage it by adding some glycerin although the resulting clay would then not harden as it dried but remain flexible … so the obvious thing to try with that was weaving. I’ve made such pieces off an on over the years since then, but I’ve never before entered one in Art All Night. So it seemed about time to do that!
Except this piece, instead of being made from salvaged clay, was made from a mix of fresh clays, PMC Flex and PMC Sterling, to yield a form of sterling silver that contains as much as 96% fine silver. Adding the sterling results in a slightly stronger piece: my earlier ones always had solid “frames” around the weaving which made them strong enough, but the sterling in the mix for a structure like this opens up design opportunities: here, it’s safe to let a few of the ends extend outwards at least a little bit for a more “adventurous” result.
I need to thank Kathy Herbst and Louise Rosenfeld for brainstorming names for this piece, along with Manny Rosenfeld who inspired the name I’ve finally decided to give it: The Empress’s Portal. If you’d like to bid on it at Art All Night, it’s #2919. If you’d like to take a class and learn how to make a piece like this, sign up for one at Artsmiths or get in touch with me to request that I organize one at my studio in Regent Square (or even another venue that you arrange for).
In the meantime, if you’re in the Western PA area this weekend, be sure to check out Art All Night! It’s free and open to the public from 4 pm on Saturday, April 23 straight through until 2 pm on Sunday, April 24. And if you’re not here this weekend, at least consider putting the last weekend in April in Pittsburgh on your calendar for next year!
As I mentioned earlier this week, I’m on the schedule to teach three workshops at The Artsmiths of Pittsburgh as they launch their Underground classrooms this month. I feel very honored to be one of the first four instructors invited to teach there, especially knowing the caliber of the other artists in that group!
All of my classes this month are suitable for beginners. Those who already have some experience with metal clays are also welcome to participate and learn new techniques. I’m listing three separate classes here, and you’re invited to take one or two or even all three of them! (Just click on the link for each one, of course, to see more details.)
We’ll make a pendant in each session; if there’s time and interest, participants may want to try making a second pendant or a pair of earrings too. I sure hope that some of my readers here will be able to join us there!
Also, there’s no significance to the specifics of dates and times. That is, if you want to take a workshop and those date/time combos don’t work for you right now, please let me (or Artsmiths) know! All of us are trying out different combinations to figure out what will work. For April, select Tuesday, Thursday, and Saturday slots were the only ones being tried, and there were other events besides classes on some of those days (e.g., the SOS_Underground opening I mentioned in my last post). But, as long as we know there’s interest, we can work out other day/time combos too.
Or, for that matter, you can just come out to my studio for a class too so, if there’s something you really want to try out, please let me know and we can find a time that’ll work for us.
What a great evening! I’d planned to treat a good friend to a birthday dinner (’twas actually yesterday, but Friday is a better night for going out), although I’d said we’d have to meet in the Lawrenceville neighborhood first because I wanted to go to the opening of the Pittsburgh Society of Artists’ (PSA) Small Works exhibit too. (I knew that’d be ok since this is someone who’s an active supporter of the arts!)
So we walked in, and headed down one aisle admiring the selections. It was fairly crowded at the beginning, but I managed to wave “Hello” to a couple of artists I know. Too far apart for an actual conversation, I was a bit puzzled when, instead of a waved “Hello” in return I got a wave and a mouthed “Congratulations!” What, I thought, am I missing some bit of social etiquette where we congratulate each other for having our works accepted into a show? It was a members-only show, and you could submit either one or two pieces for consideration. Of the 72 artists who’d applied, 45 had been accepted: 15 had two pieces in the show, and 30 had a single piece on display, for a total of 60 pieces. Now, I did have two pieces accepted, but three award-winners had already been announced and I wasn’t one of those. I knew all of that, from the mailing that PSA had sent out to its members, listing everyone whose work was in the show, and an interesting statement from the juror (which you can read there).
And then I turned the corner into the bigger room, and my entries leapt out at me! What in the world had I done to deserve a wall to myself! The photo below is a 270° panorama of three walls of that room. I shot it later in the evening, after the crowd had thinned out enough that you could see some of the artwork from afar. (And, while the artwork stayed in place, some of the people moved around which is why a few of them are partly cut-off or extended…. But the photo is about the art, so I’m using it anyway.) From left to right, there is a wall full of art, then a second wall of a different height with a strip of artworks, then a third wall with windows and a brick wall in between those, with just two pieces … mine.
You should know that these “small works” could be a maximum of 12 inches in any dimension. My pieces, in silver, were much smaller than that, 40 x 28 mm and 39 x 18 mm. (For those who don’t convert millimeters to inches regularly, 18 mm is just under 3/4 of an inch, and 40 mm is just over 1 1/2 inches.) For display purposes, I’d hung them in 10 x 12 inch black shadow boxes that I’d bought because they fit the specs for this show. And there they were, set off from all the paintings and photographs (plus more jewelry and sculpture, all of which was in two “aisles” behind me as I shot this).
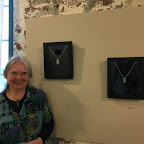
I rarely post photos of myself, but here’s one taken of me next to my entries. And, if you look really closely, you’ll see a little red dot on the tag for the piece I’m standing next to, which means that one had already been sold, either as the show was being hung or in the first few minutes that it opened. That was the reason for the congratulations!
To the person who made my evening via their purchase, I want to say “Thank you!” And I hope that many of my fellow-artists will be thanking their purchasers before the show ends, on May 13. If you’re in the Pittsburgh area and want to check it out, it’s at the Framehouse & Jask Gallery.
What can I say … I’ve been busy making, and otherwise enjoying Spring, and over the next few days I’ll finally be reporting some news. Here’s the first item: this afternoon I was notified that two of my fine silver creations have been accepted into the Small Works show that’s being sponsored by the Pittsburgh Society of Artists. It will be held at the Framehouse & Jask Gallery, 100 43rd Street, Pittsburgh PA 15201, from April 1 through May 13, 2016.
Since I normally do work “small” (at least compared to what a lot of other artists do), I knew this was a show I had to try to get into. I thought long and hard about what to enter and finally decided that, while I do have the skills to design and develop intricate and complex pieces, that’s just not the style I like, neither to work in nor to wear myself. So I went for the fairly simple pieces that are more in line with my typical style.
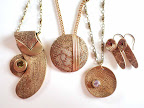
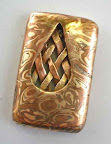
Back in the fall of 2014, I made a series of pieces with “frames” constructed out of the the same material as the “contents” of the piece inside the frame. The first few were assignments in Hadar Jacobson’s teaching-accreditaton program, and then I kept going with more over maybe the next two months. I’ve been meaning to come back to those for a while now, and this silver-framed silver-plume is one of my newest ones. For the PSA show, it’s displayed in a shadow box with just this side showing. It has an integral tube bail, so the other side really is pretty much a “back” side, but it is still fully decorated and finished in my usual “other side” approach. I’ve got a few more silver-framed silver pieces in the works, and will say a bit more about the collection (with photos of both sides) once I’ve finished several more of those.
In recent months, I’ve also been exploring the use of a different approach to my “woven” pieces. In the past, I’ve always made sure that both sides were always securely framed the whole way around. I did that to ensure that the ends were always positioned safely and securely. With my latest weaves, however, I’m resisting the urge to frame them, and seeing how I can make them work in other ways. Woven Silver Banner Reclaimed is one of my newest examples of that. This one is also being displayed in a shadow box for the show, but it is fully reversible, with different textures showing on the strips from each side. And, yes, there will be more coming in the next week or so on the woven-silver pieces too.
But, for the moment at least, let me just wish everyone a Happy Easter. It’s a lovely Spring day where I am, with lots of delightful ways to continue to enjoy the rest of the day outside! I hope that some local folks will be able to make it to the show’s opening reception this Friday, April 1, from 6 to 9 pm or, if not then, at least at some point during the show.
Life tends to get crazy-busy this time of year, for multiple reasons, some of which I’m sure you can imagine and others would take too long to explain. So I’m just going to list a few events you may want to know about should you be interested in seeing some of my work in person:
November 30 – December 7: H*liday mART at Sweetwater Center for the Arts, Sewickley, PA
December 5-6-7: Holiday Gift Shop at the Wilkins School Community Center, Swissvale, PA
December 5-6-7: Open House in my Studio, to coincide with WSCC’s Holiday Gift Shop
December 13: Open House at the Hoyt Center for the Arts, New Castle, PA
December 13-14: Open House in my Studio, to coincide with an Art Studio tour in Regent Square (Swissvale, Pittsburgh, Edgewood, Wilkinsburg), PA
For other venues, please see the list of Ongoing locations down the right side of this blog.
If you find yourself missing any of those, no problem. Just get in touch with me: leave a comment on this post, or message me via Convergent Series page on Facebook (and, while you’re at it, a Like there would be very much appreciated…). We’ll find a way for you to explore my creations!
I’m not sure how much else I’ll manage to post this month. But I have new designs in the works, new workshop pieces I’m testing out plus, of course, new variations of ongoing favorites in both those categories … and lots more for 2015! I look forward to posting about all of those in the New Year, and I hope you’ll enjoy reading about them too.
Let me be clear from the start: I think that “weaving” metal clay is loads of fun, and it produces interesting results. Great combo, eh?
Some Background
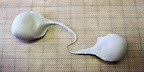
I don’t have any decent pictures from when I first started trying to weave metal clay. I don’t even have any of the earrings I made by weaving strings of PMC+ (on my own) or strips of PMC+ sheet (when I took a RioRewards certification class with CeCe Wire, down in Baltimore). Both ways, I had fun doming the results by backing that with the now-discontinued, sigh, high-shrinkage PMC Standard clay. But here’s a pair of the latter that I made in 2010 (yeah, well, I redid the Rio Rewards when Tim McCreight taught it a few miles from my house); this photo is from when I used them as one of my entries in Vickie Hallmark’s Month of Earrings Challenge that year.
While I enjoyed doing this, and I did play around with other weave-spacings, I found that the sheet product had two drawbacks. First of all, you have to be very careful attaching sheet to a backing or frame: not enough water and it doesn’t stick, but too much and you’ve ruined it. Second, another thing I love about metal clay includes the design possibilities with textures, and sheet does not take textures the same way. Early in 2008, not long after Hadar Jacobson’s first book (The Handbook of Metal Clay: Textures & Forms) had come out, I was thrilled to read about how to doctor-up my own clay so that I could texture it but it would still remain flexible, like the sheet product, in the greenware state. Here are several of the first pieces I made with that clay, photographed together to use in promoting the first workshop I taught using this approach.
Though my workshops for beginners emphasized making woven pieces that were still essentially flat, on my own I went on to explore a number of other designs. Magic Carpet (or, to those with some knowledge of non-Euclidean geometry, Weaving through Hyperbolic Space), shown below, is one of my favorites from that period.
After Hadar came out with her own base metal clays, and introduced us to various ways of combining those, I again launched right in to combining those with multi-metal weaves. Here is a piece I called Mixed Metaphors. Hadar was kind enough to include a photo of this in her fourth book, Patterns of Color in Metal Clay, which came out in 2011. (This piece later went to live with my cousin Debby; by then it was also sporting a lovely coiled-copper wire bail.)
PMC Flex
So when I first got my hands on PMC Flex, one of the things I thought to try with it was another woven piece. Yes, I knew I could also explore other styles entirely, and that’s coming. But, first time with a new clay, my inclination is to do something that is already deeply seated in my “finger memory”! Something that I know I can make successfully some other way, such that the question is how this particular clay performs in that approach. So, at last, here’s something of a step-by-step on weaving PMC Flex.
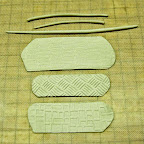
I began by rolling out a few strings (aka rods, snakes, etc.) of PMC Flex. I also textured a few small sheets of clay; after neatly trimming two edges, I returned the extra clay to the package.
Once the sheets were dry, I cut them with a pair of plain scissors. For what it’s worth, I’ve been known to cut moist regular clay the same way, with plain scissors and with fancy-edge crafting scissors. By waiting until your clay has dried to cut it, you remove the risk that you’ll smush the piece, leave unwanted finger- or tool-marks, or stretch the pattern. And, yes, I’ve been known to cut dry regular clay, but there is some risk of breakage doing that. Dried flex clay just cuts beautifully, with ease.
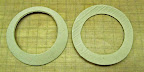
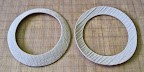
While my flex sheets were drying, I also made two narrow washer shapes. To keep this test simple, they are the same size in both inner and outer dimensions, plain on one side and textured on the other. They were dried over matching light bulbs. One had the texture facing up; the other, facing down. The one on the left (textured on the convex side) was made out of PMC Flex; the one on the right (textured on the concave side) was made from PMC 3. There is no technical reason to use two different clays. I just didn’t want to use the relatively small amount of PMC Flex that I had on components that didn’t require the flex feature, so I used PMC 3 for one of them. Still, I was curious how the PMC Flex would work in this design, so I did use it for the other. (I’ll discuss this more in a moment…)
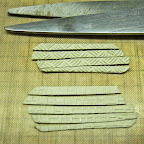
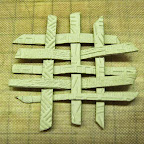
Next, I started loosely weaving together my strips of dried PMC Flex. My intention all along had been to make a somewhat open weave. I did not plan to push the pieces tightly together (as shown in the PMC+ earrings, above); neither did I intend to leave extremely large openings. What I found was that the PMC Flex could be pushed together as much as is shown in the following photo, but only that much. Had I used PMC+ to make my own diy-flex, I would have been able to snug the strips up even closer. These strips made from PMC Flex felt rather similar to the diy-flex I’ve made from PMC3. (No surprise there, just confirmation: the product is, in fact, marketed as being most-comparable to PMC3!)
My last question for the evening was how well this little woven sample would fit my cut-out washers. There’s no reason one has to get it to fit as well as shown below, though that is a pretty good fit if I do say so myself! The point is that the strips need to be long enough; later on, you can always trim off any pieces that are too long.
The one and only problem I noticed (as you can see, above) was that the inside edges of each the washers were a bit rough. I’m one of those people who tries to minimize the amount of sanding that I do: when I cut moist clay, I just take care to smooth the edges immediately. With narrow-edge washers, however, it can be a bit of a challenge to smooth the inner edges without risk of distorting the shape of the piece. So that is one area that I will “refine” by sanding once the piece has dried. Here’s what I was able to do the next morning. (Note the color change in the photos in the daylight!)
And here’s the thing about that sanding. With diy-flex, I would almost always make the washer / frame shape out of regular (non-flex) clay. Why? Because the diy-flex clay (especially the extra-bendy stuff I could make from PMC+) was challenging to sand. It was so flexible, it just bent away from my sandpaper. I’ve read about heating this new PMC Flex clay to harden it up so that you could sand it. Had that really been necessary, in this instance, it would have made sense to just make the frames out of non-flex clay. But, given the success I’d had with smoothing the sharp-ish edges on the Möbius-strip earrings I’d tried first, I decided to make one frame out of flex clay to see whether or not I could sand smooth its inner edge. As you can see from the images above (especially if you click to enlarge them), I was able to smooth both pieces out nicely. I did hold them both carefully as I did so: the PMC 3 so I would not risk cracking it, and the PMC Flex so it would remain straight-up under my sandpaper. But I did not have to heat the Flex to accomplish this, which really did please me.
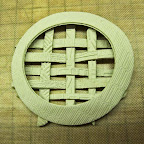
Next, I put the rigid PMC3 frame back onto the light bulb on which I’d dried it. (That’s why I’d made that one out of the non-flex clay: there is no reason at this point to have it move at all.) I carefully placed my woven swatch over that, shifting it around a bit until I was happy with its position.
Then I took a dab of water, and attached each strip-end to the frame.
And then, well, I really thought I’d taken photos of the next few steps too, but now I can’t find them. I put a few little end-trimmings in the bigger gaps around the frame to serve as supports. Then I moistened the strip-ends and the other frame element, and squidged all that together. Finally, I took a little bit of moist PMC3 and filled in all the gaps around the outer edges. (I could have used the Flex for that but, again, I was conserving my first batch of it.) Once that was all neat and smooth, I waited until I was sure it was dry. Then I fired it, sitting on top of a little pile of vermiculite to offer a bit of support. After firing, I polished it a bit, and added a liver of sulphur patina, before adding a jump ring from which to hang it.
My last comment here is that using the frame-ring made out of PMC Flex for the second side was a bit of an experiment. I wasn’t sure if the flex-aspect would help, or cause problems, in that step. In the end, I think it’s a bit of six-of-one, half-dozen-of-the-other. Its flexibility let me wiggle it around a bit to line everything up nicely; its flexibility also let one little segment end up a tad out of alignment. My current thinking about future pieces is that, with simple frames like this, I’ll probably go back to making both sides out of non-flex clay. For less-precise shapes, making it possible for the second side to be “flexed” to match the first (but out of a clay that can still be sanded as needed for clean edges) could be a real advantage.
Here’s the final result: one photo that shows both sides:
I’ve got several other high-priority things going on right now, but I just can’t resist sneaking a few moments here and there to play with this new toy!
(Sorry that the photo-colors are all over the place because I’m just shooting on my work-table as I go, not stopping to move everything over to my photo-table. And the light at my work-table varies by time of day and by which of the overhead lights are or are not on at the moment. I work in a building that’s over 100 years old, and much of the wiring is very old too.)
Fresh from the pack, when I try to break off a piece of it, it gives way in the same (what to call it? stringy? gummy?) way that diy-flex (regular silver clay with some glycerin mixed in) does:
There’s nothing wrong with clay that does that! I just note it here, in case you’re wondering why this happened to your clay. It’s normal!
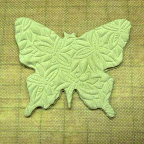
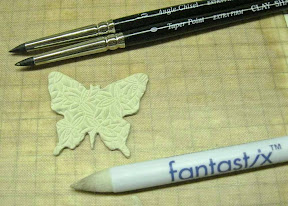
Right away, I decided to use a little “cherry blossom” texture (that I got ages ago at Cool Tools, but seems to have been discontinued…) and a butterfly-shaped pastry-cutter:
You can see (especially if you click on the image to enlarge it) that the edge of the cut is rather rough. Normally, I would smooth that out as much as possible while my clay was still wet; but I know that a lot of metal-clayers just leave it and sand the rough bits off later. I am just not into sanding clay if it can be avoided, so even when I find I’ve missed and left a rough edge behind, I still use a bit of water and various other tools to smooth out my clay. For this little test, then, I just left the edges as they were, to see how much I could smooth it once it had “dried” using my usual tools:
Pretty good!
My plan had been to cut a matching shape out of the interior of this butterfly, using a paper-punch I have. Except, it seems I had not marked that punch (for my own short-memory benefit) before I made this piece, and only at this stage did I realize it was one of my “thinner” ones … meaning this piece was one-card too thick to fit into the punch. Oh well, I’ll deal with cutting it, a different way, later on. For now, let’s just look at another little play-thing.
I had rolled out another little sheet, trimmed it down to a rectangle, and cut that in half. I left the pieces to air-dry overnight, and returned to find they were curving apart. I’ve seen a couple other early-testers mention curving, and having to press their clay down, but I’ve not seem that. The only curving I’ve seen has been like this, left to right:
Still, this is “flex” clay, so I never worry if it curves much in any direction. It’s simple enough to ease it back into shape:
The problem I ran into was with my next step which, of course, I did not stop to photograph. I had wanted to try something with this clay ever since seeing the little video that Mitsubishi had put out on YouTube about the product:
In it, they talk about how easy it is to let the clay “dry” and, since it remains flexible, you can still form it into a ring. Now, the one thing I’d always had trouble with, using the diy-flex clay, was when I wanted to join ends of “dried” flex-clay together. I found that to be far more difficult than with “wet’ clay. But I really didn’t want to invest the time in a ring first-time out. So I thought I’d just try making a couple little “Möbius bands” … where you take a strip, flip one end, and join them together. (With paper there’s tape to show the join. With clay, you get a true “Möbius” shape, where you can take a pencil, draw a line down the middle of the band, turning and drawing as you go, the whole way around, and end up where you start: there is no front or back, top or bottom of the strip. It’s all on the “same” side! If you’ve been following this blog for a while, you already know that I love to make reversible pieces. Continuous ones are even better!!!)
If you watch the video, you’ll see them make it look so easy! And I’m here to tell you their secrets: First of all, you can see the “cut” in the video stream where they left out a bit of the fussing needed to make it work (it IS possible, even with diy-flex clay) but, even more important, their band is perfectly smooth. That makes it much easier to get the join to work, because you can fuss and fill and sand it all smooth again. But I like textures, and I don’t like sanding. It’s not like it wasn’t going to work at all, but I soon realized (soon … after a twist, some water, some squidging together, some tape to hold it for a while, etc.) that it was not going to be quick and simple. I’ll work on that idea a bit more but, in the meantime, I moved on to test-plan-b for these strips.
I let the newly-damp parts dry again. I trimmed off a tiny bit at the ends that had gotten smushed; I also trimmed the second piece to match. I then gave each piece a twist, folded the ends up so the tips aligned, added a drop of water, and clipped them together:
Now, I could have gotten that shape with non-flex clay. But I would have had to do everything while the clay was wet. Or, more accurately, while it was starting to dry out, which can sometimes be a problem for me (especially when trying to make two matching pieces) and is far more often an issue with students when it all starts to crack. So, in that sense, the PMC Flex does make this project now far easier to do in a beginner class.
And, doing it this way, I could still try using a paper punch!
Not one of the fancy crafting punches, as I’d planned with the butterfly, but with a plain, small hole punch. Yeah, I could have drilled a little hole with a drill bit, but this turned out to be way more fun, once I’d gotten over the surprise!
With non-flex clay, I’d never have tried that. (I’d’ve just used a drill bit.) But, with flex, even though the piece slipped down into the punch-opening (gasp!), it was really easy to pry out–carefully–with no harm done! (I took the little “holes” I’d punched out and wrapped then with a bit of moist clay. I wrapped that in a piece of plastic, and put it back into the foil pouch. And by the next day, it had all rehydrated to the point that I could not find the little bits any more.)
The thing is, if you look at the piece lying along the bottom of the photo above, you’ll see that both it and its mate (though harder to see in the punch) have a very straight, sharp edge along what will be the top end when hung. I didn’t want that sharp edge with the rest of these curves. Had I planned to do this from the start, I would have smoothed all those corners while it was still wet. But now I had dried, attached, and punched clay, and I needed to soften its edge.
With non-flex clay, I’d either wet and smooth it (as I discussed earlier in this post) or I’d take out a bit of sandpaper and smooth it down (I may try to avoid sanding when I can; but I have no qualms about doing it in situations where it really is most appropriate…). With diy-flex clay, however, I always found that sanding was pretty difficult. Actually, the fact that I really enjoyed working with diy-flex is what first led me to figure out all sorts of sanding-alternatives! Once I started using them, I just let them spread over into my non-flexible greenware too, thus replacing much of the sanding I’d earlier been taught.
But the video and the package insert talk about how you can “dry the object by heating it to 300°F for 20 minutes.” Hmmm, I’d never even though to try that with diy-flex clay with glycerin in it. And, as of my writing this, I still haven’t … with neither diy-flex nor PMC Flex! I think those two references may have caused a little confusion via some “social media” posts, where people talk about “baking” their clay. Personally, I never saw any reason to “bake” it until you want to make it hard enough to sand. (Or, if you want to harden it in the process of building some complex 3-D structure, but I’ll get to that in some other post … much later on.)
For now, I just want to go on record as saying that you can sand PMC Flex gently in its flex state, without any “baking.” which is what I did here:
I didn’t change it a lot, but I did round out the corners as I’d wanted, while it is all still flexible.
That’s all I have time for tonight. I’ve also started on a woven-silver piece that I hope to report on next.
I’m teaching a fine-silver workshop this week (non-flex: had to have that clay on hand before the PMC Flex was actually shipping, but I’ll show of the Flex a bit since I have that first trial batch), and I will report on firing this clay once all the student pieces have been fired.
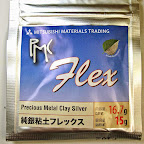
There’s a lot of “buzz” today in the Metal Clay community: Mitsubishi has just released a new fine silver product they’re calling PMC Flex. Well, it’s been available in Japan for a couple months now; the rest of the world is able to order it starting today with, I’ve heard, shipping to commence on Monday. I was lucky enough to get my hands on some of it just this week, so I haven’t had the months of experience with it that some of the official “early testers” have had, but I wanted to report my very first reaction….
First, though, some background. I’ve been working with clays that remain flexible after drying almost as long as I’ve been working with metal clay. I will say, that I find the term “flexible clay” to be a bit confusing: all clay is flexible when you’re working with it! The ones I’m going to talk about today are the ones that remain flexible, that do not get really hard, until they are fired in some way.
The center pendant in this group of three (photo, left) was one of the first pieces I ever made this way. It was after I’d used some clay at an event where I gave repeated demos, working and reworking it, exposing it to oil (so it wouldn’t stick to the textures I was using with it), adding water (to replace what had evaporated during use, but also risking the washing away of some product, silver and/or binder). By the end of the day, the clay had gone rather funny: it wasn’t acting like clay at all. It had gone from sticky to slippery. It didn’t leave bits stuck on tools or hands but it did sort of slime everything it touched. Was it destroyed? I had no clue. In the very first class I took, I’d been taught that you could extend the working time of clay by adding a very tiny bit of glycerin, but one should take care to not add too much. (And … I later heard that same instructor say she no longer recommended doing that.) I’d read in some online group that you could “revive” clay that had gone “off” by adding a bit of glycerin to it. I’d also heard or read somewhere (in a class? online? this was years ago now..) that you could make clay that would remain flexible after being allowed to dry if you added a good bit of glycerin. No specifics. Nothing about how much, or how one should do it, or just what would happen if you added too much (other than, obviously, thinning the silver out so much that it could not sinter in the kiln). There were just vague comments. Questions I’d seen about such details had remained unanswered. But … I had some glycerin on hand: what more did I have to lose beyond this clay that was unworkable? Why not try it? And, while at it, why not try to go the whole way?
I added some to the wad of muck I had. I kneaded it in. It went even more funny, and not in a humorous way: by then it was falling completely apart. I tried to not panic. I attempted to knead it some more, and it seemed to start getting better. I kneaded a bit more, and worked a bit of water into the clay too. I began thinking this might work, after all, so I rolled it into a neat ball, wrapped it up air-tight, and went to bed, hoping that would all soak in better with time. The next morning, I took the clay out of the plastic, and it seemed much more workable. It didn’t feel like clay fresh from a new pack, mind you, but I could roll out a couple small pieces and texture them. I let all that air dry while I did whatever all else it was I had to do that day (years and years ago now). When I got back to it that evening, it was wonderful: dried out enough that didn’t feel like I could smash it with clumsy fingers, but still soft and pliable enough that I could cut it with scissors and begin to weave it together. I couldn’t get the strips really close together, but that was fine. As I said, above, that weaving is shown in the center of the group of three. (The frame around it was made from fresh, regular clay.)
I had a little bit left from that test, so I added a little more glycerin, kneaded it in (it was easier this time), waited maybe an hour or two, then I rolled out a couple more small bits and left those to dry overnight. Voila! The dried clay was enough-more flexible that I could weave the strips much closer together: the pendant to the right in the collection was the result of that.
(The one to the left in the trio was made later; the photo is an old image, taken to promote one of the first “woven silver” workshops I taught.)
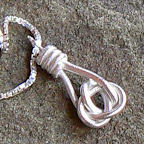
But this getting-more-flexible trend was appealing. I had just a tiny bit left, so I added one more drop of glycerin to that. (Proportionally, with how little I had left, that was a huge amount more!) Again, I kneaded that in and wrapped it up. The next day, I found it that my final scrap was flexible enough that I could tie it into this little knot. I used the entire last bit in making this, spending time adjusting the knot to the middle so the ends would line up, meaning I didn’t have to trim any off. I used fresh wet clay to add the little coil along the top. Once that had dried (hard), I made a loop from fine silver wire and embedded that into the top. I apologize for the quality of that image: it’s a detail from a very old photo, but it’s all I have to show of that piece now.
Over the next few years, I continued to make my own silver clay that would remain flexible as greenware, playing with weaves, knots, twists, and other shapes in various ways. The curved-square piece to the left (which I’ve called Magic Carpet in public but is, to the mathematician that’s still quietly in me, a basic example of creating a bit of hyperbolic space…) is but one of such explorations. I learned about Hadar Jacobson and that, in her first book, The Metal Clay Handbook: Textures and Forms, she talked about this, which is one of the main reasons I bought that book … which, eventually, led me to learning much, much more from her and her approaches!
When Hadar came out with her clays, I played around with them for a bit. But I didn’t go all-in for her clays until two things happened around the same time: Hadar herself came to town (well, our local metal clay guild chapter brought her in!) to teach a workhop on her “married metals” approach (which I took), and I started playing around with adding glycerin to her original line of clays, which she now calls the “flex” powders, because they are the most (not the only, but the most) conducive to having glycerin added to yield clay that stays flexible if you want that. (If you want the clay to dry hard, just don’t add anything besides water to the powders.) Mixed Metaphors, shown to the right (before it got its bail and went to live with my cousin Debby) is one example using copper, bronze, and a little bit of steel while combining married metals with weaving.
The other thing that people do with glycerin-enhanced metal clay is to cut it with electronic cutters, like the Cameo and Portrait products from Silhouette. (That was actually one of the things I’ve been hoping to write a bit about this coming winter!) People started by cutting out the very thin PMC+ “sheet” product with that. (I don’t know this for sure, but it would not surprise me to learn that “sheet” was the inspiration for trying glycerin! Though “sheet” acts somewhat differently than does glycerin-enhanced clay, with both the point is that they never quite dry out completely, and thus remain flexible. While sheet does make nice, plain embellishments, the advantage to glycerin-enhanced clay is that you can add textures in various ways, and make it thicker or thinner as required for your design.) When folks started trying to cut sheets of regular clay with it, the question became whether it would be helpful (or not) to add glycerin. (The short answer is: sometimes, yes; sometimes, no. The full answer, available now in various online sites, will be tackled here in future posts … eventually!)
At last, on to the new PMC Flex fine silver metal clay. Needless to say, when I first heard about the new PMC Flex, I was both eager to try it it and wondering why one might purchase that rather than just go the DIY route. When I first got my hands on a pack of it, I began by trying the techniques I have in finger-memory, the ones I’ve been doing and teaching for years, just to see how it performs. The very first thing I did was to grab a little piece of it (a bit less than 1 gram), and roll it out into a “snake” or “rod” shape. I left it to dry over night.
The next morning, I measured it: 3.25 inches long, and the size of 15 gauge wire. (Clearly, it will have shrunk a bit while drying, and will shrink even more when it’s fired. But that’s it’s “dry” measurement.) It seemed like it would bend, but felt a little stiff. I’ve had that experience with the glycerin-enhanced clays too, and found that gently “working” the piece along its length will often make it more pliable: I tried that with this piece, with the same good result.
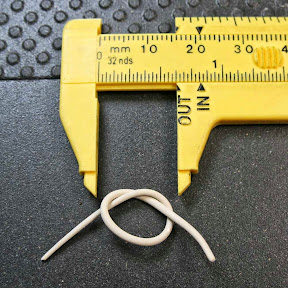
I then tried to tie it into a knot. The photo shows how far I could get it to go before feeling a lot of resistance. (The calipers shifted a bit as I was setting up the photo, so they represent a visual guide and not an exact measurement, but that’s OK for this very-preliminary report…) If I want more elaborate knot designs, I know how to get a tighter bend with my DIY-flex (as shown, for example, even in my first silver knot above, which began with a bit of clay about the same size as this). Still, this PMC Flex will clearly be great for a variety of other applications. I plan to write more about those, with photos, in future posts. As ever, as time allows…. But I’ll close by saying that it is a lot of fun to have such a delightful new toy to play with!
Update: With Hadar Jacobson’s Flex-clay powders, one trick to slightly increasing the flexibility of a piece of “dried” clay is to refrigerate it for a little while. I tried that with the above piece and it seemed as though it was going to let me pull it a little bit tighter. That is, until is broke just about in half. I’ll use the two pieces some other way, but figured I should note that (as a reminder to myself, as well as information to you…).
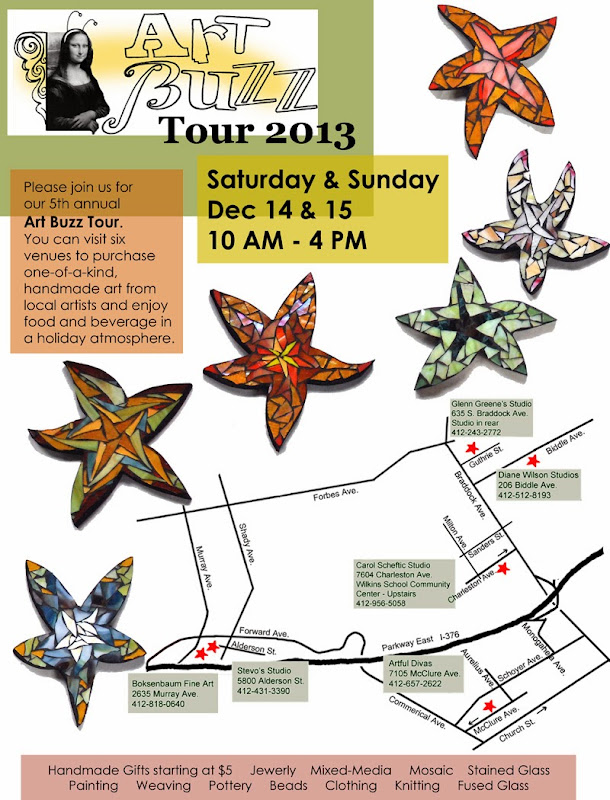
Have you heard the buzz? Six sites! All in the Pittsburgh area’s “East End” this weekend: Regent Square, Swissvale, and Squirrel Hill. And my studio is one of the locations on it again this year.
I’ve got lots of jewelry on offer, plus a handful of other small adornments.
I also have aloe vera plants that need a new home, babies that i repotted from some of the big ones I keep around. (I do work with hot metals here!) BONUS: small ones are free with a purchase of $35 or more (or a discount can be applied to the price of any of the larger ones if that’s what you prefer).
Plus you’re welcome to share some of my cookies and hot mulled cider. (I also got the makings for cranberry-orange frosties but, with all the snow that’s falling, I’ll save that until there’s a request or I run out of cider, whichever comes first.)
Have you heard the buzz? It’s even louder this year! Over forty artists! Seven sites! All in the Pittsburgh area’s “East End” this weekend. And my studio is one of the locations on it again this year.
At WSCC (where I’ll be), the Holiday Gift Shop will still be running downstairs, and I am pretty sure that Daviea Davis will have her glass mosaic studio open too, upstairs across the hall from mine.
If you’re in the area, I sure hope you can stop by. To say, “Hello” and “Happy Holidays” at least. If, for some reason, you can’t get yourself there in person, how about leaving a holiday greeting as a “comment” on this blog post. Even having you say just “Hello” or “Happy Holidays” would be much appreciated!
I look forward to seeing / hearing from you, dear readers, so I can extend my best wishes for this holiday season to you too, in return, in a more personal way.
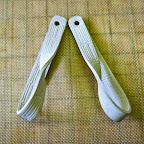
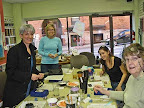
I led a “woven silver” workshop at the weekend. The first photo (right) shows the pieces that were made that afternoon and, um, once everyone got a roll, that evening too. (Yes, a few didn’t involve weaving. That’s OK too.) In that image, no finishing has taken place: it shows the “white” appearance of the silver crystal structure straight out of the kiln. I just wanted to grab a quick photo, while I could, to show how productive the session had been.
The second photo (left) of the folks at the west-side table at work is mostly a sort of visual note to myself to try to remember to take photos more often, in class but also elsewhere. Because the caption for that image should be, “No! I won’t look up! I will not look at the camera! No!” Still, I’d like to thank everyone who was there for being such good sports … in every other way.
I haven’t posted over the past couple of weeks because I’ve done all sorts of things where I just did not think to take any photos. You might think that I would have taken photos while attending a workshop on photographing artwork. But no, there were lots of handouts and images of copyrighted work and discussion and more. Even though I had both of my cameras with me, the only times either one came out of its bag were to show a few images that were already on their memory cards.
You might think I’d’ve taken some shots at our recent metal clay guild chapter meeting but, no, I didn’t even think to take a camera to that. We had an opportunity to play with the Silhouette Cameo cutter that one of our members has gotten; we did lots of great planning for next year; and there was all the usual sharing and showing and telling and hand-on time and more. But no photos….
I also didn’t think to take a camera on any of my recent shopping expeditions. But, now that I think of it, I have added a few interesting items to “the stash.” Maybe I can manage to (remember to) take photos and write in the next week or so, before those elements finish going to into pieces and out for holiday sales events.
It is such a busy time of year, with all the autumn chores and the lead-in to the season of holidays, I am sure you, dear reader, are keeping busy too. Please know that I hope you are feeling productive!
Have you heard the buzz? Eighteen artists! Seven sites! All in the Pittsburgh area’s “East End” this weekend. And my studio is one of the new locations added this year….
If you’re in the area, I sure hope you can stop by. To say, “Hello” and “Happy Holidays” at least. If, for some reason, you can’t get yourself there in person, how about saying “Hello” or “Happy Holidays” or something else even more interesting as a “comment” on this blog post.
I look forward to seeing / hearing from you, dear readers, so I can extend my best wishes for this holiday season to you too, in return, in a more personal way.
Sorry, I’ve been a bit too busy to continue the thread I started back there. But I suddenly have a little “found time” this afternoon, so I’ll try to sneak in one quick post in between some crazy rescheduling. (Long story about a leak in the water line at my house that I thought was finally going to be fixed today, but the water company called to say they were “too busy to get to this” today so we’re trying to coordinate a time for next week … PA is so not-CA sometimes, and a water line leak, even if it’s just a small one, that can stretch on for a month with no one but me seeming to be very concerned about it is one of them…).
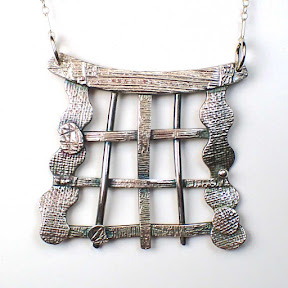
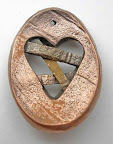
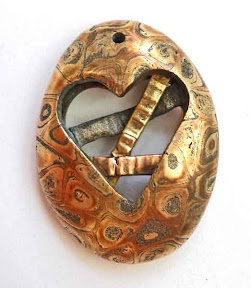
Anyway, the photo at the top of this post is a straight-from-the-kiln shot of a piece with a “mokume gane” effect in the metal on this side (it’s all-copper on the other side, shown in the second image, below) and strips of solid copper or bronze or steel woven inside the little heart-shaped opening. At this point, it has been fired twice: once to burn off the binder, and a second time to sinter the metals. (It’s not true mokume gane, because it uses an entirely different technique–pioneered by Hadar Jacobson from whom I learned it–but the end result has a somewhat similar appearance, not identical, but closer to mokume gane than to any other technique.)
And this sure does illustrate the difference in shrinkage among the various metals and clays! If you realize that the “mokume gane” had been sanded to a very smooth finish on that side when it went into the kiln, you can see some of the variation by just looking at the bumps and valleys on that surface. But the three distinct woven bars illustrate it even more. Hadar’s “original / traditional” bronze shrinks the most: look at the huge gap that opened up in that bar! Her copper is in the middle: you can see a fairly small crack in it. The steel, both because it’s steel and because it’s available only in the Quick Fire formula, shrank the least, by a lot. I actually find it rather interesting the way the steel bar in the weave bulged a little bit out the back of the heart-shaped opening as the rest of the piece shrank down into it.
So, it was time for some repairs, followed by a refiring (another two-phase episode). This second photo shows the patching in-progress, from the other (textured copper) side. I had filled in some gaps in the copper, and had just finished adding the bronze patch when I got a phone call. So I caught this shot quickly while taking that, and then went back to texturing the patch as soon as the call finished (before the clay dried).
Fast forward through what ended up being several rounds of patching and refiring (… what can I say: each two-phase refiring can fix some places while opening up cracks somewhere else, until you just say, “Enough! It’s done!”…) plus some polishing (especially on the side with the “mokume gane” effect), and I had a piece that looked like the final photo shown below (though it got a bit more polishing, then a good oiling to protect the steel, and finally a nice coat of wax, plus a hanging-ring and a cable-chain, all before it was really done…).
I call it, “Heart on the Mend.”
It’s among the hand-made, one-of-a-kind jewelry pieces that will be available at the Three Rivers Arts Festival.
I’ll say a bit more about that event in a follow-up post, but do let me know (leave a comment) if there’s a chance I’ll see you there. (I’m “working” there only two half-days, but I’ll be around and about at other times.)
I noticed something in my studio yesterday that, once I got over the surprise, did actually make sense in a way I hadn’t thought about before.
In several other posts, I’ve mentioned that I like making pieces where I weave together bits of metal clay that have been specially treated so that the resulting dried “greenware” remains flexible.
Well, I recently made several pieces using that technique applied to copper, bronze, and steel clays too. I’ll post about those pieces eventually, I’m sure, but it’s the leftover materials from those that are the focus of this post.
With silver metal clay, it’s fine to just leave lying about the dried greenware (whether it’s of the hard or the flexible variety). Dried pieces can just sit there waiting to be fired, and extra bits of dried but still flexible greenware can be left alone waiting to be used in some future project. (Leftover moist clay should be sealed up securely, so it remains moist for future use. Care should be taken with leftover moist clay to prevent it from becoming moldy, but that’s not my point here either….)
With copper and bronze clays, you can leave dried pieces around for a little while, waiting to be fired. Maybe not as long as with silver, since the outer layer will begin to oxidize (tarnish) eventually, but it’s not like you have to rush to get the stuff into the kiln. (Besides, since you can fire fewer of these pieces in a single load than you can with silver, it doesn’t take as long to accumulate a “full kiln load” as it does with silver … though sometimes it does take me a while to find the time to tend to the more complex firing schedules with these clays.) The same seems to be true of stuff that’s been treated to form flexible greenware. It will remain flexible and usable for some time, though not forever. Moist clay should be sealed up very tightly: in addition to preventing evaporation of the moisture in it, you also want to reduce any possible reactions from exposure to atmospheric oxygen and pollutants. Luckily, freezing of any of the moist or dried clays in this family seems to help reduce the oxidation that can form as a result of even limited exposure.
But steel, well, that’s a different beast. It doesn’t just tarnish, it can actually rust, so finished pieces require some extra treatments to help reduce that. But here’s the bit that surprised me when I first saw it, but not once I’d thought about it: specks of rust can form all over any pieces of flexible greenware that are left lying about! Even if it’s only been for a few days, the trick to flexible clay is that it never really dries out and, of course, damp steel will rust for sure….
Shown below are “left over” pieces of flexible greenware. In order, they are: copper, bronze, and now-rusty pearl gray steel. Sigh.
I guess I’ll have to try freezing any leftovers from the next batch I test out, to see how long that holds up.
I haven’t finished posting my notes on working with copper, but I got sidetracked teaching half a dozen workshops and private lessons.
Those all used silver metal clay. (Ahh, the reliable stuff that I understand!) We made boxes (both lidded and sealed). We wove “flexible greenware” clay into interesting shapes. We made pieces that move via the use of “metal clay” rivets. Of course, I get so involved in the moment, that I don’t think to stop and take many photos. But here’s a small sampling, from three of my workshops this past week.
2/3 of the box-class at Zelda’s, packing up and looking very happy…
The rest of the crew at Zelda’s, finished and happily exploring other potential projects
Michelle (who decided to increase the challenge in her own project) adding a hinge between two “woven” components.
Sally, refining her little lidded box.
I love working with this stuff, but I also love helping others to create something with it that they can proudly wear–or give away–saying, “I made that myself!”
I am completely amazed to realize that my “Magic Carpet” piece has just been featured on Wendy McManus’s great website, Metal Clay Magic. What an honor!
At the recent conference, I did the same thing Wendy describes: only after our delightful discussion (about brand neutrality in general, the relative oddity of brand-specific guilds, and the potential impact of so many new brands and formulations) did I realize why her name was so familiar to me. Duh!
What a memory she has, though, eventually. This pendant Wendy featured is from several months back, soon after I’d also started Vickie Hallmark’s Month of Earrings challenge.
If anyone landing here from Wendy’s site wants to read more about this particular piece, I’ve posted about it several times: once, describing how it came to be and, again, briefly, after I’d entered it in one of my favorite local shows, Art All Night.
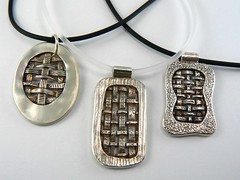
I probably should mention that Woven Silver is the topic for my next class. I’ll be back at KoolKat again for that one, on March 28. It’s a class that’s open to beginners, so the kinds of things you can expect to make are along these lines:
But, as I said in the post before this one, I’m working on a little collection of “three- dimensional” woven pieces too, and looking forward to being able to teach an intermediate-level class this summer where students can learn that too. Whether flat or curvy, weaving flexible greenware is lots of fun!
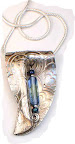
But of course, I’m easily distracted from the earring challenge. The Bead Mercantile show came to town last weekend. As I approached the Talisman booth, my attention was immediately captured by these beads:
I cried out “Ooooh!” as I grabbed a strand of them. Several friends from the Western PA Chapter of the PMC Guild were there too, and they commented that the beads were interesting. But none of them said it with the sort of enthusiasm that I clearly felt.
For me, that is, it wasn’t just the beads. Yes, I like them, but the exclamation was because I knew I was going to leave the show and go figure out how to make a piece like this from metal clay:
At this point, they don’t quite go together. I like the shiny silver (a bit more muted in the photo than in reality), but the pendant needs a bit of a patina if it’s going to be strung with those particular beads. I just figure that I’ll wear it like this for a few days, to see what kind of reactions I get to it as a solo piece, while I give a bit of thought to how I might modify the construction process I devised so that making a whole series like this might be reduced to a reasonable amount of effort.
Once I’ve had a chance to make several more, then I’ll figure out which one(s) to patina and string with the beads that inspired them, and which to just hang on good chains all by themselves. Some final results should appear on this ‘blog eventually!
And the Month of Earrings challenge lets you go back and include anything you made since the start of the year. That is, the month is really three months long: isn’t that a delightfully generous deadline?
I made that pair while Tim McCreight was in town in mid-January, teaching classes at the Society for Contemporary Craft.
I set that photo up so that clicking on it will switch to a page with a larger image and brief description of how these were made.
A later addition to this post: I forgot that I had an old photo of the woven-sheet earrings from the class I took with CeCe Wire down at the (then-wonderful but now-defunct) Made in Metal in Baltimore:
(While my more recent photos aren’t great, looking back at that one I can see some improvement…)


") Artsmiths of Pittsburgh
Artsmiths of Pittsburgh") Hoyt Center for the Arts, New Castle, PA
Hoyt Center for the Arts, New Castle, PA") Portage Hill Gallery, Westfield, NY
Portage Hill Gallery, Westfield, NY") _Open Houses in my Studio
_Open Houses in my Studio _Or…contact me about hosting a private party!
 Just register now! Right here!
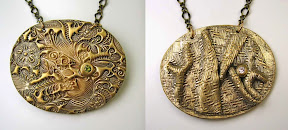 Also please notice (e.g., down the right side of my blog) that this session will be followed at NHAC by a simple, two-night introduction to making a beautiful piece out of bronze metal clay. Registration for that one will close on March 16. (Bronze is a little trickier to work with than silver, so you may end up making only one piece … but the materials cost less, so bronze worth risking for big “statement” pieces!)