Convergent Series

learning, using & teaching metal clay, and other aspects of life

Posts Tagged ‘polish’

And now, my original reason for taking the photos with my last post….

Posted by C Scheftic on 2016/01/17

I may to have to try to do this again in the summer, when the natural lighting situation is better, because I don’t think these photos tell the tale as distinctly as I’d hoped. But this is one thing I’ve been experimenting with over the past week…. The point is to look at the difference in the color (and size) of the silver pieces at different points in their process. (Next time, instead of trying to capture so many, I think I’ll try to focus specifically on just one or two, with close-ups.)

But here is a shelf-load of pieces, ready to go into the kiln. They don’t look silver-colored at all, do they, even though they are at least 90% silver! Next time, I’ll try to burnish one in the clay-state, to try to show that the silver really is there, but for now:

And here we have that same shelf-load of pieces, after being fired, when the shelf had cooled just enough to safely remove it from the kiln. Note the “white” color of these pieces: this is normal for just-fired metal constructed from silver clay. Comparing this to the previous photo, you can also get a sense of the shrinkage that took place.

And here is that same shelf-load of pieces, after having been run through either a rotary tumbler (with mixed-size and -shape stainless steel shot) or a magnetic finisher (with tiny stainless steel pins). I need to work on the lighting for each of the different versions (and I really struggled with the meager equipment I have to get all of the shined-up ones together without too many shadows or too much glare!), but I hope you can see that they are, at last, starting to look like silver!

Posted in General Techniques, Teaching Metal Clay, Technical Details | Tagged: , , , | Leave a Comment »

One more thought on using my tumbler…

Posted by C Scheftic on 2016/01/15

Well, it’s about time! Last night, I finally took two minutes to figure out how to “publicize” a blog post on Facebook. (That time was split between finding where the settings were and choosing among the options available.) And I used that feature for the first time with my last post. This morning, I found the following exchange over there:

Now, Alice is correct. So I could have just “liked” her comment but, well, I admit I don’t know how to be terse, and I thought it was worth trying to be clear about what was going on, for anyone else who might stumble across the discussion here. So I decided that another blog post was in order. Once I’ve got it ready, then I’ll go “like” her comment and share this post too.

This is what my rotary tumbler looks like when I’m ready to use it:

There’s a brown paper bag folded in thirds and stuck under one end. Why?

Well, I don’t think it’s specific to this style of tumbler, though it may be a bit more common with these than with some others. But I discovered this trick with the very first tumbler I ever used: a little, all-plastic, undersized for its intent, rock tumbler for kids. The key is that the barrel has to be in good contact with both rollers, both of which have to be able to turn smoothly.

In an ideal setting, the base would be flat on a table. The motor would turn and the belt attached to it would turn the roller in the middle of the base. That would turn the barrel. Because the barrel is also supported by the other roller–the one at the end–that one would turn too. Thus, the motor, belt, both rollers, and the tumbler would all roll around together.

But, with this particular unit, if I simply put the base flat on the table and set the filled barrel on it, then the roller in the middle–the one that’s driven by the motor–that one turns just fine. That’s my clue that the “belt” connecting it to the motor is adjusted correctly. (If that roller slips, or seems to stick, that’s a sign that the belt needs to be adjusted which, for the record, is a routine maintenance task.)

In my case, however, this barrel would just turn in fits and starts. The “other” roller turns only when the barrel turns, so it’s not helping either. It seems to me that there are two possible solutions (though I do welcome other informed suggestions…):

  1. Slightly raise the end with the motor on it. This pushes the barrel onto the roller at the “end,” which forces that one to move along with the barrel.
  2. Slightly aise the end opposite the motor. This pushes the barrel onto the roller in the “middle,” which reduces the role of the one at the outside end.

I’ve tried it both ways and, in fact, both seem to work. But, as shown in my photo, above, I tend to set things up the first way, so the end with the motor is just slightly higher than the other end. In my logic, the second way seems like it’s putting extra pressure on the motor to do all the work. The first way seems to force both rollers to contribute to the effort, and that’s why I prefer to set it up that way.

If you have any other suggestions, or a better way to explain what’s going on here, please contribute to the discussion via the comments below!

Posted in General Techniques, Misc. Musings, Technical Details | Tagged: , , , | Leave a Comment »

I love my clear plastic hexagonal tumbler barrels!

Posted by C Scheftic on 2016/01/13

An art-jewelry-friend of mine, Zoe Nelson, posted this in a metal clay group on Facebook last week. But I check Facebook only sporadically, so I didn’t see it until a day and a half later, by which time she’d already received dozens of suggestions and found a neighbor whose car-repair tool (an oil filter wrench) actually helped to solve the problem.

Until then though, none … none! … of the suggestions were how I would have responded: a few were halfway-decent alternatives, a few were complaints rather than solutions, some were simply sympathetic notes, and the rest were ideas that were far more complicated than I’d’ve thought necessary, a few even likely to damage the barrel. Thus, this blog post, at last, that Zoe knows I’m writing for her (and any others in a similar predicament!) to have for future reference.

I did make a range comments about my tumbler that uses these barrels, and more, a few years ago. (Looking for the link — gosh, that was way back in 2012!) So I have over three more years experience with it since then.

Yeah, the clear plastic lid can be a bit tricky. But (just as Zoe said in her Facebook exchanges with her readers) I’ve had as much trouble, in different ways, with the lid on the kind of barrel that’s made out of black rubber. While your experience may differ, I will take the clear plastic ones any day!

You can follow the link above to read the pros and cons I wrote back in 2012 (and see a few more photos, plus other alternatives, if you landed here without a lot of knowledge of tumblers), but here are the things I want to say now that relate specifically to Zoe’s problem and anyone else who may encounter a similar one.

First of all, let’s try to prevent the problem from the start:

  • After you’ve filled your barrel with shot, water with either a bit of dish soap or burnishing compound, and the pieces you want to tumble, do this: Dip your fingertip in the liquid and run it around the rubber ring that seals between the barrel and the top. You don’t need to soak it, just get it slightly damp. This seems to help it form a good seal.
  • Then put the lid on and turn it backwards until it feels like it is seated correctly and fits smoothly. (I don’t do this all the time, but if it seems to stick at all at the next step, then I always back up and do this!)
  • Turn the lid forward to tighten it. It should turn smoothly and freely: if it doesn’t, stop! If you have trouble getting it on, you will have more trouble getting it off! It should tighten easily. If it’s catching, it’s not seated correctly. Back up a step, and repeat that one and this until you get it to close up easily.
  • Then, tighten it a bit more so that it seals. The lid does need to be tight, but not super-tight. Tip the barrel sideways and turn it around a couple of times (like it will turn on the base), and see if it leaks.

    • If it doesn’t leak, proceed to start tumbling.
    • If it does leak, try to tighten it a little bit more and repeat the test. (If there is some liquid in the little “gaps” in the big part of the barrel, where the straight edges connect to the rim, that might be all that’s leaking. So test it for a bit longer and see if it stops dripping once that has emptied out.)
    • If it continues to fail, don’t over-tighten it! Spin the lid backwards and, if it moves smoothly, go ahead and try to re-tighten it. If it doesn’t move smoothly or still continues to fail, just take it off and start from the first, seal-lubricating step above (checking to see if it may be time to replace that rubber ring).
  • When you’re done tumbling, the lid should come off…. It may take a bit of effort (you did have it sealed up well, you know, so it wouldn’t leak!), but set it down flat on a table, hold the barrel, and figure out how to push down (to press against that great seal you managed to make) and turn the top, let up and turn if you can, push a bit more if necessary and keep trying to turn, until it starts to move.

Now, if that last step doesn’t work, ignore all the suggestions about things like cooling the bottom while heating the top, or hitting the edge of the lid with a knife, or trying to pry the lid off, or any of the other tricks that people have tried in their kitchen, and use the method that I always use in mine and which has always worked on my clear plastic tumbler barrels too. I will quote it directly from the funny but still useful book by John and Marina Bear that is illustrated to the right (just so you get an idea of what the whole book is like, in addition to the tip on what to do…):

Problems with Utensils
Stuck bottle or jar tops

H. Allen Smith revealed to the world the technique for opening all screw-top containers. Now there are untold millions of us who face Mount Kisco or wherever it is he lives and say thank you every time we are faced with an obstinate top.

The technique: Bang the top flatly on a hard surface, like the floor. Not the edge, but the flat surface of the top. Just once. Hard. That’s all. And to think of all those jars we used to hold under hot water.


(Not that I want to date myself here, but I found that book in what must have been just a few months after this version was published. I have the 1973 UK edition: that’s the year I moved there — my second real full-time job after college — and I suddenly found myself cooking in a somewhat different kitchen using a number of unfamiliar local ingredients, and in London at that time there was a waiting list of over a year and a half to get a phone installed! (I was there for only two years, to the day! So I never even applied to the waiting list. We had postal service twice a day, and lots of people I knew didn’t have a phone either: we could simply write letters back and forth to make plans for the evening! But I digress…) Transcontinental phone calls back then would have been way too expensive anyway… so I had no way to call my family or old friends for help and there were times when I just wasn’t ready to admit to my new English friends some things that tripped me up. The book was a hoot — written by former New Yorkers living in the UK — so although it did use the British terminology I was just beginning to learn, the attitude sometimes felt familiar. And it was helpful too! People seem to either love or hate that book, and I’m one of the former….)

Anyway, there may be a few “bad” clear plastic tumbler barrels out there (and others that have been damaged by mis-use) that are harder to tighten, and those will also be harder to open. But I have two myself: one marked A for the Latin Argentium aka silver (or other precious metal) pieces, and the other, marked B, for pieces containing any form of Base metal. I’ve used a few others at meetings or workshops. I’ve seen people struggle to get them to seal and I’ll admit I struggled with mine the first few times I tried to use them, until I got a feel for it. Like riding a bike (or rolling out metal clay) once you "get" it, it seems easy!

And, every time I’ve had a problem closing any of those barrels, I’ve just loosened the lid, spinning it backwards until I’m sure I’ve got it seated right, and closed it back up with little difficulty. If I tighten it just enough to get a seal (and even that does take a bit of practice to get the feel, but it will come if one remains calm and pays attention), it may take a bit of oomph to get it to start to open, but it will come loose again. Or, if it does resist, just use the tip above: lid down, flat, once, hard.

Because we do need to be able to retrieve our beauties once they’ve completed their tumble-burnishing, don’t we?!!

Posted in General Techniques, Misc. Musings, Technical Details | Tagged: , , , | Leave a Comment »

Who knew?! Colors, polishing, etc.

Posted by C Scheftic on 2013/11/12

Back in August, I wrote about one of a series of “pillow” beads I’d made using Hadar’s Quick Fire Bronze powder. In particular, I ended the post with a photo of the amazing colors the kiln provided that time, and a comment that I knew they were somewhat ephemeral.

Well, yes, after only a short time (and despite having tried to “protect” them with several layers of acryllic spray), they became rather dull. Still there, but no longer jump-out-at-you vivid. So I proceeded to do some polishing (moderately aggressively in the center-design area, and more gently around the edges) and then re-coated everything. This provided pieces with clearer bronze-yellow center-designs, while still maintaining a trace of the kiln-colors around the edges. I didn’t really think the vivid colors would last, but the subtle ones shown here have remained much more stable ever since. I’m pleased with these results.

The thing that did surprise me, however, was something that had not been at all obvious with the vivid coloring, but did jump out at me (peering closely through my bifocal safety glasses for magnification as I worked): my straight pencil-lead “registration” marks — ones that I’ve come to use often (to align parts or holes or … ) on silver clay that is fired in regular air — do not simply burn off when you bury bronze in activated carbon during firing. Who knew?! Did you? It was a surprise to me, so I thought I’d share it with y’all.

If you want to give your piece a bright, shiny polish, it’s very easy to grind (sand) the marks off. (I did that with another piece, just to be sure, though I didn’t think to grab a before-photo to use here.) But I didn’t want to do that with the pieces shown above, especially not to the one towards the right (on a brass chain). I liked its aged, colored look. So I’m just leaving the straight-line mark. I showed the piece to a number of people (metal clay artists and otherwise) and, in person, it didn’t seem to jump out to anyone (until I pointed it out to them). I’m now just calling it a part of this piece’s design.

These are now ready to go off for holiday-season sales. I hope they find good homes!

Posted in General Techniques, Technical Details | Tagged: , , , , , , | 1 Comment »

Some Thoughts on Finishing: Strength!

Posted by C Scheftic on 2012/10/08

One more comment, now that I’ve started down this route. And then I really have to get back to other things….

I have heard people say that they tumble their pieces to work-harden them. Personally, I don’t believe it works quite like that. And it’s not just a theory; it is based on at least one example (well, one series of examples) from my own personal experience.

When I got my first rotary tumbler (the one with the smelly barrel that I hated, which I mentioned two posts back), part of the reason I did so was because I’d heard people talking about work-hardening via tumbling. And I’d seen how mixed stainless steel shot did appear to bang on pieces as they tumbled, so it seemed to make sense. Since I’d started playing around with making rings, I wanted them to be as strong as possible.

Especially because I wanted to make a few adjustable / by-pass / wrap-around rings: the kind that do not have what I think of as the “extra strength of internal connectedness.” (If there is some official technical term for that, I’d appreciate learning what it is! What I’m referring to is how much harder it is to bend the band of a continuous ring, compared to that of an adjustable one.)

And, yes, I do understand that fine silver will never “work harden” to the extent that sterling silver will. (But it does get harder with working than it is after being annealed, and heat anneals it, and firing uses heat, and hammering will un-anneal it even if it does not get it quite as “hard” as work-hardened sterling.)

So there I was, working with fine silver metal clay, and I was willing to make thicker bands to help compensate for its softness; I simply wanted my rings to be as strong as I could make them. And I’m here to tell you that, in teaching myself to make them, I found out that tumbling does NOT yield full strength. If you think it does, you are wrong! I’m not saying it has no effect in that regard: tumbling is better than doing nothing. Yes, in the past few posts I’ve said that the shot does bang on pieces as they’re tumbled, but perhaps I should have used the word peck instead. Thousands, even millions, of little pecks does not equal a handful of good hammered whacks! Those pecks do appear to add a little bit of strength [later clarification: but just to the surface, not the whole way through the piece] which may be enough for earring elements that are not going to take much of a beating while worn. I have not found it to yield the strength needed for things that will get knocked around, such as rings, bracelets, cuff links, etc.

I know that some people will tell you that tumbling is adequate. But you can verify my statements by doing something very much like what I did: Just make yourself a pair of wrap-around rings. (They are the easiest project to use for this test. If you don’t know how to make them, there are sample projects online. Here is a very simple one that is actually pretty good, except for the line that then suggests tumbling to work harden the final results, sigh.) Your two rings need not be identical in design. (I’d suggest making them at least slightly different so you can clearly tell them apart!) But, for this test to be meaningful, they should be very close in size and thickness. Fire them to the maximum (2 hours at 1650 degrees Fahrenheit). You can curve them in the moist clay state and dry them in that shape, but it’s probably better if you fire them flat and carefully curve them after firing: bending a fired-flat piece into shape can be another very useful step in the work-hardening process! (I’d guess that’s the reason Nettie’s project, linked above, has you do that.) But if you are more comfortable shaping them in the moist-clay state, that’s OK; just make both of them the same way so that doesn’t add an extra “effect” to your test.

After your rings have been fired, you should shape or adjust them, as needed, to get a good fit. Tumble one for as long as you think is necessary. Then, take a hammer and a bench block and really work-harden the other one. Or, if you prefer, you can tumble both and then just hammer-harden one of them. (If you don’t know how to do that, either find a local metalsmith who can teach you, or let me know and I can make some suggestions. You really have to know what work hardening means for this test to be valid; but as you keep working on the piece, you should figure it out!)

Finally, with your bare hands, try to open or twist each of them. If you work hardened one correctly, you will feel the difference immediately!

(Full disclosure here: it did take me several tries to really grasp how to do this. At first, I was way too gentle with my attempts to hammer-harden my by-pass rings. But I kept thinking that they were just too soft: no way I’d sell them like that, I didn’t even want to risk wearing them myself. But I also wanted to keep the lovely metal-clay-style texture on my rings. So it took some experimenting with different hammers and mallets, steel blocks with and without some protection (e.g., a bit of leather), and more, even including some consulting with a local metalsmith (and author, Jan Loney) before I really grasped all this. A well-hardened ring will still be “adjustable” but it will become noticeably, ummm, harder to do so.)

For that matter, if you want to take this experiment to the next level, make one pair out of fine silver metal clay and a second pair out of the sterling form, fire each pair as recommended for its type, and do the same test with each pair. The kind of knowledge you can get from such an experiment will go a long way to building your understanding of the metals involved.

And you’ll get a nice collection of rings in the process: to wear yourself, to give as special gifts, or even to sell to help recover the cost of the clay used in this learning episode! (Be sure that any test-rings you pass on to others have really been work-hardened as much as possible…)

Happy claying to all!
-cs

p.s. I learned that lesson early on in my explorations with metal clay, when only the fine silver clays were available, though I did play around with annealing and hardening bits of both copper and sterling silver to get a feel for what was going on. All those results had such a physical feel to them, ones I had no idea how to capture in a photo so I did not even try. But I will close with a photo of a more recent ring; it’s about a year and a half old now. This one does have a connected, continuous band but, because all the flower-petal layers spin around the post holding the ruby, it still posed some particularly interesting challenges in my quest to find effective ways to work harden each and every the element of all my creations….

Posted in General Techniques | Tagged: , , , , , , | 2 Comments »

Some Thoughts on Finishing: Design Considerations!

Posted by C Scheftic on 2012/10/07

Continuing thoughts from yesterday’s post, where I said I was prompted to write some notes by recent comments about tumbling on the Metal Clay group on Yahoo, here I am going to try to make a few points about the intersection between design and finishing that I’ll illustrate with some photos of pieces I was making as I was coming to grips with some of these concepts myself. I apologize for the quality of some of the photos; while the last one was taken recently, the first five were all taken years before I even thought about starting this blog.

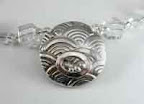
The lentil bead, shown to the right, is the very first piece I ever made using metal clay techniques! At that point, I was focused mostly on the mechanics of construction. While not ignored completely, design was really low on my priority list. I just wanted to make something that worked. This one was tumbled by my first instructor in her rotary tumbler with stainless steel shot. I was perfectly happy with its all-over shine. Well, to be honest, I was utterly thrilled to have made something that could appear that evenly shiny! I did add a slight liver of sulphur (LOS) patina to help emphasize the textured design.

After that, I went on to try making more pieces myself. In general, they had an overall texture of some sort or another, with embellishments or impressions or openings added to that. I tried constructing a variety of shapes. 
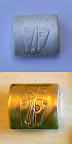
Eventually, I decided to try making a small “pillow” shaped bead, and my first attempt at that is shown in the pair of photos to the left. The top image shows the piece, with its just-fired look straight from the kiln. By the time I tried this, a friend had found a small kids rock tumbler that we’d appropriated for use with tiny fine-silver loads.

Now, the thing about this pillow bead is that, although there is a bit of a textured design on it, much of its surface is just plain smooth. And shot polishes up a piece by banging on it. The bangs are very slight (I’ll say more about this in my next post, on work hardening) and, while the results of those bangs really are not very obvious in highly textured areas of metal, they seem much more obvious on a large smooth surface. I don’t know: could this be why some people report tumbling their silver for 24 hours or more?! The instructions for the rotary tumbler I now have (see my last post, towards the bottom) say that loads should be done in two hours. Back when I was trying to polish this piece, I think I probably ended up running it for 3 hours or a bit more (checking its progress periodically) and it did get better with more time. But, at that point, I decided it had been beaten up enough. Though there is nothing terribly wrong with the results (click on the photo to get a bigger version that may (or, sigh, may not) make this clearer), it just does not look quite as even as I had gone to great pains to make it. And the unevenness did not jump out at me when it was in the kiln-white stage that I so happily noted (with some white-balance error on the camera…) before I tried to tumble it.

All of which taught me that, while tumbling can be great for some surfaces, it’s not necessarily great for every surface.

So, when I fired the next pillow bead I tried, I did not just plop it into a tumbler. I simply checked that it looked OK out of the kiln, and carefully set it aside. In a couple months, I’d be going to a PMC Guild conference, and I was signed up to take a pre-conference class. I decided I’d take this piece with me, and ask the instructor for suggestions on how to finish it.

Lo and behold, for the class she had a magnetic pin polisher for us to use! When I told her what I was hoping to be able to achieve for this piece, she suggested that tool immediately.

Here’s the thing: with a rotary tumbler, you put pieces in and then check on them periodically. After a couple of hours, in general, they appear done. Until they are done, they are simply not-done. It’s hard to describe, but easy to see. I think that what I’m seeing is that the shot keeps banging on the piece until it’s all evenly shiny; when it’s not done, it’s just not yet even. But with the magnetic pin polisher, pieces go through states. It goes from kiln-white to gray to brushed/satin to reasonably smooth to shiny. Oh, and it does that quickly: 10 to 15 minutes usually gets a piece through the entire cycle! You can just take a piece out whenever it’s reached the stage you like. You can leave it like that, or move on to hand tools (e.g., a flexshaft) to further finish select areas. The creative possibilities are thus multiplied!

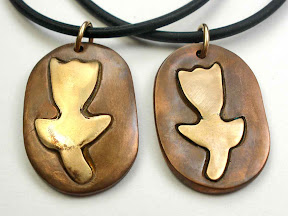
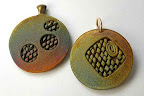
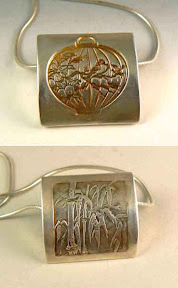
So, for my second pillow piece (shown, right, both sides), I took the piece out when it had reached a nicely polished but still somewhat satin-y stage. I then applied a patina with Liver of Sulphur: I didn’t really care what specific color I’d achieve (knowing that would change over time anyways), but what I did want was to “help the design to pop” from the contrast. On the bamboo side, I just wiped the patina off the high points with a Sunshine cloth, which pretty much preserved the satin finish overall. That was my goal: to give it a look that corresponded to my memory of misty mountainside bamboo gardens from when I’d visited China (in the late 1980s). On the birdcage side, I attacked the high / smooth areas with a Pro Polish pad, which did result in a slightly more polished, shinier, finish while leaving a rougher surface in the hollows. That kind of variation is exactly what I wanted.

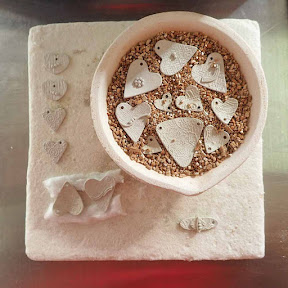
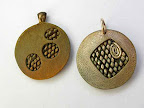
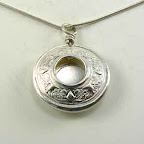
I think that sort of variation is reasonably visible in that pillow-piece photo. I’m not so sure it’s as clear in the lentil bead shown next, to the left, but I’ll still try to describe what I see in it. At that point, I had moved on to exploring the construction of hollow beads with openings in them, varying the size and location of those. Some pieces had little gems inside, others had little textured embellishments. This one simply had a nice, smooth disk. (‘Twas a fluke that resulted from the design I’d pressed into the other side, but I decided I liked it.) What I then wanted was for the inside to end up with a satin sort of look. If I’d put it into a rotary tumbler, first of all, that central disk would have ended up all very shiny but, beyond that, I could not be sure that the shot would be able to polish all the way to the edges inside and that difference might be visible through an opening that large. Again, this is a case where the magnetic pin polisher came to my rescue on the design side! I put the piece in it for (I did not keep notes but assume it was about) 8 to 10 minutes. Once I’d taken it out and rinsed it off, I continued to polish the high points on the outside by hand, using a stainless steel burnisher of some sort (it’s been a while now: I think I was still using stainless steel cutlery at that point, though I may have gotten my first actual burnisher by then).

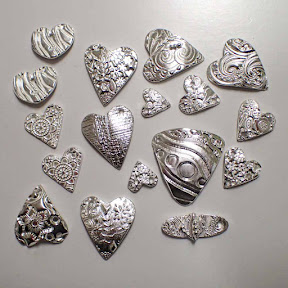
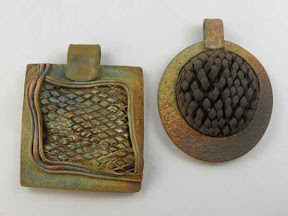
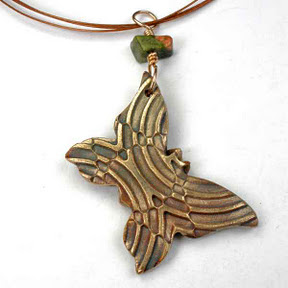
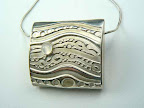
Similarly, with my biggest-ever pillow bead, with one side shown to the right, I did not want all of it all shiny either. I’ve seen a number of pieces made by others using this same texture, and what I wanted for it involved having more contrast between the peaks and the valleys. Magnetic pin polisher to the rescue again! The whole piece was finished to a brushed look, then I went after the peaks and edges with a burnisher.

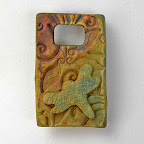
I know I had my first stainless steel one by the time I made this piece, because I do remember using that burnisher for setting the moonstone. Since I’m admitting all sorts of things here, I will also say that’s only the second stone I ever bezel-set. It was, in fact, almost my first. Until I had the thought that maybe, just maybe, I should try it first on a smaller piece. This “pillow” had been an experiment to see how big of a hollow piece I could make and have it not slump. This one did give ever such a tiny bit in the firing, but it did so in such a way that it really went “with the flow” and looks intentional. Whew! This was back before prices, of silver itself let alone the manufacturing mark-ups, started creeping up. Even then, risking something well over an ounce of silver on an experiment was an adventure! But (true to form, I guess), I digress, so….

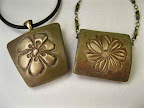
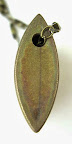
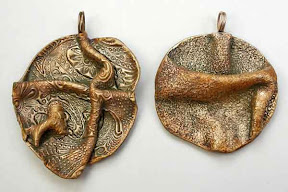
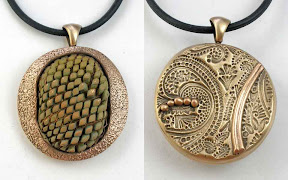
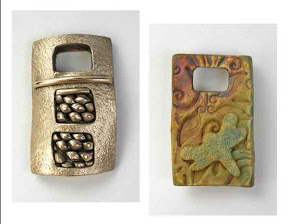
Let me close with a more recent piece that is another example of how I see finishing and design to interact on so many levels. In the case of this bronze piece, left, the mini magnetic pin polisher would not have been a good option: its pins are so tiny, they’d have worked their way into the design in ways that would have been impossible to remove. But, even more than that, I just loved the coloration that the kiln-gods chose to give this piece on the flat side, the one with the butterfly. Though I don’t often try to preserve colors in my metal pieces, this was one where I really did think that was worth trying. Problem was, the kiln-color on the other side was sort of yucky. It really was calling out to be shined up. But, if I’d put it in my rotary tumbler, that would have affected the butterfly-side too, removing all the kiln-colors and leaving it just shiny-yellow. There’s no way I wanted that! So I took out my rotary tool and started working my way through various attachments on the curved side. This being bronze, I know I started with some radial bristle disks (yellow, red, blue). Since I hadn’t planned to write about that process (I put far more thought into the color on the other side!) I didn’t keep notes but I also know I didn’t do anything special. Which means that, after the radial bristles, I gave it another quick hit with either a silicone or a rubber polishing wheel (most likely, whichever happened to be closest to my hand at that moment or else, since this is a recent piece, I’d be more likely to remember).

But the reason I wanted to end this post with that piece, in particular, is because the thread in the group that started all this was from someone asking about tumbling her bronze because she was not getting the results she wanted from the burnishing technique she’d been using. I’ve not seen any of her results, so I’ve no clue whether or not she’d consider this acceptable or not. All I know is how happy I was with this particular result, myself, achieved without using any sort of tumbler.

There’s one more issue I’d like to address about tumbling. But I’m out of time now. That one will have to wait for tomorrow….

Posted in General Techniques | Tagged: , , , , , | Leave a Comment »

Some Thoughts on Finishing: Equipment!

Posted by C Scheftic on 2012/10/06

There’s been a lot of discussion lately on the big (i.e., international) Metal Clay group on Yahoo about tumbling and other methods of finishing pieces. I’ve just been waaay to busy the past week or two to comment on individual posts. With a few minutes right now (curiously enough, because I finished a couple other tasks early while I tumble pieces for students from a recent workshop!) I thought maybe I’d start on some posts with a few of my thoughts on two aspects of this issue: (a) deciding how I will polish (and otherwise finish) a piece and (b) what equipment I do and do not use.

Now, in practice, I believe that the design-part should come first, and the equipment-choice second. But to talk about design issues, I will need to mention different kinds of equipment. And if you don’t know what I’m talking about, that could be a problem. So I’m going to start by mentioning just a few of the possible tools one could use. And I’m going to present them in the order that I discovered them, because I’m sure that affected my understanding of them.

As I think I’ve mentioned here before, though I first discovered metal clay while I was living in California but visiting my family home in Florida, I didn’t actually start working with it until after I moved to Pennsylvania. I’d read a lot, had tons of questions, but figured that (rather than waste product experimenting on my own) I wanted to start by taking an introductory class. We made a lentil bead. The instructor (Donna Penoyer) fired it after class, and tumbled it with stainless steel shot in a rotary tumbler (more on these in a moment), before returning our pieces to the shop so we could return and pick them up. I was happy with the piece. I then added a very light patina with Liver of Sulphur, before stringing it to wear. Shown to the right (in the first jewelry photo I ever tried to take … and it shows!) the thing that jumps out at me about it, now, is how evenly-shiny it is all over.

For the next few pieces, ones I made on my own or with a long-time friend (Bonnie) with whom I’d reconnected after my move (and who’d also taken one intro class!), we fired them with a creme brulee torch, brushed them with a brass brush, then burnished them by hand with stainless steel flatware. Yes, that’s right: I did buy a brass brush with my first order of clay, but we had no additional “equipment” for polishing. So I dedicated a knife, spoon, and fork to jewelry making! That approach, though admittedly slower than tumbling, kept me going for months as I spent the odd bit of spare time learning and exploring! Over time, eventually, I did buy an assortment of burnishers but I still pull flatware out during workshops to show that you don’t actually need anything fancier. You may want it, but you don’t necessarily need it!

Not too much later, Bonnie somehow ended up with a child’s plastic rock tumbler. They’re small and lightweight, meaning amazingly under-designed for actual lapidary work. But we cleaned up the barrel, and got a one-pound package of mixed-shape stainless steel shot so we could use a few scant ounces to try tumbling a couple pieces at a time. I would never recommend that someone go buy one of these for this purpose but having access to a rotary-shot tumbler to play with a few times did offer me the chance to explore the finishing process while I decided what I wanted to buy. (I’ll talk about that in the design-post.)

With that experience, I’d decided I didn’t want to start out with a rotary tumbler: I had fallen in love with magnetic pin polishers! The standard ones of these cost start at a price comparable to a full-scale metal clay kiln, and go up quickly from there! For a full-time bench jeweler, that cost can be justified because those machines work their magic so much more quickly than do rotary tumblers. For a part-time art jeweler, however, that seems like a lot of money. But then I found this little item (shown, right, with a blue base) for about $150. Still not cheap, but a price I found manageable. The cup is about the size of a measuring cup, a tad under 3 inches across, but all the action takes place in the very bottom. So I can’t do a lot of pieces at once, and I can’t do anything that’s more than about 2.5 inches across, and for really thick 3-d pieces, I may have to turn them over manually. But I rarely have any reason to exceed its capabilities. Sometimes it’ll take me several cup-loads to finish a kiln-load, but since this machine will complete the job in around 15 to 20 minutes, that means I could do six to eight loads in the two hours that is often quoted for a single load in a rotary tumbler. I must note, however, that while the time savings is a big benefit, the real reason I love this little item will be discussed more in my post on design considerations!

Before moving on, I will say that I’ve seen that some people in the MetalClay group are using a different “under $200” magnetic pin finisher (see photo here), and there seem to be larger (pricier) versions of that model. Overall, the cup on that one is reported to be 3.5 inches across, so a little bigger than mine, but there appears to be some kind of a post sticking up the middle. That would seem to severely limit the size of any individual piece one could put in it to not much bigger than one inch across, if that. (If you have one and want to say any more about that, please feel free to leave a comment!) That one also has a timer, which can be a nice convenience but is also yet one more thing that can break. So I’m neutral on that.

The next piece of equipment I added was a rotary tool. (If you somehow landed here without being familiar with them, I’ll just say that they are like small electric screwdrivers, except you can add all sorts of other attachments to them besides screw-drilling bits.) These are sometimes referred to by brand (e.g., Foredom, Prodigy, Dremel, etc.), and sometimes by handpiece style (e.g., flexshaft). A few of my favorite attachments for polishing (in no particular order) are silicone wheels, rubber wheels, fiber wheels, radial bristle disks and (least often) sanding drums or split mandrels with sandpaper. Other essential but merely human-powered tools that I use include steel bench blocks and an assortment of hammers and such. (I don’t plan on discussing any of that in detail right now. I will likely do so eventually. If you want to talk about them before then, just let me know!)

And then, yes, I did go and get myself a rotary tumbler with mixed stainless steel shot. I tried the inexpensive route first, the kind with an imported rubber barrel. It didn’t stay long: the smell of the rubber was just worse than I could bear. I kept having the feeling that I was at the gas station, filling my car, and that the pump was overflowing and would not shut off: that’s what it smelled like to me. I left the barrel out in my garage for six months, to see if it might “air out” over time. No such luck. I sold it to a student who did not seem bothered by the smell. Then I went and bought one made in this country, the kind that has a hexagonal plastic barrel. I still use the mini-mag one more often but, when I want a rotary tumbler, this one does the trick.

This particular model has gotten some negative reviews online, but I don’t consider any of the issues reported to be a big deal at all. Some people complain that the steel shot in the plastic barrel is noisy and, yes, it does make more noise rattling around in plastic than it does in a rubber barrel. But all tumblers sound noisy to me, so I put them in the next room anyway; in that case, the sound of this one does not bother me. It doesn’t have an on/off switch, but I plug it into a power strip that has one, and just use that. (And a power strip is easier to replace than is a tumbler whose switch has died. And, further, I find it convenient to operate the power strip switch with my foot, rather than having to touch a button on the machine with sometimes-wet hands.) It is possible to have little bits of the shot land in the odd small spaces at the top of the barrel (from where the hexagonal sides are spread out to meet the round lid); but a magnet captures those easily and I can just plop them down into the barrel so I never gave that a thought until I read about it later on. (Did the writers perhaps not think to try a magnet?) The lid is the one part that took me a few tries to figure out but, to be honest, so did (in a different way) the one on the rubber barrel. There is a sort of “art” to getting it on just tight enough: not so loose that it leaks, and not so tight that it’s hard to get off. But with a bit of determination, I figured that out too. The only problem reported with which I do agree is that it is possible to have very thin bits stick between the barrel and the lid. But I rarely make metal clay pieces thin and flat enough to get caught; some earwires can get that thin but those are not something I’d tumble anyway. (I’m not doing mass production. I can hammer the odd earwire to work-harden it (more on this in a few days…) or, since I often use Argentium for them, it is even easier to heat-harden that!) Still, though I’m glad I have this one, I don’t use it all that often: mostly, I use it for pieces from beginner classes, where students have not yet learned much about finishing. Just like my very first piece, an evenly-smooth shine everywhere works just fine in that situation. And if folks say they want a more nuanced finish (yep, that’s the big design-related issue!) that’s a perfect lead-in to the fact that I offer workshops on finishing too.

The other major finishing tool that some artists seem to have is a vibratory tumbler. I will admit that I’ve never used one of those. (I’d be game to try it, if you happen to have one that you’d like to offer up for my examination!) At this point, the (many!) finishing tools I have acquired over the years seem to be meeting my needs. If (when) one of the tumblers should go out, then I may make a serious attempt to look into these. At this point, at least, I’ve got nothing at all against them; I mention them simply to acknowledge that they could be on the discussion list too. But, for now, I want to spend more time making new pieces, rather than simply acquiring even more tools I may or may not ever use.

Tomorrow, I’ll try to write some things about how the tools I do have interact with the designs I try to create. I find the interactions between them, and how that has influenced my understanding of design, to be the most interesting aspect of all this!

Posted in General Techniques | Tagged: , , , | 4 Comments »

Yep, I’m still a bit baffled….

Posted by C Scheftic on 2012/09/10

This will just be a relatively quick little follow up on my recent load of “crispy” bronze and copper pieces.

The two draped pieces actually polished up nicely. Somehow that even helped with the clunky sound they were making, that had made me even more dubious about their quality. The more-irregular one, of course, is still riddled with cracks and tiny holes: it will just look prettier in my “do as I say, not as I do” box of “teaching moments.” But none of the polishing added to the disintegration of that piece, nor did it reveal any holes in the rounder one. OK, so far.

I have not yet tried to polish the tulip with a copper flower on a bronze background because I know that one will take a good bit of work. The other two tulips turned out OK, but not as nice as I’d’ve liked. The bronze (flower) on the one to the left had actually bubbled a tiny bit and, although that did look OK after some grinding, sanding, and polishing, once I exposed it to the patina solution, small spots appeared where the edge of the blisters had been. I’m thinking that the tin in the bronze must have somehow “disappeared” at those points, leaving more copper to react with the patina chemicals. And, despite a lot of grinding on the other one, I did not seem to have eliminated all signs of the earlier cracking.

I have enough else to do right now anyway, I may just put those into the “seconds” bin that’s always seemed popular among my teenage visitors. Less than ideal, but perhaps not a total loss.

Posted in General Techniques, Technical Details | Tagged: , , , , , , , , , | Leave a Comment »

Color Shifts!

Posted by C Scheftic on 2012/07/25

After designing a piece, working with metal clay to create it, and firing it in the kiln, there remains another step to consider: post-fire color of the now-all-metal creation. There are lots of ways to add color to a piece, and I’m not about to go into all of them now. That is, for this post at least, I am not going to address deliberate colorings like enamel, resin, colored pencils, inks, various forms of plating, and so on. I am going to make a few points about several of my newer bronze pieces and will mention only in passing the “Liver of Sulphur” (LOS) patinas that can produce such nice (but somewhat unpredictable) colors on fine silver (and black or near-black on silver, copper, etc.)

Instead, what I’m thinking about today are the kiln-produced colors that sometimes appear on bronze pieces (and, to a lesser extent, on copper ones). Now, the thing is, they are basically unpredictable. You get what the kiln-gods decide to give you that day.

If the pieces come out a dark gray or black color, I will usually just polish that off. I wrote a series of posts in April of last year with “before, during, and after” photos using Hadar’s Clay Powders, and one of those showed pieces with a lot of this mostly-icky black coating that is best just polished off. That is why the first photo with this post (above, right), of a rectangular bronze piece, shows it all shiny: that side came out of the kiln all dreary gray except for one small, dreary, brown spot on its edge. (It was so dreary, in fact, that I didn’t even think to take a photo of it in that state.) But you’d never know that now from looking at its bright, polished surface if I hadn’t told you, would you?

Then again, sometimes pieces come out of the kiln with stunning colors. The second photo (left) shows two other pieces that came out of that same load. (As ever, a click should get you a bigger version of any of these.) When people see pieces with colors like that, they always respond with all sorts of exclamations of “Ooooh” and “Ahhhh”!

Which I fully understand. Except I know that those colors are basically ephemeral: there for your enjoyment at the moment, but nothing that will remain so brilliant for very long.

If I make a comment to that effect to the piece’s admirer, novices are often generous with suggestions. And I do appreciate the offers. While I am open to new ideas (especially since many of my students are artists with experience in other media), there’s also a good chance that I’ve already tried everything that’s being suggested, and then some…. The third photo with this post (over to the right again) shows two of the many things that one might consider trying.

Of the two pieces shown there, the one on the left has been lacquered. Notice how the nice, variable, kiln-green has all gone a sort of even brown shade, and the lovely bright scarlet has turned a much duller orange. I don’t dislike those colors; they simply are not the ones I was trying to preserve. In fact, I only rarely use lacquer on my pieces. It does provide some protection in the short term but, once it starts to wear off, then you have a piece that darkens in those spots but not in the ones where it remains. I do keep trying various kinds of coatings, here and there, just to see what happens, but they are not a major part of my routine. (Similar shifts and dulling of bright colors happen to LOS’d silver that emerges all brilliant and lovely.)

More often, I will do what’s shown on the piece to the right in that photo. That is, instead of the “high polish” of the rectangular piece, I will give it a “light polish” like this, often highlighting one or more select areas with a slightly brighter shine. I chose to include here a piece where I’d done that so I’d have an example I could show folks, later, who seem very surprised when I say that another reason the original colors are ephemeral is that, if they are deliberately polished or rubbed enough in normal wear, the colors will go away. Except that’s exactly what polishing does: the color is only on the surface and polishing that removes whatever reaction has happened there while also laying down the metal “crystals” so they reflect light in their “typical” color range. (Again, this can be compared to what happens with silver, both in the disappearance of the “kiln white” (or, in some cases, “kiln glitter”) and the dulling and/or shifting of colors from LOS or other patinas.)

Except, the crazy thing is, just like everything else involving these colors, you can’t quite count on all the things I described above. Some, yes, but not everything. Shown below are two shots of the “other side” of the rectangular piece with which I opened this post. This side came out of the kiln with lovely colors. I considered polishing the dragonfly, but decided to leave it alone at least for the short term, and grab a photo of how it looked with no post-fire treatment. Later, when I got the lacquer out to use in coating the round piece, above, I decided to hit this piece with it as well. And, here, the color shift was much less dramatic!

straight from the kiln after being lacquered

I’m not complaining: I liked the colors here and I’m glad they didn’t shift. I’m just saying, if you happen to get this the first time you try a protectant product, don’t assume that’s what you’ll get the next time.

And I also recommend learning to appreciate and celebrate ephemeral beauty, in jewelry and otherwise.

Posted in General Techniques, Technical Details | Tagged: , , , , , , | 4 Comments »

How much to polish?

Posted by C Scheftic on 2012/06/15

How much to polish is a recurrent question with my work, one that has been reappearing even more often since I started doing more work with different bronze formulas of metal clay.

I’ve been using that photo to promote some workshops I’ll be teaching later this summer (at both Mars Beads and Zelda’s for sure, but I can schedule a session in my studio too if you’d like). You may have noticed that I polished the “sandy border” around the circular one, but not on the rectangle.

In many cases with metal clay, and the various bronze formulas in particular, polishing is something that one can’t always decide for certain at the design stage. Sometimes you have to wait until a piece comes out of the kiln. So far, I have polished that one border the round piece in both the first and last photos with this post. (I also polished its “other” side.) And that decision was an easy one: it emerged from the kiln simply looking dark, so the polishing brightened it up, whereas the rectangular one just showed up with more interesting colors.

But the choice is not always that stark. I’ve made even more than those two. Here are a couple others I have on hand:

With those, I’m still debating: will I polish any other borders? Will I polish some of the interior sections? Should I let them age naturally, or put some sort of protective coating on them (knowing that any coating will not be permanent anyway, though some do last longer than others…)?

In the end, I’m sure I’ll end up doing some mix of all that. I just need to decide which area gets what treatment. (On, and, of course, all these pieces are my usual reversible designs, so the questions arise with the very different designs on their “other” sides too!)

But it’s part of why there is often no simple answer to the question, “How long did it take you to make that?”

Posted in General Techniques | Tagged: , | Leave a Comment »

How much to polish?

Posted by C Scheftic on 2011/12/23

Here’s another butterfly from my recent little extravaganza making bronze pieces alluding to pollinators. I had this one out at the recent open house at Zelda’s, and got into a discussion with another artist (Jan) and a couple other customers from the store.

Jan had taken one of my butterfly workshops where she made several gorgeous silver pieces. I’d tumble-polished them to an even, high shine for her, per her request. And she had them on display, for sale, at Zelda’s. At least one of the customers indicated her opinion that I should have polished my bronze ones as much.

While I did polish the butterfly in this photo a bit, I chose to not take it to that same high level of shine. Why? Mostly because I liked the hints of color hiding down in its hollows. (Same thing with the butterfly shown in my last post.) To me, those subtle hints of color are part of the appeal of the bronze.

To you of course, it may just look like it still needs to be polished some more. If that’s what you want on a piece you’re thinking of buying from me, please just ask! Once I’ve polished it, however, all of it will have that dark-golden yellow tone that bronze takes on. All of the other tints will be gone.

I have done that for all sorts of pieces, but it’s just not high on my list of surface treatments for butterflies. I guess I imagine my Lepidoptera, to appear colorful.

That discussion did prompt an idea for me, for a project for next year: to make a series of pieces that are, not identical, but similar, and finish them in a series of ways. One like these butterflies, another with a solid-color satin finish, and another that is as shiny as I can get it. Don’t hold your breath waiting for the results to appear here, but know it’s on the to-do list at least. If you have done anything similar, please let me know, and we can compare notes!

In the meantime, I’ll close with images (regular readers of this blog may have already seen them) of two silver pieces I’ve made that are much shinier (though I’m not sure how fully that appears in the photos). The pendant has had a bit of patina added down in the lines of its pattern; the ring has some color in the ruby stone that’s set on the top.

Posted in General Techniques | Tagged: , , , , | Leave a Comment »

Another Holiday Butterfly

Posted by C Scheftic on 2011/12/21

Unlike last year, when I wrote about my appreciation for working with silver metal clay in the sense that one could design, build, fire, and polish up a little butterfly pendant fairly quickly, this year I found myself playing with bronze and copper for my own little one-of-a-kind pollinator-extravaganza.

Because of added time involved in each of several steps with the bronze and copper clays — mixing, firing, and polishing — those pieces require planning ahead if one is to complete them prior to a specific deadline.

This little critter has a copper “body” on the other side, but I’m displaying this one to show the shading that remained after some polishing. I thought that the little green and orange unakite bead complemented that nicely, so that’s what I attached to its little bronze hanging wire.

This piece was my contribution to the “Gift Exchange” at the “Holiday Gala” of the Penn State Master Gardeners of Allegheny County. What I got from the exchange was a pair of gardening gloves and a great little tool sharpener. There were a number of beautiful amaryllis plants involved in the exchange as well. While I enjoy having one or two around at the holidays — because it sure is great to have something in full bloom in the middle of a cold northern winter — looking at amaryllises also makes me nostalgic for the years I spent living along the Central California coast … where I had multiple huge clusters of lovely amaryllis plants just growing away all year in my yard! (To rescue myself from such nostalgia, of course, I can do something like remember how much time I also spent digging out all the fennel that grew like very invasive weeds and kept trying to take over some of those beds. Every location has its strengths but also its weaknesses!)

I added a new tag to my list–“polish”–with this post. I’m hoping to explain that in a few days, in a post with a few comments specifically on polishing. (I say I’m hoping because I’m out of town and, again, having trouble finding a good ‘net connection, at least without taking up time away from the folks that are the reason for this visit….)

Posted in Events | Tagged: , , , | Leave a Comment »