") Artsmiths of Pittsburgh
Artsmiths of Pittsburgh") Hoyt Center for the Arts, New Castle, PA
Hoyt Center for the Arts, New Castle, PA") Portage Hill Gallery, Westfield, NY
Portage Hill Gallery, Westfield, NY") _Open Houses in my Studio
_Open Houses in my Studio _Or…contact me about hosting a private party!
While I was out at Hadar’s last month, finishing up my teaching-accreditation requirements, I got a chance to try several of the newest “friendly” (i.e., one-fire) clays that she has produced (and just now made available in her store).
This post is about “Friendly Bronze.” Hadar developed that one specifically to enable the production of various “married metal” designs, which I plan to discuss in some future posts. Before going into such complex designs, I wanted to try out Friendly Bronze just on its own, to get a feel for working with, firing, and finishing it.
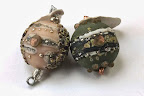
 Long-time readers of this blog will know that I’ve been happily making pieces out of Hadar’s Quick Fire Bronze XT for years (an example from last summer is shown in the first photo, left), despite the fact that it took 8 to 12 hours to complete a firing. (Yes, it takes that long for “quick fire”! But that process includes two firing phases with cool-down in between, so it’s the heating up, cooling down, and reheating of the whole kiln that takes all the time. The sintering part itself is relatively quick.) The whole heating up and firing process of the “friendly” clays, on the other hand, can be completed in just under 3 hours: much better!!! So, back home and on my own, I decided that my first trial run of Friendly Bronze in my own kiln would be a variation on one of my (other, many…) favorite pieces I’d made using some of Hadar’s earlier Quick Fire clays.
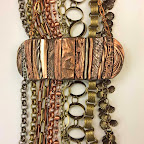
 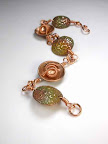 That one was my own metal-clay-based variation of a “Coils and Domes” bracelet that Maria Richmond sometimes teaches (here and elsewhere) that I wrote about a couple years ago. (Photo repeated here, right. I used “Quick Fire” Copper and Rose Bronze for that one…)
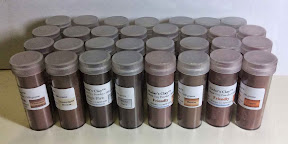
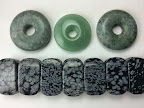
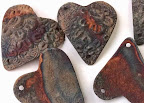
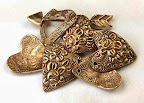
The metal elements for that project can be relatively simple, since they’ll be embellished later on. So I thought they would make good “test pieces” for my first firing of Friendly Bronze. I know that some people just make a plain strip to use as their test piece. And that others jump right in and start an elaborate piece without testing first. Me, I prefer a middle ground: fairly simple, but still something that I can use in a product creation. A handful of little domed hearts seemed perfect to use as my test pieces! I’ve included little photos showing how dark and colorful the results can be (hot from the kiln) as well as how they turn a nice yellow-bronze color with even just a light polishing (the photo shows them a little over half-way through my polishing process).
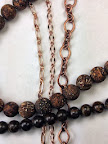
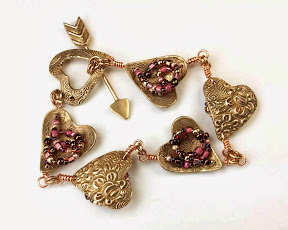
 But I will admit that I had yet another reason for doing that: I wanted to enter the February 2014 Bracelet Challenge on Facebook sponsored by one of my local bead shops, Crystal Bead Bazaar. I needed to dream up, make, and photograph something in less than two days! (Well, I did have a month to dream it up, but I had to make it after getting back from several weeks of travel … on a trip that my luggage full of tools took several more days to return from. But that’s another whole story!) The challenge has a theme each month, and the theme for pieces made in February was “Romantic.” So, instead of wire-queen Maria’s wrapped-coils added to antique enameling-domes, I figured I’d add wired-up beads (in sweetheart-pinks, blood-bond red, and romantic-rose shades) to those brand-new rose-patterned domed-bronze hearts that I made (along with an open-domed heart and clay-tipped wire arrow for a toggle clasp). As far as I know, my entry is the only one that used any metal clay processes!
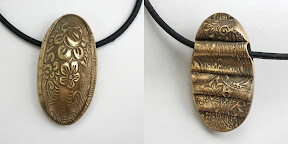
For the metal-clay part, I just mixed up about 20 grams of Friendly Bronze, rolled out five hearts (using a rose-pattern texture sheet on each side — the same one I used for the domed side of the first pendant shown above!) and dried them over the round domes on a paint palette (a slightly shallower one that I’d used for the bracelet shown above). For the bracelet’s clasp, I made a sixth heart that I also domed but, before it dried, I cut out an inner heart opening. Then I cut a piece of 16 gauge bronze wire, added a hanging-loop, scored each end a little bit, and added a bronze-clay arrow-tip and feather-texture end (actually, just between you and me, for the latter I used a tiny segment of a very geometric, non-feathery design). Once they were dried and all cleaned up, I fired them in carbon according to my usual variation on Hadar’s schedule.
(As I’ve mentioned before, my kiln tends to fire a bit hot, and to spike even hotter just as it reaches the goal temperature. To accommodate the former, I drop Hadar’s temperature by a specific amount; and to work-around the latter, I program a two-segment firing, where I stop it short of goal for a few minutes and let it spike there, then ramp the last few degrees very slowly to keep it from doing that any more. But that’s just a case of knowing my own kiln. A terser person would just have said she fired them according to Hadar’s schedule, but I know some of you read this for the tips I hide in my lengthy prose!) Everything sintered beautifully, and was as easy to clean up as any other bronze I’ve ever used. And I’m thrilled with the final result!
 |
If you like it, I’d sure appreciate your voting for my entry!
[Note, that “voting” for that piece via a “like” worked only during March, 2014. They announce only the first-place winner, which was not me. Since the vote-closing time was not announced in advance, I can’t be sure where this one ended up. But it did seem to have a strong hold on second place for most of the month. So here’s a big “Thank you!” to everyone who did vote for it! I’m hoping to enter again at some point, and will post that again here….]