") Artsmiths of Pittsburgh
Artsmiths of Pittsburgh") Hoyt Center for the Arts, New Castle, PA
Hoyt Center for the Arts, New Castle, PA") Portage Hill Gallery, Westfield, NY
Portage Hill Gallery, Westfield, NY") _Open Houses in my Studio
_Open Houses in my Studio _Or…contact me about hosting a private party!
 Before I wrap up my Smart Bronze test-reporting, I am inclined to take one last post to review and summarize a few of my thoughts about what I just put myself through.
My Test Firings.
Over the last five posts, I outlined the eight firings I called “trials” to master the firing of this particular clay. If I were starting the whole thing today, I think I could hit the right numbers in a mere three trials. Yes, that’s more than one test-firing, but I do find that to be a very manageable number. (Yes, eight was too many!) Why do I say three?
My first two firings were based on Hadar’s earliest information, right as this new product was released, before she had updated her Instruction Manual. Today, I would be starting with the later information, and avoid a couple of initial mis-steps with this new product.
My last two firings were, really, my first two production firings. I counted them as tests mostly because, having encountered some earlier problems, I was being particularly cautious before declaring my testing done.
Finally, the problems I had in one firing in the middle were simply because I’d spaced out and incorrectly programmed my kiln. Those did give me some more “confirmation” of what I thought had been going on but that should have been avoidable.
That leaves me with the three firings I think I would have taken to get it right. And you should be able to hit it right in two or three yourself, because you will know the following….
The “Trick” to Smart Bronze.
The conversion of all metal clays from a powder-form into a metal-structure one (oh, and regardless of whether they are precious metal (silver, gold) or non-precious (elemental copper or various bronze or steel alloy formulations)) requires that both (a) all the binder be burned off and, then, (b) the metal sinter and “soak” into a nice, densely-packed arrangement. In some cases, those can be done in one (sequential) process; in others, it requires two (separate) firing processes. “Smart Bronze” falls into the former category, which is its primary appeal over a number of other bronze formulations.
But you really do have to let Smart Bronze pieces spend a full hour in the “debindering” process. In a single-fire product, all the binder burnout happens during the ramp-phase of a firing. If it’s not taking your kiln an hour to do that ramping, you are probably not removing all the binder, and that will limit the metal’s ability to fully sinter correctly regardless of the temperature or time at which you “hold” it. You have two options for slowing it down: reduce the ramp-speed, or simply build a few minutes of “hold” time partway through the heating-up phase of a firing. (I did the former, as noted in this series of posts, with my brick kiln. I am thinking I may well try the latter when I get around to trying to fire this clay in my ceramic muffle kiln.)
Once you are sure you’ve adequately provided for the binder-burnout phase, only then can you confirm the actual goal-temperature that’s needed to allow sintering to take place. I know that our instinct, when sintering does not seen to happen as we’ve expected, is to try to adjust the final temperature or hold time with the expectations that such tweaking will solve the problem. But, until you get all that binder burned out, your metal will not sinter properly. You have to master the burnout-phase first. Every situation I have heard about where there has been a problem with Smart Bronze (at least so far) has involved inadequate sintering that, at least as far as I could tell, resulted from a problem in the initial heating up part of the process, when the binder should all be burning off.
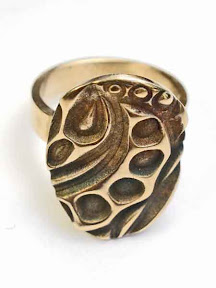
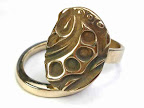
A Note on the Color of Sintered and Polished Smart Bronze.
The two rings pictured with this post both contain large areas that have been polished smooth. The round, seamless ring has been completely polished. So has the band of the double-fire ring, as well as large, raised areas of its texture. In such cases, the metal polishes up to a bright, golden-yellow color.
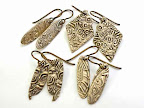
On textures with lots of fine detail, however, such as the earring pairs in my last post, where you can’t really polish everything to a super-high shine, then the color looks to me to be more of a greenish-bronze. (During the testing, I tried both: (a) using sanding plus further polishing, and (b) tumbling in a rotary tumbler. And I got a similar greenish tone either way.)
I’m not saying that either one of the colors — golden yellow or greenish bronze — looks better than the other. Just that they are rather different, and seem to be a result of the texture rather than any other construction, firing, or polishing approach that I’ve yet been able to determine. I have definitely begun planning pieces with one shade or the other in mind (e.g., with respect to some particular stone-color I may choose to add to a piece). I’d love to hear whether (or not!) you find a similar pattern in the pieces you make out of Smart Bronze.
Because, my readers, I sure am hoping you’ll try Smart Bronze too. Once you “get it,” it’s great. I’d love to hear how your results compare to mine!