Convergent Series

learning, using & teaching metal clay, and other aspects of life

Posts Tagged ‘flexible greenware’

A Simple Weaving Project with PMC Flex

Posted by C Scheftic on 2014/11/25

Let me be clear from the start: I think that “weaving” metal clay is loads of fun, and it produces interesting results. Great combo, eh?

Some Background

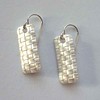
I don’t have any decent pictures from when I first started trying to weave metal clay. I don’t even have any of the earrings I made by weaving strings of PMC+ (on my own) or strips of PMC+ sheet (when I took a RioRewards certification class with CeCe Wire, down in Baltimore). Both ways, I had fun doming the results by backing that with the now-discontinued, sigh, high-shrinkage PMC Standard clay. But here’s a pair of the latter that I made in 2010 (yeah, well, I redid the Rio Rewards when Tim McCreight taught it a few miles from my house); this photo is from when I used them as one of my entries in Vickie Hallmark’s Month of Earrings Challenge that year.

Woven Rectangles

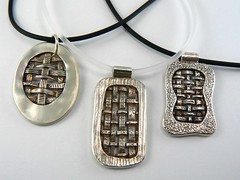
While I enjoyed doing this, and I did play around with other weave-spacings, I found that the sheet product had two drawbacks. First of all, you have to be very careful attaching sheet to a backing or frame: not enough water and it doesn’t stick, but too much and you’ve ruined it. Second, another thing I love about metal clay includes the design possibilities with textures, and sheet does not take textures the same way. Early in 2008, not long after Hadar Jacobson’s first book (The Handbook of Metal Clay: Textures & Forms) had come out, I was thrilled to read about how to doctor-up my own clay so that I could texture it but it would still remain flexible, like the sheet product, in the greenware state. Here are several of the first pieces I made with that clay, photographed together to use in promoting the first workshop I taught using this approach.

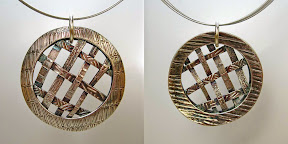
Three Woven Silver Pendants (Class Samples)

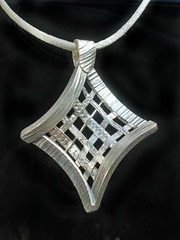
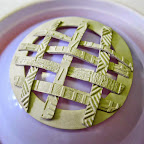
Though my workshops for beginners emphasized making woven pieces that were still essentially flat, on my own I went on to explore a number of other designs. Magic Carpet (or, to those with some knowledge of non-Euclidean geometry, Weaving through Hyperbolic Space), shown below, is one of my favorites from that period.

Magic Carpet (striped frame side)

After Hadar came out with her own base metal clays, and introduced us to various ways of combining those, I again launched right in to combining those with multi-metal weaves. Here is a piece I called Mixed Metaphors. Hadar was kind enough to include a photo of this in her fourth book, Patterns of Color in Metal Clay, which came out in 2011. (This piece later went to live with my cousin Debby; by then it was also sporting a lovely coiled-copper wire bail.)

PMC Flex

So when I first got my hands on PMC Flex, one of the things I thought to try with it was another woven piece. Yes, I knew I could also explore other styles entirely, and that’s coming. But, first time with a new clay, my inclination is to do something that is already deeply seated in my “finger memory”! Something that I know I can make successfully some other way, such that the question is how this particular clay performs in that approach. So, at last, here’s something of a step-by-step on weaving PMC Flex.

I began by rolling out a few strings (aka rods, snakes, etc.) of PMC Flex. I also textured a few small sheets of clay; after neatly trimming two edges, I returned the extra clay to the package.

Once the sheets were dry, I cut them with a pair of plain scissors. For what it’s worth, I’ve been known to cut moist regular clay the same way, with plain scissors and with fancy-edge crafting scissors. By waiting until your clay has dried to cut it, you remove the risk that you’ll smush the piece, leave unwanted finger- or tool-marks, or stretch the pattern. And, yes, I’ve been known to cut dry regular clay, but there is some risk of breakage doing that. Dried flex clay just cuts beautifully, with ease.

While my flex sheets were drying, I also made two narrow washer shapes. To keep this test simple, they are the same size in both inner and outer dimensions, plain on one side and textured on the other. They were dried over matching light bulbs. One had the texture facing up; the other, facing down. The one on the left (textured on the convex side) was made out of PMC Flex; the one on the right (textured on the concave side) was made from PMC 3. There is no technical reason to use two different clays. I just didn’t want to use the relatively small amount of PMC Flex that I had on components that didn’t require the flex feature, so I used PMC 3 for one of them. Still, I was curious how the PMC Flex would work in this design, so I did use it for the other. (I’ll discuss this more in a moment…)

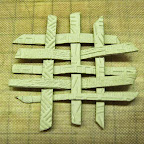
Next, I started loosely weaving together my strips of dried PMC Flex. My intention all along had been to make a somewhat open weave. I did not plan to push the pieces tightly together (as shown in the PMC+ earrings, above); neither did I intend to leave extremely large openings. What I found was that the PMC Flex could be pushed together as much as is shown in the following photo, but only that much. Had I used PMC+ to make my own diy-flex, I would have been able to snug the strips up even closer. These strips made from PMC Flex felt rather similar to the diy-flex I’ve made from PMC3. (No surprise there, just confirmation: the product is, in fact, marketed as being most-comparable to PMC3!)

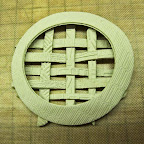
My last question for the evening was how well this little woven sample would fit my cut-out washers. There’s no reason one has to get it to fit as well as shown below, though that is a pretty good fit if I do say so myself! The point is that the strips need to be long enough; later on, you can always trim off any pieces that are too long.

The one and only problem I noticed (as you can see, above) was that the inside edges of each the washers were a bit rough. I’m one of those people who tries to minimize the amount of sanding that I do: when I cut moist clay, I just take care to smooth the edges immediately. With narrow-edge washers, however, it can be a bit of a challenge to smooth the inner edges without risk of distorting the shape of the piece. So that is one area that I will “refine” by sanding once the piece has dried. Here’s what I was able to do the next morning. (Note the color change in the photos in the daylight!)

And here’s the thing about that sanding. With diy-flex, I would almost always make the washer / frame shape out of regular (non-flex) clay. Why? Because the diy-flex clay (especially the extra-bendy stuff I could make from PMC+) was challenging to sand. It was so flexible, it just bent away from my sandpaper. I’ve read about heating this new PMC Flex clay to harden it up so that you could sand it. Had that really been necessary, in this instance, it would have made sense to just make the frames out of non-flex clay. But, given the success I’d had with smoothing the sharp-ish edges on the Möbius-strip earrings I’d tried first, I decided to make one frame out of flex clay to see whether or not I could sand smooth its inner edge. As you can see from the images above (especially if you click to enlarge them), I was able to smooth both pieces out nicely. I did hold them both carefully as I did so: the PMC 3 so I would not risk cracking it, and the PMC Flex so it would remain straight-up under my sandpaper. But I did not have to heat the Flex to accomplish this, which really did please me.

Next, I put the rigid PMC3 frame back onto the light bulb on which I’d dried it. (That’s why I’d made that one out of the non-flex clay: there is no reason at this point to have it move at all.) I carefully placed my woven swatch over that, shifting it around a bit until I was happy with its position.

Then I took a dab of water, and attached each strip-end to the frame.

And then, well, I really thought I’d taken photos of the next few steps too, but now I can’t find them. I put a few little end-trimmings in the bigger gaps around the frame to serve as supports. Then I moistened the strip-ends and the other frame element, and squidged all that together. Finally, I took a little bit of moist PMC3 and filled in all the gaps around the outer edges. (I could have used the Flex for that but, again, I was conserving my first batch of it.) Once that was all neat and smooth, I waited until I was sure it was dry. Then I fired it, sitting on top of a little pile of vermiculite to offer a bit of support. After firing, I polished it a bit, and added a liver of sulphur patina, before adding a jump ring from which to hang it.

My last comment here is that using the frame-ring made out of PMC Flex for the second side was a bit of an experiment. I wasn’t sure if the flex-aspect would help, or cause problems, in that step. In the end, I think it’s a bit of six-of-one, half-dozen-of-the-other. Its flexibility let me wiggle it around a bit to line everything up nicely; its flexibility also let one little segment end up a tad out of alignment. My current thinking about future pieces is that, with simple frames like this, I’ll probably go back to making both sides out of non-flex clay. For less-precise shapes, making it possible for the second side to be “flexed” to match the first (but out of a clay that can still be sanded as needed for clean edges) could be a real advantage.

Here’s the final result: one photo that shows both sides:

Your comments on this are welcome!

Posted in General Techniques | Tagged: , , , , | Leave a Comment »

A second second-report on the new “PMC Flex” clay.

Posted by C Scheftic on 2014/10/18

In other words, this is merely a follow-up to my earlier “second report” on PMC Flex (which I thought I’d posted earlier but just noticed I had not…) I’ll use subsequent “numbers” on later projects.

I really am working on some other designs using PMC Flex, but must-do-now tasks keep interrupting my explorations, and then I get inspired to try something else, and I end up having lots in-the-works but not yet finished and ready for reporting. As usual! But my earlier post had stopped before I’d gotten through the entire process with even my first little pair of earring elements. They are now finished, so I’ll at least take the time to finish their documentation too.

Since I last wrote, somewhere I viewed a series of pages (annotated images, but I forget where, and even whether it was a slide show or a .pdf file or…) that contained another “introduction” to the PMC Flex product. But I’d started playing with the stuff even before that was available, so I’d been just sort of guessing as I went along … based on my prior experiences with diy-flex (where you add glycerin to various regular metal clays). That “intro” also talked about heating the clay at 300°F for some amount of time, not so you could sand it (as I’d mentioned in my last post) but in order to help it hold its shape during firing. OK, now, the do-it-for-sanding idea makes a little bit of sense to me (even though I long ago learned how to work with clay in a way that will greatly minimize (though not always eliminate) sanding) but that one baffles me even more. If it’s going to distort, I’d think it would do so at the binder-burnout and/or early-sintering stages; either way, if it’s going to need support to get through that part of the firing process, I just don’t see how having “hardened” it for room-temperature handling is going to make much if any difference. (Hmmm, maybe that file was taken down and that’s why I can’t find it again now when I want to reference it? Or, if you truly understand what I’m missing about all this “baking” please contact me to discuss it! Yes, there are a few instances where I can imagine it would help, and I’m trying to explore that a bit too. But I simply don’t see why it should, in general, be required….)

Anyway, long before I saw that, I’d already fired my first two little pieces by just placing the still-flexible greenware flat and unsupported on my kiln shelf.

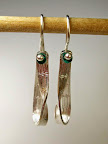
Now, to be honest, I had thought I might place them on some vermiculite in a little silica crucible I have. Except, I’d just taught a morning-only workshop where students made at total of 19 pieces (using PMC3 and PMC Plus that had been ordered well before the Flex was released). I had to get those pieces fired and returned to the participants. With this particular group I was not going to have a follow-up finishing session, where I could show them how to re-shape any that had “shifted” during firing. Though many were ones I could place flat on my kiln shelf, there were enough that had gentle curves I wanted to support, so I squeezed all of those into the vermiculite. Since I didn’t want to wait to fire my two little earring pieces, flat on the shelf they went too (as shown in the second photo with this post).

And I think they came out fine! I added a small glass bead to each for a touch of color, and hung them on ball-end sterling earwires. I’m calling the “Almost Möbius #1” (the number because, though I’m sure I’ll never make another pair exactly like this, I can imagine myself playing around some more with the Möbius-band idea).

Posted in General Techniques | Tagged: , , , , , | Leave a Comment »

A second little report on the new “PMC Flex” clay.

Posted by C Scheftic on 2014/09/22

I’ve got several other high-priority things going on right now, but I just can’t resist sneaking a few moments here and there to play with this new toy!

(Sorry that the photo-colors are all over the place because I’m just shooting on my work-table as I go, not stopping to move everything over to my photo-table. And the light at my work-table varies by time of day and by which of the overhead lights are or are not on at the moment. I work in a building that’s over 100 years old, and much of the wiring is very old too.)

Fresh from the pack, when I try to break off a piece of it, it gives way in the same (what to call it? stringy? gummy?) way that diy-flex (regular silver clay with some glycerin mixed in) does:

There’s nothing wrong with clay that does that! I just note it here, in case you’re wondering why this happened to your clay. It’s normal!

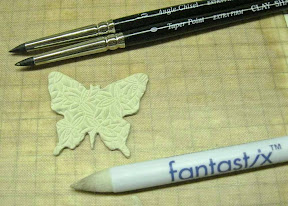
Right away, I decided to use a little “cherry blossom” texture (that I got ages ago at Cool Tools, but seems to have been discontinued…) and a butterfly-shaped pastry-cutter:

You can see (especially if you click on the image to enlarge it) that the edge of the cut is rather rough. Normally, I would smooth that out as much as possible while my clay was still wet; but I know that a lot of metal-clayers just leave it and sand the rough bits off later. I am just not into sanding clay if it can be avoided, so even when I find I’ve missed and left a rough edge behind, I still use a bit of water and various other tools to smooth out my clay. For this little test, then, I just left the edges as they were, to see how much I could smooth it once it had “dried” using my usual tools:

Pretty good!

My plan had been to cut a matching shape out of the interior of this butterfly, using a paper-punch I have. Except, it seems I had not marked that punch (for my own short-memory benefit) before I made this piece, and only at this stage did I realize it was one of my “thinner” ones … meaning this piece was one-card too thick to fit into the punch. Oh well, I’ll deal with cutting it, a different way, later on. For now, let’s just look at another little play-thing.

I had rolled out another little sheet, trimmed it down to a rectangle, and cut that in half. I left the pieces to air-dry overnight, and returned to find they were curving apart. I’ve seen a couple other early-testers mention curving, and having to press their clay down, but I’ve not seem that. The only curving I’ve seen has been like this, left to right:

Still, this is “flex” clay, so I never worry if it curves much in any direction. It’s simple enough to ease it back into shape:

The problem I ran into was with my next step which, of course, I did not stop to photograph. I had wanted to try something with this clay ever since seeing the little video that Mitsubishi had put out on YouTube about the product:

In it, they talk about how easy it is to let the clay “dry” and, since it remains flexible, you can still form it into a ring. Now, the one thing I’d always had trouble with, using the diy-flex clay, was when I wanted to join ends of “dried” flex-clay together. I found that to be far more difficult than with “wet’ clay. But I really didn’t want to invest the time in a ring first-time out. So I thought I’d just try making a couple little “Möbius bands” … where you take a strip, flip one end, and join them together. (With paper there’s tape to show the join. With clay, you get a true “Möbius” shape, where you can take a pencil, draw a line down the middle of the band, turning and drawing as you go, the whole way around, and end up where you start: there is no front or back, top or bottom of the strip. It’s all on the “same” side! If you’ve been following this blog for a while, you already know that I love to make reversible pieces. Continuous ones are even better!!!)

If you watch the video, you’ll see them make it look so easy! And I’m here to tell you their secrets: First of all, you can see the “cut” in the video stream where they left out a bit of the fussing needed to make it work (it IS possible, even with diy-flex clay) but, even more important, their band is perfectly smooth. That makes it much easier to get the join to work, because you can fuss and fill and sand it all smooth again. But I like textures, and I don’t like sanding. It’s not like it wasn’t going to work at all, but I soon realized (soon … after a twist, some water, some squidging together, some tape to hold it for a while, etc.) that it was not going to be quick and simple. I’ll work on that idea a bit more but, in the meantime, I moved on to test-plan-b for these strips.

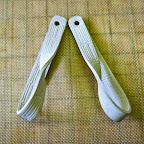
I let the newly-damp parts dry again. I trimmed off a tiny bit at the ends that had gotten smushed; I also trimmed the second piece to match. I then gave each piece a twist, folded the ends up so the tips aligned, added a drop of water, and clipped them together:

Now, I could have gotten that shape with non-flex clay. But I would have had to do everything while the clay was wet. Or, more accurately, while it was starting to dry out, which can sometimes be a problem for me (especially when trying to make two matching pieces) and is far more often an issue with students when it all starts to crack. So, in that sense, the PMC Flex does make this project now far easier to do in a beginner class.

And, doing it this way, I could still try using a paper punch!

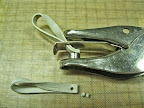
Not one of the fancy crafting punches, as I’d planned with the butterfly, but with a plain, small hole punch. Yeah, I could have drilled a little hole with a drill bit, but this turned out to be way more fun, once I’d gotten over the surprise!

With non-flex clay, I’d never have tried that. (I’d’ve just used a drill bit.) But, with flex, even though the piece slipped down into the punch-opening (gasp!), it was really easy to pry out–carefully–with no harm done! (I took the little “holes” I’d punched out and wrapped then with a bit of moist clay. I wrapped that in a piece of plastic, and put it back into the foil pouch. And by the next day, it had all rehydrated to the point that I could not find the little bits any more.)

The thing is, if you look at the piece lying along the bottom of the photo above, you’ll see that both it and its mate (though harder to see in the punch) have a very straight, sharp edge along what will be the top end when hung. I didn’t want that sharp edge with the rest of these curves. Had I planned to do this from the start, I would have smoothed all those corners while it was still wet. But now I had dried, attached, and punched clay, and I needed to soften its edge.

With non-flex clay, I’d either wet and smooth it (as I discussed earlier in this post) or I’d take out a bit of sandpaper and smooth it down (I may try to avoid sanding when I can; but I have no qualms about doing it in situations where it really is most appropriate…). With diy-flex clay, however, I always found that sanding was pretty difficult. Actually, the fact that I really enjoyed working with diy-flex is what first led me to figure out all sorts of sanding-alternatives! Once I started using them, I just let them spread over into my non-flexible greenware too, thus replacing much of the sanding I’d earlier been taught.

But the video and the package insert talk about how you can “dry the object by heating it to 300°F for 20 minutes.” Hmmm, I’d never even though to try that with diy-flex clay with glycerin in it. And, as of my writing this, I still haven’t … with neither diy-flex nor PMC Flex! I think those two references may have caused a little confusion via some “social media” posts, where people talk about “baking” their clay. Personally, I never saw any reason to “bake” it until you want to make it hard enough to sand. (Or, if you want to harden it in the process of building some complex 3-D structure, but I’ll get to that in some other post … much later on.)

For now, I just want to go on record as saying that you can sand PMC Flex gently in its flex state, without any “baking.” which is what I did here:

I didn’t change it a lot, but I did round out the corners as I’d wanted, while it is all still flexible.

That’s all I have time for tonight. I’ve also started on a woven-silver piece that I hope to report on next.

I’m teaching a fine-silver workshop this week (non-flex: had to have that clay on hand before the PMC Flex was actually shipping, but I’ll show of the Flex a bit since I have that first trial batch), and I will report on firing this clay once all the student pieces have been fired.

Posted in General Techniques | Tagged: , , , , , | Leave a Comment »

Flexible Greenware, or What Metal Clayers Mean by Flexible Clay….

Posted by C Scheftic on 2014/09/19

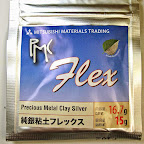
There’s a lot of “buzz” today in the Metal Clay community: Mitsubishi has just released a new fine silver product they’re calling PMC Flex. Well, it’s been available in Japan for a couple months now; the rest of the world is able to order it starting today with, I’ve heard, shipping to commence on Monday. I was lucky enough to get my hands on some of it just this week, so I haven’t had the months of experience with it that some of the official “early testers” have had, but I wanted to report my very first reaction….

First, though, some background. I’ve been working with clays that remain flexible after drying almost as long as I’ve been working with metal clay. I will say, that I find the term “flexible clay” to be a bit confusing: all clay is flexible when you’re working with it! The ones I’m going to talk about today are the ones that remain flexible, that do not get really hard, until they are fired in some way.

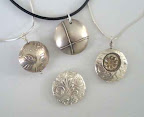
Three Woven Silver Pendants (Class Samples)The center pendant in this group of three (photo, left) was one of the first pieces I ever made this way. It was after I’d used some clay at an event where I gave repeated demos, working and reworking it, exposing it to oil (so it wouldn’t stick to the textures I was using with it), adding water (to replace what had evaporated during use, but also risking the washing away of some product, silver and/or binder). By the end of the day, the clay had gone rather funny: it wasn’t acting like clay at all. It had gone from sticky to slippery. It didn’t leave bits stuck on tools or hands but it did sort of slime everything it touched. Was it destroyed? I had no clue. In the very first class I took, I’d been taught that you could extend the working time of clay by adding a very tiny bit of glycerin, but one should take care to not add too much. (And … I later heard that same instructor say she no longer recommended doing that.) I’d read in some online group that you could “revive” clay that had gone “off” by adding a bit of glycerin to it. I’d also heard or read somewhere (in a class? online? this was years ago now..) that you could make clay that would remain flexible after being allowed to dry if you added a good bit of glycerin. No specifics. Nothing about how much, or how one should do it, or just what would happen if you added too much (other than, obviously, thinning the silver out so much that it could not sinter in the kiln). There were just vague comments. Questions I’d seen about such details had remained unanswered. But … I had some glycerin on hand: what more did I have to lose beyond this clay that was unworkable? Why not try it? And, while at it, why not try to go the whole way?

I added some to the wad of muck I had. I kneaded it in. It went even more funny, and not in a humorous way: by then it was falling completely apart. I tried to not panic. I attempted to knead it some more, and it seemed to start getting better. I kneaded a bit more, and worked a bit of water into the clay too. I began thinking this might work, after all, so I rolled it into a neat ball, wrapped it up air-tight, and went to bed, hoping that would all soak in better with time. The next morning, I took the clay out of the plastic, and it seemed much more workable. It didn’t feel like clay fresh from a new pack, mind you, but I could roll out a couple small pieces and texture them. I let all that air dry while I did whatever all else it was I had to do that day (years and years ago now). When I got back to it that evening, it was wonderful: dried out enough that didn’t feel like I could smash it with clumsy fingers, but still soft and pliable enough that I could cut it with scissors and begin to weave it together. I couldn’t get the strips really close together, but that was fine. As I said, above, that weaving is shown in the center of the group of three. (The frame around it was made from fresh, regular clay.)

I had a little bit left from that test, so I added a little more glycerin, kneaded it in (it was easier this time), waited maybe an hour or two, then I rolled out a couple more small bits and left those to dry overnight. Voila! The dried clay was enough-more flexible that I could weave the strips much closer together: the pendant to the right in the collection was the result of that.

(The one to the left in the trio was made later; the photo is an old image, taken to promote one of the first “woven silver” workshops I taught.)

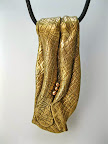
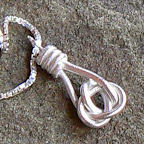
But this getting-more-flexible trend was appealing. I had just a tiny bit left, so I added one more drop of glycerin to that. (Proportionally, with how little I had left, that was a huge amount more!) Again, I kneaded that in and wrapped it up. The next day, I found it that my final scrap was flexible enough that I could tie it into this little knot. I used the entire last bit in making this, spending time adjusting the knot to the middle so the ends would line up, meaning I didn’t have to trim any off. I used fresh wet clay to add the little coil along the top. Once that had dried (hard), I made a loop from fine silver wire and embedded that into the top. I apologize for the quality of that image: it’s a detail from a very old photo, but it’s all I have to show of that piece now.

Magic Carpet (striped frame side)Over the next few years, I continued to make my own silver clay that would remain flexible as greenware, playing with weaves, knots, twists, and other shapes in various ways. The curved-square piece to the left (which I’ve called Magic Carpet in public but is, to the mathematician that’s still quietly in me, a basic example of creating a bit of hyperbolic space…) is but one of such explorations. I learned about Hadar Jacobson and that, in her first book, The Metal Clay Handbook: Textures and Forms, she talked about this, which is one of the main reasons I bought that book … which, eventually, led me to learning much, much more from her and her approaches!

When Hadar came out with her clays, I played around with them for a bit. But I didn’t go all-in for her clays until two things happened around the same time: Hadar herself came to town (well, our local metal clay guild chapter brought her in!) to teach a workhop on her “married metals” approach (which I took), and I started playing around with adding glycerin to her original line of clays, which she now calls the “flex” powders, because they are the most (not the only, but the most) conducive to having glycerin added to yield clay that stays flexible if you want that. (If you want the clay to dry hard, just don’t add anything besides water to the powders.) Mixed Metaphors, shown to the right (before it got its bail and went to live with my cousin Debby) is one example using copper, bronze, and a little bit of steel while combining married metals with weaving.

The other thing that people do with glycerin-enhanced metal clay is to cut it with electronic cutters, like the Cameo and Portrait products from Silhouette. (That was actually one of the things I’ve been hoping to write a bit about this coming winter!) People started by cutting out the very thin PMC+ “sheet” product with that. (I don’t know this for sure, but it would not surprise me to learn that “sheet” was the inspiration for trying glycerin! Though “sheet” acts somewhat differently than does glycerin-enhanced clay, with both the point is that they never quite dry out completely, and thus remain flexible. While sheet does make nice, plain embellishments, the advantage to glycerin-enhanced clay is that you can add textures in various ways, and make it thicker or thinner as required for your design.) When folks started trying to cut sheets of regular clay with it, the question became whether it would be helpful (or not) to add glycerin. (The short answer is: sometimes, yes; sometimes, no. The full answer, available now in various online sites, will be tackled here in future posts … eventually!)

At last, on to the new PMC Flex fine silver metal clay. Needless to say, when I first heard about the new PMC Flex, I was both eager to try it it and wondering why one might purchase that rather than just go the DIY route. When I first got my hands on a pack of it, I began by trying the techniques I have in finger-memory, the ones I’ve been doing and teaching for years, just to see how it performs. The very first thing I did was to grab a little piece of it (a bit less than 1 gram), and roll it out into a “snake” or “rod” shape. I left it to dry over night.

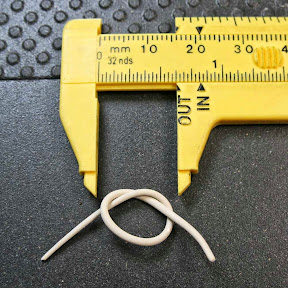
The next morning, I measured it: 3.25 inches long, and the size of 15 gauge wire. (Clearly, it will have shrunk a bit while drying, and will shrink even more when it’s fired. But that’s it’s “dry” measurement.) It seemed like it would bend, but felt a little stiff. I’ve had that experience with the glycerin-enhanced clays too, and found that gently “working” the piece along its length will often make it more pliable: I tried that with this piece, with the same good result.

I then tried to tie it into a knot. The photo shows how far I could get it to go before feeling a lot of resistance. (The calipers shifted a bit as I was setting up the photo, so they represent a visual guide and not an exact measurement, but that’s OK for this very-preliminary report…) If I want more elaborate knot designs, I know how to get a tighter bend with my DIY-flex (as shown, for example, even in my first silver knot above, which began with a bit of clay about the same size as this). Still, this PMC Flex will clearly be great for a variety of other applications. I plan to write more about those, with photos, in future posts. As ever, as time allows…. But I’ll close by saying that it is a lot of fun to have such a delightful new toy to play with!


Update:  With Hadar Jacobson’s Flex-clay powders, one trick to slightly increasing the flexibility of a piece of “dried” clay is to refrigerate it for a little while.  I tried that with the above piece and it seemed as though it was going to let me pull it a little bit tighter.  That is, until is broke just about in half.  I’ll use the two pieces some other way, but figured I should note that (as a reminder to myself, as well as information to you…).

Posted in Technical Details | Tagged: , , , , , , , , | 1 Comment »

Bits & Pieces

Posted by C Scheftic on 2013/02/23

I’ve been meaning to write for a while about several questions that often come up in workshops, especially with beginners when each person is allocated a package of clay and then finds they don’t use all of it: why did you give me more than I need and how do I save it for later use?

I see the answers to these questions as being connected, but let’s start with the first one: for many “projects” it is just worth having a bit extra as you roll it out, so you’re sure to get a big enough area to cut out the shape you want. While this remains true no matter how experienced you become, it is especially important for beginners who are just learning the various ways to manipulate clay.

The answer to the second question is a bit more complicated. Silver clays come in a well-sealed package, and can remain in great condition for a rather long time inside that. The trick is that, once the package has been opened, all sorts of things can happen. At a minimum, the clay dries out. If that happens, it can be rehydrated: ways to add water to get it back to working consistency is something I’ll try to remember to write about at some point in the future (even though it’s not something I encounter myself on a regular basis any more…). If you’re going to use the remaining clay again fairly soon, you can just try to keep it moist. There are all sorts of products you can buy, or build yourself, to create a little humidified storage environment. The problem with doing that for any length of time (and something that the product vendors rarely address) is that your clay can easily become contaminated with mold. Now, you can add something to the environment (not to the clay itself, but simply inside your storage box) that can help retard mold growth. White vinegar or lavender oil are examples of some mold retardants. And, even if your clay does acquire a bit of visible mold, it’s not a crisis. At that point, your options are to scrape off the mold or to just work with it. (You do have to take care with the latter because the extra “space” taken up by the growing mold may create spaces in your fired piece that may influence its look and/or interfere with its strength.) But, in my experience, there’s a much better solution: don’t even try to store it!

That is, my general answer to both of the original questions is this: why not see if you can just use up any remaining clay in some creative and productive way?! Add to your current piece, or make something else.

One of the earliest “lentil” shape beads I ever made is shown in an old photo here, to the left, strung with some Russian jasper and green glass beads. (It’s also one of the pieces that led me down the path of making reversible pendants!) Its other / first side had a more elaborate design; what at the time I thought of as the “back” had the simple, low-relief, fleur-de-lis pattern shown here. After decorating the first side, I had a bit of clay left. I rolled it all out, just two cards thick, which got it big enough that I could cut out a small square. I put that on the same drying form I’d used for the lentil (so it would have the same curvature) and cut a circle out of the center of that. With the clay left over from trimming the square and cutting the circle, I made a number of little balls and let those dry too. Then, I moistened the center of the fleur-de-lis side and the underside of the open square, and stuck those two pieces together. Once those seemed secure, I added more water inside the open circle, and pressed the little balls into place. Having the circle around the outside of the balls gave me a way to make sure I could attach all of them securely, to that ring and to each other, rather than trying to count on a small point of connection on the bottom of each ball. And, suddenly, after investing only a few more minutes and a tiny bit of “left-over” clay, the piece became reversible, which sure seems like a good deal to me!

Of course, if you have more clay left over, you can always make something else with it. All of the elements in the silver and bronze earrings shown in the smaller image to the right were made when I had some larger leftover bits. After completing other pieces I’ve often used any remaining clay to make little patterned disks, or cut out little textured designs, and just set them aside to dry. When I’m firing up a load in my kiln, if I have a bit of extra room, I pop them in. When I have a few spare minutes–with metal clay, one always seems to have moments of waiting for something else to happen … to dry, to rehydrate, to finish firing or cool off, for example–I will go through these bits and pieces, and assemble them into something interesting. Their small size, of course, means they often (but not always) become elements in earrings.

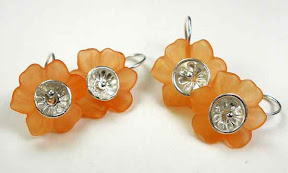
Sometimes I’ll add other elements to such “bits and pieces” too. The orange-and-silver earrings shown at the very top of this post were done that way. When I fell in love with the little colored lucite flowers, I bought a small collection of them to use both for my own creations and during workshops. For several months, whenever I’d have a little bit of clay left over, I’d make a little flower disk or leaf of some sort. I kept track, so that I’d end up with matching pairs, but I didn’t worry about completing any particular number at once. I just used up what I could for some larger shapes, made smaller ones when I had less clay left, and made other small elements or even just tiny balls with the very end of the clay I had on hand.

In fact, for silver pieces that I intend to fire first and figure out how to use later, those I make flat. Then, when I do decide where I want to use them, if they need some shaping for that particular purpose, I can use the “traditional metalsmithing” technique of dapping the fired pieces to shape them as needed. That’s what happened to the little flowers I set on top of the blue-and-white glass beads shown with the earrings in the final photo here. In fact, though I made those flowers specifically to use with these beads, I could not have domed them to match their shape in the “dry” state because I punched them out of a little bit of extra / scrap clay that I had mixed up so it would remain flexible as greenware. I had finished the project I wanted to make with that clay and had some left then too. Since I knew that “flex greenware” clay that has been rolled out is great for using with paper punches, I used some of my leftover clay to make a small sheet for punching. I then made these flowers but they had to be fired flat … since they were too flexible to hold any other shape. (I also rolled the final bits of that flex-clay into long “snake” shapes that would remain flexible and could be used to embellish other pieces later on.)

I will note that, while fired silver and copper clays can be dapped after they’ve been fired to metal itself, the various bronze clays that I enjoy working with cannot be formed much (if at all) after firing. That’s just the nature of bronze, not simply the fact that it came from metal clay.

I do sometimes wonder how much this is something I do, myself, verus what other metal clay artists do with their leftover bits of clay. I know that a number of you do read this blog (without commenting) but I sure hope you will speak up now: Do you do this too? Or what?? And, why?

Posted in General Techniques, Teaching Metal Clay | Tagged: , , , , , , , , , , , , , | Leave a Comment »

Productivity!

Posted by C Scheftic on 2012/11/05

I led a “woven silver” workshop at the weekend. The first photo (right) shows the pieces that were made that afternoon and, um, once everyone got a roll, that evening too. (Yes, a few didn’t involve weaving. That’s OK too.) In that image, no finishing has taken place: it shows the “white” appearance of the silver crystal structure straight out of the kiln. I just wanted to grab a quick photo, while I could, to show how productive the session had been.

The second photo (left) of the folks at the west-side table at work is mostly a sort of visual note to myself to try to remember to take photos more often, in class but also elsewhere. Because the caption for that image should be, “No! I won’t look up! I will not look at the camera! No!” Still, I’d like to thank everyone who was there for being such good sports … in every other way.

I haven’t posted over the past couple of weeks because I’ve done all sorts of things where I just did not think to take any photos. You might think that I would have taken photos while attending a workshop on photographing artwork. But no, there were lots of handouts and images of copyrighted work and discussion and more. Even though I had both of my cameras with me, the only times either one came out of its bag were to show a few images that were already on their memory cards.

You might think I’d’ve taken some shots at our recent metal clay guild chapter meeting but, no, I didn’t even think to take a camera to that. We had an opportunity to play with the Silhouette Cameo cutter that one of our members has gotten; we did lots of great planning for next year; and there was all the usual sharing and showing and telling and hand-on time and more. But no photos….

I also didn’t think to take a camera on any of my recent shopping expeditions. But, now that I think of it, I have added a few interesting items to “the stash.” Maybe I can manage to (remember to) take photos and write in the next week or so, before those elements finish going to into pieces and out for holiday sales events.

It is such a busy time of year, with all the autumn chores and the lead-in to the season of holidays, I am sure you, dear reader, are keeping busy too. Please know that I hope you are feeling productive!

Posted in Teaching Metal Clay | Tagged: , , , , , , , | Leave a Comment »

Weaving a Saddle Shape

Posted by C Scheftic on 2010/03/10

But of course, I’m easily distracted from the earring challenge. The Bead Mercantile show came to town last weekend. As I approached the Talisman booth, my attention was immediately captured by these beads:

I cried out “Ooooh!” as I grabbed a strand of them. Several friends from the Western PA Chapter of the PMC Guild were there too, and they commented that the beads were interesting. But none of them said it with the sort of enthusiasm that I clearly felt.

For me, that is, it wasn’t just the beads. Yes, I like them, but the exclamation was because I knew I was going to leave the show and go figure out how to make a piece like this from metal clay:

At this point, they don’t quite go together. I like the shiny silver (a bit more muted in the photo than in reality), but the pendant needs a bit of a patina if it’s going to be strung with those particular beads. I just figure that I’ll wear it like this for a few days, to see what kind of reactions I get to it as a solo piece, while I give a bit of thought to how I might modify the construction process I devised so that making a whole series like this might be reduced to a reasonable amount of effort.

Once I’ve had a chance to make several more, then I’ll figure out which one(s) to patina and string with the beads that inspired them, and which to just hang on good chains all by themselves. Some final results should appear on this ‘blog eventually!

Posted in Visual Triggers | Tagged: , , | Leave a Comment »