Convergent Series

learning, using & teaching metal clay, and other aspects of life

Posts Tagged ‘.960 silver’

May Studio Events

Posted by C Scheftic on 2023/05/01

Now that Mitsubishi has discontinued their (wonderful!) “PMC” line of metal clays, I’ve been experimenting with some of the other brands that are available. I want to do a few more tests before I start writing about them but for now I’ll add this one quick note:

I can work just fine with any of them, myself. I think I may have identified a couple favorites for my own use. But I have yet to find one that doesn’t have some major setback or other for use in classes. (This is not a total surprise: my favorite type within the PMC-brand to use for classes was not my first choice for the one I would work with in my studio!).

But I still have a few more to test out before I make any final decision (and since I am now into peak garden-prep season, my art-time is a bit constrained…).

Still, the point of this post: I have some great new pieces out of my recent explorations with these new clays, and I’ve got them ready to send off to new homes at either of the two events I have in May (which can also be found on my Facebook Page or website for Convergent Series) are:

  • First Sunday, May 7, 1 to 5 pm 
    (Moved a week earlier than in recent months to allow for shopping before Mothers Day.)
  • Third Saturday Extra-Special, May 20, 9-ish am to Noon 
    (And a second chance this month because this coincides with the wonderful Regent Square Community Yard Sale and WSCC’s annual Plant and Used Books sale.)

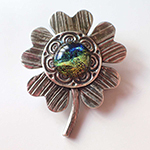
Since posts usually contain pictures, I’ll close with this one. Do stop by to discuss which product I used for it, and see my other newest treats!

Posted in Events, Learning Metal Clay, Studio | Tagged: , , , , , , , , | Leave a Comment »

NHAC 2017 Fall Members Show

Posted by C Scheftic on 2017/09/08

I’m delighted to report that I have three pieces in the current Members Show at the North Hills Art Center! The pieces were hung as they were accepted last week, but the official “opening” of the show is Saturday, September 9, from 7 to 9 pm, and runs through October 6.

As usual for NHAC, the majority of the entries are paintings. But when I dropped off my art jewelry, I did see fiber art, pottery, mixed media assemblages, and more too! A lot of the pieces were made by students of the center so, if you’re curious about that, this show can also give you an idea of what you might be able to learn in the classes there. If you’re in the area, I hope you’ll stop by to check it out! It would, of course, be great to see you at the opening on Saturday but, if you can’t make it then, do go whenever you can.

I’ve already said a few things about each of my entries, separately, in earlier blog or Facebook posts, but I thought I’d assemble a few thoughts on each of them together here. They are all available for purchase at the show.

GWV!

GWV: Give Women the Vote

If you look closely, you may notice that the flowers in this “rose bronze” bracelet are Green (nephrite jade), White (cubic zirconia), and Violet (amethyst). Embellishments in those colors were a code in Edwardian / Art Nouveau times for Give Women the Vote!

This piece was made before either of my other two in this show, but since then I’ve been holding on to it myself. This is the first time I’ve ever really considered putting it up for sale!

Night Moon

Night Moon (front & side views)

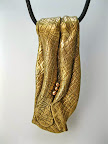
As one of the earlier pieces I made with EZ960 after its introduction in 2016, this was made as a class sample, to illustrate the draping/folding process. But it’s notable to me because it’s the first piece I made using only “scraps” from earlier projects. Obviously, that test was successful!

In draping, sometimes the material tells me the shape it wants to form, and that was definitely the case here! The title of Night Moon comes from how, once the piece was completely finished, it suddenly struck me how much it evoked thoughts of a particular night in June of 1988 (a truly wonderful summer!), when I was climbing (well, at that point, descending) Emeishan, one of the four sacred Buddhist mountains in China.

Keystone Wildflower

Urban Flower: Big Keystone (blue-green glass by Elise)

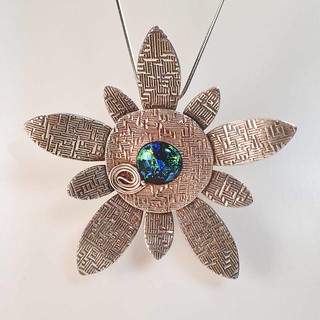
Yes, this is yet another piece from my Urban Flowers series! Like the earlier ones, this pendant was made using sterling (.960) silver for most of the piece, for strength, and in a separate step the dichroic glass cabochon was attached with fine (.999) silver because that form plays better with glass. It hangs on a sterling (.925) silver chain.

The dichro in this piece is a cabochon made by local glass artist, Elise McVeigh. It is also one of the priciest pieces I’ve had in a show in a good while: that is because, at something like 75 mm across, it is one of the largest pieces I’ve made in a good while too! And big uses a lot of silver, so the price simply reflects that. But Elise’s lovely glass is noticeably different from the other dichro cabs I’ve added to my earlier urban flowers, and I just thought it deserved to go into a “statement” piece! I hope it will find a new home with someone who agrees with me.

Posted in Challenges, Events, Teaching Metal Clay | Tagged: , , , , , , , , , , , , , , | Leave a Comment »

2017 Arts on the Riverwalk – please vote!

Posted by C Scheftic on 2017/09/05

UPDATE: Voting ended at 5 pm on September 9. I didn’t mount quite a big enough Facebook campaign (which really isn’t my style anyway) to claim the $100 people’s choice prize but, as of the last time I was able to check (an hour-ish before the deadline), I had garnered well within the top 10% of votes. So I sure do appreciate the support of everyone who took the time to enter a like-vote on my behalf!

(Also, since it no longer matters, I’ve removed the column of notes on the extra quirks of this particular voting process…. The rest of this post remains as originally written.)

Oh, and the exhibit remains on display at The Confluence cafe through October 26.

I’ve got two pieces in the Arts on the Riverwalk competition, and I’d sure appreciate your vote!

Now, I’ll admit, neither of these pieces were originally made with competition in mind… They were designed as samples for two different classes I taught last fall, and my intention was to illustrate specific technical strategies of construction! In my classes, I also point out that sometimes a design will take a while to tell me what it really wants to be; in the case of these two, they have also taken a while to tell me what they want to be called!

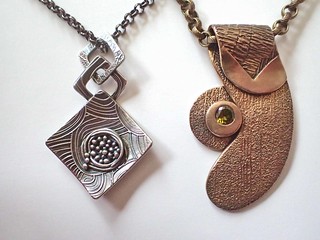
2017_0127_AngledSquareNestWithLinks_and_BronzeDrapedLayeredEmbellished_4037


1. In the pair shown here, the piece positioned towards the left, with a silver pendant on a gunmetal chain, is now titled Overflowing Nest. In the class where I taught that, we covered a range of different “nest-style” constructions, plus I threw in a “bonus” on making links. Time constraints meant I could only illustrate using links this way, as a bail, but the same techniques work for making an entire chain. The other interesting thing about this piece is that it was made for one of the first classes I taught using “EZ960” sterling silver metal clay, and it was made entirely from reconstituted “scraps” that were left over from earlier samples. It’s always good to learn how well different clays do or do not reconstitute, and this sample worked wonderfully.

If you’d like to vote for my “Overflowing Nest” piece, please click to find the instructions here.

(Quick mini-lesson on re-use: Like all clays, scraps can get “worn out” after many re-uses. After just a few repeats, if you’ve treated your clay nicely all along, it’ll be fine. But even after it’s had a long or rough time, it can still be salvaged by mixing little bits of “scrap” in with “fresh” clay! This is one of the things I really appreciate about most metal clays!)


2. The piece towards the right, with a bronze pendant on a brass chain, is now called At a Bend in the River. That main part of this one was also made from a scrap! I’d finished the main demonstration on making a rolled bail on a two-sided piece, but there was a question, so I quickly rolled out another piece of clay to use as an illustration while answering. I was a bit distracted while talking about something raised by yet another student, so I didn’t roll it very straight AND I rolled off the edge of one of the texture sheets with clay squishing out. But I looked at it and exclaimed, “What great luck! This piece just told me how it wants to be built!”

I immediately reversed my plan of which side would be the back or the front, because the place where I’d overshot the texture has that lovely angle-into-smooth look that I just had to put on the outside-front, not tucked under in the back. Since the remaining demonstrations I had planned involved layering elements and how to add a fire-able stone (in this case, a peridot-colored cubic zirconia), I made use of the curve of the piece to embellish it with a piece where I could also talk about design issues for centering, or not centering, any embellishments. Ended up being a very interesting, if unplanned, answer to the original question!


If you’d like to vote for my “At a Bend in the River” piece, please click to find the instructions here.


Also, though I don’t have these specific classes scheduled (yet) for this fall in either of my North Hills or South Hills venues, there’s still time to add a workshop or two in my East End studio. So if you’ve been inspired enough by one (or both) of these to want to learn how to make something like that yourself, please let me know and we can talk about our options!

More on other shows, classes, and more, as soon as I find the time for another chance to post here.

Posted in Challenges, Events, Teaching Metal Clay | Tagged: , , , , , , | Leave a Comment »

The evolution of two “old favorite” classes!

Posted by C Scheftic on 2016/07/21

It’s time to follow up on an earlier statement, and write a little bit about some upcoming classes. But since this is (what is often called in social media circles) Throwback Thursday, I thought I’d include a few notes on how the ideas and directions for two popular sessions have evolved over time, since I’m repeating them on a couple of Saturday afternoons this month (soon!) and next.

Reversible Draped Silver
Saturday, July 23, 2016 from 1:00 PM to 4:00 PM (EDT)

I must admit that the idea for this came from Hadar Jacobson. I’ve made pieces, and then been asked to teach classes, using both precious metals (silver) and base metals (bronze, copper, steel).

We texture the clay and then roll it thin in order to get it to drape nicely. With .999 fine silver, that produces pieces that seem to me to be a bit too fragile, risking bending or breaking at the thinnest points. We can solve that problem by adding a backing layer, or at least a frame, to provide additional stability.

When we use base metals (like these in bronze and copper), we get pieces that are a bit harder. Thus, most of our pieces can just be folded and embellished. They rarely seem to require extra layers for sturdiness, though of course those can always be added if desired from a design standpoint.

I will admit that I never tried making these with .925 sterling silver: I don’t particularly like fussing with the firing schedule for that clay, and have only used it for a handful of different designs. But last winter I started making these with .960 sterling which is much easier to fire than is the .925 form, and they turned out great. So that’s what we used the last time I offered this as a class, and it’s what we’ll be using again this week.

At this point, we’ll still be using “homemade” .960, that will come from mixing .999 and .925 clays. There is a commercial version now available, EZ960, that’s recently been released. We won’t be using that here simply because I haven’t yet had enough time to experiment with that to feel as comfortable as I’d like using it in a class. I want to learn any and all potential pitfalls with it myself before foisting it on a room full of students! Stay tuned for news in that arena.

Reversible Woven Silver
Saturday, August 27, 2016 from 1:00 PM to 5:30 PM (EDT)

Three Woven Silver Pendants (Class Samples)The way I began to make these pieces, and lead students in making them, has had a number of inspirations. Hadar, again, was one of them, but so were CeCe Wire, a project in the RioRewards certification program, plus a whole range of others (such as some of Mary Hettmansperger’s metal-weaving projects).

Sometimes, as in the silver pieces above, the weaving would be the main element in the design. Other times, as in the mixed-metals piece shown next, the woven portion is more of an accent to another important part of the design. Because of the thin nature of the strips used in the weaves, however, I always made sure that their ends were securely tucked into a frame.

Ahh, but do you remember the .960 silver I just mentioned above? Yes! While I’ll still guide students through some dos and don’ts in letting small ends hang out, we can now be far more adventurous in allowing that. We no longer need to be completely constrained by framing. Again, we can use solid frames if we want that in our designs, but it’s now an option, not a requirement. This class is going to be another one that’s lots of fun!

If you’re in the western PA area, or can get here for one or both of those dates, I hope you’ll join us!

Please note: The links in the title of each session above take you to the site from which you can reserve a seat at that particular class. In each case, the materials provided will be enough to make an interesting pendant. If you want to divide it in half and make earrings instead, that’s fine with me. If you want to buy a bit more material and make something big or even (if you find yourself so comfortable with this material that you are able to work quickly enough to…) make both a pendant and a pair of earrings, that’s yet another option.

Also: I’ve got two other workshops coming up this summer, both of which are multi-day events. I’m hoping to write about those soon too, but the ‘net access in my studio is getting increasingly less reliable (we’re hoping for a fix next month…), so I’m struggling to keep up with online announcements. But you should know that all my workshops at The Artsmiths of Pittsburgh are announced on the Eventbrite system. If you are interested in a specific class but for some reason can’t make it on the given date(s), please let me know. I’m happy to repeat any of my sessions on another date, whether it’s back at Artsmiths again, in my studio, or at another site.

Posted in General Techniques, Teaching Metal Clay, Technical Details | Tagged: , , , | Leave a Comment »

Summer Workshops Galore!

Posted by C Scheftic on 2016/07/03

I’m really excited: The Artsmiths of Pittsburgh has scheduled five of my metal clay workshops in July and August, and two of them are special multiple-day events so I’ll be teaching there for nine days in all during those two summer months!

(Some day, I hope to arrange a lighting set-up that will give me a consistent color background regardless of the time of day when I take my photos … sigh! The shots above show the range from morning to afternoon to after dark at night; and, yes, all of them DID have the same three bright “daylight” bulbs trained on them in addition to the room’s ambient lighting.)

The length of the various sessions does give a hint about the complexity of the different projects, but everything I’ve scheduled at Artsmiths for this summer should be do-able even by complete beginners. The reason I set aside more time for some of them is so that I can welcome even first-time clayers into any of these classes! Folks with some prior experience with metal clay are likely to learn some new techniques, and may well be able to apply their existing knowledge to kick their designs up a notch.

If you follow the links above to get more information and/or sign up for a class, you may notice that the descriptions there often talk about making a pendant (and the corresponding photos show a range of possibilities for how you might construct yours piece). Anyone who’s taken my classes already knows that, while I often demonstrate a pendant design, I’m happy to support reasonable variations on any given project. By reasonable, I mean variations that are appropriate to the materials we will be using, appropriate to the skill level of the student wanting to make something else and, tied to both of those, appropriate in the sense of the amount of support you’ll need to succeed at your idea while also being “fair” to others who are trying to complete the specified project. But I want everyone to make a unique piece they are happy with, so there’s a lot of leeway in exactly what you might make! Get in touch with me directly if you have any questions about that aspect of my classes. Or, just come and make some gorgeous, unique, and (probably) reversible pendants!

Also, if you have time and material left once you’ve completed the main project, I’m always happy to have you make a little something else with what’s left, often a pair of earrings or a few small charms, or even embellishments that you might add to future projects. I’ll fire those along with the regular class pieces.

With my one-day classes, I fire pieces for you after class, tumble-polish them to an even, high shine, and return them to the site of the class in about a week. This time, I’m especially happy about the two- and four-day sessions, because I’ll fire everyone’s pieces before the last session listed and then, on that last day, we’ll review and practice a number of different finishing techniques, ones that often get overlooked in the one-day sessions (unless you schedule a time to come to my studio for a private or semi-private lesson on finishing).

I’m going to try to post a little something about each session in the coming week or two but, given how spotty my blog-posting has been recently, I figured I should get the overview up for you to consider all at once now…

ALSO / alternatively …

Is Mt. Lebanon too far for you? Would you prefer another date and time? I’d be happy to teach any of these classes in my studio (in Regent Square) or at another location (that you arrange). Let me know if you’d like to discuss any other possibilities!

Posted in Events, Teaching Metal Clay | Tagged: , , , , , , , , , , | Leave a Comment »

Well, that was a surprise!

Posted by C Scheftic on 2016/06/30

As promised in my last post, here’s the story behind the earrings whose photo I posted there….

1. In my fairly early days working with metal clays—as soon as I’d moved on from just using a creme brulee torch and bought my first kiln but when I was still working on tray-tables in my family room, years before I started this blog or opened my studio—I found much inspiration in the work of CeCe Wire (one of the pioneers in metal clay techniques), and one of the things I had fun doing was making pieces that played with shrinkage. I learned about the concept in her first book, from 2003, Creative Metal Clay Jewelry: techniques, projects, inspiration, and had that reinforced when I earned my PMC Certification in a course with her, in Baltimore in 2007.

At that point, I’d make a small piece (earrings or small pendants) out of the original PMC Silver formula (no longer available), that had a shrinkage rate of 28% (and had to be fired in a kiln for a full two hours). I’d embellish it with Art Clay Silver, that had a shrinkage rate of 10%. Why those two? Because their shrinkage rates were the farthest apart of all the clays at that time on the market.

Because it was constrained by the low-shrinkage clay, the high-shrinkage clay would curve and distort in interesting ways: the fun part was trying different locations for connecting the clays to discover what results I could produce. (This was also back in the day when the nominal price of silver was a mere fraction of what it is today…. I am so glad I started that early! Even then, I did feel limited in how much sheer experimenting I could do, but nothing like it would be today….) I did some other clay combos too, but that particular pairing consistently yielded the most interesting results. The relatively high shrinkage of “original” was the key, no matter what other clay was combined with it.

I stopped doing any of that when Mitsubishi discontinued their original formula. Like many others, I was sad to see it go, but I created enough designs in other ways that the loss didn’t feel as devastating to me as it did to some folks. Since then, a few other silver clays have come on the market with shrinkage rates in the range of 20 to 25%, and at times I’d think about reviving that old technique with them, but then would get caught up in other project ideas and that would slide way down on the priority list.

2. I have written here before about how I try to not store “leftover” clay. I just keep making things until I’ve used a packet all up. Some of my earrings are made with leftover bits. Little embellishments can be cut out or coiled up, dried, and used in later creations. The last few dregs can be shaped into little balls, dried, and stored for later use too. If I don’t have time at the end of a work session to use everything up, I will store the last bits for a brief time, but I do try to form those into something useful as soon as I can.

3. Last month, for various reasons (e.g., different projects, classes, demonstrations), I used a number of different clays, including these (as well as several others, but these are the ones relevant to the rest of this post):

Clay Formula Shrinkage Rate
PMC 3 12%
PMC Flex 15%
PMC Sterling 15% – 20%
.960 made with PMC3 Question #1
.960 made with PMC Flex Question #2, this post’s inspiration…

Re Question #1: In a comment on the post where Celie Fago introduced the idea of home-made .960, Holly Gage estimated the shrinkage of PMC3 and Sterling to be about 13%. In a post that further disseminates the idea of using .960, Emma Gordon writes that “You can use PMC3 syringe with it, no problem.”

Now, maybe I’m missing something obvious, but if folks are combining PMC 3 syringe clay with .960 made from mixing PMC3 and PMC Sterling, it seemed as though I should be able to combine PMC Flex lump clay with .960 made from it and sterling: their nominal shrinkage rates are even closer! I had a bit of Flex.960 left from one activity, so I used up those dregs making a couple little pairs of earring bases. Flat ones. Definitely flat. I had a bit of regular Flex left, so I twisted a little spiral-pair for one set of earrings, and made a little twisted rope to embellish the other pair. (With the last few bits, I made a number of little balls which I then accidentally knocked all over my studio floor. I’ll hunt for those eventually!)

And when I fired those two pairs of earrings … the photo below shows what I got! Can you see how far they’ve curved?!! I’m not disappointed in the results. In fact, I’m happily reminded of those early CeCe-inspired domed pieces that were so much fun. It’s just that this is not what I was expecting! The shrinkage rates on these clays are nowhere near as far apart as what I was using in all domed pieces I was making a decade ago — I would have expected this with those. Just not now.

I guess this is telling me I need to find some time (where?!!) to do some more experiments! If you’ve experienced anything like this, intentionally or not, please let me know.

Posted in General Techniques, Misc. Musings | Tagged: , , , | Leave a Comment »

May 12, 18, and 21: More Workshops at Artsmiths!

Posted by C Scheftic on 2016/05/07

Happy Mothers Day weekend, everyone!

As I said in my last post in April, I sure had a great time teaching at The Artsmiths of Pittsburgh last month, and I’m thrilled to have been invited back to offer more courses there this May! Here are the three that are on the calendar for this month. Clicking on each course title should take you to a page where you can read a bit more about the projects and, if you want, actually register for the various sessions.

  • Earring Extravaganza: An Introduction to Fine Silver Metal Clay! on Thursday, May 12, from 6 to 9 pm

    This will be the simplest, most fun, yet easy-going introduction to metal clay that’s possible! In three hours, each participant will create lovely, unique, art jewelry: fine silver (.999) earrings!

    There will be lots of options for texture, shape, and small embellishments, so everyone will come out with their own unique pieces. And, we’ll texture both sides, so each pair will be reversible!

    There will definitely be enough time and materials for each participant to make (at least!) two pairs of earrings … but, remember, since they’ll be reversible, it’ll almost be like getting four pairs from just this one class!

  • Reversible Hollow Silver Art Jewelry Pendant, on Wednesday, May 18, from 1 to 5:30 pm

    The very first piece I ever made using metal clay was one of these “lentil shape” beads, and it can be the first one you make too, if you want.

    Then again, even if you’ve been working with the stuff for a while, this project involves a few special techniques that are also applicable for a range of more “advanced” projects … which makes this a special (and easy) project on which to learn and begin practicing them.

    I find that lentil-beads always seem to be such fun to make: join us, if you can, and see for yourself!

  • Reversible Woven-Silver Art Jewelry Pendant (or Earrings), on Saturday, May 21, from 1 to 5:30 pm

    There’s a long story here, not worth going into but, although I’d hoped to offer this class last month, several situations conspired to prevent that. So we simply rescheduled this one for May! I hope that those who had signed up for April will be able to come to this one; plus, there were a few seats still open in that session so there should still be room for some new-comers!

    There are lots of things I love about this woven-silver project. The one I’ll mention here is that this is a great session for people who like to make and / or wear silver pieces that are big! At times, the sheer cost of the materials can seem somewhat intimidating but, because these designs have so much open space, they require far less material. Relative to many other designs or approaches, you can stay small, and keep your material costs down, or go big, and not have those costs skyrocket. Your choice!

As I said last month, there’s no significance to the specifics of dates and times. That is, if you want to take a workshop and those date/time combos don’t work for you right now, please let me (or Artsmiths) know! All of us are trying out different combinations to figure out what will work for folks who are interested in the classes. As long as we know there’s interest, we can work out other day/time combos for future months, either repeating these topics or adding new projects to the offerings. And I’m willing to offer any of them as small (private or semi-private lessons) or group sessions (if enough people express interest) in my Regent Square studio as well as at The Artsmiths of Pittsburgh.

Personally, I think that all of these are lots of fun to make!

Posted in Events, Teaching Metal Clay | Tagged: , , , , , , , , , | 2 Comments »

April Recap: First Classes at Artsmiths

Posted by C Scheftic on 2016/04/30

Some days I think to take photos, other days I don’t. I can find no pattern at all to which is which!

But, whether or not I remembered at any point to stop and take photos, I want to say how much I enjoyed my first month of teaching at The Artsmiths of Pittsburgh!

Our very first class, on April 14, was an easy introductory session, where we covered learning how to texture metal clay, give it some shape (e.g., by drying it over a dome), and embellish it for a bit of extra oompth (e.g., with balls or coils of clay). In all, in three hours, six students completed twenty-one different pieces!

Now, if you’ve worked with metal clays, one thing you know is that you usually should start out with a little more clay than you actually need to make a piece. You’ll roll it out, but then cut it down to the size and shape you want, and trim away the excess. And the question is, always, what to do with the excess? I’ve already written here about this, but the basic options seem to be: make something else (small) with what you have left; get some more clay and add your leftovers to that to make another piece (bigger); or, go to the bother of saving it to do one of the above later on. (Clearly, I lean towards either of the first two!)

And I have to give this group credit for finding ways to use all their clay. First-timer Linda, in particular, kept making smaller and smaller pieces, using the bits she cut out of one piece as elements on their own, and using the final dregs to make tiny ball embellishments.

Everyone’s pieces fired beautifully, but I didn’t think to get a photo of that. No, what I did capture was when, after I’d fished Linda’s last three teensy pieces out of the shot, someone surprised me by pounding on my studio door, and I dropped them back onto the shot. At least, they landed on top, so I didn’t have to search through the whole barrel-full again. Still, can you spot all three pieces in this photo?!! (I think two are pretty obvious, but not the third, which was the center she’d cut out of the little gear/sun-shape.)


Then, on February 21, I taught a “Draped Silver” class. Didn’t take a photo of that group at work…. Don’t have a good photo of all my samples either, but I include here two older pics of two pieces each, one pair in .999 fine silver, and one pair in bronze and copper (because that’s my best one of little “ball nest” embellishments).

In this class, we worked in .960 silver. That allowed us to roll the pieces nice and thin, which is the key to making draped metal clay pieces. It also let us make them fairly thin without having to add a backing or frame for protection.

Several of the folks in this session had taken one of my earlier classes (at Artsmiths or my studio) and had seen a wide range of my textures; for this workshop, however, I took only shallow-texture choices.

The last photo with this post shows the fired and tumbled pieces from this class (though, for some reason I don’t understand, it is not a good representation of any of the colors, nor the textures; though you can see the range of interesting shapes that folks made). The one with wire, beads, and chain (middle of top row) is the one I made as an in-class demonstration. It’s a slightly different color from the other pieces because, before I added the beads and chain, I gave it a very light Liver of Sulphur (LOS) patina and then polished off most of it. But I returned the students’ pieces all shiny-silver, and will let them decide if they want to leave them like that, or if they want to add a patina. I do love patinas but, sometimes, and especially with broad, shallow textures like many of these, I think that pure silver shine is wonderful!

I did have a third class scheduled for April, Woven Silver on April 26 but, as I mentioned before, April was a killer month. (I mean that literally: suddenly, randomly, several friends and parents of friends all died.) It got to the point that I just couldn’t swing that class. I didn’t get a clay order in on time (to get it without express shipping charges) and, even if I had made it to class with clay, it’s not clear where my head would have been. I want workshop participants to know that I am there with them, ready to present, encourage and help! So we rescheduled that one, for May 21.

I’ve got two other classes scheduled for May too. I’m really looking forward to those! More on all that shortly!!

Posted in Teaching Metal Clay | Tagged: , , , , , , | Leave a Comment »

This weekend: the nineteenth Art All Night!

Posted by C Scheftic on 2016/04/23

Yes, once again, the last weekend in April brings us the wonderful community celebration of art that is known as Art All Night.

For this, the nineteenth such event, they’ve returned to switching locations again (hey, it’s a project of the Lawrenceville Development Corporation so besides all the art, part of the point is to get tens of thousands of people circulating through an “empty” site in the hopes that someone will see its potential…!), so I’m eager to see what this one will be like.

Though I had finally gotten comfortable with finding my way to, finding parking relatively near, and finding my way back out of the site they’ve used for the last few years, it’ll be interesting to see what it’s like down on the other side of the 40th Street bridge this year. It’ll also be fun to see all the entries.

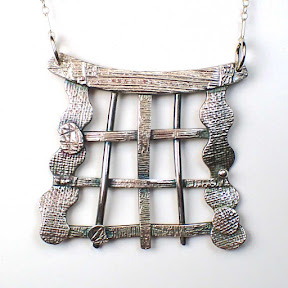
I submitted a “woven textured silver” piece that I made, originally, as a sample piece for a workshop at The Artsmiths of Pittsburgh. Entering it for Art All Night is sort of a full-circle thing, because I made my first woven silver pieces in 2008, with the clay I’d used while doing my first-ever public demonstrations anywhere that used metal clay, and that was at Art All Night. (Talk about starting big!) I’d over-worked and over-lubricated the clay in the many hours of demos, and I’d heard it might be possible to salvage it by adding some glycerin although the resulting clay would then not harden as it dried but remain flexible … so the obvious thing to try with that was weaving. I’ve made such pieces off an on over the years since then, but I’ve never before entered one in Art All Night. So it seemed about time to do that!

Except this piece, instead of being made from salvaged clay, was made from a mix of fresh clays, PMC Flex and PMC Sterling, to yield a form of sterling silver that contains as much as 96% fine silver. Adding the sterling results in a slightly stronger piece: my earlier ones always had solid “frames” around the weaving which made them strong enough, but the sterling in the mix for a structure like this opens up design opportunities: here, it’s safe to let a few of the ends extend outwards at least a little bit for a more “adventurous” result.

I need to thank Kathy Herbst and Louise Rosenfeld for brainstorming names for this piece, along with Manny Rosenfeld who inspired the name I’ve finally decided to give it: The Empress’s Portal. If you’d like to bid on it at Art All Night, it’s #2919. If you’d like to take a class and learn how to make a piece like this, sign up for one at Artsmiths or get in touch with me to request that I organize one at my studio in Regent Square (or even another venue that you arrange for).

In the meantime, if you’re in the Western PA area this weekend, be sure to check out Art All Night! It’s free and open to the public from 4 pm on Saturday, April 23 straight through until 2 pm on Sunday, April 24. And if you’re not here this weekend, at least consider putting the last weekend in April in Pittsburgh on your calendar for next year!

Posted in Events | Tagged: , , , | Leave a Comment »

Buttons, Buttons, Yet More Silver Buttons!

Posted by C Scheftic on 2016/01/12

Did you miss the button-making class at Indie Knit and Spin last November? If so, you’re in luck: I’m offering it again at the February 6 session, from 10 am to 12:30 pm!

We had a great time last year! A number of folks wandering along the hallway, checking the vendors and classes in other rooms, stopped in to see what we were doing and said they wished they’d signed up. There aren’t going to be many (if any) other classes at the February event but, since I’ll be using my own studio (i.e., Cosy doesn’t need to pay to rent another whole room for the class, and WSCC doesn’t need to schedule other events around IKS’s use of yet another of the by-the-hour classrooms), I said I’d be happy to offer this one again.

Please note: You don’t have to make actual buttons in this workshop! If you’d prefer to make a focal piece to serve as an embellishment on your fiber work, or just want to make some other type of decoration, that’s OK too. Unlike most of my workshops, where I make a point of showing how to make two-sided pieces, for buttons which are typically sewn down onto some fabric, we will just be texturing the “front” side of our pieces. But all it takes is a shift in the placement and/or size of the holes we’ll make in our pieces, and you can have another form of decoration for your work or even a few charms, earrings, or a pendant. It’s up to you!

  • For more details, see the Button Making post at the Indie Knit and Spin website.
  • As described there, to sign up for the class, send an email to cosymakes@gmail.com
  • Please sign up by 8 am on Monday, February 1, so I can have time to place an order that morning for enough material to use in the class. Seating is limited but, if spaces remain after that deadline, I’ll allow others in if but only if I have enough material for late-comers to use.


Once again, I forgot to tell Cosy to change the write-up but, as I discussed last fall, I’m planning to use .960 Sterling Silver for the class. If anyone has problems with that alloy, I will have on hand the .999 Fine Silver mentioned in the class description for you to use. The techniques used are the same either way.

(What problems, you may wonder? .999 means it’s 99.9% silver, and only silver; it’s not certified at 100% simply because no manufacturer is going to swear that not even an atom or two of something else managed to sneak in there somehow, but it’s as pure as reasonably possible. Whereas .960 means it’s only 96% silver and 4% copper has deliberately been added, so if you are someone who reacts badly to copper (or to traditional .925 sterling silver, which contains up to 7.5% copper), then you may want to stick to fine silver. It is extremely rare for anyone to have a bad skin-contact reaction to silver alone; most people who say they’re allergic to silver are actually reacting to the copper in sterling (not the silver element itself), or else to some patina chemical or polishing compound applied to their silver (which I am happy to omit for anyone with a sensitivity–there are several products I’ve learned to avoid myself!).)


Here’s looking forward to another fun class with more great participants: it’s only a little over three weeks away now, so please sign up soon.

Posted in Events, Studio, Teaching Metal Clay | Tagged: , , , , , | Leave a Comment »

Yes, hand-made: Buttons at Indie Knit & Spin!

Posted by C Scheftic on 2015/11/10

The delightful Indie Knit & Spin returns to the Wilkins School Community Center this year on Saturday, November 14, 2015. The marketplace will run from 10 am to 4 pm, and there will be classes running from 9 am to 6 pm!

In one of those classes (10 am to 12:20 pm), I will be teaching how to make your very own silver buttons!

And, you may ask, just how do metal buttons tie into an event aimed at “Everyone who loves to work with beautiful and unique yarn and fiber”? Well, the theory is this: if you’re going to go to all the effort to attend this show in order to obtain fabulous fiber arts products and materials, and then lots more time making your own hand-made creations, doesn’t it make sense to have your own hand-made buttons that you can use on those items?

Though I originally announced this as a workshop using .999 fine silver (at least 99.9% silver; not 100% only because we can’t swear that there aren’t a few atoms of other stuff in there somewhere), upon some reflection it dawned on me that .960 sterling silver (at least 96% silver, with up to 4% copper) would be better for buttons.

In general, I tend to make a lot of pendants and earrings and, in that context, fine silver is a wonderful material to work with. But metals-folks have been adding a touch of copper to silver for ages because that alloy yields a slightly harder, stronger product, and that’s useful for things like rings or bracelets that tend to suffer a bit more from normal wear and tear.

Now, the most typical alloy, called sterling silver, is referred to as .925: i.e., it’s at least 92.5% silver, and the remaining 7.25% is usually just copper, though sometimes other metals will be included with copper in that 7.25% as well. The problem is that alloys with even just that much copper or other metals then require lots of special handling, firing and/or finishing than does true fine silver.

But, there is yet another compormise: .960! That designation means it’s at least 96% silver. With that mix, you get (roughly) 90% of the strength of .925 sterling with almost none of the extra complications!

So I’m now planning to use .960 for the class, though I will have a bit of .999 on hand just in case anyone signed up specifically because I’d said we’d use fine silver. But I’m assuming the students will all be metal clay beginners, and happy to use the product the teacher is recommending for their buttons.

I’d also said that it’d take just a minor adjustment to turn a button-project into one where the person is making charms, earring elements, or small pendants. We can make any of those out of .999 fine silver or .960 sterling silver.

Last I heard, there were still just few seats left. If you’ve been looking for a good introduction to metal clays, why not sign up for that session! Or, if you can’t make it that Saturday, let me know if you’d be interested and able to come over the next day, on Sunday the 15th. I’m hoping to offer another little introductory session then: the focus will be small earring, charm, or pendant pieces.

Posted in Events, Studio, Teaching Metal Clay | Tagged: , , , | Leave a Comment »

Sili, Sillier, Silliest

Posted by C Scheftic on 2015/07/30

Lately it seems that all I’ve managed to post about are shows, not the creative process. I do love shows, parties, festivals, and more. I want people to see my creations, those are great ways to enable that, and talking about those is generally considered to be a way to help in finding an audience for my works.

But I also enjoy sharing information about the processes involved in my artwork so I’m going to try to slip in one of those posts today. I’ll discuss a technique I use at times that I only just realized I haven’t written about here: using a little electronic die-cutting machine on my metal clays.

As far as I know, Wanaree Tanner is the one who got the ball rolling on using these with metal clays, traveling around doing workshops and promoting the use of the Silhouette Cameo several years ago. It seemed to me that the thing she promoted most was using them to create your own elaborate bezels for setting stones. She doesn’t seem to be making such a big deal about the Silhouettes any more (though anyone who follows her work can see where she’s still using hers).

I can appreciate the way she simplifies the making of such bezels with that tool; it’s just not a style I want to emulate all that much myself. Cindy Pope seems to be the person now leading the charge with Silhouettes and metal clays, making layered designs, etching words and patterns along various shapes, and doing all sort of things I find much more up my alley, design-wise. (Cindy was also a great house-mate in CA and then host in OR the last time I went out to the west coast!) The photos with this post will illustrate one of the very simplest applications of these cutters.

Several years ago, I bought a Silhouette Cameo. I used it a few times with metal clays, enjoyed the results, but still found my own designs mostly going in other directions. But I do use that device at home for all sorts of useful little paper-crafting tasks which is really what that machine was designed for.

Of course, not long after I bought my Cameo, Silhouette America came out with a new machine, called a Portrait (more compact than the Cameo), and then a newer version of the Cameo (with a touch screen instead of the buttons that both the Portrait and my older Cameo have)! I guess those are why the one I got was available at a really good price at that moment in time! But that’s fine, because they all use the same software, and attachments, and so on.

The biggest difference is that the Cameo will cut up to a 12″ width, while the Portrait only goes to 8″ across. Your big scrapbooking papers, wide vinyl, etc., are going to be 12″ across, so the Cameo is best if that’s the sort of thing you’re ever going to do. Metal clay folks work with small bits of clay, however, ones that are typically just one or at most just a few inches across, so the Portrait is more than enough if you’re never going to work on big projects. At one point (after several months of really good sales at my end … and another really good-price offer at Silhouette’s), I bought a Portrait. I figured that having two could be useful: it would allow me to have one each at home and in studio and, even better, it’d give me more options when I finally get around to trying to teach a workshop on using the tools. (Whatever I’m doing, I’m still always thinking about teaching it to others!)

My Portrait now sits on the table next to the computer in my studio. I’m still not into making Sili-cuts as my primary design tool but, now and then, such as times when I’m feeling a bit of a creative block with other methods, I’ll sit down at computer, sketch out a few simple designs, and use those to cut out a few pieces. Just making something, getting a feel of accomplishment, will usually get me out of feeling stuck again. (And that’s probably why I don’t post much about those creations — they feel more like little “interim activities” to me and, once I’m over whatever stuck-ness I was feeling, I’m not particularly inclined to write about them … much as I do enjoy the process (in limited amounts) and appreciate the opportunities they provide.)

So there I was one day a few weeks ago, with a brand new tube of “One Fire Brilliant Bronze” clay powder. This was the only one of Hadar’s basic “One Fire” clays I’d not yet tried. I wasn’t feeling stuck or anything, I was just looking for something simple to make to try out this new-to-me clay. I had fought a bit with the older Quick Fire Brilliant Bronze: I did like the bright golden color; my problem was that I kept facing challenges with the “bottom side” of textured, reversible pieces I’d made with it. (And regular readers of this blog will know that textured, reversible pieces make up the majority of my creations!) The thing is, with pieces cut on the Silhouettes, you really want one side of the piece to be flat: that helps it to stick better to the cutting mat! So, I thought, if I’m ever going to try this One Fire Brilliant Bronze, using it for plain-backed Sili-cut pieces seems to be the way to go.

So, I mixed up a batch, took a part of that and added a bit of glycerin (which gives the dried clay a tiny bit of flexibility, which is extremely useful as you’re separating your just-cut pieces from the cutting mat!). Then I rolled out a few small pieces with light- to moderate-depth textures on one side only, and set those aside to dry while I sketched a few sample designs. Not imagining I’d have any reason to write about it, I didn’t stop to take any photos. I loaded the clay pieces onto the cutting mat of my Portrait, and cut away. The cutting was the easy part!

As always with a new-to-me clay, I did NOT fill up the kiln for my first firing. I started small, taking just one pendant and two smaller, matching pieces (an earring-pair) and fired those. Massive fail: bubbles and cracks: overfired by a lot! I took another earring pair, dropped the temperature, and tried again. Overfired again but, OK, not quite as much. Another pair, dropped the temp a good bit more, tried yet again. Still a bit bubbly, meaning they were still overfired. To drop any lower, though, I’d be going well below the recommended temperature for that clay, so I went online and asked Hadar herself for some advice. She said the firing range for that clay was actually rather large, she often fired at a temperature close to where I had ended up. Since I know my kiln does actually fire a bit hotter than where I’ve set it, it only took me two more tries before I got things to work out the way I wanted!

But, while waiting for Hadar to reply, I fell into one of those pits where I couldn’t think of anything else to create. So …. I mixed up some .960 clay, and rolled out a number of small, thin sheets of that with textures on just one side.

Aside: My .960 was made by mixing .999 PMC Flex, which serves the same purpose as the glycerin, and .925 PMC Sterling, which gives more strength to the thin pieces that are at the limit in terms of thickness hat the Silhouette Cameo and Portrait machines can cut. I used .960 instead of straight .925 because its firing is as reliable as the super-easy .999 fine silvers…

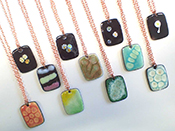
To keep things simple (since I was just trying to perk myself up during a brief lull!), I used the same sketches as I had for the bronze, cut out nine (9) silver pendants and six (6) pairs of earrings (shown in the first photo in this post), cleaned them up a little bit as needed, and fired them right away.

When I finally got a Brilliant Bronze piece to fire successfully, I took a photo of it.

I then fired all the remaining Brilliant Bronze pieces I had waiting and, when those came out fine too, I polished everything up and took a photo. Well, this isn’t quite everything: it’s just pendants (not any of the earrings) and only the ones for which I had enough chain! I’ll have to get some more for that, and finish off the rest. But I am feeling a great sense of accomplishment!

A few final notes:

  • Hadar also now has a number of “One Fire Flex” clays (not every color in her range, but many of them). The were designed specifically to be used with electronic die-cutters, like the Silhouettes and other machines on the market. I have purchased a bit of that, but have yet to try any. Since the winter of 2007-08, I’ve been adding glycerin to clays (in varying amounts, and to different clay formulas, depending on the amount of “flex” I want in my dried clay, anywhere from just enough to peel away a cutting mat without breaking to wiggly-enough to tie a knot!) and, while it can be nice to get a little flex without having to do that, it’s now so second-nature to me the need to switch is just not urgent…
  • Silhouette America had at least one model before the Cameo, which I think was called an SD (for Silhouette Design, I would think), and they’re about to come out with yet another newer one, the curio (yes, they use lower case for it). The bed of curio will be even smaller than the Portrait, but it will be able to cut thicker materials, meaning thicker layers (less fragile after firing) of metal clay! (Though the Silhouettes are all at the low end of cutting-force compared to other electronic die-cutters, so the curio will still be limited by that with regard to some other materials.) Still, though I’d love to have that option, I need to sell a lot more pieces before I spring for yet another machine… I don’t see the curio replacing my Cameo but, if I were just starting out now, I’d get it instead of the Portrait. Still, having all three could be useful for workshops next year…?!
  • I’ve fired a few more loads in the two weeks since the adventures reported above and, at the same temperature (even just a tad lower with the last, very-full load); all have turned out fine! I’ve heard / read about some people who say they don’t like Hadar’s clays because they seem so fussy. My personal experience is that each new one does seem to have its own personality, what it’s like to work with and to fire, but once you find its sweet spot, it’s then at least as reliable as any of the others on the market. Regardless of whose clay I’m using, the scientist / engineer in me is fine with starting off slow, observing what happens, building my understanding, and then taking off! The next time I go on a real Sili-binge, with much more elaborate constructions, I’ll try to remember to illustrate those here too, eventually. It really is a fun little tool!
Posted in General Techniques | Tagged: , , , , , , , , , , | Leave a Comment »