Convergent Series

learning, using & teaching metal clay, and other aspects of life

Archive for May, 2012

Starting Out by Layering.

Posted by C Scheftic on 2012/05/29

OK, now, let me get back to silver again…. While I’m perfectly happy to have beginners in sessions like the box-pendant workshop I mentioned in my last couple of posts, I also enjoy offering start-up workshops with much simpler projects. Especially with silver: many people are happy to dive right in and try it but, especially given the price of silver these days, some may be more hesitant, concerned about doing something wrong, perhaps not yet fully grasping how easy it is–with metal clay–to just squish it up and start over! (Well, there are a few limits, but it sure is easier to “just start over” without any waste using the metal clay approach than it is with traditional metalsmithing.)

In the past, I’ve offered a collage / mosaic class that’s pretty straightforward; this summer I’ll be offering one (or more) with the option of doing a somewhat simpler layering approach.

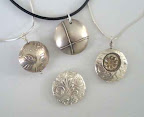
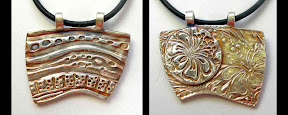
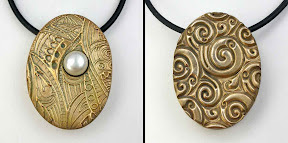
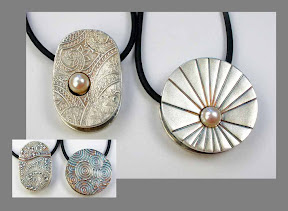
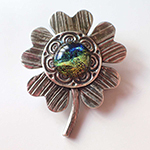
With this post are photos showing both sides of three of the sample pieces I made for this. I try to make ones that I can use to present a number of design and construction issues.

Just few of the points I can make with these are issues involving: using a texture stamp, creating your own design, and combinations of those; deep versus shallow textures and various ways they interact; rolling “coils” and “balls” of clay and different things you can do with those; pre-fire finishing of textured versus plain areas; and more.

Of course, we’ll also cover the different methods of joining pieces–wet to wet, wet to dry, and dry to dry–and how to “reactivate the binder” in dry elements for secure joins.

Also, using these (and a number of other examples I’ll bring to class), we can discuss a range of ways to hang a pendant. Of the three sets of images I chose to show here, my own opinion is that:

  1. one works just fine in general;
  2. one is OK as long as you pay attention to what you hang it from; and
  3. one needs “something else” (which I’ll take to show) to make it work reasonably.

Can you tell which is which?

Also, later this summer I’ll be offering one or more Add-a-Cab workshops. Folks who’ve taken a class from me, or from someone else, or who’ve made a piece on their own, will be able to come and add a (most likely 6 mm) cabochon to it. This will be an introduction to stone-setting, so you can see what’s involved, before you get into doing something more complicated (which I’ll address in other workshops later on). I may use one of my layered pieces in the demo for that. I think I’ve picked one out for that purpose, but I’m still debating if that’s the right one. If you have a suggestions there, feel free to chime in with a comment on that too.
Posted in General Techniques, Teaching Metal Clay | Tagged: , , | Leave a Comment »

Speaking of Box-with-Pearl Pendants….

Posted by C Scheftic on 2012/05/25

Even though my last post did open with a comment about silver projects, it may have been a bit misleading. So, just for the record, while silver is great for making the pendants described there, not required! It is, for example, perfectly possible to make the Box Pendant with an Inset Pearl in bronze.

After making several samples to use in discussing various aspects of the design and mechanics of the project, I thought of one other issue regarding placement of the pearl in relation to the hanging mechanism that I wanted to remember to mention in class. Rather than sink more money into making yet another silver piece to illustrate this, I figured I might as well make it in bronze. (I’ve got a couple workshops, after the pearl box pendant one, that will use bronze in various ways, so I can also use this as a way to segue into that in class….)

I didn’t have any bronze wire in the right gauge to use for setting the pearl, so I tried a piece of copper I had that was the right size. And, hmph, it broke off as I was trimming it to size. (This was jewelry-grade copper, and I fired it just to the bronze-sintering temperature, so it should have held up…) The good news is that at least it broke off perfectly flush with the little plug into which I’d set it. So, rather than attach the pearl to that post, I simply attached it directly to the plug. Not ideal, but it’ll work for a demo. I’ll have to get some bronze wire that size because, in other gauges, it’s held up just fine through even multiple firings. And wear this piece around for a while, to verify that such an alternative connection will hold well enough.

It’s a tough job, wearing all this jewelry, but someone has to do it…..

Posted in General Techniques, Teaching Metal Clay | Tagged: , , , , | Leave a Comment »

Another Round (Oblong, Square…) of Box Pendants.

Posted by C Scheftic on 2012/05/23

Recent posts might have you thinking that I’ve been focused solely on various bronze and copper projects. While I have been having fun with those, I’ve been making plenty of silver pieces as well!

And, despite the comment in my last post about spending time over the summer exploring new approaches, much of my time is already scheduled for a range of activities, jewelry- and other-wise! In addition to trying out new designs and approaches in the art-jewelry side of my life (the Three Rivers Arts Festival is fast approaching!), I’ve also got classes set for several shops, more under discussion, and I’m collecting information from folks who’d like to come to my studio for workshops too. (Since I’m in control of the studio schedule, I can set things up there by request on much shorter notice!)

Last year, I taught a number of workshops involving reversible pendants, where both lentil beads and box-style pendants included the option of a sort of shadow-box opening. In those, we either textured the “inside” of the side opposite the opening, or layered a small decorative element onto it. Either of those could be viewed through the opening. I’m planning some new versions for this year: the first one will be a box-style pendant but this time the opening will hold an inset pearl.

Participants will not be forced to make their piece reversible but, this being me, I’ll encourage everyone to do so! The photo-inset shows the “other” side of these sample pieces. (Sorry the photo isn’t that great, even if you click to enlarge it; long story, but I’m still awaiting the return of an essential piece of the photo-setup in my studio and I just can’t get enough light for decent shots at the moment.) I’ve got one of these classes scheduled for June 2 at Zelda’s Bead Kit Company. I’m hoping to offer it a couple times more over the summer and then, if there seems to be enough interest, to offer a lentil-shape version later in the year. Let me know if you’d be interested in taking one somewhere … I’m really looking forward to these!

Posted in General Techniques, Teaching Metal Clay | Tagged: , , , | Leave a Comment »

Doubly-Coiled Metal Bracelets

Posted by C Scheftic on 2012/05/15

While it does take study, practice, more practice, patience, practice, skill, more practice, talent, and still more study and practice to do exceptional work with any medium, including metal clay, one of the things I love about this approach is the way that even a first-time novice can actually produce a delightful and amazing piece. You just have to be willing to take the plunge and try it!

But if you don’t really have a clue what the stuff is, how do you convince yourself to do that? As an instructor, one of the challenges I’ve found is to devise projects that are simple enough for even a beginner to complete in a reasonable amount of time, yet with something “new” that the returning student can learn. So I have a particular appreciation for others who clearly address that conundrum.

And there I was one recent day, browsing through my copy of the book, Mixed Metal Jewelry Workshop, by the delightful Mary Hettmansperger, when I saw what she describes as “probably the simplest project in this book.” It involves winding wire into a bangle-bracelet shape, taking some care with the sizing of that, and then wrapping it with “organic coils” of metal clay. The end result is so interesting, but the process permits lots of exploration!

How “wonky” can you make the clay-coils before they break all apart as you wrap them? How thin can you work them before they dry out and crack too much? How thick can they be and still let you wrap them? How does the shrinkage of the clay work with the fixed size of the wire? How (and how much) does any coiling on the wire interact with the coiling of the clay? How can you use combinations of different clays? How do you want to design them so they fit nicely and are comfortable to wear? Those are the questions that came to my mind in the first half-minute of looking at the project; after a few hours of trying this, I had dozens more, going well beyond what was covered in the book.

The photo shows my first four attempts. (Two were brushed after firing, while two are shown with their magical kiln-colors.) More exist already (still unphotographed…), already veering in other directions, with yet more to come after those! I hope to offer some of those variations in workshops over the summer: Of course, I will credit “Mary Hetts” for the original idea, direct everyone to the book that inspired my path to new options, and suggest that folks get it to inspire their own explorations in other ways.

Of course, one advantage to making pendants and earrings, rather than bracelets or rings, is that exact-sizing is not such an issue with them. Even with cuff- or link-style bracelets, you have more sizing options than with these bangles. So that’s a major feature to address. And one disadvantage to using the “base metal” clays for these is how few you can fire at one time. So this fun project is slow going in its own way, but it’s my incentive, at last, to look at alternative firing approaches. There has to be an easier way to make lots more of these, for my own enjoyment as well as for both my students and customers. Ahhh, just what I needed: yet another exploration on which to spend time! But, what else are summers for, eh?

Posted in Learning Metal Clay, Teaching Metal Clay | Tagged: , , , | Leave a Comment »

Following Up with Alice.

Posted by C Scheftic on 2012/05/12

Or maybe I should call this post “Slipping Up…”?

Though I hope others find something of interest in this note (like my last post, another example of a piece that just evolved during some demos), my reason for writing about this one is a little exchange Alice Walkowski and I had early this year about a technique (borrowed from the pottery world) called slip trailing, some of which may be found among the posts here (on her blog) and here (on mine).

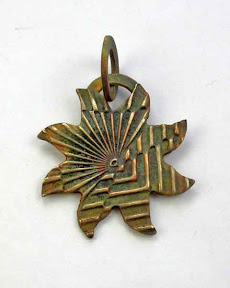
But, let’s start with the first photo. I had cut the “sunshine shape” out of bronze during a demonstration. At the time, I was making several points. One was about taking care at corners, points, hollows, and such, (regardless of whether you used (my favorite) press-down cutters or (as books and articles often describe) drag-tools with templates to make your cuts). Another was about how, if you had a texture sheet with several different designs on it, you could sometimes get an interesting look by letting the area you cut out cross over from one pattern into another. Because I was focusing on all that, I did not bother to texture the other side before I cut it out. But I liked the result enough that I didn’t continue, as I often do in demos, with just squishing my clay up to reuse later on: I kept it, and let it dry as it was.

As I also reported recently, I’d demonstrated several examples of making and then joining links “invisibly” so I had a pair of linked rounds lying on my worktable. I added them to the “plain” side of the sun-shape. Again, I included my little talk about how, although many metal clay artists would use paste for the connection, I don’t get why so many people do it that way. I use plain water plus a brief moment of patient pressure (no longer, overall, that opening and closing a jar of paste…) and, neat and easy, it works just fine!

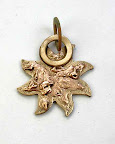
Then, someone just happened to ask me about slip trailing. They’d read about it, but didn’t quite get how it worked. So I moistened up some rose bronze clay, and used that to fill an empty, clean syringe so I could start to show the process. But, as can happen in quick, impromptu demos that get me off track of what I was planning to do, I didn’t pay as much attention as I should have to the thickness of the moist clay I was loading into my syringe. And a big “plop” landed on my careful (if quickly-sketched) design, covering several “rays” all at once.

I cleaned it up a bit and then tried, without as much success as I’d hoped, to add a dainty “plop” on the other side, to at least offer a bit of balance to the piece. But it just seemed to continue its own ungainly theme….

Refusing to acknowledge any sort of crisis regarding my lovely textured-star shape, I explained that piece was just telling me what it wanted. So I dribbled on some more goopy rose bronze and then added a few “highlight blobs” of copper clay too. The end result is more “turbulent” than what I’d planned to do, but I decided to just fire it anyway and see what happened. And I think the “stormy” look is just fine, especially in contrast with the precisely-textured first-side. Two different looks in one piece, as I often say!

And besides, by that point, what other reasonable choices did I have? I hope it will find a home with someone who can appreciate the mixture of precision and wildness across its two sides. Some may not, but I’m sure a very special person will, in the end, resonate with it!

(By the way, I did do a second demo using another base piece I had on hand, showing how the results can vary with different consistencies of slip. Much more successful! For reasons not worth going into here (though Alice knows at least one reason why…), I haven’t yet managed to capture a photo of that piece.)

Posted in General Techniques, Teaching Metal Clay | Tagged: , , , , , | 2 Comments »

Having Fun with Bronze, and More.

Posted by C Scheftic on 2012/05/07

It’s not that I haven’t been doing anything with metal clay recently: I’ve just been so busy with that and other things I haven’t had time to sit at computer and muse. I’m also assembling some new projects for workshops (which I’ll discuss in upcoming posts), so I’m again paying a lot of attention to process: to what I do for a specific reason versus what I do out of sheer habit.

The photo with this post shows both sides of a little piece I made during several demonstrations of working with metal clay in general, and bronze clay in particular. I made the various elements separately, to illustrate a range of techniques at different times. I showed the application of a simple texture with the hibiscus, and the use of a pastry cutter to get the oblong shape.

What started that: I was saying how much I really do like to use cutting forms with metal clay–special “clay” cutters, pastry cutters, even scissors, anything where you are pressing down into the clay. Whenever I can figure out how to do that, I prefer it to the often-suggested needle tools (or X-acto knives) that drag through the clay. The “pressed” cuts are so much cleaner, and it’s very easy to smooth out any small imperfections while the clay is still wet with a finger or other small tool. A “drag through” tool, even a needle or blade with the finest tip, still leaves a rougher edge. You can try to smooth such cuts while wet, but it’s rarely as effective, so you’re forced to sand more and create more “dust.” (“Refine the edge” is the term of art for that process.) Although you can salvage much of the dust, there will still be some that drifts off; besides wasting any metal in that, you’re also wasting time with sanding and clean-up. That may seem like just a small amount of either time or metal, but the “waste-cost” does accumulate with each piece made (especially if, unlike this example, the dust is from a precious metal such as silver!).

Plus, if I want a shape for which I don’t already have a cutter, I can always just make one. I admit that I am someone who’d rather spend my time making a cutter than making dust and then turning that into paste (which is another metal clay “staple” that I do use, but only very rarely)!

Then, in another setting, I showed how to cut out washer-shapes, and how you could even reshape a round washer into another shape, such as the oblongs shown here. In yet another, I showed how to attach two washers to each other with an “invisible join” (here, in yellow bronze; and how to do that with water only, not paste) and how to cut washers and other dried pieces to use in various ways (in rose bronze). At one point, I even made a little ball (in copper) to demonstrate that technique.

Finally, looking over the bits and baubles I had scattered across my worktable from all of that, when I was talking about how I attach pieces of dried metal clay with just water (so yet another situation where I don’t need “dust” to make paste with!), and it just struck me how to assemble those particular bits this way.

Most of the time, I enjoy methodically developing and then executing a deliberate design. But, sometimes, it’s such fun to just let a piece evolve on its own.

Posted in General Techniques, Teaching Metal Clay | Tagged: , , , , , | 2 Comments »

Other Happenings at Art All Night This Year.

Posted by C Scheftic on 2012/05/03

My simple little review of the 2012 version of Art All Night opens with a photo (above) of the wall just inside the entrance to this year’s event. One of the interesting aspects of this particular location was figuring out what elements were just part of the site, and which were actual entries….

As I mentioned in my last post, the pieces that Alice and I entered were hung together. This shows the whole board on which our entries were placed. (The big blue arrow pointing to mine, with Alice’s below it, was “photoshopped in” by me afterwards, of course!)

Alice had taken a bit of a break to explore earlier than I had. I asked her where she’d found our entries, and she said they were together, and pointed me in a general direction. The thing she neglected to mention was that our little pieces were with a number of other larger and much easier to spot ones: under a row of lovely “nature” images, on the same board with the very large painting of a hook and eye, and right next to a drawing of Troy Polamalu … with all his famous hair. Great spot! Good company!

There wasn’t anywhere near as much jewelry as last year. In fact, one of the few others I noticed was a lovely beaded piece by the owner of a local bead shop. I didn’t get a close-up, because I wanted to capture more of that whole board too.

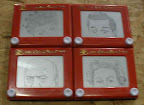
As ever, our local Etch-a-Sketch artist was there (and, at some point, I’ll actually manage to note where I can find it later his name….). Given the lighting in general (no complaint intended with that, just a comment on repurposing empty buildings for this event) and the peculiarities of capturing the dark-on-light-gray-behind-a-“glass” nature of the Etch-a-Sketch, I could not get a shot with enough light at a fast enough speed to do justice to the “I Love Lucy” collage. But it was another good one!

This year’s surprise theme seemed to involve machinery of various sorts. A number of those entries were placed together in one of the smaller rooms. In my mind, that was the “machinery hall” collection:

Alice managed to get a pretty good shot of the piece in that group called “She Metal” but the thing you can’t see from the still image is the way she shimmied and shook!

Though the “machinery hall” entries were, in some ways, more futuristic than this next item, I was certainly amused by the entry, “Gone But Not Forgotten” that was built from a number of “dated” devices. (If you can’t see enough detail on that, or any other of these images, please remember that a quick click on any of them should bring up a version that’s at least somewhat bigger…).

As with the “art jewelry,” there were also fewer “art guitars” this year too, but I could not resist including one of the few of those in that shot….

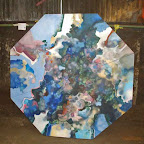
I really liked this octagonal painting, titled simply “Abstract.” Except, I wish it hadn’t been painted on canvas. I kept looking at it, thinking what I’d’ve preferred as a base: because for some reason I really wanted to use it as a table. Can you imagine sitting at a table like this, enjoying a good breakfast? I can! I think it would accentuate a sunny morning, and brighten up a dreary one: both good ways to start the day.

Much as I liked the Cactus Chair, however. I was not at all compelled to consider using it with the Abstract Octagon I wanted as a table. Even if it had still been a people chair, rather than being converted into a chair that would hold a flower pot.

Although the flower pot sitting next to it would have had much of its own artistry lost had it been inserted in the chair…. It really was better, sitting on its own, next to that.

Since I’ve started down the “nature” theme with the images I’m showing here, I’ll just move on to the “Gypsy Summer” panel.

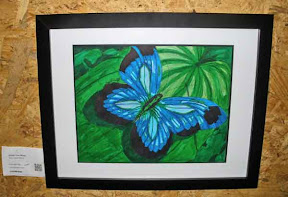
And close with one of my favorite butterfly-images from this year, with the lovely title, “Spread Your Wings.”

That’s what Art All Night does: encourage an entire community to spread its wings, whether in the creation, admiration, purchase, or otherwise supporting of art.

I’ve got one other set of images to post from this year but (for reasons that will become clear when I get them up) it’s going to take me a while to get to those. In the meantime (or afterwards, if it takes a while before you stumble across this) you can always find out more about Art All Night through any of these:

And mark your calendar, once again, for the last weekend in April next year!

Posted in Events | Tagged: | Leave a Comment »

Western PA Metal Clay @ Art All Night

Posted by C Scheftic on 2012/05/01

I’ve been doing Metal Clay demos at Art All Night for five years now. We actually announced the formation of our local guild-chapter at a previous Art All Night, with our first meeting scheduled for about two weeks later. In subsequent years, I have been joined by anywhere from one to six other members of the group. With me this year were Alice Walkowski, Debbie Rusonis, and Donna Penoyer, putting on a little metal clay show for about five hours on Saturday night.

Debbie left a little earlier and Donna arrived a little later than Alice and I did. Here’s a shot of Alice and Debbie posed, during a brief lull, about an hour after we had set up our demonstration area:

And here’s another shot, taken moments after that one, showing how they really felt:

Yes, after a warmer-than-usual March, our April weather has been very fickle, and Saturday night in an unheated building turned out to be a particularly cold undertaking! Though, of course, our hearts were warmed by all the visitors!

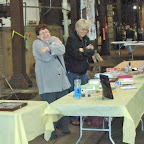
We really did enjoy talking with the different people who stopped by our table. We were located in a somewhat challenging spot to find: you had to either work your way down a row of exhibits and then through the entire hands-on activity section for children, or else find the “back passage” through the show.

One thing that did draw some people to that back passage was catching a glimpse of the “artists in residence” down in a sort of pit just beyond our spot. I really thought I had taken some photos of them, creating pieces on-site, but now I don’t see any on my camera. Oops…. Though I’m sorry that a lot of people never made it down to where we were, the nice thing about how it worked out this year was that we had a great opportunity for some extended interactions with the folks who did stop by.

As far as I know, Alice and I were the only artists who entered pieces that were constructed using “metal clay’ techniques. Because we had checked in separately (although only a few minutes apart, we’d been directed to different stations), we were amused to find our two pieces hung together:

Since you probably can’t see much detail inside the frames on either of our entries, here are some photos we’d each taken earlier. First, there’s a shot of Alice’s piece, Diving with Pearls (with fine silver and a CZ, plus pearls and ceramic beads) that she took and I found on her blog, followed by my entry, a reversible pendant (in yellow bronze, rose bronze, and copper) called Three Flowers … with a Twist.

Posted in Events, Guild | Tagged: | 2 Comments »