Convergent Series

learning, using & teaching metal clay, and other aspects of life

Posts Tagged ‘draping’

NHAC 2017 Fall Members Show

Posted by C Scheftic on 2017/09/08

I’m delighted to report that I have three pieces in the current Members Show at the North Hills Art Center! The pieces were hung as they were accepted last week, but the official “opening” of the show is Saturday, September 9, from 7 to 9 pm, and runs through October 6.

As usual for NHAC, the majority of the entries are paintings. But when I dropped off my art jewelry, I did see fiber art, pottery, mixed media assemblages, and more too! A lot of the pieces were made by students of the center so, if you’re curious about that, this show can also give you an idea of what you might be able to learn in the classes there. If you’re in the area, I hope you’ll stop by to check it out! It would, of course, be great to see you at the opening on Saturday but, if you can’t make it then, do go whenever you can.

I’ve already said a few things about each of my entries, separately, in earlier blog or Facebook posts, but I thought I’d assemble a few thoughts on each of them together here. They are all available for purchase at the show.
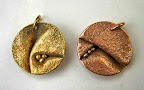
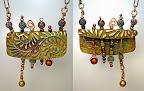
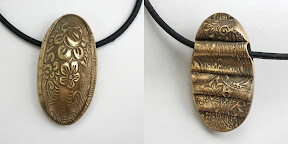
GWV!

GWV: Give Women the Vote

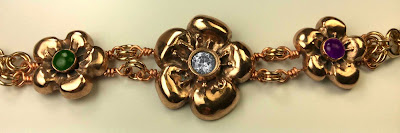
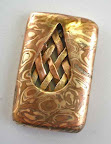
If you look closely, you may notice that the flowers in this “rose bronze” bracelet are Green (nephrite jade), White (cubic zirconia), and Violet (amethyst). Embellishments in those colors were a code in Edwardian / Art Nouveau times for Give Women the Vote!

This piece was made before either of my other two in this show, but since then I’ve been holding on to it myself. This is the first time I’ve ever really considered putting it up for sale!
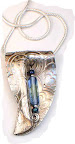
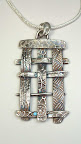
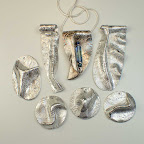
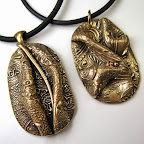
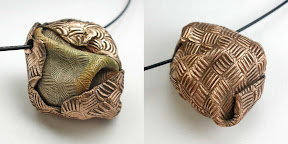
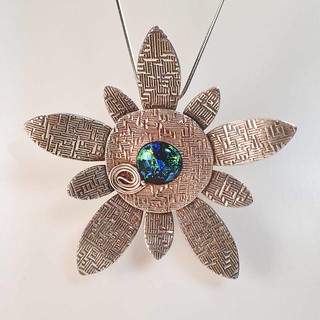
Night Moon

Night Moon (front & side views)

As one of the earlier pieces I made with EZ960 after its introduction in 2016, this was made as a class sample, to illustrate the draping/folding process. But it’s notable to me because it’s the first piece I made using only “scraps” from earlier projects. Obviously, that test was successful!

In draping, sometimes the material tells me the shape it wants to form, and that was definitely the case here! The title of Night Moon comes from how, once the piece was completely finished, it suddenly struck me how much it evoked thoughts of a particular night in June of 1988 (a truly wonderful summer!), when I was climbing (well, at that point, descending) Emeishan, one of the four sacred Buddhist mountains in China.
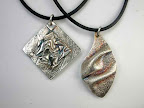
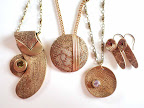
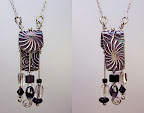
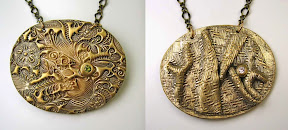
Keystone Wildflower

Urban Flower: Big Keystone (blue-green glass by Elise)

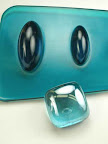
Yes, this is yet another piece from my Urban Flowers series! Like the earlier ones, this pendant was made using sterling (.960) silver for most of the piece, for strength, and in a separate step the dichroic glass cabochon was attached with fine (.999) silver because that form plays better with glass. It hangs on a sterling (.925) silver chain.

The dichro in this piece is a cabochon made by local glass artist, Elise McVeigh. It is also one of the priciest pieces I’ve had in a show in a good while: that is because, at something like 75 mm across, it is one of the largest pieces I’ve made in a good while too! And big uses a lot of silver, so the price simply reflects that. But Elise’s lovely glass is noticeably different from the other dichro cabs I’ve added to my earlier urban flowers, and I just thought it deserved to go into a “statement” piece! I hope it will find a new home with someone who agrees with me.

Posted in Challenges, Events, Teaching Metal Clay | Tagged: , , , , , , , , , , , , , , | Leave a Comment »

Four-week Intro Class: Deadline Extended!

Posted by C Scheftic on 2017/02/16

Great news! My four-week introductory series on working with silver metal clay still has a few seats available in “Session 2” — from 6 to 9 pm — starting next Thursday (Feb 23) at the North Hills Art Center, and we’ve agreed not to close the registration this afternoon, but leave it open until next Tuesday!

So if you forgot to sign up, there is still time. Or, if you didn’t notice the listing among my classes down the right side of this blog, didn’t check the Classes section of my website, and you’re not on my mailing list nor the one for the North Hills Art Center … well, now you know about the series and that it’s still possible to sign up.

intro class samplesJust register now! Right here!

We’ll cover the basics of designing, texturing, shaping, cutting, and refining pieces. You’ll make a woven piece. And a hollow one (open or closed design: you choice!). With every piece you make, pendant or earrings, you’ll have the option of making it reversible! By the end, we will also have covered various ways to polish and add patinas to your pieces, to help bring out the textured designs. And we’ll have lots of fun doing it all!

For my one- or two-day workshops, registration is usually cut off a week ahead: I need time to order the silver we’ll be using (and I sure don’t want to charge students for overnight shipping)! I have ordered silver clay for those who already signed up for this but, since I’m getting enough to cover all four weeks, I can sneak enough out of that for late-comers to use the first week, and replenish it in time for later evenings.

If you’re in the area, I hope you’ll be able to join us!

big reversible bronze, both sides with CZsAlso please notice (e.g., down the right side of my blog) that this session will be followed at NHAC by a simple, two-night introduction to making a beautiful piece out of bronze metal clay. Registration for that one will close on March 16. (Bronze is a little trickier to work with than silver, so you may end up making only one piece … but the materials cost less, so bronze worth risking for big “statement” pieces!)

Posted in Events, Teaching Metal Clay | Tagged: , , , , , , , , , , | Leave a Comment »

The evolution of two “old favorite” classes!

Posted by C Scheftic on 2016/07/21

It’s time to follow up on an earlier statement, and write a little bit about some upcoming classes. But since this is (what is often called in social media circles) Throwback Thursday, I thought I’d include a few notes on how the ideas and directions for two popular sessions have evolved over time, since I’m repeating them on a couple of Saturday afternoons this month (soon!) and next.

Reversible Draped Silver
Saturday, July 23, 2016 from 1:00 PM to 4:00 PM (EDT)

I must admit that the idea for this came from Hadar Jacobson. I’ve made pieces, and then been asked to teach classes, using both precious metals (silver) and base metals (bronze, copper, steel).

We texture the clay and then roll it thin in order to get it to drape nicely. With .999 fine silver, that produces pieces that seem to me to be a bit too fragile, risking bending or breaking at the thinnest points. We can solve that problem by adding a backing layer, or at least a frame, to provide additional stability.

When we use base metals (like these in bronze and copper), we get pieces that are a bit harder. Thus, most of our pieces can just be folded and embellished. They rarely seem to require extra layers for sturdiness, though of course those can always be added if desired from a design standpoint.

I will admit that I never tried making these with .925 sterling silver: I don’t particularly like fussing with the firing schedule for that clay, and have only used it for a handful of different designs. But last winter I started making these with .960 sterling which is much easier to fire than is the .925 form, and they turned out great. So that’s what we used the last time I offered this as a class, and it’s what we’ll be using again this week.

At this point, we’ll still be using “homemade” .960, that will come from mixing .999 and .925 clays. There is a commercial version now available, EZ960, that’s recently been released. We won’t be using that here simply because I haven’t yet had enough time to experiment with that to feel as comfortable as I’d like using it in a class. I want to learn any and all potential pitfalls with it myself before foisting it on a room full of students! Stay tuned for news in that arena.

Reversible Woven Silver
Saturday, August 27, 2016 from 1:00 PM to 5:30 PM (EDT)

Three Woven Silver Pendants (Class Samples)The way I began to make these pieces, and lead students in making them, has had a number of inspirations. Hadar, again, was one of them, but so were CeCe Wire, a project in the RioRewards certification program, plus a whole range of others (such as some of Mary Hettmansperger’s metal-weaving projects).

Sometimes, as in the silver pieces above, the weaving would be the main element in the design. Other times, as in the mixed-metals piece shown next, the woven portion is more of an accent to another important part of the design. Because of the thin nature of the strips used in the weaves, however, I always made sure that their ends were securely tucked into a frame.

Ahh, but do you remember the .960 silver I just mentioned above? Yes! While I’ll still guide students through some dos and don’ts in letting small ends hang out, we can now be far more adventurous in allowing that. We no longer need to be completely constrained by framing. Again, we can use solid frames if we want that in our designs, but it’s now an option, not a requirement. This class is going to be another one that’s lots of fun!

If you’re in the western PA area, or can get here for one or both of those dates, I hope you’ll join us!

Please note: The links in the title of each session above take you to the site from which you can reserve a seat at that particular class. In each case, the materials provided will be enough to make an interesting pendant. If you want to divide it in half and make earrings instead, that’s fine with me. If you want to buy a bit more material and make something big or even (if you find yourself so comfortable with this material that you are able to work quickly enough to…) make both a pendant and a pair of earrings, that’s yet another option.

Also: I’ve got two other workshops coming up this summer, both of which are multi-day events. I’m hoping to write about those soon too, but the ‘net access in my studio is getting increasingly less reliable (we’re hoping for a fix next month…), so I’m struggling to keep up with online announcements. But you should know that all my workshops at The Artsmiths of Pittsburgh are announced on the Eventbrite system. If you are interested in a specific class but for some reason can’t make it on the given date(s), please let me know. I’m happy to repeat any of my sessions on another date, whether it’s back at Artsmiths again, in my studio, or at another site.

Posted in General Techniques, Teaching Metal Clay, Technical Details | Tagged: , , , | Leave a Comment »

Summer Workshops Galore!

Posted by C Scheftic on 2016/07/03

I’m really excited: The Artsmiths of Pittsburgh has scheduled five of my metal clay workshops in July and August, and two of them are special multiple-day events so I’ll be teaching there for nine days in all during those two summer months!

(Some day, I hope to arrange a lighting set-up that will give me a consistent color background regardless of the time of day when I take my photos … sigh! The shots above show the range from morning to afternoon to after dark at night; and, yes, all of them DID have the same three bright “daylight” bulbs trained on them in addition to the room’s ambient lighting.)

The length of the various sessions does give a hint about the complexity of the different projects, but everything I’ve scheduled at Artsmiths for this summer should be do-able even by complete beginners. The reason I set aside more time for some of them is so that I can welcome even first-time clayers into any of these classes! Folks with some prior experience with metal clay are likely to learn some new techniques, and may well be able to apply their existing knowledge to kick their designs up a notch.

If you follow the links above to get more information and/or sign up for a class, you may notice that the descriptions there often talk about making a pendant (and the corresponding photos show a range of possibilities for how you might construct yours piece). Anyone who’s taken my classes already knows that, while I often demonstrate a pendant design, I’m happy to support reasonable variations on any given project. By reasonable, I mean variations that are appropriate to the materials we will be using, appropriate to the skill level of the student wanting to make something else and, tied to both of those, appropriate in the sense of the amount of support you’ll need to succeed at your idea while also being “fair” to others who are trying to complete the specified project. But I want everyone to make a unique piece they are happy with, so there’s a lot of leeway in exactly what you might make! Get in touch with me directly if you have any questions about that aspect of my classes. Or, just come and make some gorgeous, unique, and (probably) reversible pendants!

Also, if you have time and material left once you’ve completed the main project, I’m always happy to have you make a little something else with what’s left, often a pair of earrings or a few small charms, or even embellishments that you might add to future projects. I’ll fire those along with the regular class pieces.

With my one-day classes, I fire pieces for you after class, tumble-polish them to an even, high shine, and return them to the site of the class in about a week. This time, I’m especially happy about the two- and four-day sessions, because I’ll fire everyone’s pieces before the last session listed and then, on that last day, we’ll review and practice a number of different finishing techniques, ones that often get overlooked in the one-day sessions (unless you schedule a time to come to my studio for a private or semi-private lesson on finishing).

I’m going to try to post a little something about each session in the coming week or two but, given how spotty my blog-posting has been recently, I figured I should get the overview up for you to consider all at once now…

ALSO / alternatively …

Is Mt. Lebanon too far for you? Would you prefer another date and time? I’d be happy to teach any of these classes in my studio (in Regent Square) or at another location (that you arrange). Let me know if you’d like to discuss any other possibilities!

Posted in Events, Teaching Metal Clay | Tagged: , , , , , , , , , , | Leave a Comment »

May 12, 18, and 21: More Workshops at Artsmiths!

Posted by C Scheftic on 2016/05/07

Happy Mothers Day weekend, everyone!

As I said in my last post in April, I sure had a great time teaching at The Artsmiths of Pittsburgh last month, and I’m thrilled to have been invited back to offer more courses there this May! Here are the three that are on the calendar for this month. Clicking on each course title should take you to a page where you can read a bit more about the projects and, if you want, actually register for the various sessions.

  • Earring Extravaganza: An Introduction to Fine Silver Metal Clay! on Thursday, May 12, from 6 to 9 pm

    This will be the simplest, most fun, yet easy-going introduction to metal clay that’s possible! In three hours, each participant will create lovely, unique, art jewelry: fine silver (.999) earrings!

    There will be lots of options for texture, shape, and small embellishments, so everyone will come out with their own unique pieces. And, we’ll texture both sides, so each pair will be reversible!

    There will definitely be enough time and materials for each participant to make (at least!) two pairs of earrings … but, remember, since they’ll be reversible, it’ll almost be like getting four pairs from just this one class!

  • Reversible Hollow Silver Art Jewelry Pendant, on Wednesday, May 18, from 1 to 5:30 pm

    The very first piece I ever made using metal clay was one of these “lentil shape” beads, and it can be the first one you make too, if you want.

    Then again, even if you’ve been working with the stuff for a while, this project involves a few special techniques that are also applicable for a range of more “advanced” projects … which makes this a special (and easy) project on which to learn and begin practicing them.

    I find that lentil-beads always seem to be such fun to make: join us, if you can, and see for yourself!

  • Reversible Woven-Silver Art Jewelry Pendant (or Earrings), on Saturday, May 21, from 1 to 5:30 pm

    There’s a long story here, not worth going into but, although I’d hoped to offer this class last month, several situations conspired to prevent that. So we simply rescheduled this one for May! I hope that those who had signed up for April will be able to come to this one; plus, there were a few seats still open in that session so there should still be room for some new-comers!

    There are lots of things I love about this woven-silver project. The one I’ll mention here is that this is a great session for people who like to make and / or wear silver pieces that are big! At times, the sheer cost of the materials can seem somewhat intimidating but, because these designs have so much open space, they require far less material. Relative to many other designs or approaches, you can stay small, and keep your material costs down, or go big, and not have those costs skyrocket. Your choice!

As I said last month, there’s no significance to the specifics of dates and times. That is, if you want to take a workshop and those date/time combos don’t work for you right now, please let me (or Artsmiths) know! All of us are trying out different combinations to figure out what will work for folks who are interested in the classes. As long as we know there’s interest, we can work out other day/time combos for future months, either repeating these topics or adding new projects to the offerings. And I’m willing to offer any of them as small (private or semi-private lessons) or group sessions (if enough people express interest) in my Regent Square studio as well as at The Artsmiths of Pittsburgh.

Personally, I think that all of these are lots of fun to make!

Posted in Events, Teaching Metal Clay | Tagged: , , , , , , , , , | 2 Comments »

April Recap: First Classes at Artsmiths

Posted by C Scheftic on 2016/04/30

Some days I think to take photos, other days I don’t. I can find no pattern at all to which is which!

But, whether or not I remembered at any point to stop and take photos, I want to say how much I enjoyed my first month of teaching at The Artsmiths of Pittsburgh!

Our very first class, on April 14, was an easy introductory session, where we covered learning how to texture metal clay, give it some shape (e.g., by drying it over a dome), and embellish it for a bit of extra oompth (e.g., with balls or coils of clay). In all, in three hours, six students completed twenty-one different pieces!

Now, if you’ve worked with metal clays, one thing you know is that you usually should start out with a little more clay than you actually need to make a piece. You’ll roll it out, but then cut it down to the size and shape you want, and trim away the excess. And the question is, always, what to do with the excess? I’ve already written here about this, but the basic options seem to be: make something else (small) with what you have left; get some more clay and add your leftovers to that to make another piece (bigger); or, go to the bother of saving it to do one of the above later on. (Clearly, I lean towards either of the first two!)

And I have to give this group credit for finding ways to use all their clay. First-timer Linda, in particular, kept making smaller and smaller pieces, using the bits she cut out of one piece as elements on their own, and using the final dregs to make tiny ball embellishments.

Everyone’s pieces fired beautifully, but I didn’t think to get a photo of that. No, what I did capture was when, after I’d fished Linda’s last three teensy pieces out of the shot, someone surprised me by pounding on my studio door, and I dropped them back onto the shot. At least, they landed on top, so I didn’t have to search through the whole barrel-full again. Still, can you spot all three pieces in this photo?!! (I think two are pretty obvious, but not the third, which was the center she’d cut out of the little gear/sun-shape.)


Then, on February 21, I taught a “Draped Silver” class. Didn’t take a photo of that group at work…. Don’t have a good photo of all my samples either, but I include here two older pics of two pieces each, one pair in .999 fine silver, and one pair in bronze and copper (because that’s my best one of little “ball nest” embellishments).

In this class, we worked in .960 silver. That allowed us to roll the pieces nice and thin, which is the key to making draped metal clay pieces. It also let us make them fairly thin without having to add a backing or frame for protection.

Several of the folks in this session had taken one of my earlier classes (at Artsmiths or my studio) and had seen a wide range of my textures; for this workshop, however, I took only shallow-texture choices.

The last photo with this post shows the fired and tumbled pieces from this class (though, for some reason I don’t understand, it is not a good representation of any of the colors, nor the textures; though you can see the range of interesting shapes that folks made). The one with wire, beads, and chain (middle of top row) is the one I made as an in-class demonstration. It’s a slightly different color from the other pieces because, before I added the beads and chain, I gave it a very light Liver of Sulphur (LOS) patina and then polished off most of it. But I returned the students’ pieces all shiny-silver, and will let them decide if they want to leave them like that, or if they want to add a patina. I do love patinas but, sometimes, and especially with broad, shallow textures like many of these, I think that pure silver shine is wonderful!

I did have a third class scheduled for April, Woven Silver on April 26 but, as I mentioned before, April was a killer month. (I mean that literally: suddenly, randomly, several friends and parents of friends all died.) It got to the point that I just couldn’t swing that class. I didn’t get a clay order in on time (to get it without express shipping charges) and, even if I had made it to class with clay, it’s not clear where my head would have been. I want workshop participants to know that I am there with them, ready to present, encourage and help! So we rescheduled that one, for May 21.

I’ve got two other classes scheduled for May too. I’m really looking forward to those! More on all that shortly!!

Posted in Teaching Metal Clay | Tagged: , , , , , , | Leave a Comment »

April 14, 21, and 26: Workshops at Artsmiths!

Posted by C Scheftic on 2016/04/07

As I mentioned earlier this week, I’m on the schedule to teach three workshops at The Artsmiths of Pittsburgh as they launch their Underground classrooms this month. I feel very honored to be one of the first four instructors invited to teach there, especially knowing the caliber of the other artists in that group!

All of my classes this month are suitable for beginners. Those who already have some experience with metal clays are also welcome to participate and learn new techniques. I’m listing three separate classes here, and you’re invited to take one or two or even all three of them! (Just click on the link for each one, of course, to see more details.)

We’ll make a pendant in each session; if there’s time and interest, participants may want to try making a second pendant or a pair of earrings too. I sure hope that some of my readers here will be able to join us there!

Also, there’s no significance to the specifics of dates and times. That is, if you want to take a workshop and those date/time combos don’t work for you right now, please let me (or Artsmiths) know! All of us are trying out different combinations to figure out what will work. For April, select Tuesday, Thursday, and Saturday slots were the only ones being tried, and there were other events besides classes on some of those days (e.g., the SOS_Underground opening I mentioned in my last post). But, as long as we know there’s interest, we can work out other day/time combos too.

Or, for that matter, you can just come out to my studio for a class too so, if there’s something you really want to try out, please let me know and we can find a time that’ll work for us.

Posted in Events, Teaching Metal Clay | Tagged: , , , , , , , | Leave a Comment »

Combining Inspirations

Posted by C Scheftic on 2015/04/15

Two of my favorite art jewelry makers and teachers are Hadar Jacobson and Mary Hettmansperger. I love many of their designs, though I’m rarely if ever inclined to copy any of them (including those in their project books) exactly as shown. What I like is the way they create designs using techniques that inspire me to tweak a little here and a little there, and somehow end up making something that’s much more my own.

Towards the end of last year, I was browsing through one of “Mary Hetts'” older books, Wrap, Stitch, Fold, and Rivet (© 2008), looking for some tip I thought I’d read in it a while ago, when I was stopped dead in my tracks by a project I’d seen before but had never given much thought to, one she calls a “Bead Shelf Pendant.” In it, she talks about cutting, punching, and heat-coloring copper, but at that moment I suddenly saw a variation on it as a great metal clay project as well. The first photos here show one of several fine silver pieces I made as soon after realizing that as I could find the time.

I wore a couple of them throughout the holiday season at the end of 2014, and I probably got more comment and compliments on those than on any other piece I’ve ever made and worn. I’m not just talking about friends and family comments, I’m including store cashiers, physical therapists (yeah, one of the reasons I’ve been off-line a good bit lately), random people sitting near me at concerts, and so on.

Since I had so much fun both making and wearing those pieces, at the start of the year I tried a few others. The second photo here shows one of the first bronze pieces I made in this style. Bronze is a less expensive metal to purchase than silver, so I felt I could afford to go bigger (wider or longer) with the ones I made that way. Mind you, working with bronze (or any other base metal clay, such as copper or steel) takes more time which I feel, in the end, pretty much balances out most of the savings on the materials. The final retail price for a base metal piece ends up similar to that of a silver one of a similar design, because of the extra time one has to spend on it. The thing bronze does allow me, however, is the opportunity to go a bit bigger without having the price of a piece go out of reach. The one shown here (reversible, with a “fiddlehead fern” texture) is about as long as the silver one, but easily thrice as wide.

But, as I was playing around with my first bronze bead shelves, I had another “gotcha!” moment: Foldies! These are also known as Drapings. There’s a great description of the basics of this technique in Hadar Jacobson’s third book (© 2009), Mixed Metal Jewelry from Metal Clay, on pages 104-105. I’ve made a number of such pieces over the years (and posted a number of photos on this blog) but, while I’ve been happy-enough with the ones I have made so far, I have never been totally satisfied with any of the bail designs I’ve used. But, as I was making those bronze bead shelves, it suddenly came to me: make a bead-shelf-foldie…. You’ve already seen on this blog a photo of the first one of those I ever tried (which, for the time being at least, I’m keeping in my own little stash of personal NFS (not for sale) pieces): it’s one of the pieces I submitted with the application that got me admitted to the Pittsburgh Society of Artists.

The bead-shelf-foldie is fun to make out of clay (thanks, Hadar!) and fun to finish and hang (thanks, Mary!), and I find an extra-bonus in having found a way to adapt ideas from two of my favorite jewelry artists. I look forward to stretching this idea even more in the future.

Posted in General Techniques, Teaching Metal Clay | Tagged: , , , , , , , | Leave a Comment »

Softly Draping Hard Metals

Posted by C Scheftic on 2014/05/25

I have to admit something: I love “draping” metal clay! The clay is so soft and pliable, and the end results are so satisfying!

I am impressed with many of the effects that can be obtained via various “metalsmithing” techniques, but this draping is just sooo different from working with “solid” metal (sheet, wire, etc.). Yes, there are a lot of little “tricks” involved in successfully draping a mix of powdered metal, binders, and water, but it still is a relatively easy process for achieving a look that is much more difficult to achieve via any methods used with, say, sheet metal.

All the photos in this particular post were made with Hadar’s new-ish Friendly Bronze metal clay powder. At one point or another, I’ve draped every clay I’ve ever tried: every brand, every metal, etc. (OK, no, I haven’t done this with gold. It should work, but I don’t feel I can afford to use gold for anything this big. Of course, if you can afford it, I’d be absolutely thrilled to “drape” a gold piece for you on commission!) But all the different brands of silvers, coppers, bronzes, steels: yes! I’ve draped those.

In fact, there’s one very-special thing I do with draping that I teach in my metal clay workshops. Yes, while I do share a lot here on the blog, there’s even more that happens in person! You see, this little post is not only about draping metal clay. It’s also a little bit about workshops. (My plan is to mention workshops a few times, in this and several other posts over the next few months, then tie that together with one specifically about classes and workshops, both ones I offer myself and those offered by others.)

Anyway, the two draped oblong shapes are ones that I made in advance of a recent workshop. They were fun to make. I fired them both before the class; they ended up being about 37 mm long (excluding bail) and 25 mm wide. The idea was for me to have finished polishing one completely, and use the other one in my demonstration illustrating some techniques (and potential issues) in polishing such drapings. They also served to illustrate two of the many different bail-mechanisms that can be used for hanging the piece.

The long and narrow piece was begun during the in-class demo. It illustrates a different kind of draping, and a different kind of bail structure, both of which are harder to describe (but still easy to show) compared to the first two (oblong) pieces. It’s 66 mm long by 24 mm wide, and contains a little over 24 grams of metal.

The last photo shows two sides of a fourth piece. Also constructed mostly during in-class demos, it’s the biggest of this lot: 45 mm high by 56 mm wide. It weighs a little over 33 grams (including a CZ on each side, but excluding all the chain on which it’s hung). While I was manipulating it in class, we talked about things like overall size and weight versus maneuverability and polishing constraints. (You may notice this piece has a separate backing, while the two oblong ones do not, and the longer-narrower piece folds over on itself.)

Have you tried draping metal clay yet? If so, please leave a note about it in the comments!

Posted in General Techniques, Teaching Metal Clay | Tagged: , , , , , , , , | 1 Comment »

Two More Hollow Beads

Posted by C Scheftic on 2013/08/31

While I’m still thinking of it, here are a couple other hollow beads I’ve made recently, and the armatures on which I built them.

Well, let me start with the armatures. In the first photo, you can see two oval-dome parts of a graduated, five-part “doming plate” that is sold specifically for use with metal clays. (This one actually belongs to a friend, who won it in an online contest!) Below that is a square, blue, glass “rock” that is sold in the floral-arranging section of a craft store. (That is mine, one of three I found in the back of a drawer in a house I rented for a while. I liked their sea-blue color.)

The first piece shown here, reversible with both sides in the photo to the right, was made with the glass rock. I covered it with a plain layer of bronze clay, let that dry, cut it open to remove the rock, and pasted the two parts back together again. Once that seam had dried, I then covered it with what I thought of as three different “blankets” — each with a different woven texture using a different metal (all from Hadar’s Quick Fire clay powders). The first layer was bronze which, when fired, had a lovely sort of blanket-y color that I left alone. The next layer (the wavy weave) is rose bronze, and the outermost later (a straight weave design) is copper. I did them in that order because I’ve found that copper layered over bronze, with air-filled gaps in between, sometimes alloys into odd colors. The rose bronze serves as a sort of buffer to help avoid that. (And, I just like the color of the rose bronze metal!) Both the rose bronze and copper were polished with radial bristle disks and silicone wheels to bring out their shine.

The second piece shown here, also reversible, with both sides in the image to the left, is all bronze, and was made with the second-largest shape on the doming plate, with some additions. First of all, I cut a flat oval shape just a bit larger than the dome. I let that dry, attached the dome, and dried it yet again. Then I rolled out a thin, textured layer and “draped” that over the other side of the flat oval. I used a straw to prop open a place near the top, to serve as a bail, trimmed the rest to match the oval, and let it dry one more time. After cleaning it up a bit, I fired it. I decided to polish this piece using the same tools as I had on the “blanketed rock” piece.

Although these are both relatively simple pieces, they illustrate one of the things I find so very engaging about working with metal clay: the wide range of creativity it brings out, not just in the designs one ends up making, but also in the range of items one can either find or adapt to use as “tools” to aid in the making. Maybe I can remember to show more of those over the next few weeks. In the meantime, feel free to leave a comment describing other such items in your “tool” stash!

Posted in General Techniques, Technical Details | Tagged: , , , , , , | Leave a Comment »