If you’ve stumbled across this blog / post without a lot of previous metal clay experience, you may want to just click on the photos to enlarge them and read the brief notes there. For the rest of you, I’ll start by asking if you remember the earrings I wrote about last week?
For today’s post, I’ll start by saying a little about the steps I went through in making the bronze-parts of the two-metal earring pair I described earlier.
- Grab a good-size chunk of Champagne Bronze clay.
- Roll it out to a thickness of four cards.
- Position cards around it, two cards high.
- Use a thin, straight edge to cut two distinct sets of five intersecting lines. (This was done freehand, so their positions are similar but not identical.)
- Use a circle cutter to make two “large” circles.
- Use another circle cutter to make a “small” circle inside each of the “large” ones. (Again, done freehand, so their positions are similar but intentionally not identical.)
- Do all the usual clean-up and drying of the various bits of clay.
When the circles had dried, I used the small, matching “inner” circles (where each set of lines all intersect) over some Low Shrinkage Steel XT to make the earrings I mentioned before. So far, so good.
 Looking at the dry “outer” circles (washers, actually: the larger circles with their centers removed), I had another idea. Using a texture sheet with some concentric circles, I rolled out two more sheets of clay, one each from Friendly Copper and Low Shrinkage Steel XT. Then I centered one of the bronze “washers” over each of those, and cut a matching circle out of each clay. Finally, I rolled out another pair of those two clays, this time using two different “flowered” textures, and cut out a third circle of the same size from each of those. Both the circles- and the flower-design were rolled to four cards at first and then, with the textures, down to two cards. (I didn’t roll the clay with textures on both sides because: (a) I hadn’t yet decided for sure how I would use them, and (b) I wanted to center the designs on both sides the way I wanted, and doing that separately for each side was easier.) I set all those aside to dry (as well as a few other bits I’ll try to write about another time), figuring I’d use them for something….
A few days later still, I got to wondering about the “high fire” temperature of these new “one fire” clays. In general, even with this new trio, it’s the bronze that’s going to limit how hot the product can get during the sintering process. Would the “bronze embeddable” bails survive that heat? (I use them myself, on occasion, and I often offer them to students, especially in introductory workshops, because they can save a bit of time when compared to having to make one’s own bail.) So I took one of the bronze washers, attached the copper disk with circles and let that dry, then positioned the embeddable bail and attached the copper flower-design disk. Once all that had dried, I filled in a few little gaps, dried it all some more, and finally fired the piece.
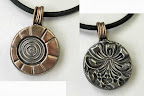
The results were interesting, as shown in the first photo, above. It all sintered just fine. The bail did blister a little bit: not enough to ruin it, but enough that any metal artist “in the know” should be able to spot what happened. But I still think it’s interesting.
There was one small blister on the sintered bronze section. My first thought was that I’d overfired the batch a bit, but then I realized it was exactly over the post on the embeddable bail. Silly me, I didn’t think to capture a photo of that: What I did was to immediately see if I could polish it out. Easy! I’m not done polishing this piece (it was just a spur of the moment creation, not a planned project), but I think the photo I include here (click on it for a bigger version) gives you a hint as to the blistering on the bail (in case you’re someone who uses them too), and to the way it does look like the disk itself will polish up nicely with a little more work.
There’s one other item worth noting: how the bronze in the bail alloyed a bit with the copper on the other side! Look at the side shown to the right in the first photo, up near the bail, and notice the golden-colored patch. Alloying! Again, artistically, I’m OK with its looking like that. But it’s good to know it will happen.
 A few days later, I got to wondering, would the bronze wire I sometimes use with such pieces show the same blistering? [Later clarification: I’ve used that wire in the past with pieces made using Hadar’s Quick Fire bronze. That’s a clay that takes a two-phase firing and only mid-fire temperatures and it’s always held up beautifully in pieces fired that way. Here, I’m otherwise reporting on the newer one-phase high-fire clays.]
So I made a simple wire-loop bail out of phosphor bronze (melting temp listed as 1800°F), then took the other (matching) bronze washer and the Low Shrinkage Steel XT disks, and assembled it the same way as I’d done before. I fired that using the same schedule too.
And, again, I noticed a bit of blistering on the bail and, with this wire-design, a bit of fusing across the loops. Again, I think that slightly grainy look is OK. Other than a quick clean-up, I have not yet stopped to polish this one at all. But I decided to post about it quickly because, this time, the main piece shrank much further away from the bail. In its clay state, the loops were pressed lightly down into the piece, but the post-firing separation is visible in the photo. No alloying with the steel though, which is also good to know.
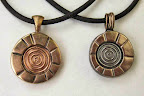 But you have to see the two together to catch what surprised me the most: the difference in shrinkage! They started out exactly the same size, and look how different they are now. The current (as I write this) Hadar’s Cheat Sheet (.pdf) says that, on their own, Champagne Bronze shrinks about 30%, Low Shrinkage Steel XT about 28%, and Friendly Copper about 25%. Combos will be limited, to some extent, by the least-shinkage clay in the mix. But there’s only a 3% difference between LSStXT and FrCu, and it sure looks to me like there’s more than a 3% difference in the results here. What I can feel, but can’t really show here, is that there is maybe a 3% difference in height but it’s in the wrong direction. The one made from copper is a teensy bit thinner (i.e., more shrinkage, not less).
I really do like the results I’m getting with these clays, and the 3-hour firing time is a huge help compared to some of the others. But, with the others (and any of the “older” clays, both precious and non-precious), I think I have a pretty good feel for the shrinkage. With this new One Fire Trio, I’m still exploring….
What are you finding with them? Do leave a comment!


") Artsmiths of Pittsburgh
Artsmiths of Pittsburgh") Hoyt Center for the Arts, New Castle, PA
Hoyt Center for the Arts, New Castle, PA") Portage Hill Gallery, Westfield, NY
Portage Hill Gallery, Westfield, NY") _Open Houses in my Studio
_Open Houses in my Studio _Or…contact me about hosting a private party!
