Convergent Series

learning, using & teaching metal clay, and other aspects of life

Posts Tagged ‘metal clay’

Where do other workshop ideas come from?

Posted by C Scheftic on 2011/08/13

I sure do think that it’s loads of fun to wrap strips of clay into cylindrical shapes … and, then, fire them so they turn into sturdy but lovely metal tubes! Do you? Have you tried it? Would you like to come to a workshop and make a few?

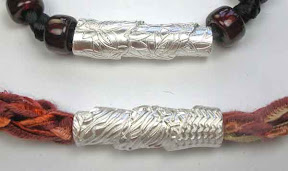
One fairly easy thing—something even an absolute beginner can do—is to overlap the material as you twist it around. This gets you a shape I think of as a “lapped cylinder,” one that’s open at both ends. Depending on the texture / design you have chosen, the pattern can remain the same along the full length of the cylinder (upper tube in photo to the right), or it can vary noticeably as you turn it around (lower tube in upper photo at right).

You can hang one or more of these cylinders from some fancy ribbon and you’ll have your very own one-of-a-kind piece of art-jewelry! You can use ribbon just as it comes from its package, or you can use any of a range of braiding and/or beading techniques to make it fancier. It can be as quick and easy, or as elaborate, as you want it to be.

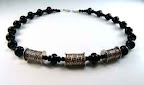
(Not shown in that photo is the way you can even use a matching tube as part of a toggle clasp! I’ll write about bracelets again in a little while, and show that then.)

Cylinders that Can Spin. Little Cylinders
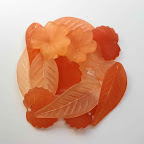
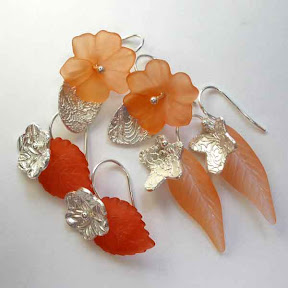
An interesting variation on the cylinder involves capping one end and putting a small hole in that, just large enough for a piece of wire to pass through. Then, you can use a headpin (I often make my own!) to either: make a wrapped loop so you can hang the whole thing from an earwire (first photo to the left) or even use a headpin that’s long enough so you can bend it directly into a hand-made earwire (second photo, to the left). Though I illustrate only the second approach with additional beads here (I used crystal and glass), it’s possible to include them (or not) with either style, as you desire.

All of the cylinders described so far are possible outcomes for the workshop I offer periodically called Simply Stupendous Cylinders. Where did that idea come from? I wanted to find a way to offer a shorter, simpler version of a couple of my other favorite projects.

(1) Silver Spools involves another great project. It’s also appropriate for beginners, while those with prior metal clay experience will often have the chance to learn some new techniques. But the strategy used to construct spools just takes a bit longer to complete than does that for simple cylinders. Spools also use up some more material. So I like to offer the simpler version sometimes too, for those who want to try making some tubes but at a slightly lower cost.

Spinner Twists(2) I also love making and teaching others to make “twistie” earrings (or pendants) like the ones shown to the left here. I like their twisted shape, and I especially like the way they can be made to spin on their handmade ear-wires. Surprisingly, however, they are much harder than they may look to make! The Do the Twist workshop where we make these is one of the few I teach involving silver metal clay that I do not recommend for absolute beginners….

Here’s why: The “open twist” shape of this construction is just incredibly fragile in the greenware shape. The end result is sturdy enough, but even the slightest “wrong” move as you do any finishing or cleaning prior to firing can cause a “twistie” to snap into pieces. Then you have to decide: stick them back together (and risk snapping it somewhere else in the process), smooth off the ends of the pieces and just end up with shorter twists (though that smoothing can also lead to more breakage), or rehydrate the clay and try again another day (since, though no clay is lost, it still takes time to get it workable again)? That’s just not a set of choices I want to foist on metal clay beginners! You need not be an expert to make these, but I do recommend waiting until you feel comfortable working with metal clay in both its moist (lump clay) and dried (greenware) states before you tackle this approach. And the cylinders-class is one great way to gain the relevant experience.


If you’re reading this note within about a month of when it was first posted, you can look over to the right sidebar to see when I’ll next be offering the relatively quick and easy Simply Stupendous Cylinders workshop in my studio (in “Regent Square” in western Pennsylvania, where Pittsburgh, Swissvale, Edgewood, and Wilkinsburg intersect…). If you’re interested, just let me know that you want to sign up for it.

If you’re reading this more than a month after it was first posted, you may not see it listed on my evolving workshop schedule. But, at any time, you are welcome to request any of my workshops (regular ones or something special), including the ones discussed here. I’m always happy to offer any of them (at my studio or even at your site) as long as I know there are folks interested in taking them!

Posted in Misc. Musings | Tagged: , , , , , , , | Leave a Comment »

Where do workshop ideas come from?

Posted by C Scheftic on 2011/08/07

I was over at Zelda’s Bead Kit Company a week or so ago, and noticed a box with these cute and colorful little Lucite beads. I think they’re so adorable—with several different leaves and flowers and butterflies—and I just couldn’t decide which color or design to buy.

How could I justify getting a whole collection of them? Even a single strand of one color and design contained more than I’d be likely to use myself. Why? Well, while I may make “similar” pieces in a “series,” I don’t go around making lots of multiples of the same design. So I rarely use lots of the same kind of bead.

But … I got to thinking, in workshops, my participants are encouraged to take my ideas, demonstrations, and samples as inspiration and then make something that adds their own special twist to it.

So … could I justify buying a collection of these in different designs and colors, and offer a workshop where I’d make these available as materials? Clearly, given the presence of these photos, the answer was, “Of course!”

Garden Delight Earrings is now on the schedule as one of the workshops I’ll offer in my studio at the Wilkins School Community Center soon after the fall series opens. This one will be on the evening of September 21. Though returning students are certainly welcome, this is one of the classes I’ve designed as a super-easy one for beginners. And because the silver elements themselves are likely to be relatively small, the materials fee for this one should also be very affordable!

Posted in Misc. Musings | Tagged: , , , , , , | Leave a Comment »

WPaPMC tries 14K Rose Gold Metal Clay!

Posted by C Scheftic on 2011/01/30

Yesterday (January 29), the Western PA Chapter of the PMC Guild became the first group anywhere to try out 14K Rose Gold metal clay.

A member of our chapter, Michelle Glaeser, announced the availability of this product earlier this month. This will not replace the more traditional yellow gold, but it can be a nice alternative or complement to that color. Michelle and I got to talking and the end result was that, when 14 of our members gathered on Saturday in a local library’s community room, we ended up sharing almost two packs of the stuff. Michelle kept what was left over for her own continued experiments.

Of course, the price of precious metals — including gold and silver — has been climbing lately. So we didn’t go off making big gold pieces. People brought their own creations made using their favorite form of silver metal clay. Some had already been fired so that only fine silver remained; others were still in the dried “greenware clay” state. Each participant bought a little piece (0.2 grams) of rose gold clay with which to embellish them. The open domed disk with a rose gold heart was made by Stephania; the photo shows her little heart, still in the clay state, attached to her piece of pre-fired, un-burnished silver.

Why would we fire the silver first? The basic formula for any “rose gold” involves gold, silver, and copper, and the presence of copper means that the rose gold clay must be fired in an oxygen-reduced environment. But the silver clay itself prefers to be fired with oxygen. If the silver clay has been pre-fired as usual then, once it is in its fine silver state, it can be re-fired with or without oxygen. So you can attach the rose gold embellishment and fire that new bit of clay in activated carbon, which is the easiest way to get the necessary reduction atmosphere. (There are other alternatives, if you really do want to fire the two together, but I won’t go into those here.) We had several stainless steel pans (which can take the heat of the kiln), filled them part-way with carbon, loaded our pieces (as shown), topped that with more carbon, covered it with a lid, loaded those into several of the kilns we’d brought, and set them to fire away!

When the firing cycle was complete (slightly over an hour later) we let things cool down a little bit, removed the pans, and started sifting through the (very hot) carbon for our pieces. Shown, are Dee, Donna, and Nicole searching through one of the pans.

As we found the pieces, they were laid out on a firebrick shelf for a few minutes until they had cooled down to a safe-handling temperature (as shown to the right).

Then we started examining the results. Most turned out beautifully!

Two of mine are shown at the very top of this post. Each little coil used half of the rose gold clay that I had (thus, about 0.1 gram each). My one on the left (up above) is what pieces look like straight from the kiln: the silver looks almost white, and the rose gold looks dark like the clay. The one on the right shows what happens when you burnish and otherwise polish the piece: the silver and rose gold get very shiny and bright. The darker areas on that piece are the result of applying a “liver of sulphur” patina (which turned especially colorful around the rose gold!), and then polishing that off the high points to accentuate the textured areas.

(I’m pretty sure those are Sharon’s hands, in the photo to the left, polishing one of her pieces.)

For a few, the little rose gold embellishments had come loose: with more (and very careful) sifting through the carbon we were able to retrieve those. (They can be reattached and refired.) Michelle’s earlier testing had shown that painting on thick layers of paste worked just fine; we discovered, however, that trying to be “conservative” by just painting on a very thin layer wasn’t a good idea. The way the attachment happens involves a reaction between the silver and gold atoms and, if there’s just a thin gold layer, it all sinks down into (alloys with) the silver. You need to use enough for some to remain above the part that attaches. (Well, and there may also be factors involving the exact temperature and length of the firing, but that’s beyond the scope of this basic report.) Michelle says that she saw no such alloying with embellishments that were at least 2 cards thick, and that is consistent with what we observed. With pieces that big, the shrinkage rate for the rose gold clay appears to be about 15%.

Finally, I will note that regular readers of this blog will know that I emphasize the fact that most of my pieces are fully reversible. This last shot here shows the “other” side of the two pieces with which I opened this post. Though they’re similar in design (but rotated 90° from each other) on the side where I added the rose gold (shown first), this last photo lets you see how different they are on their “other” side.

(As usual, clicking on any photo should open a new tab with a larger image.)

Posted in Guild, Learning Metal Clay, Technical Details | Tagged: , , , , , , | 3 Comments »

Happy New Year!

Posted by C Scheftic on 2011/01/01

As I’m sure you know, people will often start a project with enthusiasm. Then, after a while, it starts to feel more like a chore, and they drop it.

Well, if it seems like a chore, that makes sense. The question, which applies to many aspects of life, is how to keep it fresh and interesting and motivating.

In that sense, the “it” can be anything. For me, in the context of writing here, there are several relevant “it” possibilities: the making of jewelry and other small adornments in general, making them through the specific application of “metal clay” techniques, and writing about both via this blog.

WordPress has launched a “program” to encourage people to continue to maintain blogs that they have started. There are two: postaday2011 and postaweek2011.

Now, for me, the thought of having to post every day holds no interest. To me, that would become a chore. But averaging once a week is about the goal I set myself when I started this, one year ago today.

I have not gotten upset with myself when, on occasion, I’ve gone more than a week without posting: if I didn’t have something to say, why write just to be writing? Or, if I was so busy, so otherwise engaged for a week or so, why stress out just to post, rather than wait until a better moment? As long as I averaged that pace over about a month (and occasionally posted more when I really did have more to say) that has seemed fine to me.

In that context, I am tagging this post as my entry into the “postaweek2011” program. I’ve no clue if I’ll both feel inclined and remember to tag every post that way: seems kind of silly to me to over-tag things. But I’ll try to remember to include that at least some of the time.

The thing I’d appreciate would be to see more comments in response to my posts. Through basic statistics such as number of hits, I can see that people read them (though I can’t tell who you are): Please speak up!

~-~-~-~-~-~-~-~-~-~-~

The photo shown with this post is the same one I used when I launched this blog a year ago today: the large, central, “fine” silver bead is the very first one I ever made using metal clay techniques. Clearly, I’m still motivated to make small adornments that way!

Posted in Misc. Musings | Tagged: , , , , | 4 Comments »

A New Year & A New Blog

Posted by C Scheftic on 2010/01/01

Well, I’ve been thinking about starting a blog for a while now and, at last, here it is….

I feel so behind-the-times doing this now! It’s not like I’ve been oblivious to advances in technology. I got my first arpanet (as it was then known) account in 1978 or 79 (’twas that academic year, by now I just forget exactly when, possibly mid-year), I wrote my first web-page in 1993 (late fall of the 93-94 year), and so on. I just had lots of other things to do as well.

Back in that same 1978-79 school year, I also signed up for a course in jewelry design and metalsmithing. I’ll tell the full story of that some other time: the short version is that it was a huge disappointment, extremely discouraging, and I simply dropped out before the term was over. The interest wasn’t gone, but there were other activities that I found more rewarding.

I first heard of Art Clay Silver (ACS) in 2002: I saw a couple samples and a book at Crystal Creations / Beads Gone Wild in West Palm Beach, not too far from where I grew up. I was then living in California, was just back in FL visiting my mother, but my life was crazy-busy with work so I had no chance to really explore it. But I was fascinated. I finally got my hands on the stuff in October of 2006, by then I was living in Pennsylvania, and the class I took used Precious Metal Clay (PMC).

Here’s a photo of the first fine silver piece I ever made, in that class. It’s the shape of a “lentil” bead that is about an inch across, with some embellishments (the smooth oval and three tiny balls) added to the surface:

First Fine Silver Lentil Bead

Over time, I hope to post more about ACS, PMC, fine and sterling silver, other metals, and related topics. Plus, probably, miscellaneous other stuff. When I find the time…

Posted in Learning Metal Clay | Tagged: , , , | Leave a Comment »