Way More Photos of My Work
(on Picasa, which Google took over, and broke the links; I’m still trying to figure out how to link to the album collection there…)
Yes, I am sticking to the (mostly / mostly) Second Sunday schedule for February.’s Open House. That is Super Bowl Sunday, but I’ll have my studio open for you to come shopping because it’s also the last weekend before Valentine’s Day!
This is just a shopping-day! Come on over to get a little treat for someone special, or for yourself! I doubt I’ll have a chance to clear up enough space for students to work along with me, but students are still welcome to stop by with questions or requests.
Unlike most Open Houses, I won’t stick around afterwards. I’ll probably even start packing up a little before 5. If you arrive near the end, you may be looking through my storage bins, rather than seeing pieces out on display, but I do expect to stay until 5.
Please stop by on your way to (or during a break as you prepare for) your Super Bowl party (or whatever else you have planned for that Sunday)!
(Photos: Love’s Garden in Pinks necklace. Handmade focal bead (fine silver (.999) lentil bead with small pink CZs) strung with cloisonné, crystal and glass beads. Upper photo here shows the Love side of the lentil bead, with a heart-shaped texture. Lower photo shows the Garden side with a leaf-pattern texture and the necklace’s hand-made heart-shaped toggle clasp.)
Carol here! I am holding three Studio Open Houses this month (and have six other venues for your consideration too!).
Convergent Series Studio Shows (Upstairs, Room 204) Wilkins School Community Center 7604 Charleston Ave, Pitttsburgh, PA 15218 [412-244-8458]
1. Days and times that coincide with WSCC’s Holiday Market (that will be downstairs when I’ll be in my studio upstairs!) Saturday, December 2, 9 am – 5 pm Sunday, December 3, 12 Noon – 5 pm
2. Carol’s Second Chance Show, in my regular (mostly) Second (mostly) Sunday slot: Sunday, December 10, 1 – 5 pm Just come and shop then, or come back to see if you can still get something you passed on last week, or send someone who is shopping for a gift for you to pick up that piece you really wanted!
3. Other days & times by appointment! (Afternoons or early evenings tend to be best.)
I should, of course, be at all of the above myself. Here are some other places where you can find (and buy!) my creations. (These are basically listed in order. if you were to drive from south to north.)
First, note the dates on these limited-time, fairly-local, art shows and holiday markets:
North Hills Art Center Holiday Artisan Market: November 18 – December 9, 2023 3432 Babcock Blvd, Pittsburgh, PA 15237 [412-364-3622] Mondays thru Saturdays, 10 am – 3 pm’ Tuesday evenings, 7-9 pm
Mars Area Public Library Regional Art Show: mid-September 2023 – mid-March 2024 107 Grand Avenue, Mars, PA 16046 [724-625-9048] Mon-Thurs: 10am-7pm Friday: 10am-3pm Saturday: 9am-4pm
Cranberry Artists Network Holiday Show: November 17 – December 21, 2023 at the Bottlebrush: A Gallery for the Arts 539 Main Street, Harmony, Pa. 16037 [724.452.0539] Tue, Wed, Thu: 11 am – 4 pm Fri: 11 a m – 7 pm Sat: 11 am – 5 pm Sun: 12 noon – 4 pm
And, farther north, some shops that regularly carry my work!
Hoyt Art Center Gift Shop 124 East Leasure Ave., New Castle, PA 16101 [724-652-2882] Tuesday, Wednesday & Thursday: 11 am – 8 pm Friday & Saturday: 11 am – 4 pm Closed Sunday & Monday
Glass Growers Gallery 10 E. 5th St. Erie, PA 16507 Holiday Season Hours Monday thru Saturday: 9 am – 6 pm Sunday: 11 am – 4 pm
Portage Hill Gallery 6439 South Portage Road, Westfield, NY 14787 [716-326-4478] Winter Hours Saturdays: 11 am – 5 pm other times by chance or appointment: call to check or to schedule
Whether in person or simply via this post, whether you’re actualIy shopping or simply browsing, I look forward to being able to offer you best wishes for the season and for the year to come!
I was eligible to submit up to two pieces to the Pittsburgh Society of Artists’ Annual show, so why not offer two and maybe get at least one in! So I was truly delighted when I got word that both of them had made it in. Here’s a little (perspective-distorted) panorama of the show at the 3rd Street Gallery in Carnegie, PA. You can locate (not actually see…) my two pieces, displayed in long white shadow boxes on the orange part of the wall to the left here, and then I’ll tell you a little about my entries.
I started thinking about making the pendant I’ve titled Enjoying Nature during a few local political discussions about proposed zoning variances to allow for a huge condominium building on a parcel that, while not officially in the large city park that surrounds it on three sides, is still zoned as a park area. Those who treasure the greenery and wildlife (well, except perhaps for the massive overabundance of just a few, select species…) have been trying to emphasize the value of that oasis amidst the urban neighborhoods that surround it. And I simply wanted to try to illustrate it.
Click this image to see it rotate in my hand!
I started the piece I’ve titled Circling Into Control way back last year, in 2022. But I kept debating with myself about how actually to finish up the mechanism that would allow it to hang so that the wearer would be able to spin it around if s/he wished to play with it that way. I had one main idea, and a handful of spin-offs from that. But, finally, I decided there was enough going on with the piece so I should keep the spin-mechanism under control (as shown here): I let the piece have the little black onyx trillion I’d set into it from he start, plus all its textures and loops and other embellishments. Then I just kept the top lightly decorated but otherwise as simple as possible.
All of that making and finishing happened while I was in the depths of this summer’s covid-exhaustion. I had to work in much shorter spurts than usual. I held myself together pretty well while doing that — because I like doing that kind of work — but I did simply run out of functional time for a real photography session. I did manage to catch these quick shots in the last few minutes before I had to head out the door to deliver them, set into their display boxes, for the show.
Does either of them inspire you in any way? If so, please let me know!
Well, in my last post, back in the spring, I said I was experimenting with new silver clays. Which I was doing. I can successfully make pieces out of any of them, but my questions have been:
which one(s) do I have the most fun working with myself and
which one(s) seem most appropriate for even first-time students to use.
There is no reason the same clay needs to fit both roles.
And then several good friends had personal crises, and it seemed worth taking a bit of time off to try to help where I could. Then I headed off to the west coast to spend time with one of those friends out there. (For example, I devoted a little over two whole days to making calls on her behalf about a few “customer service” issues, and was surprised to discover how much easier it is to deal with ridiculous complications, mis-directions, dis-connections, and more when it’s not about any of your own services!)
While I was in that time zone anyway, I also went to see another friend and join a dear cousin in celebrating her birthday and to connect with other x-removed cousins in her part of our clan that I hadn’t seen in years. So far, not a whole lot to post, but I was enjoying fitting in a few trips to art fairs and museums, generally doing ok myself while feeling thankful for friends & family. I was planning, as soon as I got home, to get back to exploring clays and posting online about both my trips and my latest explorations.
It must have been taking my mask off to eat while traveling back east from there where I picked up the darn covid bug. I spent my first day back just doing laundry and catching up on mail. The next day I felt what I thought was more jet-lag. That night I started to feel awful and did a covid test. (Is it just me, or do others who work with silver read the “Ag” on the test piece as “silver” at first, and have to re-think, no, it means it’s an “antigen” test?!!) For the first time, I got a reading of positive! I perked up again after only a couple of days and began testing negative (though I was still isolating and feeling just a little bit tired) for a week. And then, bam!, the “rebound” hit and totally wiped me out! For what seemed like forever (it was “just” about two months, meaning most of the summer). I’m no longer sleeping 18 hours / day (and coughing my guts out for half of my time awake), but I still tire easily as I try to catch up on everything that got postponed or ignored during that covid-stretch, as well as keep up with all the new activities that come with autumn.
To include an image here, I’ll post an older one with two shamrock pendants from my ongoing Urban Flowers series! They’ve both been sold but you can come by my studio to see some new pieces that I have made but not yet photographed! I am trying to revive my (mostly) Second (mostly) Sunday Open House sessions starting this Sunday, October 8. I’m hoping to get to my studio in the Wilkins School Community Center by 1 pm, and plan to stay until 5. I may not fully convert my workspace into a shopping space this month but, at worst, I’ll go get my bins out of storage and let you dig through those.
I know this is relatively short notice! If you can’t get there this month, I’m planning to hold Open Houses again in both November and December. And you can always get in touch via comments or email. I’m really looking forward to seeing visitors again! Though I’m sure you’ll understand if I continue to wear an N95 mask as I greet you.
Now that Mitsubishi has discontinued their (wonderful!) “PMC” line of metal clays, I’ve been experimenting with some of the other brands that are available. I want to do a few more tests before I start writing about them but for now I’ll add this one quick note:
I can work just fine with any of them, myself. I think I may have identified a couple favorites for my own use. But I have yet to find one that doesn’t have some major setback or other for use in classes. (This is not a total surprise: my favorite type within the PMC-brand to use for classes was not my first choice for the one I would work with in my studio!).
But I still have a few more to test out before I make any final decision (and since I am now into peak garden-prep season, my art-time is a bit constrained…).
Still, the point of this post: I have some great new pieces out of my recent explorations with these new clays, and I’ve got them ready to send off to new homes at either of the two events I have in May (which can also be found on my Facebook Page or website for Convergent Series) are:
First Sunday, May 7, 1 to 5 pm (Moved a week earlier than in recent months to allow for shopping before Mothers Day.)
It’s the last weekend in April, so it’s Art All Night weekend again here in Pittsburgh! Participants this year had the choice of entering for the in-person show only (you have to be able to drop off and pick up at very specific times), or online only (then you needed to submit a photo with your entry), or both. I am doing both!
And here’s the story behind my entry this year: While we didn’t have severe winter weather the past few months, the wild temperature swings (high temps could be 40°F higher or lower from one day to the next!) seem to have confused so many living things. I’ve no idea how my garden will do, nor whether we’ll continue to set high temperature records all summer too (30° above normal on a winter day is one thing; 30° over on an already-hot day is quite something else!).
So, amidst the confusion, what better style of piece to enter in Art All Night this year but another creation from my Urban Flowers series (that I first introduced back in 2016)! My entry for this year is the flower pendant I’ve titled Kiss Me Twice.
I have never promised my Urban Flowers to be botanically accurate… I say they come from just “a city-girl’s dreams”! So this pendant is not in any way an accurate representation of the Nigella damascena flower that is sometimes called Kiss Me Twice Before I Rise (or Love in a Mist or Devil in a Bush or any of a dozen or more other common names), but the connection here is the similarity I see in the position of the petals, and the way the blue glass in the center here, while not at all like the feathery bits in the real plant, does remind me of the blue in the real flower’s petals. Which seems like good enough reasons to use as a title something so interesting as Kiss Me Twice.
For those of you familiar with my interest in edible flowers, I will note that, while the seeds of Nigella damascena are, apparently, edible (perhaps reminiscent of nutmeg? I’ve never tried them), they are also reported to be far less flavorful than Nigella sativa, aka black cumin, black caraway, kalonji, charnushka, … Those little, black N. sativa seeds are among my favorites to add to my home-made breads, both loaf-style ones and flatbreads. I should get off my computer and get baking!
But not from 4 pm this Saturday, April 29, through 2 pm on Sunday, April 30! My plan is to do a volunteer shift on Saturday (then go to at least one of several other conflicting art shows and a music concert), try to sleep a little, and then get back over to actually see the show on Sunday morning. If you can’t get there in person during that timeframe, you can still see some of the entries at Art All Night’s virtual show. (I’m assuming it’ll show up there, on the event’s website. If not, you might try the Facebook page of Art All Night: Pittsburgh. There are lots of little, informative posts there too.)
Several artists I very much admire (I’m not naming them because I haven’t asked their permission) got into a recent discussion about the difference in some fees charged by the Square credit card processing system. A comment was made about this being higher than that … but the formulas were different. There had to be a “break even” point where they matched! So I immediately calculated those values for my own benefit.
And then this evening I just had to go back to some good old graphing software and produce this plot. This applies specifically to the Square system as of April 6, 2023. Other credit card processors calculate their fees differently, both in their formulas and any various categories. But Square is one of the more common ones you’ll see used at art fairs, so I thought some of you might share an interest in this..
Always the lowest fee (purple line): charged in-person, using their card reader.
Next lowest (red and green lines swap at the green circle):
Under $25, when you manually enter the information or a card stored in Square’s system is used;
Over $25, a purchase processed online through Square.
Highest (red and blue lines swap at the blue star):
Under $75, when you invoice the buyer through Square;
Over $75, when you manually enter the information or a card stored in Square’s system is used.
I can understand the logic of a higher fee for an invoice: Square is providing an extra service that involves more steps through their system.
But I agree with the folks who started this discussion: I can’t think why the fee for using a card stored in their system creeps higher, relative to their other categories, as the total amount processed at that time goes up.
Can you? If so please leave me a comment!
p.s., There are yet more fee structures, but I thought that graph had enough lines already! For instance, if you offer the Afterpay service, the vendor’s fee for that (at least through Square) is higher-still, 6% + $0.30. [Editorial comment: The pitch is that the vendor will get more sales and be paid in full. Since Afterpay has to both cover the float and deal with any problems with the later payments, the higher fee compensates them for all that. I don’t rely on an online shop for the bulk of my income but, as a shopper, I know that vendors are now factoring the possibility that “you” will use that service into the price that “I” will be paying even if I simply hand over cash, contributing its own little factor to increasing inflation…]
I’ve been reorganizing a lot of “behind the scenes” parts of my studio, which doesn’t seem to lend itself to interesting blog posts. But I’ve got work in three shows, so I ought to at least let folks know that much. I’ve included the address for each location, plus a link to a web page where you can verify the current information on hours.
Plumes and Celtic / Waves -plus- Dahlia / Fern and Paisleys North Hills Art Center Traveling Gallery Show Northland Public Library, 300 Cumberland Road, Pittsburgh, PA 15237 January 6 – April 7, 2023
If you go up the stairs and turn right towards the non-fiction section, then go to the far wall and you’ll find my four pieces in two shadow boxes at the far-right of the show that wraps around two whole walls. Each piece is a reversible fine silver pendant (with a cubic zirconia on one side), hung on an 18″ sterling silver chain.
The first box, at the very start of the show, includes Plumes and Celtic / Waves. The second box is a mere two spaces over to the left, and holds Dahlia / Fern and Paisleys. An interesting fact about the second display box (shown here) is that the North Hills Art Center folks hung it just above an entry by LarryBrandstetter.
Larry and I are scheduled to have “solo” shows in adjoining locations in October, up in the Cranberry Township Municipal Center. He’ll have works in the Back Hall Gallery at the same time as I’ll have some in the central Glass Case. I am delighted to be paired with him: I think his doodles and my textures complement each other well. Stay tuned for news of at least one public event (and maybe even more) that we’ll hold together during that month!
Flower Play and Fern Botany Cranberry Artists Network Simply Spring Show Cranberry Township Municipal Center. 2525 Rochester Road , Cranberry Township, PA 16066 March 3 – April 20, 2023 Opening Reception: 6 to 8 pm on Wednesday, March 8
My pieces are among those in the big glass case in the lobby of the building, across from the library. The building hours don’t seem to be listed anywhere, but they match those of the library.
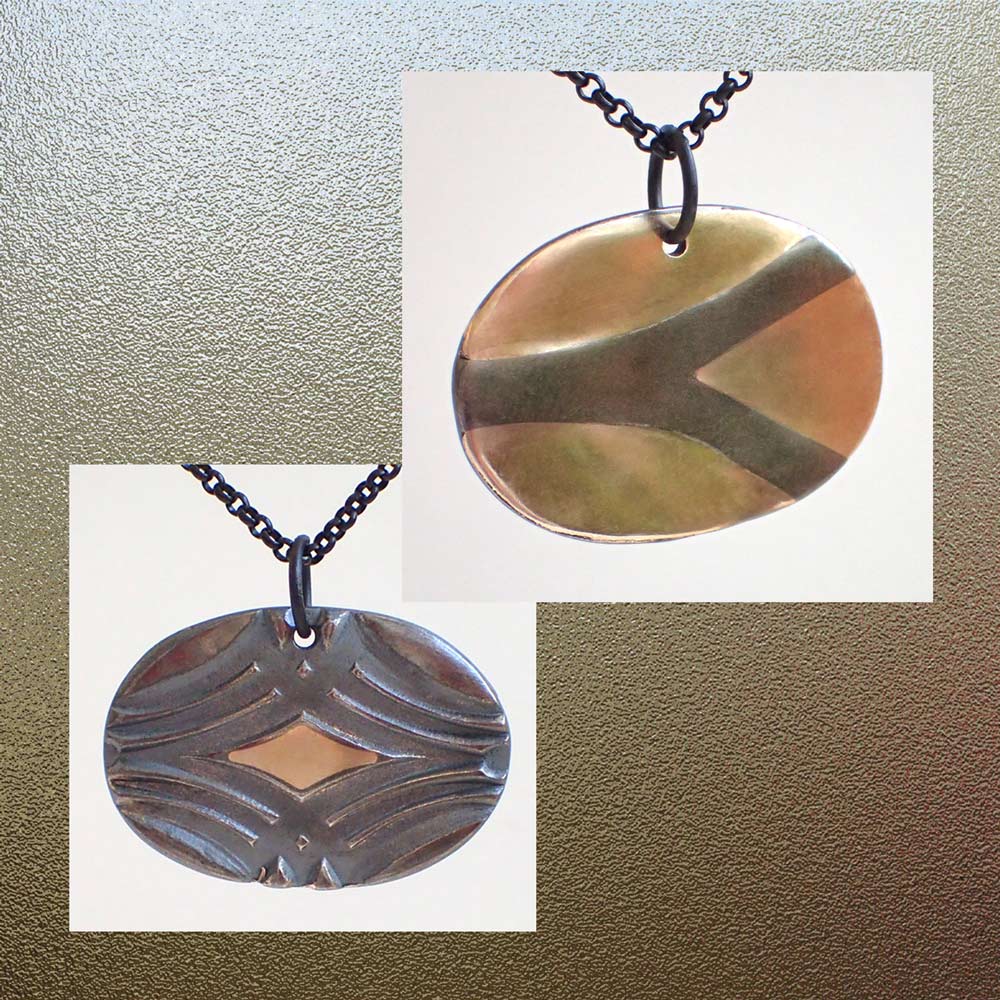
Fern Botany (both sides)
Each of my entries is a reversible, fine silver pendant (hung on an 18″ sterling silver chain). Because, in a display case, you can see only one of each piece’s two sides, I’ve displayed a QR code on the stands to an image showing both sides of each piece. (I’m not including that here because, while it now contains information specific to this show, I reuse it in different ways for different shows. Instead, I’ve just duplicated one of the images here!)
River Rocks, At a Bend in the River, and Ribbon Candy Community Art Show Mars Area Public Library 107 Grand Avenue, Mars, PA 16046 (approximate dates) March 15 – September 15, 2023
(I’ll try to update this with more specifics on dates and location once I get back up to see the whole show myself. But this library is much smaller than Northland, so I’m sure you can find them easily enough!)
River Rocks
River Rocks (shown) is a pendant with three fine silver hollow “rock” shapes hung between small snowflake obsidian beads (using Argentium silver wire, and then suspended from an 18″ sterling silver chain). There is no front or back to this piece: instead, all of the elements can rotate around the wire that connects them to the chain.
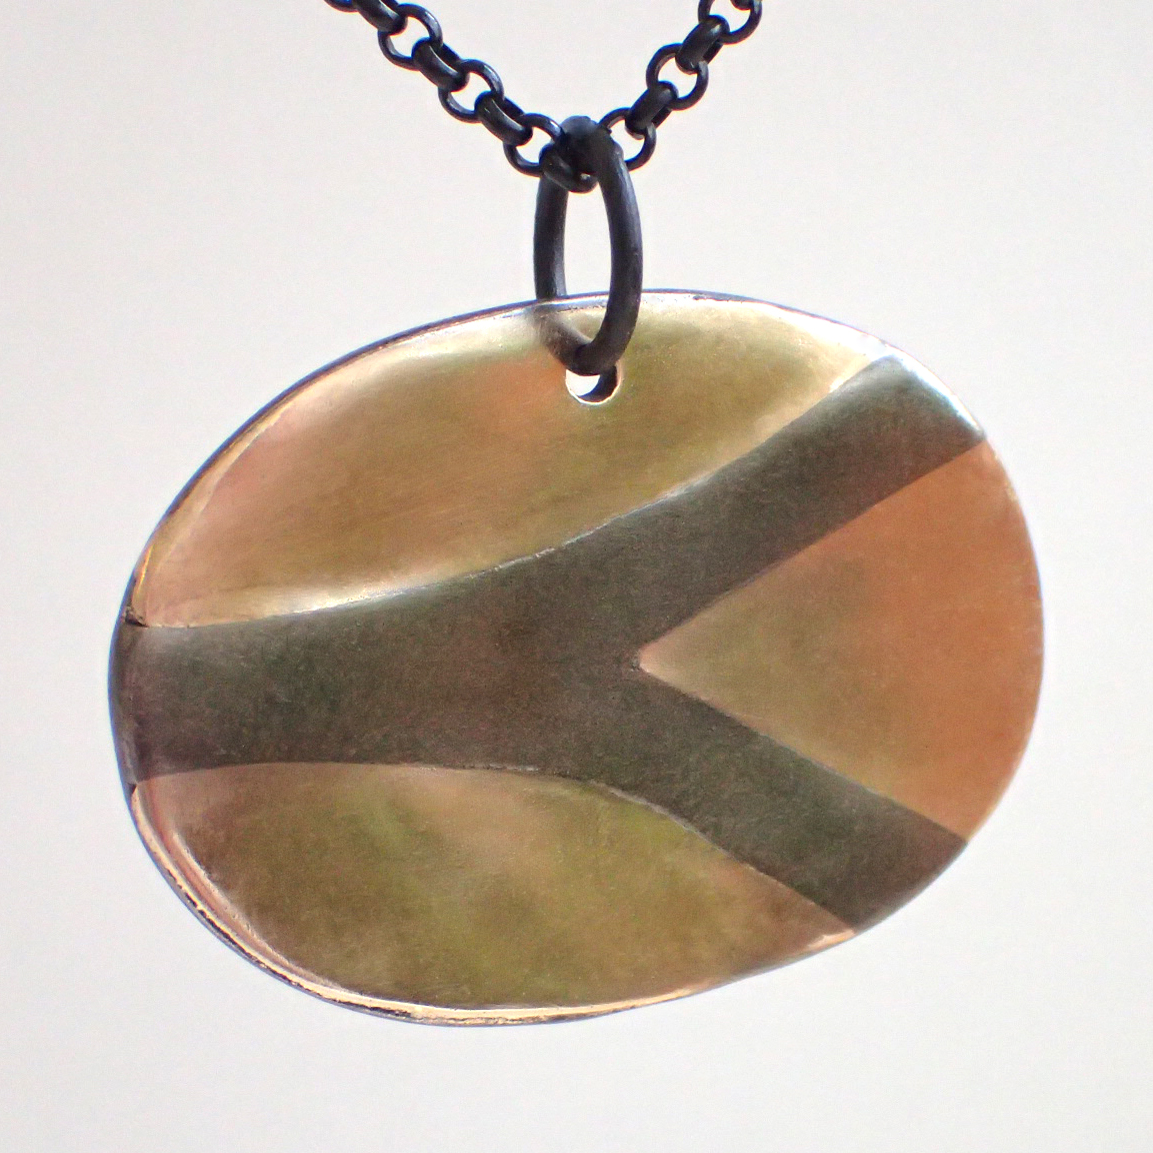
At a Bend in the River is a yellow bronze pendant with a green cubic zirconia on one side, and a simple texture on the other (hung on an 18″ brass chain).
Ribbon Candy is a reversible, iron bronze pendant with a brilliant bronze embellishment on one of its sides (hung on an 18″ steel chain).
Update, April 10: As two of these shows close, I finally found time to replace here a couple of my first-pass images (used just to get the post up at all) with at least slightly better ones. While doing that, I also added a “tag” to the post itself to include Larry Brandstetter, because the in-line one I’d tried the first time didn’t seem to be working…
I’m hoping to get up to Mars so I can confirm more about that show shortly, but no promises as to when…
Well that was a fun event last weekend! I went to an electric Kiln Maintenance workshop at The Union Project.
The kiln we used for the hands-on exercises was apparently a Skutt KM1231-PK. (My kilns are not by Skutt. I got that model-name from the diagram on the page that came with the new elements we installed and then went online to confirm that!)
It is a big, electric, ceramic-studio kiln (almost 10 cu ft inside: Skutt calls it “Our Tallest Kiln”!). Such big kilns (any brand) heat up and hold the temperature reasonably evenly throughout their entire interior: good enough for most ceramics but not always close enough for the tiny safe range between sintered and melted that we have with metal clays! We tend to use much smaller kilns (often on the order of 0.20 to 0.25 cubic feet, so smaller by a factor of 40 to 50!) to help resolve that issue. Skutt does have a few great little ones, but they still require 240V circuits. Paragon makes ones that run on regular household 120V, so I went with those.
I got my Caldera first, in the winter of 2008-09 (before starting this blog) and set it up at home. I moved my workspace into a studio in 2010; that’s also around the time I got the SC-2 that I now use there. Both are great for firing metal clays! Because the Caldera can go up to 2350°F, I can also use it for mid-fire ceramics; the 2000°F limit on the SC-2 pretty much restricts me to low-fire ceramics in that one. But the front-loading door on the SC-2 makes it much easier to load and unload hot things like metals with enamels or pottery to then be raku-fired.
The little SC-2 did have some issues right at the start, resulting in my learning how to install replacement digital controllers provided under warranty (which turned out, in the end, to not have been the source of the problem!). It has continued to work great ever since that got sorted out. And the Caldera has been great too, despite having been pushed a bit harder by some of the more complex (for metal clay) firings I’ve set it to do.
Which one is better? I’m happy with both! It depends on what you want to do. I feel so lucky that I am able to have two and that they are different! I can pick the right one for certain tasks, when that matters. And when it doesn’t, I can just fire whichever one is located in the most convenient place. If I’m done making pieces in my studio and want to go home, I can take them home and fire there. If I have a lot that have been sitting around for a while, I can fire them in my studio kiln while I start making my next batch.
But while they’ve worked well for ages already, I know that eventually some part(s) or other(s) are going to need to be tended to. So when I saw this being offered I figured it was worth a shot.
The class was interesting: it was aimed at potters, and it began with some discussion of basic firing processes before going on to how various ramp speeds and hold temperatures affect particular glazes. I do some pottery, mostly mid- and high-fire at places where they do all the firing for me. But I’ve always done a bit of low- and mid-fire on my own and (since covid) have been exploring and making more small pieces, so hearing all that was a delightful bonus.
Then we went to work on one of the studio kilns! We basically dismantled the whole thing! We replaced elements. And a thermocouple. And saw how to replace relays (though that didn’t actually need to be done, so it just involved loosening and retightening a few screws). We didn’t have time to replace a couple firebricks along the top, in part because of one small technical glitch (a mis-placed tool), so that topic ended up being another presentation. But by that time I at least was getting kind of tired, felt I’d already learned a lot, so I appreciated getting that information simply as discussion. And there were lots of good handouts too. While I don’t know when I may have to apply all the knowledge I gained, I’m glad to feel prepared when the time comes!
Here are a few fun thoughts resulting from the day:
Question: How many people (students in addition to the instructor) does it take to remove the lid of a big Skutt ceramics kiln tucked into a rather tight corner?! (At this point in my life, I was just glad that half of the class, all much younger, stepped up to help!)
Answer: A lot more than the one person it takes for a little Caldera! Its lid is not connected, so you just pick the little thing up by its handles. Easy! (Removing and replacing that Skutt lid would have been far and away the hardest task of that whole day, and I’m very happy I won’t have to deal with that on mine.)
I usually run this firebrick-construction Caldera kiln on my covered & enclosed back porch. I usually plug it straight into the GFCI outlet right there. I took this photo when I was documenting the need to use an electric-company-supplied surge protector power strip during several weeks when we were urged to use them anywhere we could while they were making repairs. (I should take a better photo, but when not in use that kiln lives just inside the house, by the door you don’t see to the left there and, mid-winter, I’m not hauling it back out just for this post.)
The uppermost three “layers” are the kiln. Counting from the top here, the first and third are the two interchangeable and reversible base and cover layers. The second one down, between those two, is the “functional” middle section with three complete rounds of elements inside and the blue control section you can see towards the back. In this configuration, it can reach 2350°F. (I believe that is the maximum that any firebrick kiln can reach on 120V current. (I’ve seen some quoted as 2400, but I think that’s just a rounding-error / marketing-promotion for what is really more like 2350…) If you are aware of real exceptions, please let me know!)
The lowermost (hollow inside) layer shown here is simply serving as a sort of stand to let air circulate under the kiln. In reality, it is a “bead shelf” that can be moved up one level (so the base is really at the bottom and the “middle” level with the elements is just above this one). Doing that adds another 0.15 cu ft to the firing chamber (for a total of 0.40 cu ft) but drops the maximum temperature to just under 2000°F.
The reason to move the bead shelf up, besides getting room for a third metal clay shelf or a tall (but now low-fire) ceramic piece, is because it has a little hinged opening (on the back as I have it set up here, so not visible in this photo) that you can open to insert and remove glasswork and some other media (certain kinds of enameling, miniature ceramics you want to treat as raku, etc.).
My mind did wander a few times in this weekend’s class as I thought: how many of my entire little metal clay kilns would fit (unusably, but just thinking for fun) inside the Skutt? Well more than I own! I could stack two SC-2s over to one side, and then tuck various arrangements of components from two Calderas in around them. (I confirmed that by looking up the specs…) I could continue to fit more, perhaps even all the pieces that make up a third Caldera, but only if I took it all apart, which is clearly going way too far with that silly but fun thought exercise.
So I’ll just end with a couple photos peeking into my (original blue color) SC-2. The SC part means it was designed specifically for use with Silver Clays. The 2 means it’s the kiln in Paragon’s SC line that is sized to hold up to two shelves with silver clay (though these photos both show it with just one).
The SC kilns are a “muffle” style, not firebrick. (I believe that 2000°F is the maximum temperature for any muffle kiln, regardless of voltage: if you can document that I’m wrong, please let me know!) The elements are stashed behind that inner white material (the muffle), and when those finally fail, you end up having to replace the entire muffle…
The first SC-2 photo shows it at the end of a silver firing cycle. Many pieces are on the shelf; a few others are supported by vermiculite in a small crucible.
(I often leave my annealing pan just sitting on that same cabinet top; it’s not serving any purpose here since I let everything cool before opening the kiln door.)
This last photo shows my SC-2 at the beginning of a “base metal” firing. Those metals (e.g., copper, bronze, steel) need to be fired in a reduction atmosphere. With metal clays, we can easily achieve that even in an electric kiln by completely burying the pieces to be fired in a box or bowl of activated carbon. (I love some reduction glazes, so I sure wish I could do that for them…)
Enough about kilns for today. I hope you found something useful in these ramblings!
Happy New Year! With the holiday on a weekend, the way Facebook seems to suck up blog-posting energy, and my getting out of the routine during the pandemic, somehow I didn’t manage a blog-anniversary post this year. But I do have a little bit of news to share here!
As I’ve mentioned, I’m continuing to test out holding my (mostly) monthly Studio Session / Open House sessions on Sundays. The times will mostly be 1 to 5 pm but, as ever, I may have to make occasional adjustments to that plan. Also, though I’d like to have them on the afternoon of the second Sunday (making that easy to remember) this year’s calendar seems to be calling for a number of different tweaks…
Here’s my tentative schedule for the next few months. Anything that’s off the “normal” will be noted be noted in bold.
Sunday, January 15, 1 – 5 pm (This is the second non-holiday Sunday of the month..,.)
Sunday, February 12, 1-5 pm (The schedule I’d like to have all the time! In addition to being just a few hours before the Super Bowl, it falls just in time to shop for Valentine’s Day!)
Sunday, March 12, 2-5 pm (Note the slightly later start: Have you ever though of joining the Pittsburgh Society of Artists?! Consider signing up for their new member screening that will be held down on the lowest level of WSCC that day. I’ll head back upstairs as soon as that (and the post-screening board meeting) are finished.)
Sunday, April 2, 1-5 pm (I’m sorry about doing it on Palm Sunday, but there just happen to be many different holidays celebrated this month.)
Sunday, May 7, 1-5 pm (Well, the second Sunday, the 14th, is Mothers Day. I guess I could try to open up that day, but it seems better to let folks do down-to-the-last-week shopping on the 7th! I also plan to set aside a few specific evening times later the week of the 7th in case you come shopping, see something you’d like to request, and want to send someone over to get it for you…)
Sunday, June 11, 1-5 pm, tentative! (I think the others are likely to stick as stated here. Well, I may have to change one of them, but hoping not. But right now I’m just guessing about June, and will confirm that date and time once (a) the Three Rivers Arts Festival schedule has come out and (b) I sort out with several friends when we’ll jointly celebrate a number of Gemini birthdays!)
I will try to remember to update this post if/when I have to change any of those. But the latest information should always be available as an event on my public Facebook page. In the meantime, here’s a photo of one of the pieces I’ll have available at least through my January event. It’s just so cute, and the cubic zirconia in the middle adds a lovely little bit of sparkle!
Shoppers: Just show up at any time in the given range!
Students: I’m not yet announcing specific come-and-work-with-me schedules on these days (as I’d been doing pre-Covid…). But I’d love to have some of you come back to work on your own projects on my “spare” worktable during these sessions. If you’ve been looking forward to having those return, please just contact me directly and we’ll work something out!!!
Merry Christmas to you, or Happy whatever-other Holidays you may be celebrating this season! I’ve shifted to Second Sunday events this year, and it’s finally time for my Second Sunday Holiday Open House!
If you’re looking to shop for some art jewelry or other small adornments this month, whether to give as gifts or as a treat for yourself, come on over to my studio this Sunday, December 11, from 1 to 5 pm.
If you’re not one of my studio regulars, know that you can come find me upstairs, over the front door, at the Wilkins School Community Center (in Regent Square), 7604 Charleston Avenue, 15218.
Even farther “behind” that usual as I write this on Thursday, I haven’t even begun to turn my workspace into a sales venue, but somehow I’ll get that done by this Sunday…
If your schedule is crazy too now, and you can’t get there on Sunday afternoon, reach out to discuss what days / times after that would work for you. Alternatively, I’ve still got pieces in my usual retail shops: find those (with addresses and open hours) on my website.
For now, here’s a little peek at one of the many pieces I’ll have available in my studio. (This is the “other side” of the piece that was in the recent Pittsburgh Society of Artists Show.)
I am honored that two of my pieces are included in the Cranberry Artists Network’s annual Holiday Show, Give a Gift of Art, that runs from November 15 through December 15, 2022!
Flower Party Fine Silver Pendant (with cubic zirconia) on Sterling Silver Chain
Stream Shield Fine Silver Pendant (with lab-created pink sapphire) on Sterling Silver Chain
As with most CAN shows, it’s in the Cranberry Township Municipal Building at 2525 Rochester Road in Cranberry Township, PA.
There will be an Opening Reception on Tuesday, November 15, from 7-9 pm. (Correction! The time apparently is 6-8 pm, so I’m not sure I’ll make it to that. The application had said it’d be 7-9, and I’d thought I could get there by 7:30 or so and it’d still be ok. But since it’s 6-8, folks will be leaving by 7:30. With an almost two hour round trip for me, that drive gets hard to justify. I’m sorry I’ll miss the people! I hope you can still go!)
Update: Thanks to CAN member Jim Tobin, I found this photo of the glass case with the 3D entries, including my two, on black stands, third and second from the bottom right, respectively. There are many, many more 2D entries down the hallway: you’ll just have to go to see those yourself.
I’m delighted that my reversible, silver “lentil bead” necklace, Acanthus, was selected to be included in the Pittsburgh Society of Artists Guild‘s 56th Annual Exhibit!
What was most stunning to me was that, of the 71 artists who submitted pieces, I was one of only 22 whose work was selected, and this was the only 3D piece chosen! What an honor!
Oh, and if you know me, you probably expect that piece to be reversible … and it is! The other side is a similar sort of leaf design, with a somewhat subtle difference: more of an “outie” than this “innie” pattern in the center. I had originally made them separately, intending to do two different things with their respective “other” sides. But once these components were ready, they just sort of told me that they belonged together instead!
In addition to the two receptions for this show that are noted in the “postcard” photo, above, there are two additional events related to this show that seem worth mentioning:
Saturday evening, October 28, an Ekphrastic Reading. Free and open to the public. (I’ve been holding off making this post, awaiting time and other details (poet, artistic inspiration) for this event, but so far only the evening date has been made available. Do let me know if you want to attend that evening but don’t see details anywhere else and I forget to update this.)
Friday, November 4, from 4 to 8 pm. This is the shift during which I will be staffing the gallery! (It’d sure be great to have some folks I know stop by to see the show and visit with me a bit during that.)
And, since I’m writing, I just realized that while I mentioned this earlier event on Convergent Series’ Facebook page, I didn’t note here that I’d had two pieces accepted in July for the Cranberry Artists Network‘s annual Martinis with Monet show, that one of them (shown on the left in this picture) had won an award, and that both of them were purchased by one of my collectors!
What with all that from Martinis with Monet, my solo “glass-case” show for the month of September, and now getting into the PSA annual show, it really feels great to have hit the ground running (and not falling!) again, at last. (Though I still have to remember about posting such things!)
Here’s hoping that we all have a great autumn. And, as noted in my last post, I have two classes scheduled and filling (as I write this, a few seats do still remain) at Artsmiths soon too: might I see you there?
If you subscribe to my very-occasional newsletter, you have a clue as to why I’ve been quiet for a while. Overall, the reason isn’t important. What matters is that, beyond simple pandemic issues, I’m slowly getting back to business, with some new, upcoming events!
My First-Ever Solo Show!
Throughout September, 2022, I am so honored to be Cranberry Artists Network’s “Glass Case Artist”!
Cranberry Twp Municipal Center, 2525 Rochester Road, Cranberry Twp, PA.
While the show is running all month, I encourage local folks to join me for my Artist’s Reception. While you are welcome to just show up, it’d help me to have a clue if you’re planning to attend (since I’m trying to figure out how many light refreshment treats to bring!).
Tuesday, September 20, from 6:30 – 8:30 pm
Studio Sessions Return Next Month!
At the moment, I’m planning them as mostly-Second, now-mostly-Sunday events in my studio in the Wilkins School Community Center in Regent Square. These are times when I set up a little mini-show – I have only a handful of things on display but if there’s something in particular you’d like to see, let me know a day or two in advance and I can be sure to have that sort of thing to show you. I have one table set up so I can work on some chores, and students from my previous classes are welcome to come by and use my tools to do something of their own (as long as I have a couple days notice!). These are the dates I have set up so far:
Second Sunday, October 9, 1 to 5 pm (I’ll likely be cleaning up pieces I’ve brought back from the display case in Cranberry.)
Third Sunday, November 20, 1 to 5 pm (Can’t be the second one: see classes, below)
Second Sunday, December 11, 1 to 5 pm (I may well extend the time for this one as we get closer to the holidays!)
New Classes Coming!
Regular readers here will know I’ve been involved with The Artsmiths of Pittsburgh for years now. They sell a good share of my pieces for me, and I teach classes there on how to make pieces along the lines of many of the ones I offer. They moved from Mt Lebanon to Carnegie early in 2020 (what timing!) and if you haven’t made it over to check out the new facility, you should! Here are the workshops I have set up there for this fall:
Sunday, October 23, Noon to 3:30 pm Textured Reversible Silver (pendant or earrings) Register Here
Sunday, November 13, Noon to 3:30 pm Tiny Silver Pendants (make several: pendants-earring pieces-charms, for yourself and/or as gifts!) Register Here
Beyond These?
Who knows?! Let’s enjoy all of these for now, and see what happens next!
It’s the last (full) weekend in April, so once again it’s time for Art All Night! And this is number 25 — can it really have been going on that long?! And they’re returning to an in-person show, but keeping the option of entering online or in person or both! I look forward to seeing how many folks enter the various different ways: I chose both!
Never before have I even considered entering a piece a second time, but this year I chose to (re-title and) submit the same one I had completed shortly before the 2020 show. Remember what things were like that year? The long-planned in-person show had to be cancelled at almost the last minute, though it was magically reinstated as a virtual show just a few weeks later. Wow! That was a superb effort, but I really have no clue how many people may have (or not) seen this piece in the 22-hour virtual show: and it really did take so much longer to get through the pieces online than it does in the various huge halls of the live show. This piece contains so many ‘burgh-specific elements, I figure I’d make sure locals had an opportunity to see it live and perhaps be among those who consider buying it.
Find Strength Together (Three Rivers of Steel)
Upper Right: Rivers of Steel in a Field of Bronze. Does the Ohio split into two smaller parts? No, the Allegheny & Monongahela join to form a bigger, stronger river!
Lower Left: A bronze “Steelers Star” creates waves in a River of Steel. Yet they find ways to complement the strengths of each other.
[A technical point about the “star” (that is, should you be one of the mere handful of people who happen to have any interest in the mathematics / geometry of it all): the three “stars” in the Steelmark / Steelers logos are a form of astroid called hypocycloid, a very special, multi-symmetrical shape formed by rotating a circle within another circle.
The design on the river waves side of this piece is a little bit shorter and wider than that; it looks more like an astroid that is the evolute of an ellipse rather than a circle.
But the whole piece is oval (almost) elliptical so that shape seemed a better fit, visually, while still linking to Pittsburgh’s steel heritage.
Yes, strength can come from compromise too!]
I hope you’ll find some time to explore the 22-hour show! It’s open from 4 pm on April 23 through 2 pm on April 24. You can find information at the Art All Night website or their specific Facebook Event!
One entry per artist. No Fee. No Jury. No Censorship. (Less family-friendly aisles are noted.) A wonderful Celebration of Community Art!!!!!
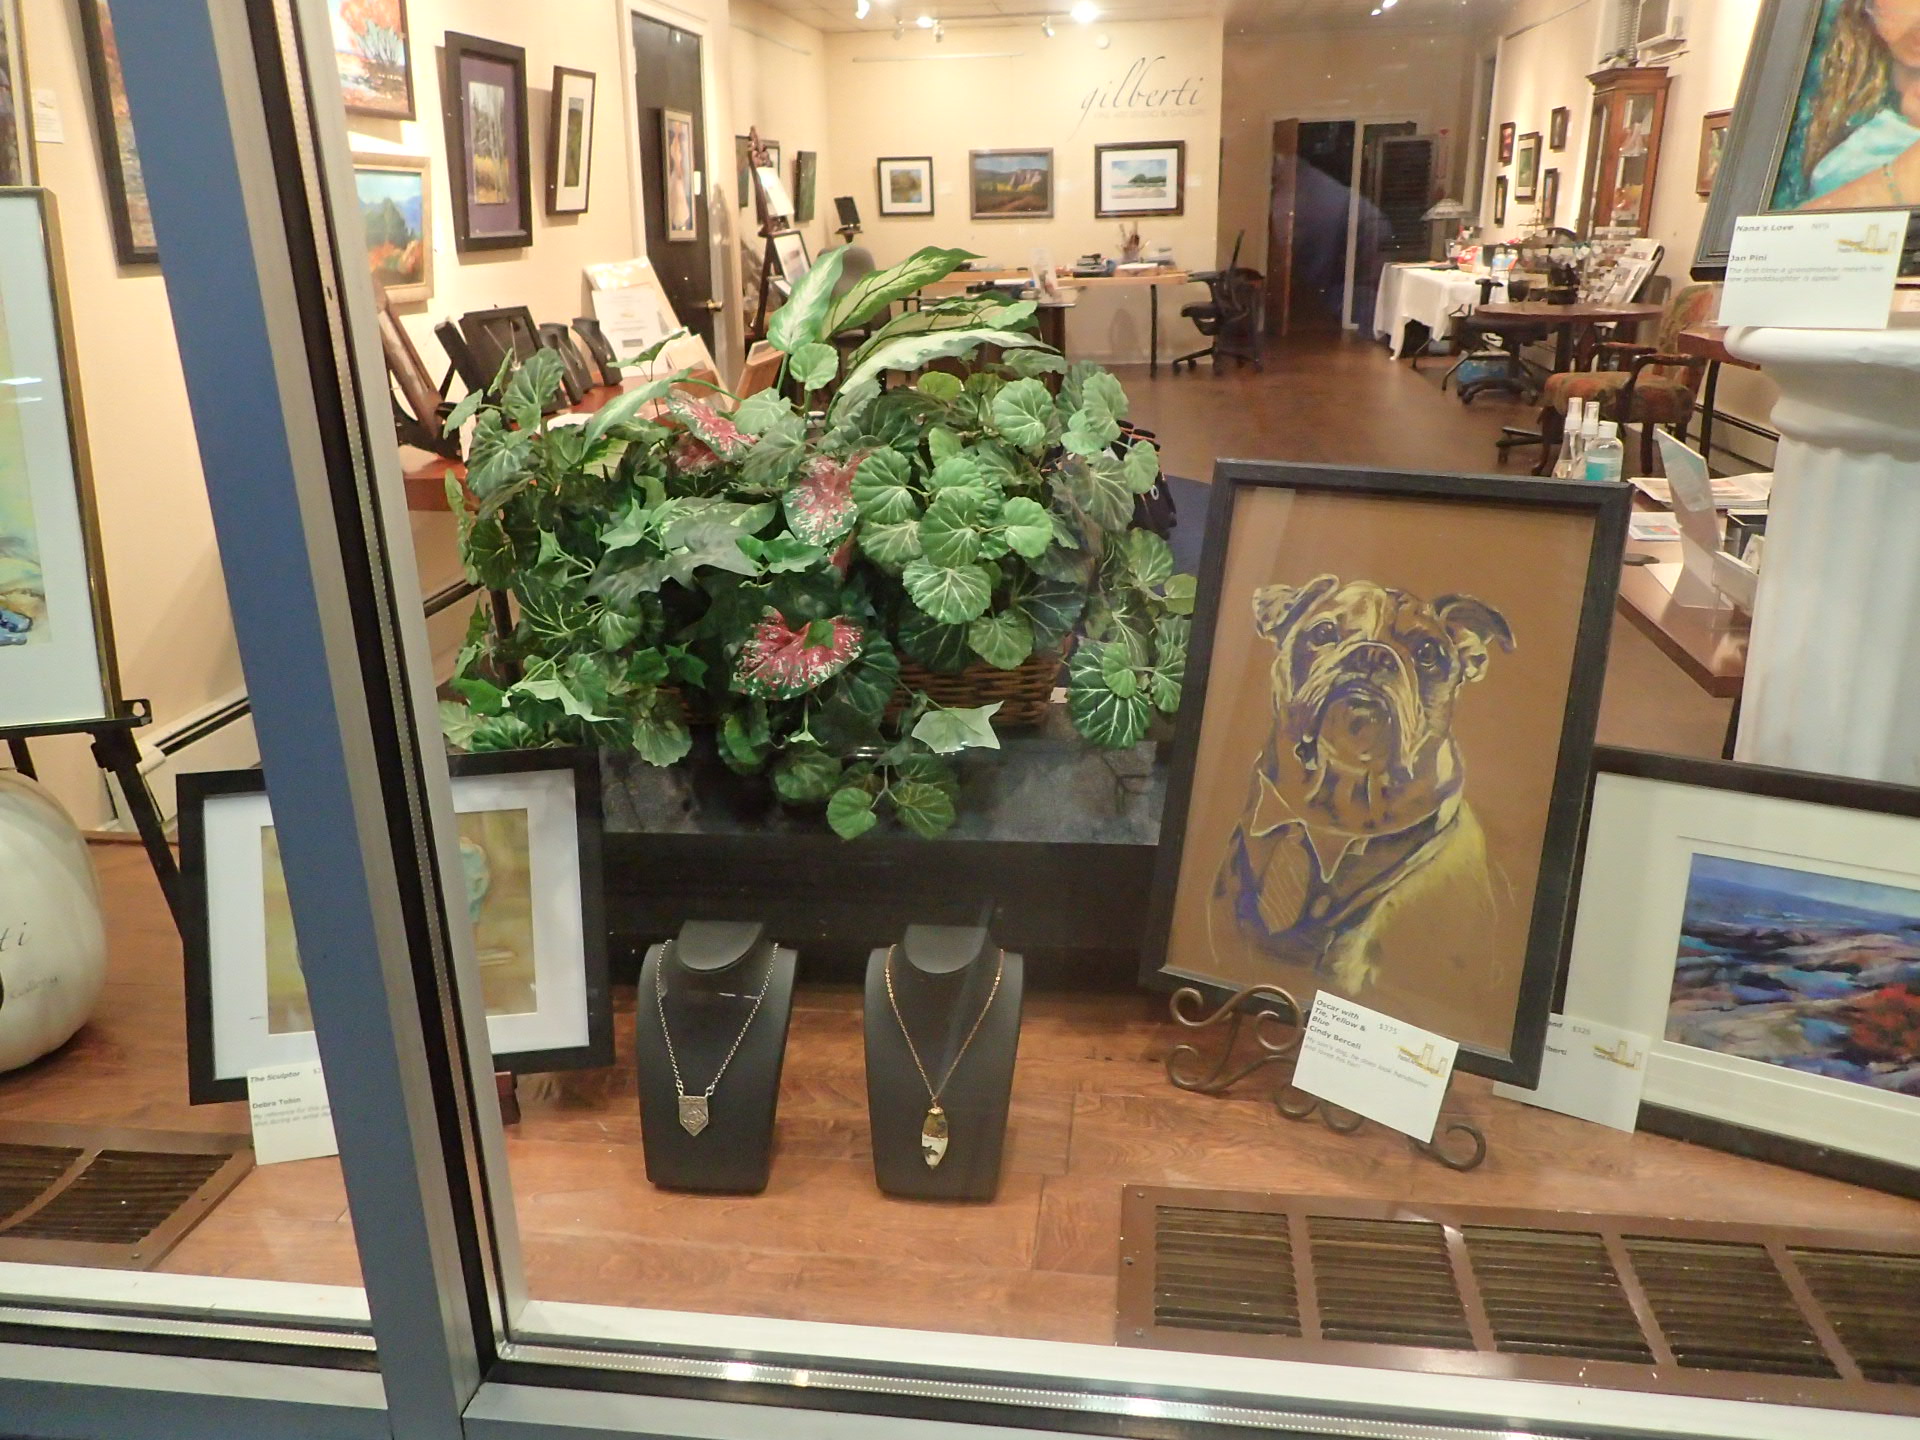
Last minute notice, yet again, but for reasons not worth going into, I only got tentative confirmation a couple days ago that I was in, and final confirmation of my display space on Friday morning … for a show on Saturday! But it should be a great event: 30+ artists exhibiting at 30+ different venues up and down the main street.
So I then packed up several boxes of goodies on Friday night and headed out to Coraopolis, PA. I set up my art jewelry displays amidst the Pure Brilliance show of the Pittsburgh Pastel Artists League at the Gilberti Fine Art Studio & Gallery. Here’s a directory and map, but you can also pick up copies at various venues along the route.
And here’s a little peek inside the front window. Two of my pieces are on display there, but the biggest part of my show is, from this angle, hidden behind the plant. If you’re in the area, you’ll just have to stop by in person to see all these pieces! And more!
Join me at WSCC’s Open House! Sunday, July 25, 2 to 5 pm
I’d been thinking I’d just go to WSCC’s party. But at the last minute I decided to host a little art-jewelry Christmas in July show and invite folks to come over for either or both too.
If you don’t already get updates from WSCC, I’m sorry for the last-minute notice: this was a spur of the moment decision for me!
Their event, with Alloy pgh Artist in Residence Bradford Mumpower: Grab a drink and a sweet snack while checking out the work in progress for Bradford’s artwork, a larger than life replica of the “greens” jacket worn by steelworkers at the Carrie Furnace (to be installed there in August). Ask questions, discuss the project and if interested find out ways you can help work on this art project.
My event: This photo shows one of my Steel Rivers pendants that I will have available for you:
I will of course also have a selection of my regular silver, steel, bronze, enamel, and other pieces!
I’m not yet keeping regular hours at my studio, but the building is beginning to open back up. I’d be happy to meet you at another time by appointment! I am so looking forward to seeing more people again, and I hope you are too!
This is my own neighborhood but, given the last-minute notice I had about it and the drizzly weather forecast, I’m not setting up a display for this.
But I do plan to wander around and meet other artists (all within walking distance for me!), plus chat with others I encounter along the way. I’ll wear a fly fishing vest with lots of pockets, and plan to stuff them with samples of my art-jewelry (and, while I’m at it, a credit card reader too!).
Let me know if I should be looking for you too!
Chautauqua – Lake Erie Art Trail: Hub Crawl, Saturday, May 29 and Sunday, May 30, 10 am – 5 pm each day.
I sure wish I could just zip up for this tour too! If you’re too far north to make it down to my area for the Art Walk, above, then consider heading up for the Art Trail. If you stop at Hub 2, the Portage Hill Art Gallery, please tell artist-owner Audrey that I pointed you to this event (and ask to see some of my pieces that are available there).
And, wherever you may find yourself, have a memorable Memorial Day weekend!
The Wilkins School Community Center in Regent Square, where I have my studio, is still closed to the public. But the big paved area in front is open, outside, and this Saturday, May 15, from 8 am to around 1 pm, will be the site of WSCC’s annual Plant Sale and more! No book sale inside, and I can’t do a show up in my studio, but I will set up a simple sales spot outside among the gardeners and various information tables. I think they’re putting me on the driveway side, but can’t be sure until we set up.
Also at the same time is the annual Regent Square Community Yard Sale. If you’re not familiar with that, it’s typically a big event, with folks coming in from all over to stroll around the whole lovely neighborhood on that special morning seeking good deals. Street parking is first come first served, and please watch out for pedestrians!
Because yard-sale customers don’t come expecting to buy high-end jewelry, my spread this time will feature a lot of my most affordable pieces. Because I don’t do the thing where I mark my pieces up just so I can offer big sale-price discounts, the best I can do (for this show only) is to offer a bit of a deal for multiple purchases: 10% off second and subsequent items (after the first, highest price, one). If you want something I haven’t brought down, at the end of the show (once I’ve taken things back inside), I’ll be happy stay a bit longer so I can bring out some of my very special pieces for your consideration. (I sure look forward to the day when I can welcome visitors inside my studio again!)
Students, fellow artists, and others: If I have something of yours and we haven’t been able to connect while the building has been closed, do let me know. I have sone fired pieces, books, a stool, and more that I’ve saved for various folks! It’s probably worth letting me know in advance, so I can be sure to pull it out of whatever corner I stashed it into and set it someplace where it will be easy to grab and bring downstairs.
One final note: I rarely do outdoor shows, just indoor ones. I don’t have all the regular display materials and such for outdoors, so if the weather turns windy or rainy, I’ll have to bail out and haul everything back inside as fast as I can. Cool is fine, just not a lot of wind and/or rain! But predictions are for a lovely spring day, so I’m sure hoping that holds…
It’s the last weekend in April, so once again it’s time for Art All Night!
Here’s what I posted on Facebook about it:
I just found the specific page for my entry. Both that, and the show itself, should be visible for a mere 22 hours. Then, poof!, the only way to see my entry again will be through one of my posts. (Of course, the piece is for sale … should you wish to look at it any time you want!)
I am really hoping that the show will be able to return to an in-person event next year!
ADDENDUM: Congratulations to Debra for your winning bid on this piece! I hope you’ll enjoy it for many years to come!
So here we are at the first Wednesday in April of 2021 and this evening I’m not going to be able to meet with other members of the Penn State Master Gardener of Allegheny County at the first regular Wednesday work-night at the lovely Edible Teaching Garden, and not because I’ll be at the opening of always-interesting Quantum Theatre‘s latest story-walk, 10 for 21 (10: based on the Decameron; 21: another year, still in pandemic…)
At the same time, instead, I’ll be at the (virtual) opening of the Cranberry Artists Network‘s spring show, Reawaken, Rejoin, Rejoice, where two of my pieces have been accepted for display!
Yes, while the reception will be virtual, this will be my first, actual, in-person show in a year!
Exit from the Vault is a fine silver (.999) pendant (hung on a sterling silver chain, not shown here) from my Doorways series. What can I say: I just hope it’s an appropriate metaphor for much of the world right now…
Leaves and Tendrils–As Spring Returns! is a fine silver (.999) reversible hollow bead (the other side has a similar but less-deep texture) suspended from Argentium silver (.930) round and square wire “tendrils,” with all of that hung on a sterling silver (.925) chain. This one just seemed highly appropriate for the season.
The reception tonight is from 6-8 pm. You can view the show at the Cranberry Township Municipal Center, 2525 Rochester Road, Cranberry Township, PA 16066. It runs during regular Municipal Center hours through May 6, 2021.
~~~~~~~~ If you would like to purchase any of my pieces but are unable to get to the show itself, please just let me know and I’ll be happy to review your (all very easy!) options.
Like so many of us over the last year, I have missed getting together in person with a lot of my usual people although, except for the worst of winter, I have been able to share outside activities with many of the local ones. In another way though, I have missed even more all the different, random people I would interact with at the Wilkins School Community Center (WSCC) where I have my studio.
Still, I am very happy to have two pieces in WSCC’s current exhibit, Artists Choice IV, even though is yet another virtual show. It looks as though I have the only 3D entries in this one! There are two pendants and, once again, I was able to make both of them reversible!
I Will Always Hold a Piece of Your Heart in Mine has two golden-bronze (“brilliant bronze”) hearts, one nestled inside the other, and hangs on a gold-plated chain. It is fully reversible: you can wear it with the pairing facing forward, or you can turn the chain around to keep the little one snuggled in, closer to your own heart. To me, the difference in the size of the hearts indicates a visual illusion, a sort of perspective, where the smaller one represents the heart of someone at a distance, for the moment at least, but the two are still firmly anchored together.
What do you see in it?
Spring is Peeking Out at Last! is another reversible bead, this time a hollow one made from fine silver (.999). One side is textured with an array of cute little spring blossoms. The other side shows a different flower eagerly peeking out through an opening in the ground. Like so many of us, all of the flowers are ready to get out into the sunshine and to get on with their lives!
What are your plans for this spring, and beyond?!
~~~~~~~~ Both pieces are available for purchase, so do let us know if you’re interested! There’s info on the show page, or you can simply get in touch with me directly and I can process it for you.
Another creative yet meaningful thing I did in 2020, one that just happened to end up taking place during the pandemic shut-downs, was to volunteer to make three squares for the Violet Protest project. Personally, I am not happy with the way “politics” is handled by “social media” (and by others, but all that is for yet another discussion) so I don’t tend to say much about political topics online. (I am not apolitical! It’s more that only occasionally do I wear politics on my social-media sleeve.) But this seemed like an idea that people from either / any side could support, which is why it interested me. Because I do believe that we have to stop talking at each other and re-learn how to converse with each other, to stop emphasizing our differences and start making progress for the future via the interests and goals we do share…
So what is the Violet Protest?
In short, makers from across all 50 states, the District of Columbia, Puerto Rico and all American territories—without regard to their own political inclinations—are joining together in using their time and talents to make 8” x 8” fiber and/or fabric squares using equal parts red and blue. These are, first, being exhibited in Phoenix, AZ; after about six months, the show will be taken down and the squares will be distributed to all members of Congress, of all parties, to ask them to find ways to come together too.
“Focused on the values we hold dear as Americans, rather than any political beliefs, the color violet symbolizes the literal combination of red and blue, long held as symbols of our nation’s differing ideologies. Our common goal is to send a physical message of friendly protest through this … visual expression to demonstrate that if we as citizens are willing to come together, so then must our elected officials.”
For more detailed information, you can check the project’s website, at violetprotest.com
Why did I decide to make three squares?
Some people volunteered to make just one; others, scores! The website is set up for you to easily choose to make one, or else multiples of five, but it was possible to assign yourself a different number of contributions. I offered three.
Since the idea is that, at the end of the museum exhibit in Phoenix, the squares will be packaged up in groups and sent to each of the current members of Congress, I figured that, even though the pieces given to each recipient would be assigned at random, the fact that there were three people supposedly designated to carry my voice to congress (one regional state representative and two state senators) meant that three would be a good number to make.
(Also, I made that commitment early in pandemic, when some supplies were scarce and lots of stores were closed to the public. I did have a few small skeins in appropriate red and blue colors (among several I had “inherited” when the mother of some friends died a few years ago). I knew those skeins would provide enough to make three squares, but I really wasn’t sure if I could squeeze any more out of that stash!)
What Is Hairpin Lace?!
Before I explain the why of my design choices, let me show you a little bit of the construction process.
The technique I used is called hairpin lace because, in the past, delicate, lacy designs were made by looping and then crocheting very small, fine threads on actual hairpins! While I do dabble in a bit of miniature artistry at times — various kinds of clay, both ceramic and metal, being my favorites — I am not into working on mini fiber projects (though I have seen some made by others that have been truly stunning!)
I’ve used a larger-scale hairpin lace process to make, for myself and as gifts, a number of winter scarves and hats, and even one large blanket (with a second one that’s turned into a perpetual UFO…). Most often, I will choose three complementary colors, or three different shades of a hue, and work with them in various pairs. So I’ll use a big crochet hook and two strands of yarn at a time for each “row.” I will make each one just a little bit longer than my final goal (because I find it easier to pull out a little bit if it seems to be shaping up to be longer than planned than it is to add a little more at the end. The latter is possible, just not as much fun!) Then the individual strips are hooked together to create the final piece. Picking up an equal number of loops from the strip on each side will yield a flat piece, while differing counts will produce curves. (And for more advanced designs than I’m showing here, you can also vary the width and counts within and across strips.)
What the process photo shows is this: five complete rows already woven together, and a sixth complete strip that’s ready to be taken off its hairpin-substitute “loom” and added to those.
The weaving together is what will tweak the size, both length and width, of the final piece. Not a problem with a scarf where exact sizing is unlikely to matter, but trickier when your goal is to end up with a square that is exactly 8 by 8 inches! The photo shows Melting Pot where I did hit it exactly at the 8-inch width but, yikes!, this first of my squares ended up being only 7 inches long.
I set it aside to make the other two. Lessons learned, I got those to come out to just the right size from the start. In the meantime, continued forced closures of public gathering spaces meant the the exhibition dates for the Violet Protest show were pushed ahead by a few months. Instead of opening just before Election Day in 2020, the museum show would launch soon after Inauguration Day in 2021. I had plenty of time to fix up the size of my third piece and, when complete, I sent them all in!
My Thinking with These Three Designs
But why the three designs I chose? Now that you have at least a little idea of how the rows are made, and how they interact, let’s take a look at my three offerings, from left to right, and I’ll describe the symbolism I feel in each one:
Top, left: How can anyone imagine simply staying in their own red or blue lane (even if they try to do so with civility and respect) when ALL OUR LANES ARE CONNECTED?
Center, bottom: Rather than divide by red vs blue, why not combine creativity, courage, compassion, and compromise as we all aim our efforts to be for THE COMMON GOOD?
Top, right: Can politicians from across our country model, not selfishness and division, but consideration, collaboration and compromise … for all people but especially for the children of our great MELTING POT?
Would you like to join the Violet Protest?
As I write this, you still can! A few photos from the exhibition can be seen online at https://www.violetprotest.com/vp-at-phoenix-art-museum.html. It has been open for in-person viewing at the Phoenix Art Museum since March 10, and will remain open though September 5, 2021. Squares can still be registered (in advance, to get the required exhibition tag!) and sent in. Submissions will be accepted and added to the display through August 1.
After the show ends, all the squares will be evenly (and randomly) divided up, packaged, and sent to every member of Congress. I sure hope that some of them get the message!
Do you think any / many of them will?!! Please leave a comment!
(Well, that is, please leave a comment that (even if it is controversial) shows respect, kindness, compassion, candor, and, perhaps, also creativity; any that do the opposite will be removed.)
So … I haven’t posted here in a while, have I? Then let me start with a question: How “creative” have you been during the pandemic?
Background
Back when I retired from working full time at a university (plus taking on a range of consulting gigs), I was so thrilled to have more time for creative adventures. I could keep all my other “outside of work” activities going, still do a bit of consulting and/or tutoring, but start using what had been my regular work-time for new projects. Wonderful!!!
Though I had done some things like art-jewelry and gardening when working full time, I really appreciated having more time for those in particular and, through them (as I’d had as a faculty member), more outlets for continuing to meet and interact with new people. So when so much shut down, instead of seeing it as an opportunity for more creative activities, for me at least it felt more like it shut down so many of the reasons I had expanded those areas. I didn’t drop those balls completely, of course, just some. But I went sort of back to the pace of when I’d been working full-time-plus.
(I’ve always done a lot of “creative cooking” and for the past year I have done a lot of very “creatively inefficient” cooking! That is, instead of cooking “in bulk” to make food for dinner parties and several meals at once, I was making just enough for each meal. I set the table each time too, with nice glasses and dishes, my good flatware and fabric napkins, etc. (I did often use my smallest plates so it would feel simpler to not over-eat!) I tried new recipes and re-worked older ones (especially early on, when we were contending with various shortages) which I found to be easy when I didn’t have to worry about timing … beyond all those zoom-calls!)
One Fun, New Creationf
Ah, but other types of artistry… With this post, I include a photo of one of the jewelry pieces I did make this past year, yet another in my “doorway” series, this one in brilliant bronze. It was a combination gift for a friend “out west” when she: retired from her (self-employed) job; celebrated a decade-turning birthday; and, by coincidence, had just completed her 2-jab covid-vaccine sequence!
When looking at a different doorway pendant I’d made on commission a while ago, she had asked for one (rather insistently, I might note) and it did seem a good choice now as she was stepping out into the next phase of her life.
We don’t normally exchange gifts at the price-level of what I’d’ve normally charged for one of these. Until now, I’ve always made these in silver. During the pandemic, the price of silver has gone up even more … sigh. The relatively few sales I have managed to make were fine for covering fixed costs like rent but didn’t leave enough extra to splurge on more up-priced silver…. But I was happy to see this as a chance for me to explore what it’d take to make doorways in this lovely golden bronze color. Bronze does take more time than silver at several points in the process so, after balancing the cost across both materials and time, the final retail price would still be close to that of a silver one. But in this case, I had plenty of time to spend on a gift for a dear friend while both saving myself the cost of more silver and testing for any issues in trying to make these in a base metal alloy. I’m happy with this result, and she seems to be too!
Have you tried anything new, or modified any previous interests, during the shutdowns?
My studio is still open by appointment only, but I’m delighted that two of the venues that carry my work are reopening (with new safety policies) next week!
Portage Hill Art Gallery (Westfield, NY, on the road to Mayville / Chautauqua) will reopen on Tuesday, June 2 (primary election day here in PA!) at 11 am, and
the Gift Shop at the Hoyt Art Center (in New Castle, PA), on Wednesday, June 3, at 11 am.
I’m sure a lot of folks will be in no position to buy higher-end pieces, but both of those do carry items from my “black & gold” gifts series — affordable, reversible, golden-bronze pendants on black chains (and earrings on black wires):
Let me know if you have any questions! And, please, be safe and help keep others safe too.
Sometimes when I make a piece I have an idea, a theme, a story in mind, from the very beginning. Other times, I make a design, a geometry, and then let it tell me what it’s saying. Early this year, in January, BCO (see note 1, below), I had an idea for the piece I wanted to make for this year’s Art All Night event, a reversible pendant in steel and bronze. Then the pandemic struck and, DCO, it took me a while to get started on it. And the Art All Night show that’s usually held in late April was, first, postponed until the fall and, later, rescheduled yet again as an online event in mid-May. The piece discusse here is what I ended up making. It still exhibits my original idea, but is it now saying what I’d first been thinking, or something else … or both?
Let’s consider this side first. What might it represent?
Many people local to me here in the Pittsburgh area (2), and beyond, will read it from right to left, seeing the design as a confluence: where two major rivers flow along until they join together to make one that’s even stronger.
Please note that while one can hope that together+stronger means better, that is hope talking, and we should act accordingly!
But others (from here or elsewhere) will read it from left to right! In that case, it could represent a path that reaches a fork, where you must make a choice, or pick a side, and go with that. In some cases, the decision can be between right and wrong, while in others, simply a divergence where each one is neither is better nor worse, even though it will yield a very different outcome in the long run.
From this vantage point, at this scale, and as so often happens, it feels impossible to be sure where either path leads…
Now, consider the other side:
For a very special Pittsburgh event, this sort of art deco design could be an homage to many of our lovely older downtown (3) buldings built during that era, with the golden-bronze element in the center of the steel design reminiscent of the logos of US Steel and the Pittsburgh Steelers.
It could also represent the light at the end of the tunnel (4).
In general terms, a brilliant star in the swirling darkness could be there to help us see our way forward, whether we are traveling downriver amidst strong currents, or standing at a crossroads trying to make the right decision for ourselves and for all those we care about.
Alternatively, it could be the light of an explosion hurtling towards us, potentially signaling our destruction if we don’t muster adequate defenses.
For me, one good thing about Art All Night going online this year is that it suddenly become easy to display both sides of my piece together! Here is the collage I created for my entry this year:
What do you see in these images? Do you see what I’ve seen here? Do you see a confluence or a crossroads? Do you see yourself uniting with others to make something stronger, or choosing a path that could go beyond the point of reconciliation? Do you see the star as a beacon of light to help guide you forward, or as an explosion signaling potential destruction speeding towards you? And … what might you do with that understanding … of yourself, or of your reaction to others being faced with the same choices? Or do you see something else?!
And … what might you do with that understanding … of yourself, or of your reaction to others being faced with the same choices?
It’d be great to read your thoughts on this: Please respond in the comment section below!
~~~~~~~~~~ Endnotes:
BCO –> Before Covic-19 Outbreak; DCO –> During Covid-19 Outbreak.
Here, specifically, the confluence is when the Allegheny, down from the north, and the Monongahela, up from the south, flow together to form the Ohio, which later joins the Mississippi River that flows the whole way to the Gulf of Mexico.
Locally pronounced dahntahn, of course!
Though the shapes don’t match, one interpretation of that note is another local reference: traffic congestion in both directions on the interstate at either end of dahntahn Pittsburgh is common since many drivers slow down as they approach the (Squirrel Hill or Fort Pitt) tunnels, and seem only to get back up to speed when they can see the light at the end….
Merry Christmas to you, or Happy whatever-other Holidays you may be celebrating this season! If you’re looking to shop for some art jewelry, colorful glass ornaments, or miniature pottery this month, whether to give as gifts or as a treat for yourself, this post will list the times and places where you can find items I’ve created!
All of these events are have for a while been on my public events page, and on the “blogroll” down the right side of this blog (when viewed on a computer). But I thought I should also list them all together here, just in case you (or your mobile device) didn’t catch them in either of those places…
You should be able to find me in person with many of my creations on these three Saturdays:
Dec 7 from 9 am to 6 pm: Arts & Crafts Fair, C.C. Mellor Memorial Library, 1 Pennwood Avenue, 15218.
Dec 21 from (probably) 1 to 4 pm: Third Saturday Holiday-Extra Open House, WSCC, 7604 Charleston Avenue, 15218. (Note: If, at either of the first two events above, I get requests to change the time for this day, then I will. You can confirm any modifications to that schedule on my public events list a few days ahead of this one.)
Here are other places where you can find some of my creations, listed in order by end date.
Dec 6 – 8. Stop #41 on the Lawrenceville Joy of Cookies Tour, 3100 Penn Ave through 5600 Butler Street, Pittsburgh (10-5 Fri-Sa; 10-4 Su — the Steel City Craft Emporium* is the tour-stop closest to downtown!)
Dec 6 – 8: Portage Hill Gallery*Open House, 6439 Portage Rd, Westfield, NY 14787 (10 am – 5 pm on those days).
Nov 23 – Dec 14: Holiday Artisan Market at the North Hills Art Center, 3432 Babcock Blvd, 15237 (10-3 Mon-Sat plus 7-9 Tues).
Nov 8 – Dec 20: Season of Joy Show in the Cranberry Township Municipal Center, 2525 Rochester Road, 16066 (10-8 M-Th; at least 1-4 Fri-Sun). One enamel on copper show piece with bronze accent: It’s in the Middle of … Where?!!
Nov 23 – Dec 22: jewelry plus ornaments in the extended Holiday Collection at the Hoyt Center for the Arts*, 124 E Leasure Ave, New Castle, 16101 (11-8 Tu-Th; 11-4 Fri-Sat).
Nov 11 – Dec 23: Pop-up Shop of The Artsmiths** of Pittsburgh, 329 E Main St, Carnegie, 15106 (Fri-Sun, 11-4).
and through Dec 24: The Artsmiths of Pittsburgh, 1635 McFarland Road, Mt. Lebanon, 15216 (Mo-Sa 10-6; Su 12-4).
* My works will be available in the sites marked with this asterisk even after the “special event” noted in this list, although the open days and hours may vary at other times of the year. ** Artsmiths will be moving from Mt Lebanon to Carnegie early in 2020, and my creations will continue to be available there (daily!) after the move.
I hope I’ll get to see you in person at one or more of these events. (And while I’d be thrilled if you chose to make a purchase, there’s no pressure to do so. I’m always happy just to see familiar faces and catch up a bit!). But, even if I don’t see you, please know that I wish you all the best for 2020!
I can’t believe I’m about to start the tenth year in my studio!
Which means I’m into at least my fifteenth year with metal clays.
It’s clear when I moved into my studio, and I now can’t imagine not having it. The other date is harder to pinpoint: from when do I start counting?!! While visiting my family home in Florida, when I first saw something made using fine silver metal clay and immediately became intrigued? While I was still teaching in California, when I first succeeded in tracking down some good information to learn more about it? After moving to Pennsylvania, the first time I actually opened a package of clay? In my friend Bonnie’s barn, the first time we each held a piece we had made and fired entirely on our own? At home in my family room, the first time I felt comfortable enough with every step in the process of a piece — design, construction, firing, finishing, assembling into its final form, pricing — to consider offering it for sale? The point at which I felt committed-enough to pursue this that I started looking for a studio? All of that (and more!) developed gradually, over some years.
But what I’m thinking about today, this week, at this time… is back to when I first opened my own studio and, specifically, to this day back in 2010 when I first picked up the keys to my studio and arranged to meet my friend Jeff at Ikea; we reviewed the options I was considering; and I bought the basic tables and shelving I started off with (all of which still use). We loaded it all into our vehicles, and he followed me back to this new location. After hauling all the boxes up all the stairs, we took a break a block or so up the hill (at D’s, including a stop in their “beer cave”!). Then we spent the rest of the afternoon assembling (almost) everything. It was a magical day for me, in so many ways, made even better by sharing it as we did.
Well, I did it again, first time in a while, though: delivered a piece to a show and then, when I went to post about it, found I can’t find a photo of that piece!
This is an Artist’s Choice show with the Pittsburgh Society of Artists. So the artist has to be juried into the PSA in the first place, but then we get to pick which piece we want to exhibit. This time, in fact, though only one piece would be displayed, you could register either one or two. If you registered one, then you just had to deliver it. If you registered two then, when you delivered your work, you could talk with the show chairs and other people who were there about which one of them should go into the show. Unlike most juried shows, where you don’t get any kind of feedback on your work, I thought it would be interesting to hear some discussion of my two choices.
I chose to register two of my biggest, and thus heaviest, pieces. Pricey, in part just because each one used up a big chunk of silver. (Thus if either one of them were to sell, I could buy a good chunk more!) Another factor in their prices is that, because of their size, the construction techniques were not simple either. While I was delighted with the results each time, at that size and heft, both were what I’d call “learning experiences,” made a year or so apart. Because of that “status,” I was sure I had taken photos of both of them.
And then I went to write this post and, guess what: I can find a number of lovely photos of each side of the one that I did not end up leaving for the show, but none of the piece that’s in it. I know when I made it, and I can find others from that same time. It is a kind of unusual shape, so I guess I just figured I’d spend time another day figuring out what angles I wanted to try shooting from … and then forgot to do that? (That still doesn’t explain why I can’t even find any in-process shots….) Who knows!
So, to see what it is (hint: it’s a lovely, multi-sided, fine silver (.999) pendant with a citrine cabochon, hung on a sterling silver (.925) chain) you’ll just have to come to the show! As shown in PSA’s promo-card, the show is at the Christine Frechard Gallery which is now at 5126 Butler Street, 15201.
I’ll be at the opening reception on Satuday evening, August 3. The show will be open through August 30. (Check with the gallery for days and hours: I think it’s We-Fr-Sa-Su but the Gallery website indicates different days!) I also plan to attend the closing reception, on August 30. If you want to see me, but can’t be at either of the receptions, let me know so that we can arrange to meet some other time.
p.s., I probably won’t be at the opening for the full three hours, but I’ll be there for at least two. I also want to get downtown to catch the Squonk show! I’d planned to do that on Sunday, but then there was the mess of the annual Pittsburgh Regatta being cancelled. I’m delighted that Squonk was able to salvage at least a few Saturday evening shows in conjunction with the Pittsburgh Downtown Partnership’s Saturday Night Market & Downtown Sound Music Series! I hope lots of folks will show up to support that!
A&C was the “presenter” at the semi-annual CAN membership meeting this month. Instead of a presentation, however, two folks from A&C spread out a wide range of paints, brushes, and papers across a line of tables, just encouraged participants to try them out, and were happy to discuss the results and suggest other things to try. There was technical information too if you wanted it, but mostly it was just a chance to explore and play for yourself!
They also provided us a with small sample-size tube or jar of a few items we were most curious about. I left with two different texturing media I’d never tried before. Well, to be honest here, I work mostly in 3D. I’ve done much less painting, so there are a lot of things I haven’t (yet) tried! But I love samples because, obviously, they give me a chance to explore a little bit in order to decide if I like that product enough to spend my own money on a full-size supply. Thus the evening ended quite happily.
There’d been a bit of confusion about the time of CAN’s meeting. I arrived for the earlier time, and enjoyed the chance to mingle with others who did the same. But that meant I’d thought it would end sooner, and had said that I could stop at a friend’s house to offer a quick extra hand on a little project there. So I had to leave a bit before the end. I said to the A&C folks that, should I happen to win the door prize, please don’t leave it with anyone in Cranberry (30 miles away) because I could easily stop by their store (where I do shop: it’s maybe 3 miles from my studio, at a corner I pass regularly). But it was just an off-hand remark, because I really did not expect to win.
But I did win it! What a great collection! Thank you so much!


") Artsmiths of Pittsburgh
Artsmiths of Pittsburgh") Hoyt Center for the Arts, New Castle, PA
Hoyt Center for the Arts, New Castle, PA") Portage Hill Gallery, Westfield, NY
Portage Hill Gallery, Westfield, NY") _Open Houses in my Studio
_Open Houses in my Studio _Or…contact me about hosting a private party!


404_0199_HairpinLaceScarves_andOneHat.jpg)


